Page 130 of 216
The fuses are coded as follows.
Fuse/Relay
LocationFuse Amp
RatingPassenger Compartment Fuse
Panel Description
R17—Starter relay
R18–Rear intermittent relay
R19—Front wiper intermittent relay
R20—Not used
R21—Not used
R22—Not used
R23—Horn relay
R24—Battery saver relay
R25—Rear defrost relay
30 10A Light switch
31 15A Radio
32 15A Turn signal
33 20A Horn, Power seats (SVT only)
34 20A Power sunroof
35 7.5A Interior lamps, Power mirrors
36 7.5A A/C switch, Hazard flasher,
Instrument cluster
37—Not used
38—Not used
39—Not used
40 10A Backup lamps (automatic
transaxle)
41 7.5A Radio and cluster (accessory)
42 15A Stop lamps
43 15A Rear wiper
44 20A Fog lamps
45 7.5A Recirculated air, Air conditioning
46 7.5A Anti-lock Brake System (ABS)
47 20A Cigar lighter, Rear power point
(SVT only)
Roadside Emergencies
130
Page 131 of 216

Fuse/Relay
LocationFuse Amp
RatingPassenger Compartment Fuse
Panel Description
48 10A Data link connector
49 25A Rear defroster
50 7.5A Heated mirror, Heated backlite
indicator
51—Not used
52 15A Heated seats
53 10A Backup lamps (manual transaxle)
54 25A Rear power windows
55 25A Front power windows
56 20A Front wipers
57 7.5A Position and side lights (right)
58 7.5A Position and side lights (left)
59 7.5A Light switch (headlamps)
60 7.5A Air bag module
61 7.5A PATS modules, Instrument cluster
62 7.5A License plate lamp
63 20A Power locks (GEM)
Fuse 63 is located on the back of the fuse panel. See your dealer or a
certified technician for service of this fuse.
Power distribution box
The power distribution box is located in the engine compartment. The
power distribution box contains high-current fuses that protect your
vehicle’s main electrical systems from overloads.
Always disconnect the battery before servicing high current
fuses.
Always replace the cover to the power distribution box before
reconnecting the battery or refilling fluid reservoirs
If the battery has been disconnected and reconnected, refer to the
Batterysection of theMaintenance and specificationschapter.
Roadside Emergencies
131
Page 133 of 216
Fuse/Relay
LocationFuse Amp
RatingPower Distribution Box
Description
10 10A (2.0L engine
only)Battery voltage sensor
1A (2.3L engine
only)
11 30A Anti-lock Brake System (ABS)
12 15A Fuel pump
13—Not used
14—Not used
15 10A A/C clutch solenoid
16 10A Low beam (left side -
conventional headlamps)
15A Low beam (left side - HID
headlamps)
17 10A Low beam (right side -
conventional headlamps)
15A Low beam (right side - HID
headlamps)
18 10A (2.0L engine
only)Heated oxygen sensors
15A (2.3L engine
only)
19—Not used
20 10A Engine module
21 20A ABS
22 20A Low beam (DRL)
23—Not used
24 30A Subwoofer
25—Not used
26 10A High beam (left)
27 10A High beam (right)
28—Not used
29—Not used
Roadside Emergencies
133
Page 138 of 216

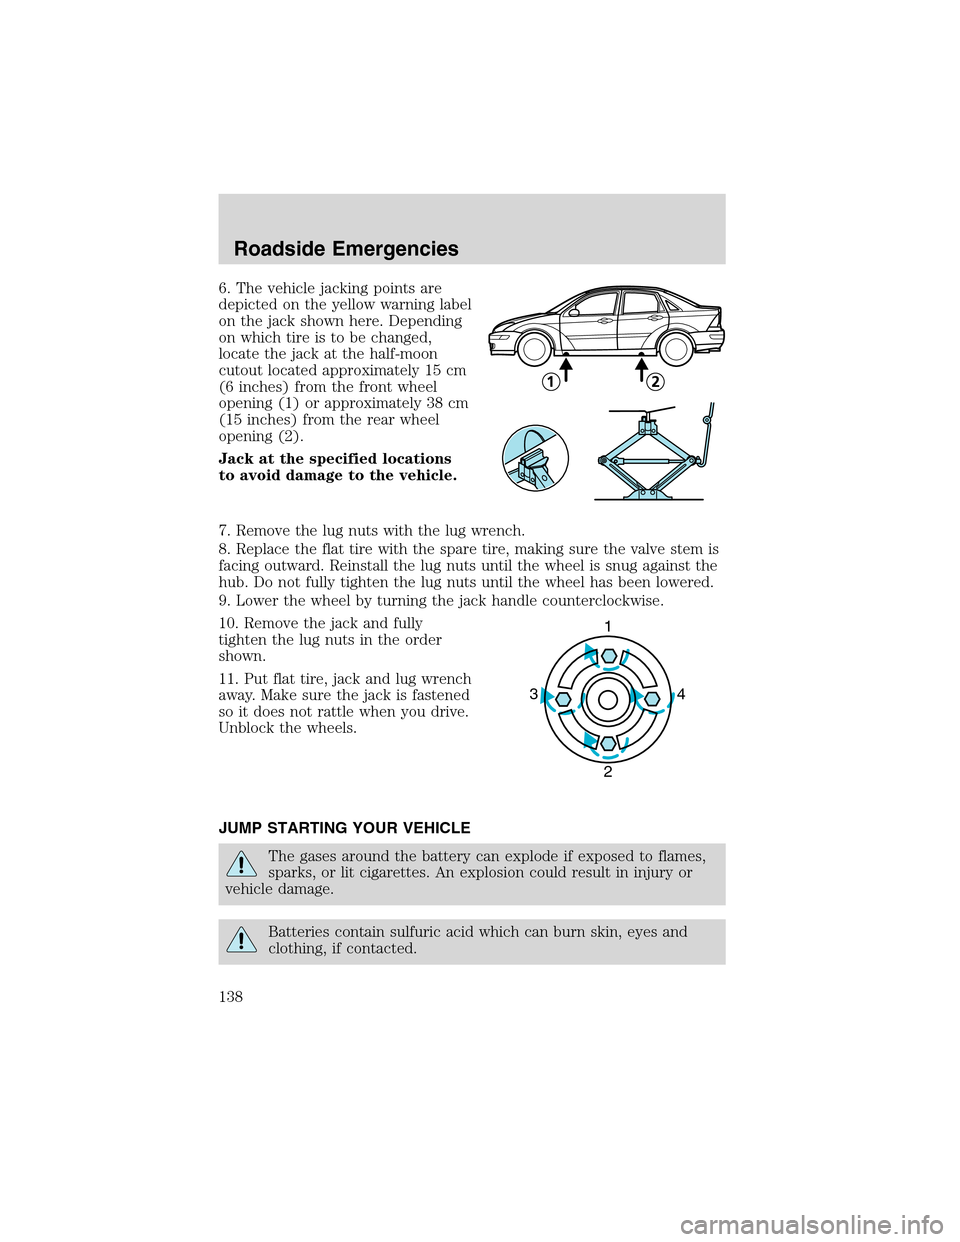
6. The vehicle jacking points are
depicted on the yellow warning label
on the jack shown here. Depending
on which tire is to be changed,
locate the jack at the half-moon
cutout located approximately 15 cm
(6 inches) from the front wheel
opening (1) or approximately 38 cm
(15 inches) from the rear wheel
opening (2).
Jack at the specified locations
to avoid damage to the vehicle.
7. Remove the lug nuts with the lug wrench.
8. Replace the flat tire with the spare tire, making sure the valve stem is
facing outward. Reinstall the lug nuts until the wheel is snug against the
hub. Do not fully tighten the lug nuts until the wheel has been lowered.
9. Lower the wheel by turning the jack handle counterclockwise.
10. Remove the jack and fully
tighten the lug nuts in the order
shown.
11. Put flat tire, jack and lug wrench
away. Make sure the jack is fastened
so it does not rattle when you drive.
Unblock the wheels.
JUMP STARTING YOUR VEHICLE
The gases around the battery can explode if exposed to flames,
sparks, or lit cigarettes. An explosion could result in injury or
vehicle damage.
Batteries contain sulfuric acid which can burn skin, eyes and
clothing, if contacted.
1
4 3
2
Roadside Emergencies
138
Page 161 of 216

Maintenance and SpecificationsSERVICE RECOMMENDATIONS
To help you service your vehicle:
•We highlight do-it-yourself items in the engine compartment for easy
location.
•We provide a scheduled maintenance guide which makes tracking
routine service easy.
If your vehicle requires professional service, your dealership can provide
the necessary parts and service. Check yourWarranty Guide/Owner
Information Guideto find out which parts and services are covered.
Use only recommended fuels, lubricants, fluids and service parts
conforming to specifications. Motorcraft parts are designed and built to
provide the best performance in your vehicle.
PRECAUTIONS WHEN SERVICING YOUR VEHICLE
•Do not work on a hot engine.
•Make sure that nothing gets caught in moving parts.
•Do not work on a vehicle with the engine running in an enclosed
space, unless you are sure you have enough ventilation.
•Keep all open flames and other burning (cigarettes) material away
from the battery and all fuel related parts.
The engine cooling fan may operate for several minutes after the
engine is turned off. Do not start maintenance work until the fan
has stopped operating.
Working with the engine off
•Automatic transmission:
1. Set the parking brake and shift to P (Park).
2. Turn off the engine and remove the key.
3. Block the wheels.
•Manual transmission:
1. Set the parking brake, depress the clutch and place the gearshift in 1
(First).
2. Turn off the engine and remove the key.
3. Block the wheels.
Maintenance and Specifications
161