Page 20 of 280
AM/FM STEREO
1.Seek:Press
/to find the
next strong station down/up the
frequency band.
2.Tune:Press
/to manually
change radio frequency down/up.
3.AM/FM:Press to choose a
frequency band in radio mode.
4.Memory preset buttons:To set
a station: Select frequency band
AM/FM; tune to a station, press and
hold a preset button until sound returns.
1234AM/FM
SEEKTONE
CLK
TUNE
TONE VOL
12 FMSTDX
VOL
PUSH
ON
5
3
67
4
12
AM/FM
1234
Entertainment Systems
20
ProCarManuals.com
Page 23 of 280
next selection). Then, press REW (for the beginning of the current
selection) or FF (to advance to the next selection). The tape MUST have
a blank section of at least four seconds duration between programs.
5.Side 1–2:Press to change tape
direction.
6.REW (rewind):Press to rewind
the tape.
FF (fast forward):Press to
advance the tape.
7.Memory preset buttons:To set
a station: Select frequency band
AM/FM1/FM2; tune to a station,
press and hold a preset button until sound returns.
8.
Dolby�noise reduction:Works in tape mode only. Reduces tape
noise and hiss; press to activate/deactivate.
9.Scan:Press SCAN to hear a brief
sampling of all listenable radio
stations or all tape selections. Press
again to stop.
10.Tune:Works in radio mode only.
Press TUNE
/to change
frequency down/up
11.Seek:Press and
release
/for previous/next
strong station, selection or track.
SIDE 1 - 2
REW
FF
Entertainment Systems
23
ProCarManuals.com
Page 24 of 280
12.Power/volume:Press to turn
ON/OFF; turn to increase or
decrease volume levels.
13.AM/FM:Press to choose a
frequency band in radio mode.
14.Bass:Press
/to
decrease/increase the bass output.
15.Treble:Press
/to
decrease/increase the treble output.
16.EJ (Eject):Press to eject a
tape.
17.Cassette door:Insert a cassette into the cassette door.
EJ
Entertainment Systems
24
ProCarManuals.com
Page 26 of 280
4.Cassette door:Insert the
cassette with the opening to the
right.
5.Eject:Press to eject the
cassette/CD. The radio will resume
playing.
6.Tape:Press to start tape play.
Press to stop tape during
rewind/fast forward.
CD:Press to start CD play. With the
dual media audio, press CD to
toggle between single CD and CD
changer play (if equipped).
7.Mute:Press to MUTE playing
media; press again return to playing
media.
8.Auto:Press to set first six
strongest stations (if available) into
AM, FM1 or FM2 memory buttons;
press again to return to normal
stations.
9.Clock:Press and hold to set the
clock. Press the
SEEK to
decrease hours or SEEK
to
increase hours. Press the
TUNE
to decrease minutes or TUNE
to
increase minutes. If your vehicle has a stand alone clock this control will
not function.
Entertainment Systems
26
ProCarManuals.com
Page 28 of 280
18.Select (SEL):Use with Bass,
Treble, Balance and Fade controls.
19.Bass:Press BASS; then press
SEL
/to decrease/increase
the bass output.
Treble:Press TREB; then press
SEL
/to decrease/increase
the treble output.
20.Tune:Works in radio mode only.
Press TUNE
/to change
frequency down/up.
21.Seek:Press and release
SEEK
/for previous/next
strong station, selection or track.
22.AM/FM:Press to select
AM/FM1/FM2 frequency band.
SEL
SEEKTUNE
SEEKTUNE
Entertainment Systems
28
ProCarManuals.com
Page 31 of 280

10.Memory presets:To set a
station: Select frequency band
AM/FM; tune to a station, press and
hold a preset button until sound
returns. In CD mode, press to move between CDs.
This radio is equipped with six station memory preset controls which
allow you to set up to six AM stations and 12 FM stations (six in FM1
and six in FM2).
11.CD:Press to select CD mode.
Seamless play:In CD mode, the
transition between the end of one
CD and the beginning of another will not contain delay time unless SEEK
or a preset control is pressed.
12.AM/FM:Press to select a
frequency band in radio mode.
Autostore:Allows you to set the
strongest local radio stations without losing your original manually set
preset stations for AM/FM1/FM2 . Press and momentarily hold AM/FM.
AUTOSTORE will flash on the display. When the six strongest stations
are filled, the station stored in preset 1 will begin playing. If there are
less than six strong stations, the system will store the last one in the
remaining presets. Press again to disengage.
13.Power/volume:Press to turn
ON/OFF; turn to increase or
decrease volume levels.
14.Load:Press to load a CD. Press
and hold to load up to six discs.
15.Shuffle:Press to play tracks in
random order on the current CD.
Press SHUF to cycle through SHUF
TRAC, SHUF DISC or SHUF OFF.
16.Scan:Press to hear a brief
sampling of all listenable stations or
CD tracks. Press again to stop.
Entertainment Systems
31
ProCarManuals.com
Page 32 of 280
17.Disc/Tune:Radio: Press
orto manually tune down or up
the frequency band.
CD: Press
orto select the previous or next track on the CD.
18.CD door:Insert a CD label side
up.
CD CHANGER (IF EQUIPPED)
Your CD changer is in one of the following locations:
•Behind the passenger’s seat
•In the center console
•Under the rear bench on the driver’s side (see instructions below)
•In the stowage bin on the passenger’s side
1. Slide the door to access the CD
changer magazine.
2. Press
to eject the magazine.
3. Turn the magazine (A) over.
4. Using the disc holder release
knob (C), pull the disc holder (B)
out of the magazine.
Do not pull too hard on the disc holder as the disc holder may come
completely out of the magazine. If this happens, reinsert the disc holder
back into the magazine while pressing on the lever.
AB
C
Entertainment Systems
32
ProCarManuals.com
Page 33 of 280

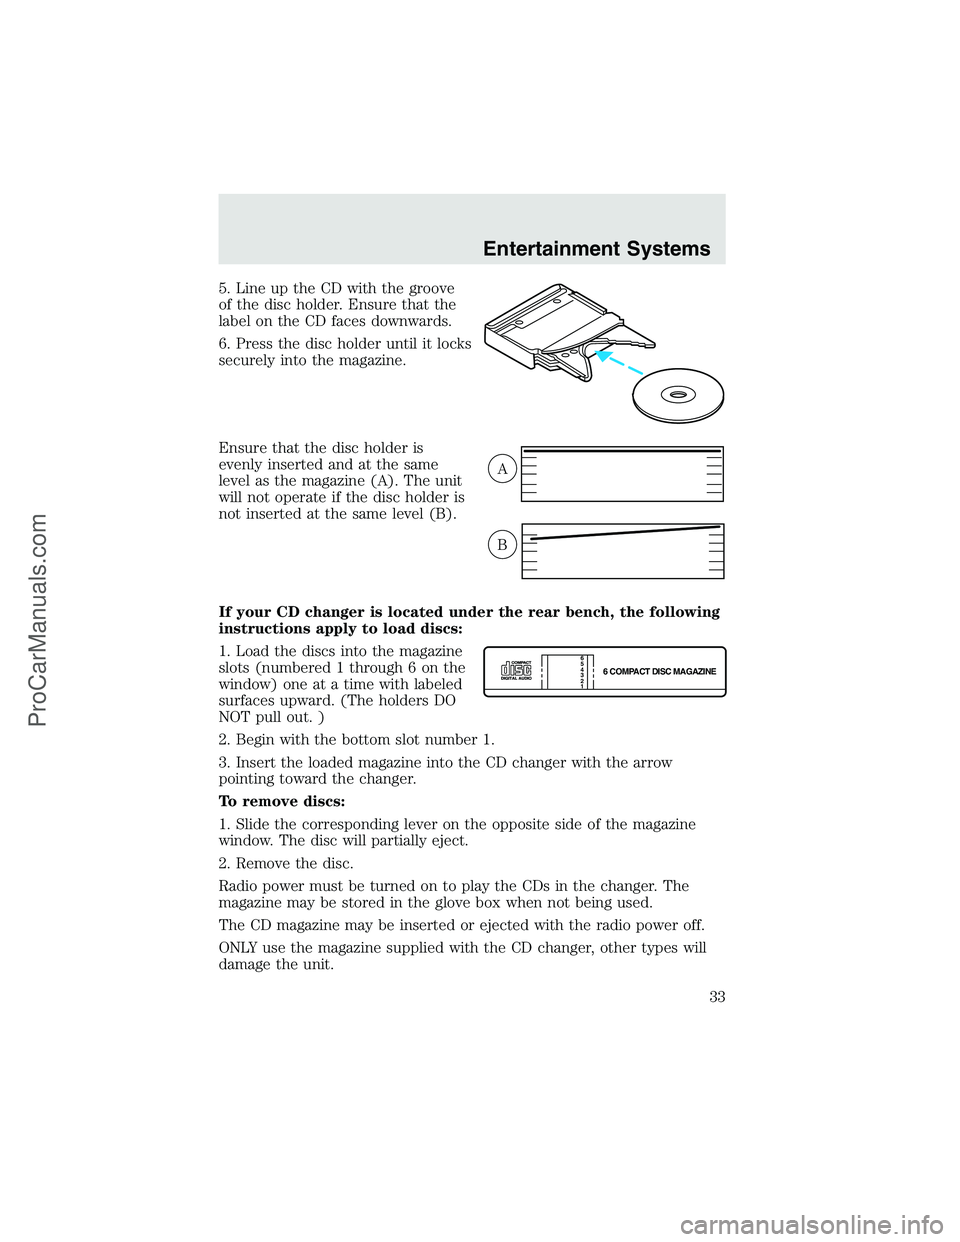
5. Line up the CD with the groove
of the disc holder. Ensure that the
label on the CD faces downwards.
6. Press the disc holder until it locks
securely into the magazine.
Ensure that the disc holder is
evenly inserted and at the same
level as the magazine (A). The unit
will not operate if the disc holder is
not inserted at the same level (B).
If your CD changer is located under the rear bench, the following
instructions apply to load discs:
1. Load the discs into the magazine
slots (numbered 1 through 6 on the
window) one at a time with labeled
surfaces upward. (The holders DO
NOT pull out. )
2. Begin with the bottom slot number 1.
3. Insert the loaded magazine into the CD changer with the arrow
pointing toward the changer.
To remove discs:
1. Slide the corresponding lever on the opposite side of the magazine
window. The disc will partially eject.
2. Remove the disc.
Radio power must be turned on to play the CDs in the changer. The
magazine may be stored in the glove box when not being used.
The CD magazine may be inserted or ejected with the radio power off.
ONLY use the magazine supplied with the CD changer, other types will
damage the unit.
A
B
6 COMPACT DISC MAGAZINE1 2 3 4 5
6
Entertainment Systems
33
ProCarManuals.com