2003 FORD F350 weight
[x] Cancel search: weightPage 166 of 280
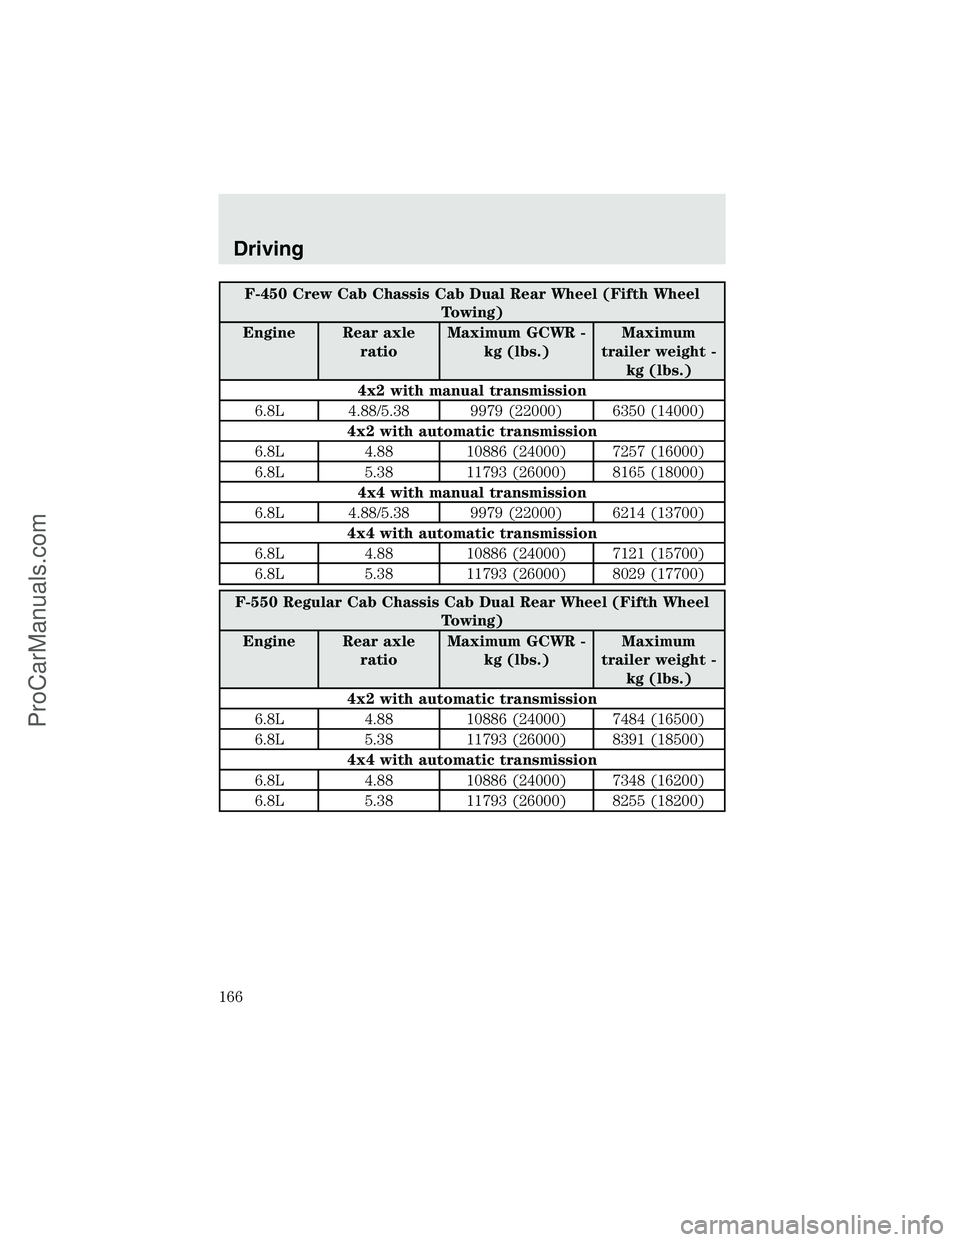
F-450 Crew Cab Chassis Cab Dual Rear Wheel (Fifth Wheel
Towing)
Engine Rear axle
ratioMaximum GCWR -
kg (lbs.)Maximum
trailer weight -
kg (lbs.)
4x2 with manual transmission
6.8L 4.88/5.38 9979 (22000) 6350 (14000)
4x2 with automatic transmission
6.8L 4.88 10886 (24000) 7257 (16000)
6.8L 5.38 11793 (26000) 8165 (18000)
4x4 with manual transmission
6.8L 4.88/5.38 9979 (22000) 6214 (13700)
4x4 with automatic transmission
6.8L 4.88 10886 (24000) 7121 (15700)
6.8L 5.38 11793 (26000) 8029 (17700)
F-550 Regular Cab Chassis Cab Dual Rear Wheel (Fifth Wheel
Towing)
Engine Rear axle
ratioMaximum GCWR -
kg (lbs.)Maximum
trailer weight -
kg (lbs.)
4x2 with automatic transmission
6.8L 4.88 10886 (24000) 7484 (16500)
6.8L 5.38 11793 (26000) 8391 (18500)
4x4 with automatic transmission
6.8L 4.88 10886 (24000) 7348 (16200)
6.8L 5.38 11793 (26000) 8255 (18200)
Driving
166
ProCarManuals.com
Page 167 of 280
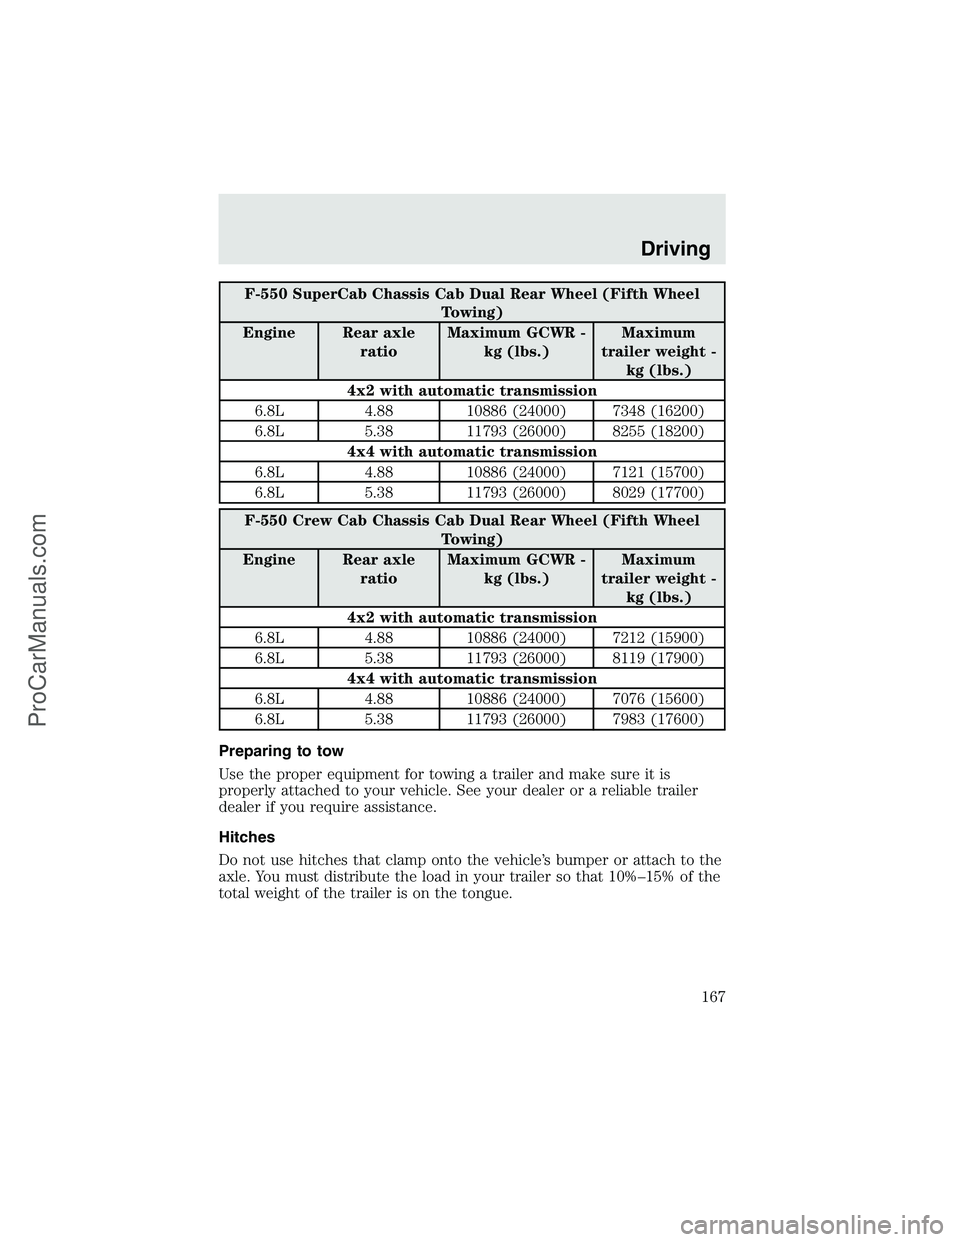
F-550 SuperCab Chassis Cab Dual Rear Wheel (Fifth Wheel
Towing)
Engine Rear axle
ratioMaximum GCWR -
kg (lbs.)Maximum
trailer weight -
kg (lbs.)
4x2 with automatic transmission
6.8L 4.88 10886 (24000) 7348 (16200)
6.8L 5.38 11793 (26000) 8255 (18200)
4x4 with automatic transmission
6.8L 4.88 10886 (24000) 7121 (15700)
6.8L 5.38 11793 (26000) 8029 (17700)
F-550 Crew Cab Chassis Cab Dual Rear Wheel (Fifth Wheel
Towing)
Engine Rear axle
ratioMaximum GCWR -
kg (lbs.)Maximum
trailer weight -
kg (lbs.)
4x2 with automatic transmission
6.8L 4.88 10886 (24000) 7212 (15900)
6.8L 5.38 11793 (26000) 8119 (17900)
4x4 with automatic transmission
6.8L 4.88 10886 (24000) 7076 (15600)
6.8L 5.38 11793 (26000) 7983 (17600)
Preparing to tow
Use the proper equipment for towing a trailer and make sure it is
properly attached to your vehicle. See your dealer or a reliable trailer
dealer if you require assistance.
Hitches
Do not use hitches that clamp onto the vehicle’s bumper or attach to the
axle. You must distribute the load in your trailer so that 10%–15% of the
total weight of the trailer is on the tongue.
Driving
167
ProCarManuals.com
Page 169 of 280
Using a step bumper (if equipped)
The rear bumper is equipped with an integral hitch and only requires a
ball with a 25.4 mm (one inch) shank diameter. The bumper has a 2,270
kg (5,000 lb.) trailer weight and 227 kg (500 lb.) tongue weight capacity.
If it is necessary to relocate the trailer hitch ball position, a
frame-mounted trailer hitch must be installed.
Driving while you tow
When towing a trailer:
•Turn off the speed control. The speed control may shut off
automatically when you are towing on long, steep grades.
•Consult your local motor vehicle speed regulations for towing a trailer.
•If your vehicle is equipped with a 4–speed automatic
transmission:To eliminate excessive transmission shifting, use a
lower gear. This will also assist in transmission cooling. (For additional
information, refer to theUnderstanding the positions of the 4–speed
automatic transmissionsection in this chapter.
•If your vehicle is equipped with a 5–speed automatic
transmission:To eliminate excessive transmission shifting, activate
the Tow/Haul feature. This will also assist in transmission cooling. (For
additional information, refer to theUnderstanding the positions of
the 5–speed automatic transmissionsection in this chapter.
•Anticipate stops and brake gradually.
•Do not exceed the GCWR rating or transmission damage may occur.
Servicing after towing
If you tow a trailer for long distances, your vehicle will require more
frequent service intervals. Refer to your scheduled maintenance guide for
more information.
Trailer towing tips
•Practice turning, stopping and backing up before starting on a trip to
get the feel of the vehicle trailer combination. When turning, make
wider turns so the trailer wheels will clear curbs and other obstacles.
•Allow more distance for stopping with a trailer attached.
•The trailer tongue weight should be 10–15% of the loaded trailer
weight.
•After you have traveled 80 km (50 miles), thoroughly check your
hitch, electrical connections and trailer wheel lug nuts.
Driving
169
ProCarManuals.com
Page 171 of 280
RWD vehicles with 4x4 electronic shift transfer case or All Wheel
Drive (AWD) vehicles with automatic transmissions:
Regarding recreational towing or having your vehicle towed, 4x4 vehicles
with electronic shift on the fly and AWD vehicles cannot be towed with
any wheels on the ground (with the exception of moving it as a disabled
vehicle off the road out of traffic).
SNOWPLOWING
Note:Do not use your vehicle to snowplow until it has been driven at
least 800 km (500 miles). Follow the severe duty schedule in your
scheduled maintenance guide for engine oil and transmission fluid
change intervals.
Note:Ford does not install snowplows.
For low speed snow removal, Ford offers a Snowplow Package Option on
select 4x4 vehicles. To assist Ford dealers and equipment installers
further prepare the vehicle for snowplowing, Ford includes instructions
in theFord Truck Body Builders Layout BookandFord Truck Source
Book. These instructions are available through your Ford dealer; they
include the list of vehicle models recommended for snowplowing and
snowplow weight limits. Use of the Snowplow Package Option, or its
equivalent, along with these instructions will help avoid possible
powertrain and chassis damage from snowplowing.
The front and rear GAWR, GVWR, Total Accessory Reserve Capacity
(TARC) and tire inflation pressures are found on the Safety Compliance
Certification Label located on one of the vehicle’s door jambs. This label
is applied to all vehicles completed by Ford Motor Company. Incomplete
vehicles built by Ford Motor Company will have an Incomplete Vehicle
Label in place of the Safety Compliance Label. The TARC does not apply
to Incomplete Vehicles and will not be shown on the Incomplete Vehicle
Label. The weight of the vehicle with occupants must never exceed the
front and rear GAWR or the GVWR.
The TARC is the weight of the permanently attached equipment that can
be added to the vehicle without violating the vehicle’s Safety Compliance
Certification. This includes the snowplow mounting hardware but does
not include the removable portion of the snowplow assembly.
Installing the snowplow
Read the following instructions before installing a snowplow:
•Front GAWR must not exceed 63% of the GVW. Add ballast weight to
the back of the vehicle, if necessary. Refer to the Safety Compliance
Certification Label to find your vehicle’s front GAWR.
Driving
171
ProCarManuals.com
Page 172 of 280
•The Front Axle Accessory Reserve Capacity and the TARC listed on
the bottom right of the Safety Compliance Certification Label will
determine whether or not the addition of a snowplow will overload
your vehicle.
•The weight of the snowplow and supporting components distributed to
the front axle must not exceed the Front Axle Accessory Reserve
Capacity.
•The total weight of the snowplow and aftermarket equipment must
not exceed the TARC.
•The weight of the installed snowplow and aftermarket equipment must
not load the vehicle beyond the GAWR (front/rear) and GVWR listed
on the Safety Compliance Certification Label.
•The total weight of the snowplow and aftermarket equipment must be
considered part of the payload and must not exceed the GCWR for
towing.
•Federal and most local regulations require additional exterior lamps
for snowplow-equipped vehicles. Consult your dealer for additional
information.
•Tires have their maximum inflation pressure and associated load rating
imprinted on the tire sidewall. This pressure may or may not be the
same as that shown as recommended on the vehicle. The vehicle
operator may have to adjust the tire inflation pressure to
accommodate the snowplow and payload. Consult your dealer or
equipment installer for help with proper inflation pressures.
•Federal and some local regulations require additional exterior lamps
for snowplow-equipped vehicles. Consult your dealer for additional
information.
•After installing a snowplow to the vehicle, ensure the vehicle’s front
toe alignment and front ride height are within specification (reset if
required). These specifications are located in the vehicle’s Workshop
Manual.
Note:Do not exceed the GVWR or the GAWR specified on the
certification label.
Removing snowplow
After removing a snowplow from the vehicle, ensure the vehicle’s front
toe alignment and front ride height are within specification (reset if
required).
Driving
172
ProCarManuals.com
Page 237 of 280
•Revving the engine before turning it off may reduce fuel economy.
•Using the air conditioner or defroster may reduce fuel economy.
•You may want to turn off the speed control in hilly terrain if
unnecessary shifting between third and fourth gear occurs.
Unnecessary shifting of this type could result in reduced fuel
economy.
•Warming up a vehicle on cold mornings is not required and may
reduce fuel economy.
•Resting your foot on the brake pedal while driving may reduce fuel
economy.
•Combine errands and minimize stop-and-go driving.
Maintenance
•Keep tires properly inflated and use only recommended size.
•Operating a vehicle with the wheels out of alignment will reduce fuel
economy.
•Use recommended engine oil. Refer toLubricant specificationsin
this chapter.
•Perform all regularly scheduled maintenance items. Follow the
recommended maintenance schedule and owner maintenance checks
found in your vehicle scheduled maintenance guide.
Conditions
•Heavily loading a vehicle or towing a trailer may reduce fuel economy
at any speed.
•Carrying unnecessary weight may reduce fuel economy (approximately
0.4 km/L [1 mpg] is lost for every 180 kg [400 lb] of weight carried).
•Adding certain accessories to your vehicle (for example bug
deflectors, rollbars/light bars, running boards, ski/luggage racks) may
reduce fuel economy.
•Using fuel blended with alcohol may lower fuel economy.
•Fuel economy may decrease with lower temperatures during the first
12–16 km (8–10 miles) of driving.
•Driving on flat terrain offers improved fuel economy as compared to
driving on hilly terrain.
•Transmissions give their best fuel economy when operated in the top
cruise gear and with steady pressure on the gas pedal.
Maintenance and Specifications
237
ProCarManuals.com
Page 270 of 280
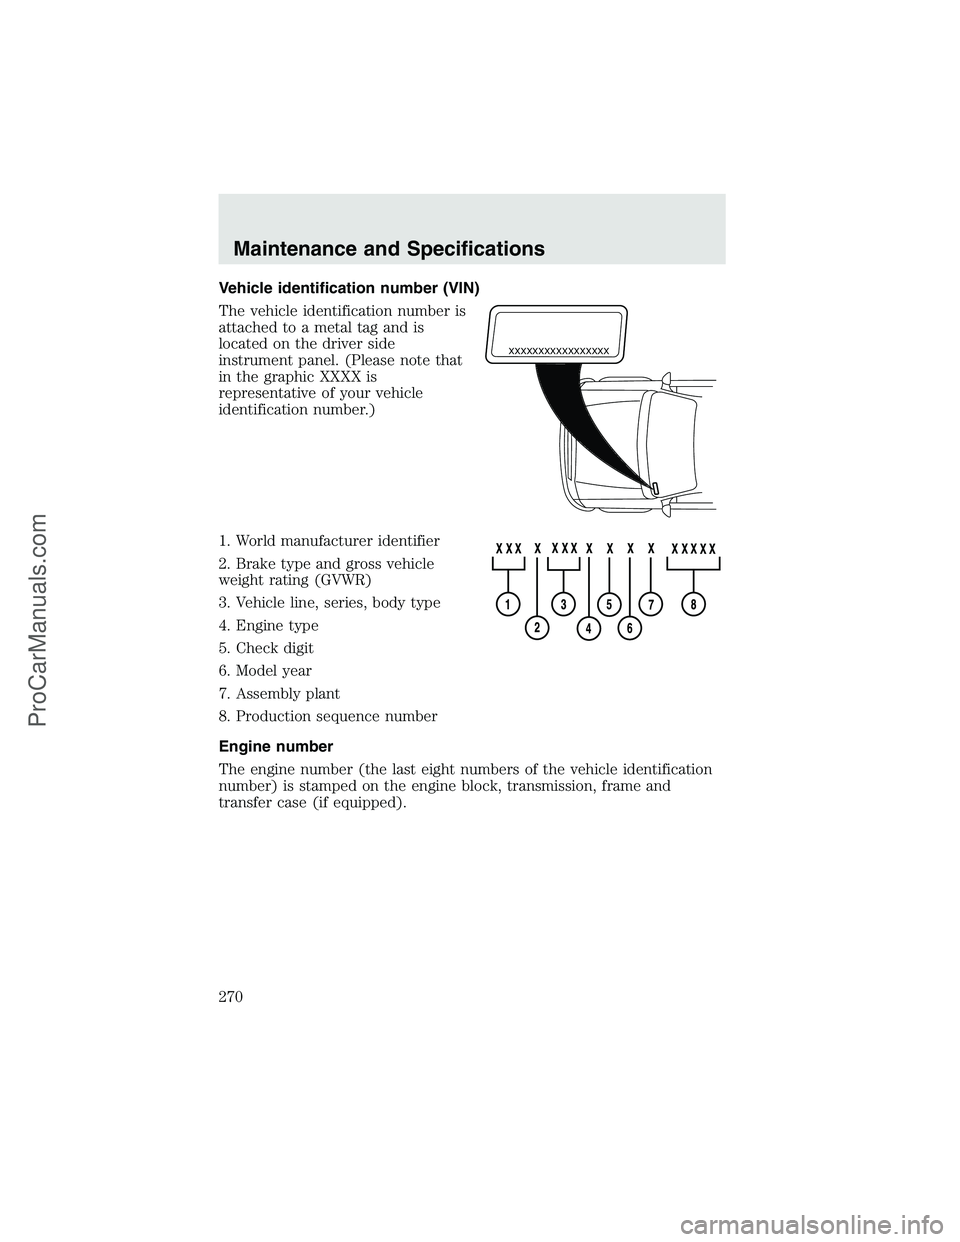
Vehicle identification number (VIN)
The vehicle identification number is
attached to a metal tag and is
located on the driver side
instrument panel. (Please note that
in the graphic XXXX is
representative of your vehicle
identification number.)
1. World manufacturer identifier
2. Brake type and gross vehicle
weight rating (GVWR)
3. Vehicle line, series, body type
4. Engine type
5. Check digit
6. Model year
7. Assembly plant
8. Production sequence number
Engine number
The engine number (the last eight numbers of the vehicle identification
number) is stamped on the engine block, transmission, frame and
transfer case (if equipped).
XXXXXXXXXXXXXXXXX
Maintenance and Specifications
270
ProCarManuals.com
Page 273 of 280
Door edge guards
Fender flares
Flat splash guards
Front end covers (full)
Hood deflectors
Leather wrap steering wheel
Locking gas cap
Lubricants and oils
Molded splash guards
Rear window deflector
Side window air deflectors
Stainless steel grill insert
Tailgate covers (Diamond plate)
Tonneau cover (soft)
Tonneau cover (hard, color keyed–Leer supplier branded)
Touch-up paint
Truck cover (full vehicle)
Universal floor mats
Wheels
Wheel covers
Wood trim - interim applique
For maximum vehicle performance, keep the following information in
mind when adding accessories or equipment to your vehicle:
•When adding accessories, equipment, passengers and luggage to your
vehicle, do not exceed the total weight capacity of the vehicle or of
the front or rear axle (GVWR or GAWR as indicated on the Safety
compliance certification label). Consult your dealer for specific weight
information.
•The Federal Communications Commission (FCC) and Canadian Radio
Telecommunications Commission (CRTC) regulate the use of mobile
communications systems - such as two-way radios, telephones and
theft alarms - that are equipped with radio transmitters. Any such
equipment installed in your vehicle should comply with FCC or CRTC
regulations and should be installed only by a qualified service
technician.
Accessories
273
ProCarManuals.com