2003 FORD F350 seats
[x] Cancel search: seatsPage 104 of 280
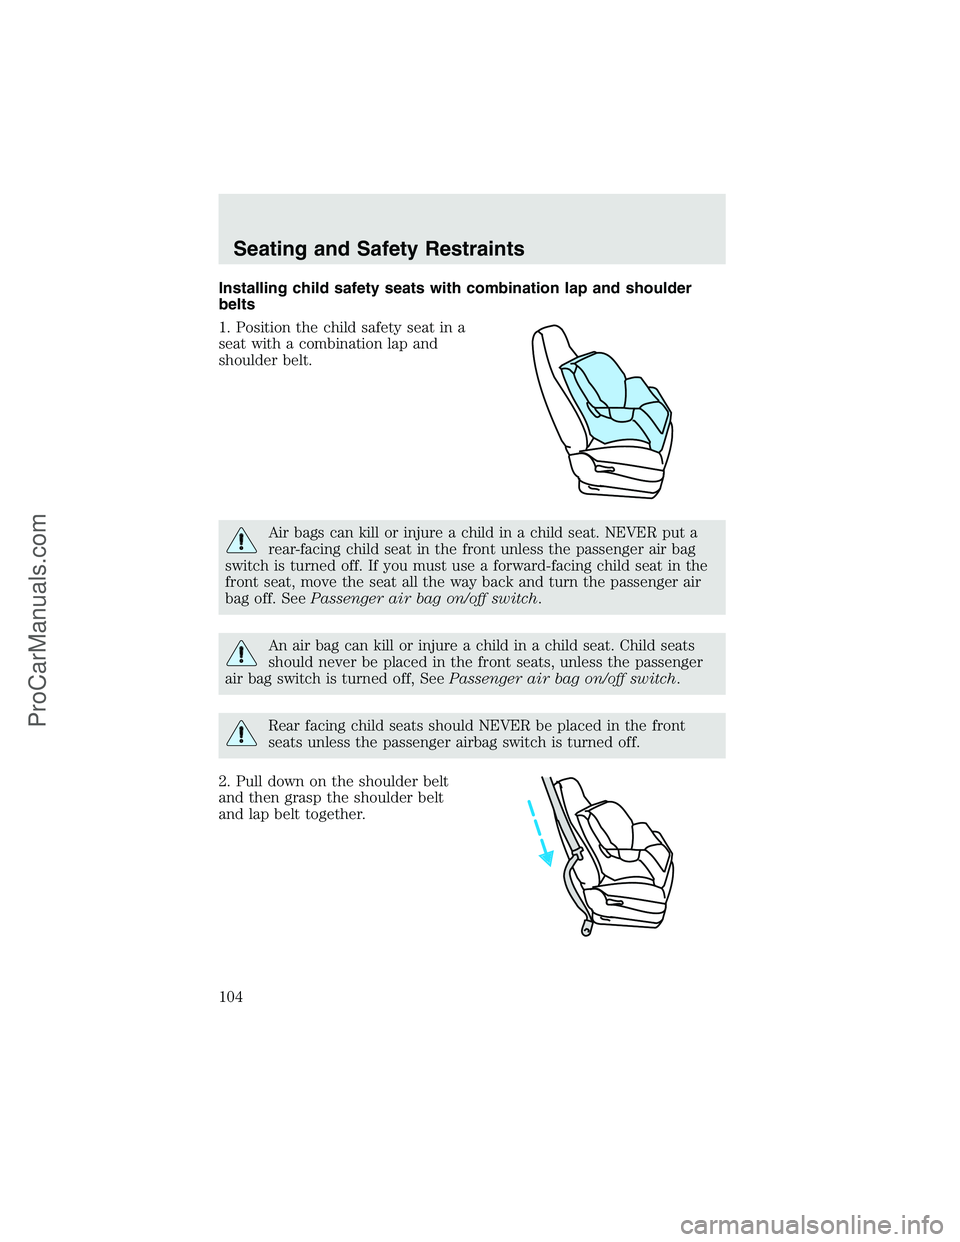
Installing child safety seats with combination lap and shoulder
belts
1. Position the child safety seat in a
seat with a combination lap and
shoulder belt.
Air bags can kill or injure a child in a child seat. NEVER put a
rear-facing child seat in the front unless the passenger air bag
switch is turned off. If you must use a forward-facing child seat in the
front seat, move the seat all the way back and turn the passenger air
bag off. SeePassenger air bag on/off switch.
An air bag can kill or injure a child in a child seat. Child seats
should never be placed in the front seats, unless the passenger
air bag switch is turned off, SeePassenger air bag on/off switch.
Rear facing child seats should NEVER be placed in the front
seats unless the passenger airbag switch is turned off.
2. Pull down on the shoulder belt
and then grasp the shoulder belt
and lap belt together.
Seating and Safety Restraints
104
ProCarManuals.com
Page 106 of 280
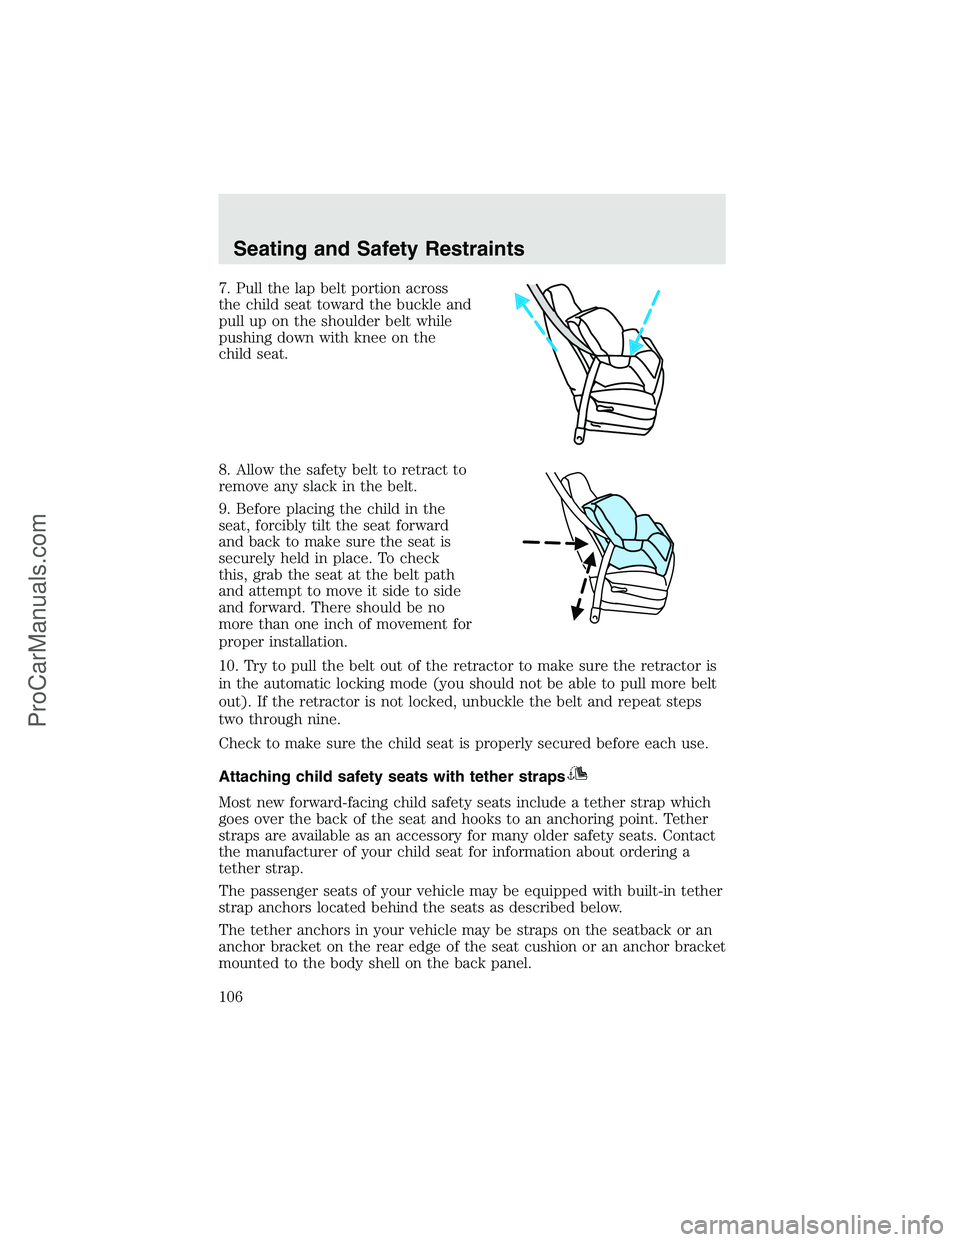
7. Pull the lap belt portion across
the child seat toward the buckle and
pull up on the shoulder belt while
pushing down with knee on the
child seat.
8. Allow the safety belt to retract to
remove any slack in the belt.
9. Before placing the child in the
seat, forcibly tilt the seat forward
and back to make sure the seat is
securely held in place. To check
this, grab the seat at the belt path
and attempt to move it side to side
and forward. There should be no
more than one inch of movement for
proper installation.
10. Try to pull the belt out of the retractor to make sure the retractor is
in the automatic locking mode (you should not be able to pull more belt
out). If the retractor is not locked, unbuckle the belt and repeat steps
two through nine.
Check to make sure the child seat is properly secured before each use.
Attaching child safety seats with tether straps
Most new forward-facing child safety seats include a tether strap which
goes over the back of the seat and hooks to an anchoring point. Tether
straps are available as an accessory for many older safety seats. Contact
the manufacturer of your child seat for information about ordering a
tether strap.
The passenger seats of your vehicle may be equipped with built-in tether
strap anchors located behind the seats as described below.
The tether anchors in your vehicle may be straps on the seatback or an
anchor bracket on the rear edge of the seat cushion or an anchor bracket
mounted to the body shell on the back panel.
Seating and Safety Restraints
106
ProCarManuals.com
Page 108 of 280
installing the child seat. Refer to theFolding down the rear seats
section in this chapter for information on how to operate the rear seats.
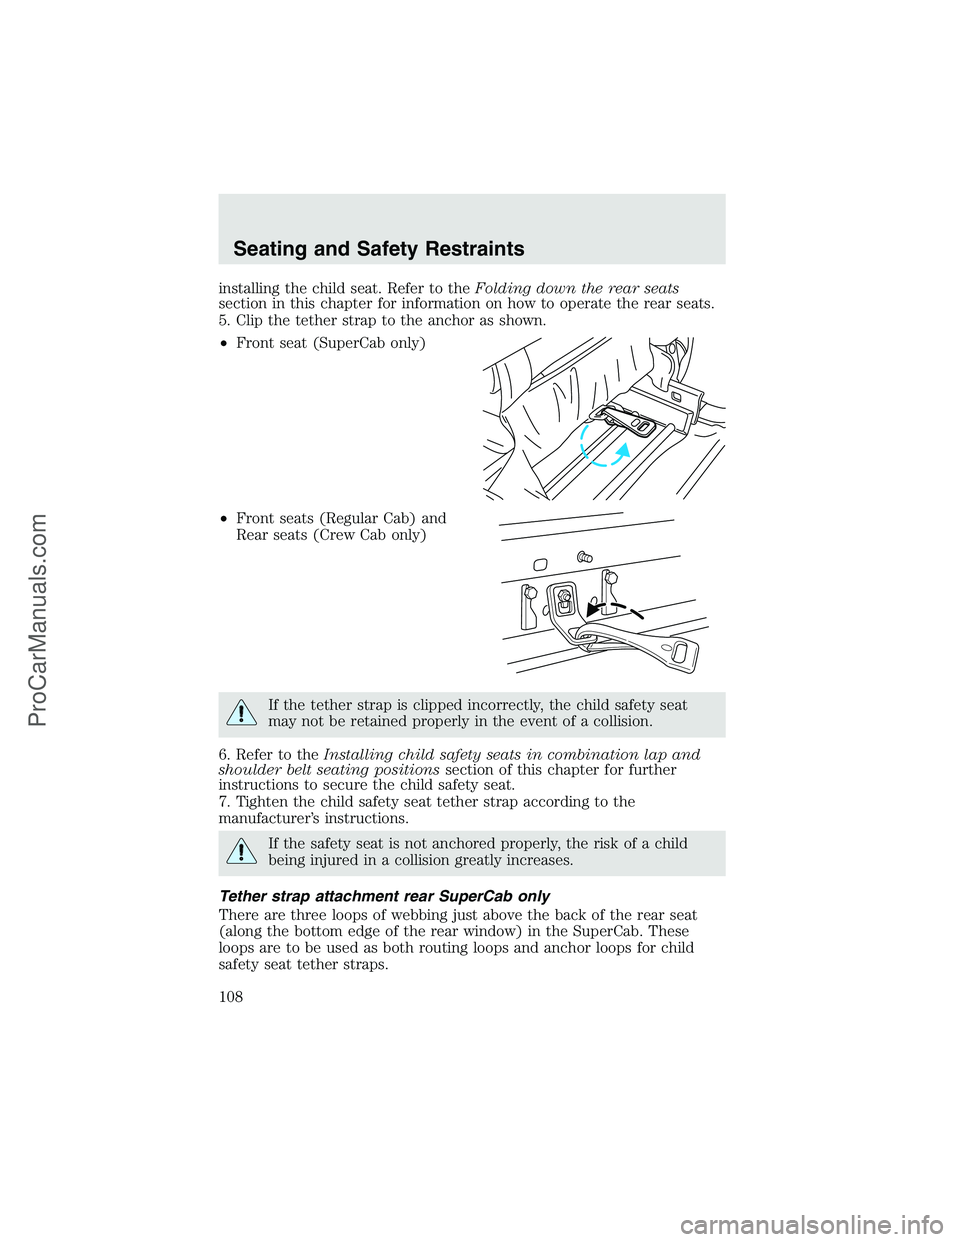
5. Clip the tether strap to the anchor as shown.
•Front seat (SuperCab only)
•Front seats (Regular Cab) and
Rear seats (Crew Cab only)
If the tether strap is clipped incorrectly, the child safety seat
may not be retained properly in the event of a collision.
6. Refer to theInstalling child safety seats in combination lap and
shoulder belt seating positionssection of this chapter for further
instructions to secure the child safety seat.
7. Tighten the child safety seat tether strap according to the
manufacturer’s instructions.
If the safety seat is not anchored properly, the risk of a child
being injured in a collision greatly increases.
Tether strap attachment rear SuperCab only
There are three loops of webbing just above the back of the rear seat
(along the bottom edge of the rear window) in the SuperCab. These
loops are to be used as both routing loops and anchor loops for child
safety seat tether straps.
Seating and Safety Restraints
108
ProCarManuals.com
Page 109 of 280
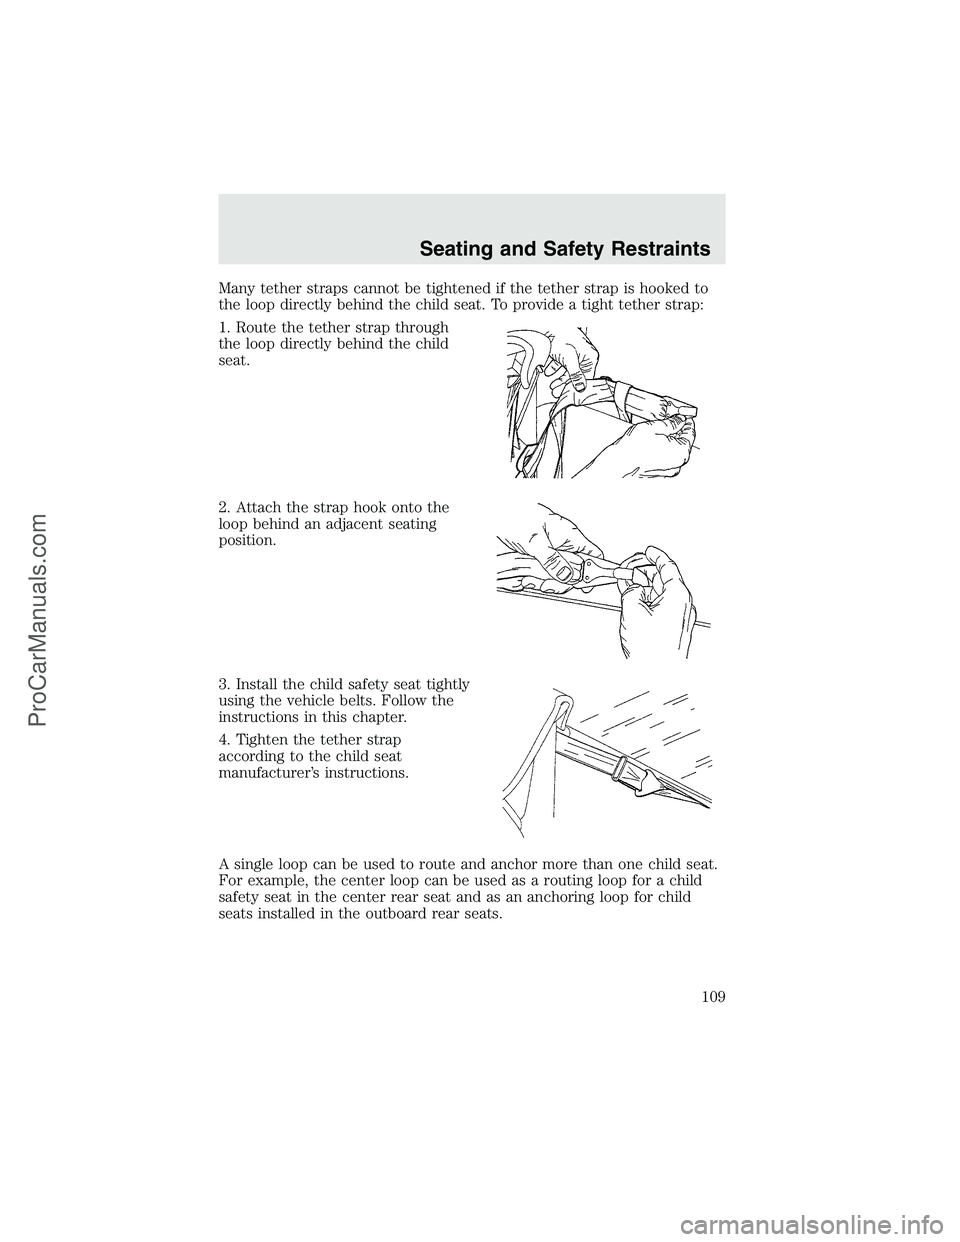
Many tether straps cannot be tightened if the tether strap is hooked to
the loop directly behind the child seat. To provide a tight tether strap:
1. Route the tether strap through
the loop directly behind the child
seat.
2. Attach the strap hook onto the
loop behind an adjacent seating
position.
3. Install the child safety seat tightly
using the vehicle belts. Follow the
instructions in this chapter.
4. Tighten the tether strap
according to the child seat
manufacturer’s instructions.
A single loop can be used to route and anchor more than one child seat.
For example, the center loop can be used as a routing loop for a child
safety seat in the center rear seat and as an anchoring loop for child
seats installed in the outboard rear seats.
Seating and Safety Restraints
109
ProCarManuals.com
Page 181 of 280

Fuse/Relay
LocationFuse Amp
RatingPassenger Compartment Fuse Panel
Description
36 10A* PCM Memory
37 15A* Horn
38 20A* Trailer tow park lamps
39 15A* Trailer tow back-up lamps
40 20A* Fuel pump
41 10A* Instrument cluster
42 15A* Delayed accessory
43 10A* Fog lamps
44—Not used
45 10A* Ignition switch Run/Start feed
46 10A* Left-hand lowbeam
47 10A* Right-hand lowbeam
48—Not used
101 30A** Trailer tow electric brake
102 30A** Door locks/Body security module
103 50A** Ignition switch (gasoline engine only),
FICM power (Diesel engine only)
104 40A** Heated backlight
105 30A** Fuel heater (Diesel engine only)
106 30A** Front wiper main
107 40A** Front blower motor
108—Not used
109 30A** Heated seats
110 50A** Ignition switch
111 30A** 4WD/Shift on the fly
112 30A** Left-hand power seats
113 30A** Starter motor
114 30A** Right-hand power seats
115 20A** Trailer tow battery charge
116 30A** Ignition switch
601 30A CB*** Window motors, Moonroof
Roadside Emergencies
181
ProCarManuals.com
Page 212 of 280
INSTRUMENT PANEL AND CLUSTER LENS
Clean the instrument panel with a damp cloth, then dry with a dry cloth.
•Avoid cleaners or polish that increase the gloss of the upper portion of
the instrument panel. The dull finish in this area helps protect the
driver from undesirable windshield reflection.
Do not use chemical solvents or strong detergents when cleaning
the steering wheel or instrument panel to avoid contamination of
the air bag system.
•Be certain to wash or wipe your hands clean if you have been in
contact with certain products such as insect repellent and suntan
lotion in order to avoid possible damage to the painted surfaces.
INTERIOR TRIM
•Clean the interior trim areas with a damp cloth, then dry by wiping
with a dry, soft, clean cloth.
•Do not use household or glass cleaners as these may damage the
finish.
INTERIOR
For fabric, carpets, cloth seats and safety belts:
•Remove dust and loose dirt with a vacuum cleaner.
•Remove light stains and soil with Ford Extra Strength Upholstery
Cleaner (E8AZ-19523–AA).
•If grease or tar is present on the material, spot-clean the area first
with Motorcraft Spot and Stain Remover (ZC-14).
•Never saturate the seat covers with cleaning solution.
•Do not use household cleaning products or glass cleaners, which can
stain and discolor the fabric and affect the flame retardant abilities of
the seat materials.
Do not use cleaning solvents, bleach or dye on the vehicle’s
seatbelts, as these actions may weaken the belt webbing.
Cleaning
212
ProCarManuals.com
Page 213 of 280
LEATHER SEATS (IF EQUIPPED, EXCEPT FOR THE KING RANCH
F–250 AND F–350 CREWCAB)
Your leather seating surfaces have a clear, protective coating over the
leather.
For King Ranch F-250 and F-350 CrewCab leather seats, refer to
separate section in this chapter.
•To clean, use a soft cloth with Motorcraft Deluxe Leather and Vinyl
Cleaner (ZC-11–A). Dry the area with a soft cloth.
•To help maintain its resiliency and color, use the Motorcraft Deluxe
Leather Care Kit (ZC-11–D), available from your authorized dealer.
•Do not use household cleaning products, alcohol solutions, solvents or
cleaners intended for rubber, vinyl and plastics, or oil/petroleum-based
leather conditioners. These products may cause premature wearing of
the clear, protective coating.
LEATHER SEATS FOR THE KING RANCH F-250 AND F-350
CREWCAB ONLY (IF EQUIPPED)
Your vehicle is equipped with seating covered in premium, top-grain
leather which is extremely durable, but still requires special care and
maintenance in order to ensure longevity and comfort.
Regular cleaning and conditioning will maintain the appearance of the
leather. Failure to care for the leather can result in drying out and fading
of the material.
CLEANING
For dirt, use a vacuum cleaner then use a clean, damp cloth or soft
brush.
First use a damp cloth then wipe with a dry cloth. Allow the area to dry,
then apply conditioner.
•Clean spills as quickly as possible.
•Test any cleaner or stain remover on an inconspicuous part of the
leather as cleaners may darken the leather. For more specific cleaning
information, contact the King Ranch Saddle Shop at 1–800–282–KING
(5464).
•Do not spill coffee, ketchup, mustard, orange juice or oil-based
products on the leather as they may permanently stain the leather.
•Do not use household cleaning products, alcohol solutions, solvents or
cleaners intended for rubber, vinyl or plastics.
Cleaning
213
ProCarManuals.com
Page 275 of 280
A
Accessory delay ..........................54
Air bag supplemental restraint
system ..........................................90
and child safety seats ..............92
description ................................90
disposal ......................................94
driver air bag ............................92
indicator light ...........................93
operation ...................................92
passenger air bag .....................92
passenger deactivation
switch ........................................95
Air cleaner filter .......246–247, 254
Ambulance packages ....................8
Antifreeze
(see Engine coolant) ................224
Anti-lock brake system
(see Brakes) ..............................115
Audio system
(see Radio) ................20, 22, 25, 29
Automatic transmission ............118
driving an automatic
overdrive .........................119, 121
fluid, adding ............................242
fluid, checking ........................242
fluid, refill capacities ..............254
fluid, specification ..................261
Auxiliary power point .................53
Axle
lubricant specifications ..258, 261
refill capacities ........................254
traction lok ..............................117
B
Battery .......................................222
acid, treating emergencies .....222jumping a disabled battery ....193
maintenance-free ....................222
replacement, specifications ...254
servicing ..................................222
BeltMinder ...................................85
Brakes ........................................114
anti-lock ...................................115
anti-lock brake system (ABS)
warning light ...........................115
fluid, checking and adding ....241
fluid, refill capacities ..............254
fluid, specifications .........258, 261
lubricant specifications ..258, 261
parking ....................................116
shift interlock ..........................118
Bulbs ............................................42
C
Calculating load ........................145
Capacities for refilling fluids ....254
Cassette tape player ...................29
CD changer .................................32
CD-single premium .........20, 22, 25
Cell phone use ............................60
Certification Label ....................269
Child safety restraints ................99
child safety belts ......................99
Child safety seats ......................102
attaching with tether straps ..106
in front seat ............................104
in rear seat ..............................104
Cleaning your vehicle
engine compartment ..............210
instrument panel ....................212
interior .....................................212
interior trim ............................212
plastic parts ............................211
Index
275
ProCarManuals.com