2003 FORD F350 heater
[x] Cancel search: heaterPage 1 of 280

Introduction 4
Instrument Cluster 12
Warning and control lights 12
Gauges 16
Entertainment Systems 20
AM/FM stereo 20
AM/FM stereo cassette 22
AM/FM stereo cassette with CD 25
AM/FM stereo with CD 29
CD changer 32
Climate Controls 36
Heater only 36
Manual heating and air conditioning 37
Lights 39
Headlamps 39
Turn signal control 41
Bulb replacement 42
Driver Controls 49
Windshield wiper/washer control 49
Steering wheel adjustment 50
Power windows 53
Mirrors 54
Speed control 57
Message center 60
Table of Contents
1
ProCarManuals.com
Page 36 of 280
HEATER ONLY SYSTEM
(IF EQUIPPED)
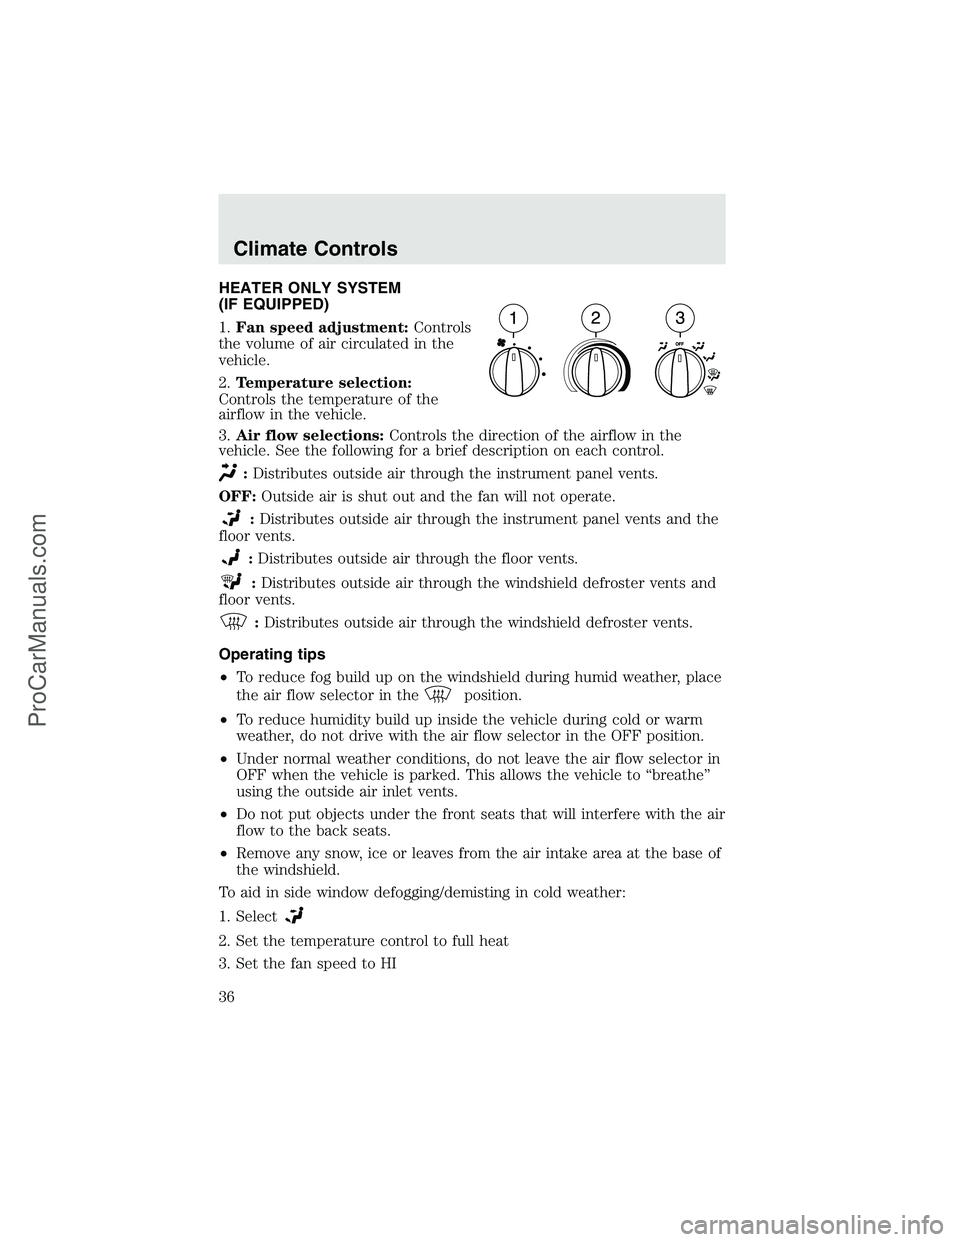
1.Fan speed adjustment:Controls
the volume of air circulated in the
vehicle.
2.Temperature selection:
Controls the temperature of the
airflow in the vehicle.
3.Air flow selections:Controls the direction of the airflow in the
vehicle. See the following for a brief description on each control.
:Distributes outside air through the instrument panel vents.
OFF:Outside air is shut out and the fan will not operate.
:Distributes outside air through the instrument panel vents and the
floor vents.
:Distributes outside air through the floor vents.
:Distributes outside air through the windshield defroster vents and
floor vents.
:Distributes outside air through the windshield defroster vents.
Operating tips
•To reduce fog build up on the windshield during humid weather, place
the air flow selector in the
position.
•To reduce humidity build up inside the vehicle during cold or warm
weather, do not drive with the air flow selector in the OFF position.
•Under normal weather conditions, do not leave the air flow selector in
OFF when the vehicle is parked. This allows the vehicle to“breathe”
using the outside air inlet vents.
•Do not put objects under the front seats that will interfere with the air
flow to the back seats.
•Remove any snow, ice or leaves from the air intake area at the base of
the windshield.
To aid in side window defogging/demisting in cold weather:
1. Select
2. Set the temperature control to full heat
3. Set the fan speed to HI
Climate Controls
36
ProCarManuals.com
Page 63 of 280
The compass heading is displayed in average fuel economy modes, fuel
range modes and temperature modes.
The compass reading may be affected when you drive near large
buildings, bridges, power lines and powerful broadcast antennas.
Magnetic or metallic objects placed in or on the vehicle may also affect
compass accuracy. Adjustments may need to be made to the zone and
calibration of the compass.
Compass zone adjustment
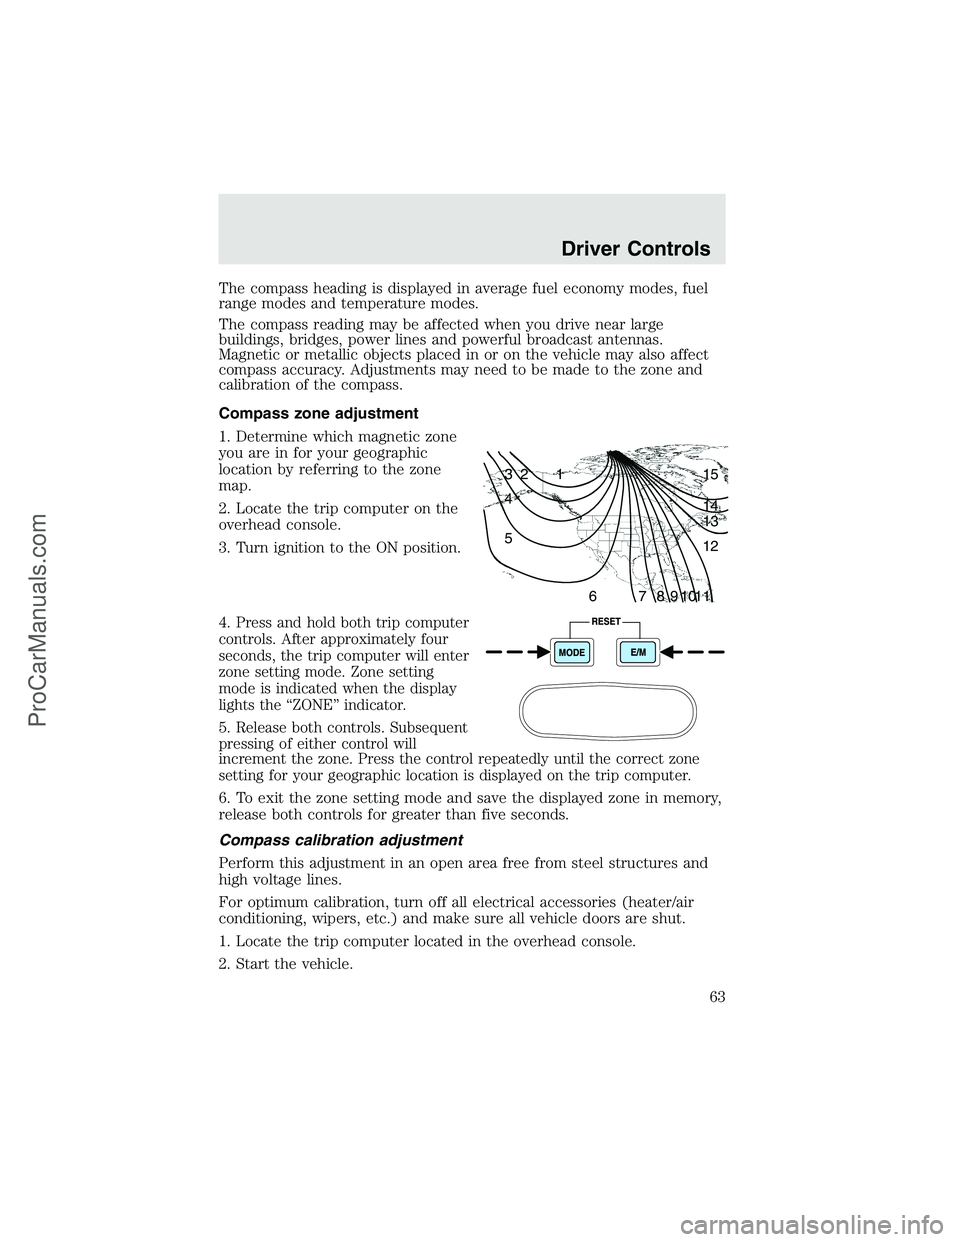
1. Determine which magnetic zone
you are in for your geographic
location by referring to the zone
map.
2. Locate the trip computer on the
overhead console.
3. Turn ignition to the ON position.
4.
Press and hold both trip computer
controls. After approximately four
seconds, the trip computer will enter
zone setting mode. Zone setting
mode is indicated when the display
lights the“ZONE”indicator.
5.Release both controls. Subsequent
pressing of either control will
increment the zone. Press the control repeatedly until the correct zone
setting for your geographic location is displayed on the trip computer.
6. To exit the zone setting mode and save the displayed zone in memory,
release both controls for greater than five seconds.
Compass calibration adjustment
Perform this adjustment in an open area free from steel structures and
high voltage lines.
For optimum calibration, turn off all electrical accessories (heater/air
conditioning, wipers, etc.) and make sure all vehicle doors are shut.
1. Locate the trip computer located in the overhead console.
2. Start the vehicle.
1 2 3
4
5
6 7 8 9 101112 13 14 15
Driver Controls
63
ProCarManuals.com
Page 114 of 280
Using the engine block heater (if equipped)
Use of an engine block heater is
strongly recommended if you live in
a region where temperatures reach
-23°C (-10°F) or below. For best
results, plug the heater in at least
three hours before starting the
vehicle. The heater can be plugged
in the night before starting the
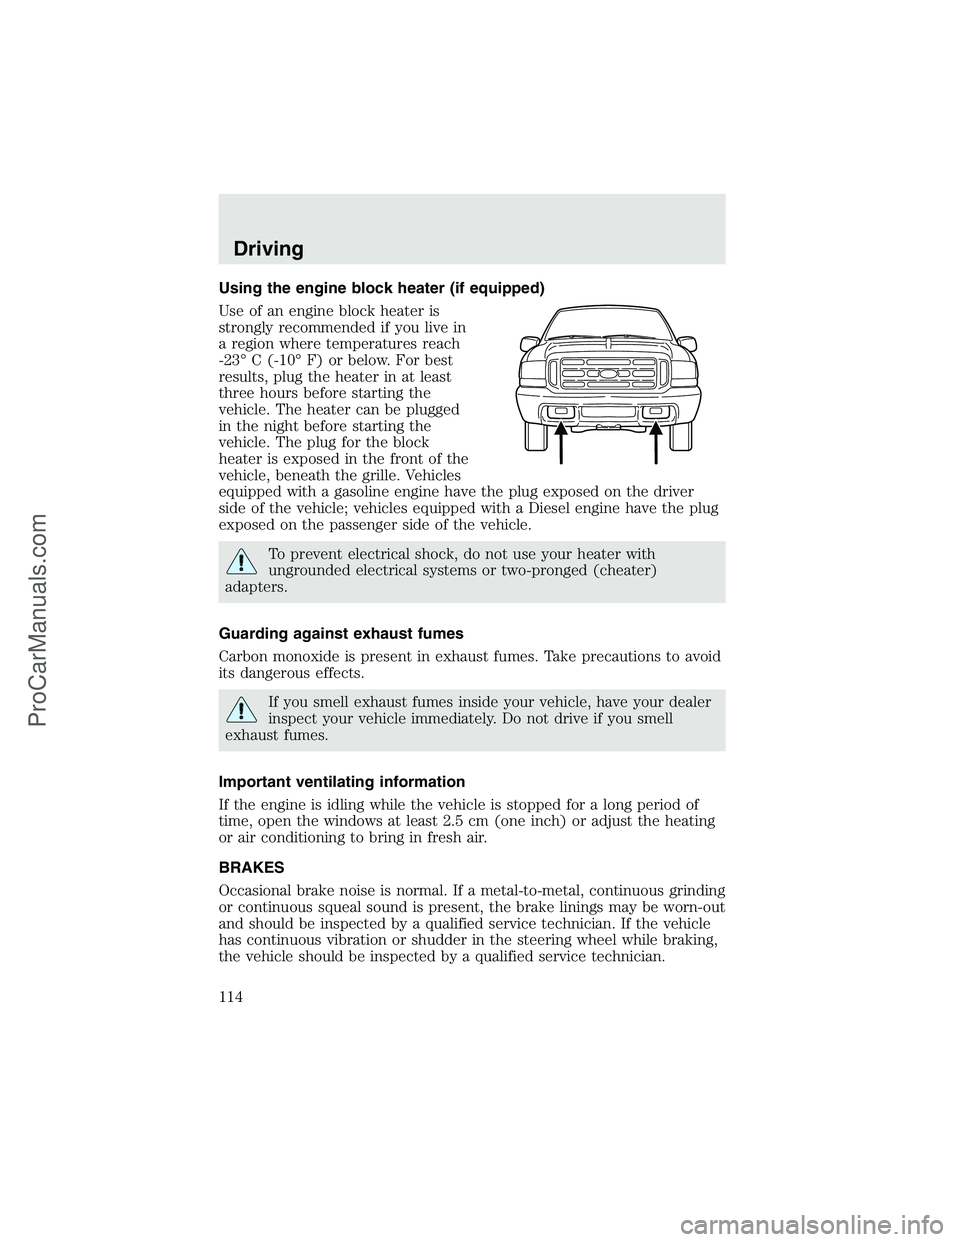
vehicle. The plug for the block
heater is exposed in the front of the
vehicle, beneath the grille. Vehicles
equipped with a gasoline engine have the plug exposed on the driver
side of the vehicle; vehicles equipped with a Diesel engine have the plug
exposed on the passenger side of the vehicle.
To prevent electrical shock, do not use your heater with
ungrounded electrical systems or two-pronged (cheater)
adapters.
Guarding against exhaust fumes
Carbon monoxide is present in exhaust fumes. Take precautions to avoid
its dangerous effects.
If you smell exhaust fumes inside your vehicle, have your dealer
inspect your vehicle immediately. Do not drive if you smell
exhaust fumes.
Important ventilating information
If the engine is idling while the vehicle is stopped for a long period of
time, open the windows at least 2.5 cm (one inch) or adjust the heating
or air conditioning to bring in fresh air.
BRAKES
Occasional brake noise is normal. If a metal-to-metal, continuous grinding
or continuous squeal sound is present, the brake linings may be worn-out
and should be inspected by a qualified service technician. If the vehicle
has continuous vibration or shudder in the steering wheel while braking,
the vehicle should be inspected by a qualified service technician.
Driving
114
ProCarManuals.com
Page 181 of 280

Fuse/Relay
LocationFuse Amp
RatingPassenger Compartment Fuse Panel
Description
36 10A* PCM Memory
37 15A* Horn
38 20A* Trailer tow park lamps
39 15A* Trailer tow back-up lamps
40 20A* Fuel pump
41 10A* Instrument cluster
42 15A* Delayed accessory
43 10A* Fog lamps
44—Not used
45 10A* Ignition switch Run/Start feed
46 10A* Left-hand lowbeam
47 10A* Right-hand lowbeam
48—Not used
101 30A** Trailer tow electric brake
102 30A** Door locks/Body security module
103 50A** Ignition switch (gasoline engine only),
FICM power (Diesel engine only)
104 40A** Heated backlight
105 30A** Fuel heater (Diesel engine only)
106 30A** Front wiper main
107 40A** Front blower motor
108—Not used
109 30A** Heated seats
110 50A** Ignition switch
111 30A** 4WD/Shift on the fly
112 30A** Left-hand power seats
113 30A** Starter motor
114 30A** Right-hand power seats
115 20A** Trailer tow battery charge
116 30A** Ignition switch
601 30A CB*** Window motors, Moonroof
Roadside Emergencies
181
ProCarManuals.com
Page 182 of 280

Fuse/Relay
LocationFuse Amp
RatingPassenger Compartment Fuse Panel
Description
602 60A** 4WABS module
210—Not used
211—Backup lamps relay (Diesel engine only)
212—Not used
301—Front blower motor relay
302—Powertrain Control Module (PCM) relay
303—Fuel heater relay (Diesel engine only)
304—Heated backlight relay
305—Trailer tow battery charge relay
306—Delayed accessory relay
307—Starter relay
* Mini Fuses ** Maxi Fuses ***Circuit Breaker
Note: (Diesel engine only)The Fuel Injection Control Module (FICM)
logic 15A mini-fuse is located in the underhood relay block.
CHANGING A FLAT TIRE
If you get a flat tire while driving:
•do not brake heavily.
•gradually decrease the vehicle’s speed.
•hold the steering wheel firmly.
•slowly move to a safe place on the side of the road.
The use of tire sealants is not recommended and may
compromise the integrity of your tires. The use of tire sealants
may also affect your tire pressure monitoring system (if equipped).
Spare tire information
Your vehicle may be equipped with a spare tire that can be used as
either a spare or a regular tire. The spare tire is not equipped with wheel
trim. The wheel trim from the original wheel/tire may be used on the
spare.
Roadside Emergencies
182
ProCarManuals.com
Page 193 of 280
JUMP STARTING YOUR VEHICLE
The gases around the battery can explode if exposed to flames,
sparks, or lit cigarettes. An explosion could result in injury or
vehicle damage.
Batteries contain sulfuric acid which can burn skin, eyes and
clothing, if contacted.
Do not attempt to push-start your vehicle. Automatic
transmissions do not have push-start capability; also, the
catalytic converter may become damaged.
Preparing your vehicle
When the battery is disconnected or a new battery is installed, the
transmission must relearn its shift strategy. As a result, the transmission
may have firm and/or soft shifts. This operation is considered normal and
will not affect function or durability of the transmission. Over time, the
adaptive learning process will fully update transmission operation.
1.Use only a 12–volt supply to start your vehicle.
2. Do not disconnect the battery of the disabled vehicle as this could
damage the vehicle’s electrical system.
3. Park the booster vehicle close to the hood of the disabled vehicle
making sure the two vehiclesdo nottouch. Set the parking brake on
both vehicles and stay clear of the engine cooling fan and other moving
parts.
4. Check all battery terminals and remove any excessive corrosion before
you attach the battery cables. Ensure that vent caps are tight and level.
5. Turn the heater fan on in both vehicles to protect any electrical
surges. Turn all other accessories off.
Roadside Emergencies
193
ProCarManuals.com
Page 271 of 280
FORD ACCESSORIES FOR YOUR VEHICLE
A wide selection of genuine Ford accessories are available for your
vehicle through your local authorized Ford, Lincoln, Mercury or Ford of
Canada dealer. These quality accessories have been specifically
engineered to fulfill your automotive needs; they are custom designed to
complement the style and aerodynamic appearance of your vehicle. In
addition, each accessory is made from high quality materials and meets
or exceeds Ford’s rigorous engineering and safety specifications. Ford
Motor Company will repair or replace any properly dealer-installed Ford
accessory found to be defective in factory-supplied materials or
workmanship during the warranty period, as well as any component
damaged by the defective accessory. The accessory will be warranted for
whichever provides you the greatest benefit:
•12 months or 20,000 km (12,000 miles) (whichever occurs first), or
•the remainder of your new vehicle limited warranty.
This means that genuine Ford accessories purchased along with your
new vehicle and installed by the dealer are covered for the full length of
your New Vehicle’s Limited Warranty—3 years or 60,000 km (36,000
miles) (whichever occurs first). Contact your dealer for details and a
copy of the warranty.
Not all accessories are available for all models.
Vehicle Security
Remote keyless entry
Styled wheel protector locks
Vehicle security systems
Comfort and convenience
Cargo organizers
Engine block heaters
Manual sliding rear window
Power sliding rear window
Tire step
Travel equipment
Auto headlamp system with Daytime Running Lights (DRL)
Bed Tent
Accessories
271
ProCarManuals.com