Page 43 of 280

“E”for Europe to assure lamp performance, light brightness and pattern
and safe visibility. The correct bulbs will not damage the lamp assembly
or void the lamp assembly warranty and will provide quality bulb burn
time.
Function Number of
bulbsTrade number
Headlamps (aerodynamic) 2 9007
Headlamps (sealed beam) 2 H6054
Park/turn 2 3157
Sidemarker 2 194
Tail/stop/turn/sidemarker 2 3157 K
Backup 2 3156K
High-mount stoplamp 1 921
Foglamp 2 899
License plate lamp 2 168
Cargo lamp 2 906
Roofmarker 5 194
Rear fender clearance* 4
(a)
Interior visor lamp (if equipped) 4 194
Rear identification 3 194
All replacement bulbs are clear in color except where noted.
To replace all instrument panel lights - see your dealer
(a)Replace entire lamp assembly; bulb is not serviceable.
* Dual rear wheels or if equipped.
Replacing headlamp bulbs (aerodynamic)
1. Make sure that the headlamp control is in the OFF position open the
hood.
2. Disconnect the electrical connector from the bulb by pulling rearward.
Lights
43
ProCarManuals.com
Page 44 of 280
3. Remove bulb retainer ring by
turning it counterclockwise, then
slide the ring off the plastic base
4. Pull bulb out of headlamp
assembly.
Handle a halogen headlamp bulb carefully and keep out of
children’s reach. Grasp the bulb only by its plastic base and do
not touch the glass. The oil from your hand could cause the bulb to
break the next time the headlamps are operated.
Install the new bulb(s) in reverse order.
Replacing headlamp bulbs (sealed beam)
1. Make sure headlamp switch is in OFF position and open the hood.
2. Remove the two screws and
parking lamp/side marker assembly
by pulling gently
3. Disconnect the electrical
connectors from the parking
lamp/side marker assembly and
remove.
4. Remove the four bolts and
headlamp bezel.
Lights
44
ProCarManuals.com
Page 45 of 280
5. Remove the four screws and the
headlamp retaining ring from
headlamp.
6. Disconnect the electrical
connector and remove headlamp.
Install the new bulb(s) in reverse order.
Replacing front parking/turn signal bulbs
1. Make sure headlamp switch is in OFF position and open the hood.
2. Remove the two screws and
carefully disengage parking
lamp/turn signal assembly from the
vehicle.
3. Rotate bulb socket
counterclockwise and remove from
lamp assembly.
4. Carefully pull bulb straight out of
the socket and push in the new
bulb.
Install the new bulb(s) in reverse order.
Lights
45
ProCarManuals.com
Page 46 of 280
Replacing tail lamp/turn/backup lamp bulbs — F250/F350 only
1. Make sure the headlamp switch is
in the OFF position and then open
the tailgate to expose the lamp
assemblies.
2. Remove the two bolts from the
tail lamp assembly and carefully pull
the lamp assembly from the tailgate
pillar by releasing the two retaining
tabs.
3. Rotate the bulb socket counterclockwise and remove from lamp
assembly.
4. Pull the bulb straight out of the socket.
Install the new bulb(s) in reverse order.
Replacing brake/tail/backup lamp bulbs — F450/F550 only
1. Make sure the headlamp switch is
in the OFF position.
2. Remove the four screws and the
lamp lens from lamp assembly.
3. Carefully pull the bulb straight
out of the socket and push in the
new bulb.
Lights
46
ProCarManuals.com
Page 47 of 280
Replacing cargo lamp and high-mount brakelamp bulbs
1. Make sure the headlamp switch is
in the OFF position.
2. Remove the two screws and lamp
assembly from vehicle as wiring
permits.
3. Remove the bulb socket by
rotating counterclockwise.
4. Pull the bulb straight out of the
socket.
Replacing roof marker bulbs
1. Make sure the headlamp switch is
in the OFF position.
2. Remove the screw and lens from
the lamp assembly.
3. Pull the bulb straight out of the
socket.
Replacing foglamp bulbs (if equipped)
1. Make sure the headlamp switch is
in the OFF position.
2. Remove the bulb socket from the
foglamp by turning
counterclockwise.
3. Disconnect the electrical connector from the foglamp bulb.
Install the new bulb(s) in reverse order.
Lights
47
ProCarManuals.com
Page 48 of 280
Replacing license plate lamp bulbs
The license plate bulbs are located
behind the rear bumper. To change
the license plate lamp bulbs:
1. Reach behind the rear bumper to
locate the bulb.
2. Twist the bulb socket
counterclockwise and carefully pull
to remove it from the lamp
assembly.
3. Pull out the old bulb from the
socket and push in the new bulb.
4. Install the bulb socket in lamp assembly by turning it clockwise.
Lights
48
ProCarManuals.com
Page 63 of 280

The compass heading is displayed in average fuel economy modes, fuel
range modes and temperature modes.
The compass reading may be affected when you drive near large
buildings, bridges, power lines and powerful broadcast antennas.
Magnetic or metallic objects placed in or on the vehicle may also affect
compass accuracy. Adjustments may need to be made to the zone and
calibration of the compass.
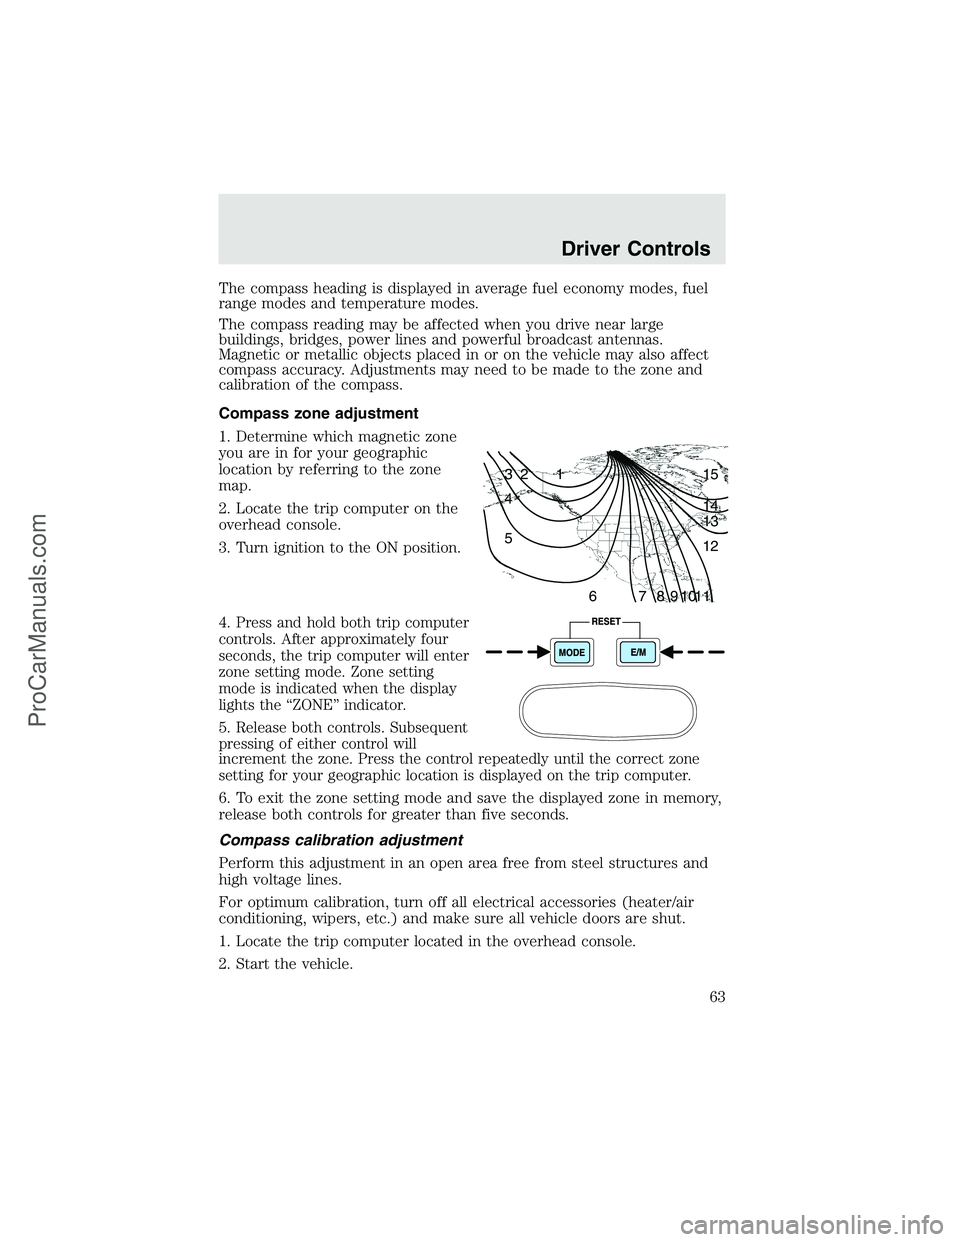
Compass zone adjustment
1. Determine which magnetic zone
you are in for your geographic
location by referring to the zone
map.
2. Locate the trip computer on the
overhead console.
3. Turn ignition to the ON position.
4.
Press and hold both trip computer
controls. After approximately four
seconds, the trip computer will enter
zone setting mode. Zone setting
mode is indicated when the display
lights the“ZONE”indicator.
5.Release both controls. Subsequent
pressing of either control will
increment the zone. Press the control repeatedly until the correct zone
setting for your geographic location is displayed on the trip computer.
6. To exit the zone setting mode and save the displayed zone in memory,
release both controls for greater than five seconds.
Compass calibration adjustment
Perform this adjustment in an open area free from steel structures and
high voltage lines.
For optimum calibration, turn off all electrical accessories (heater/air
conditioning, wipers, etc.) and make sure all vehicle doors are shut.
1. Locate the trip computer located in the overhead console.
2. Start the vehicle.
1 2 3
4
5
6 7 8 9 101112 13 14 15
Driver Controls
63
ProCarManuals.com
Page 64 of 280

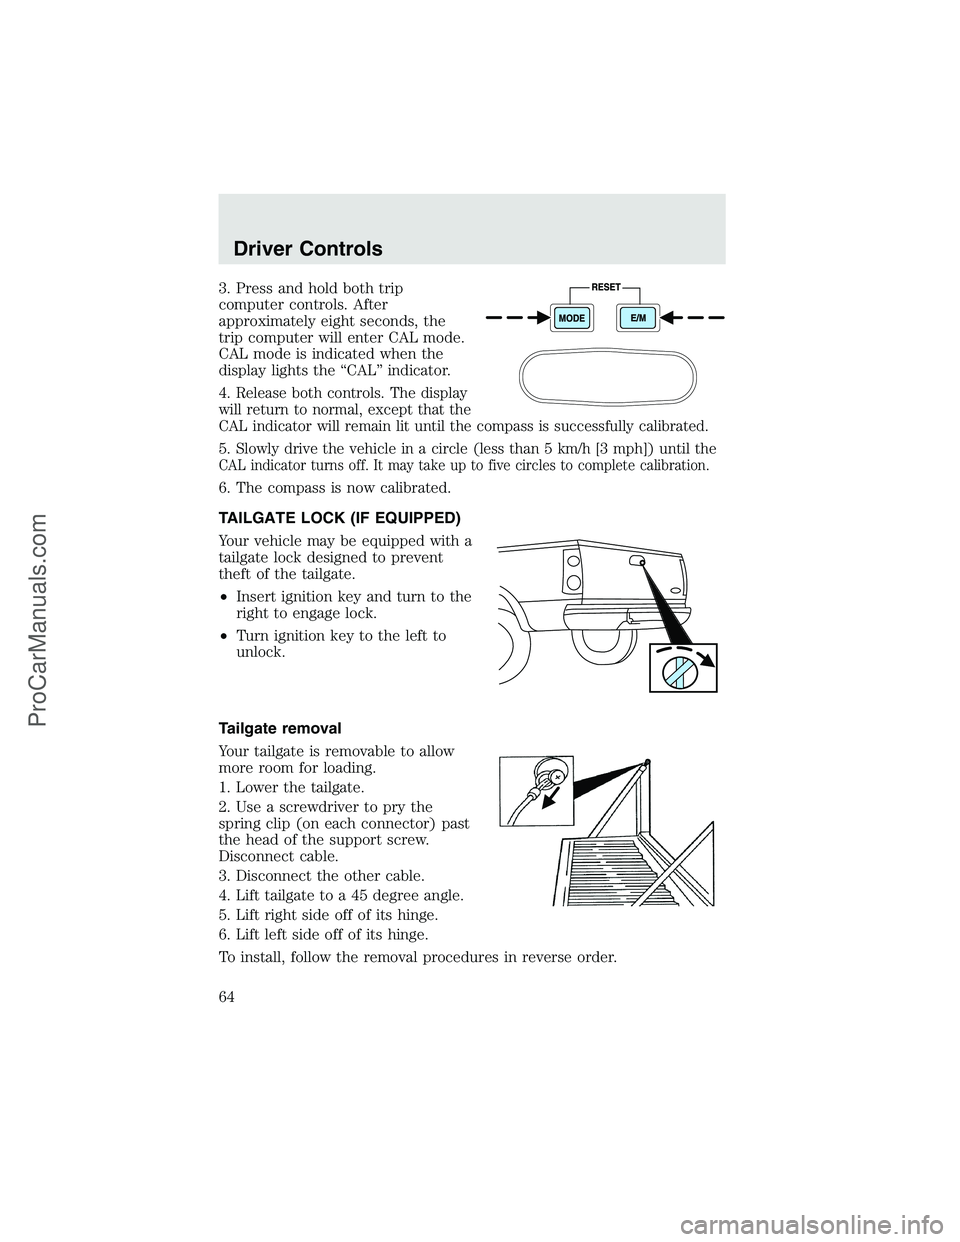
3. Press and hold both trip
computer controls. After
approximately eight seconds, the
trip computer will enter CAL mode.
CAL mode is indicated when the
display lights the“CAL”indicator.
4.
Release both controls. The display
will return to normal, except that the
CAL indicator will remain lit until the compass is successfully calibrated.
5.Slowly drive the vehicle in a circle (less than 5 km/h [3 mph]) until the
CAL indicator turns off. It may take up to five circles to complete calibration.
6. The compass is now calibrated.
TAILGATE LOCK (IF EQUIPPED)
Your vehicle may be equipped with a
tailgate lock designed to prevent
theft of the tailgate.
•Insert ignition key and turn to the
right to engage lock.
•Turn ignition key to the left to
unlock.
Tailgate removal
Your tailgate is removable to allow
more room for loading.
1. Lower the tailgate.
2. Use a screwdriver to pry the
spring clip (on each connector) past
the head of the support screw.
Disconnect cable.
3. Disconnect the other cable.
4. Lift tailgate to a 45 degree angle.
5. Lift right side off of its hinge.
6. Lift left side off of its hinge.
To install, follow the removal procedures in reverse order.
Driver Controls
64
ProCarManuals.com