Page 2 of 272
Driving 134
Starting 134
Brakes 137
Traction control/AdvanceTrac 139
Transmission operation 143
Trailer towing 169
Roadside Emergencies 176
Getting roadside assistance 176
Hazard flasher switch 177
Fuel pump shut-off switch 177
Fuses and relays 178
Changing tires 188
Jump starting 195
Wrecker towing 200
Customer Assistance 201
The dispute settlement board 203
Utilizing the mediation/arbitration 206
Getting assistance outside the U.S. and Canada 207
Ordering additional owner’s literature 208
Reporting safety defects (U.S. only) 209
Cleaning 210
Maintenance and Specifications 216
Engine compartment 219
Engine oil 221
Battery 227
Fuel information 235
Low tire warning system 252
Part numbers 254
Refill capacities 254
Lubricant specifications 257
Table of Contents
2
Page 6 of 272

SPECIAL NOTICES
Special instructions
For your added safety, your vehicle is fitted with sophisticated electronic
controls.
Please read the sectionAir bagin theSeating and safety
restraintschapter. Failure to follow the specific warnings and
instructions could result in personal injury.
Front seat mounted rear facing child or infant seats should
NEVERbe used in front of a passenger side air bag unless the
air bag can be and is turned OFF.
Data Recording
Computers in your vehicle are capable of recording detailed data
potentially including but not limited to information such as:
•the use of restraint systems including seat belts by the driver and
passengers,
•information about the performance of various systems and modules in
the vehicle, and
•information related to engine, throttle, steering, brake or other system
status.
Any of this information could potentially including information regarding
how the driver operates the vehicle potentially including but not limited
to information regarding vehicle speed, brake or accelerator application
or steering input. This information may be stored during regular
operation or in a crash or near crash event.
This stored information may be read out and used by:
•Ford Motor Company.
•service and repair facilities.
•law enforcement or government agencies.
•others who may assert a right or obtain your consent to know such
information.
Introduction
6
Page 8 of 272
These are some of the symbols you may see on your vehicle.
Vehicle Symbol Glossary
Safety Alert
See Owner’s Guide
Fasten Safety BeltAir Bag-Front
Air Bag-SideChild Seat
Child Seat Installation
WarningChild Seat Lower
Anchor
Child Seat Tether
AnchorBrake System
Anti-Lock Brake SystemBrake Fluid -
Non-Petroleum Based
Traction ControlAdvanceTrac
Master Lighting SwitchHazard Warning Flasher
Fog Lamps-FrontFuse Compartment
Fuel Pump ResetWindshield Wash/Wipe
Windshield
Defrost/DemistRear Window
Defrost/Demist
Introduction
8
Page 11 of 272

Check fuel cap (if equipped):
Illuminates when the fuel cap may
not be properly installed. Continued
driving with this light on may cause
the Service engine soon light to
come on.
Brake system warning light:To
confirm the brake system warning
light is functional, it will
momentarily illuminate when the
ignition is turned to the ON position when the engine is not running, or
in a position between ON and START, or by applying the parking brake
when the ignition is turned to the ON position. If the brake system
warning light does not illuminate at this time, seek service immediately
from your dealership. Illumination after releasing the parking brake
indicates low brake fluid level and the brake system should be inspected
immediately by your servicing dealership.
Driving a vehicle with the brake system warning light on is
dangerous. A significant decrease in braking performance may
occur. It will take you longer to stop the vehicle. Have the vehicle
checked by your dealer immediately.
Anti-lock brake system:If the
ABS light stays illuminated or
continues to flash, a malfunction has
been detected, have the system
serviced immediately. Normal
braking is still functional unless the brake warning light also is
illuminated.
Air bag readiness:If this light fails
to illuminate when ignition is turned
to ON, continues to flash or remains
on, have the system serviced
immediately. A chime will also
sound when a malfunction in the supplemental restraint system has been
detected.
CHECK
FUEL
CAP
ABS
Instrument Cluster
11
Page 33 of 272

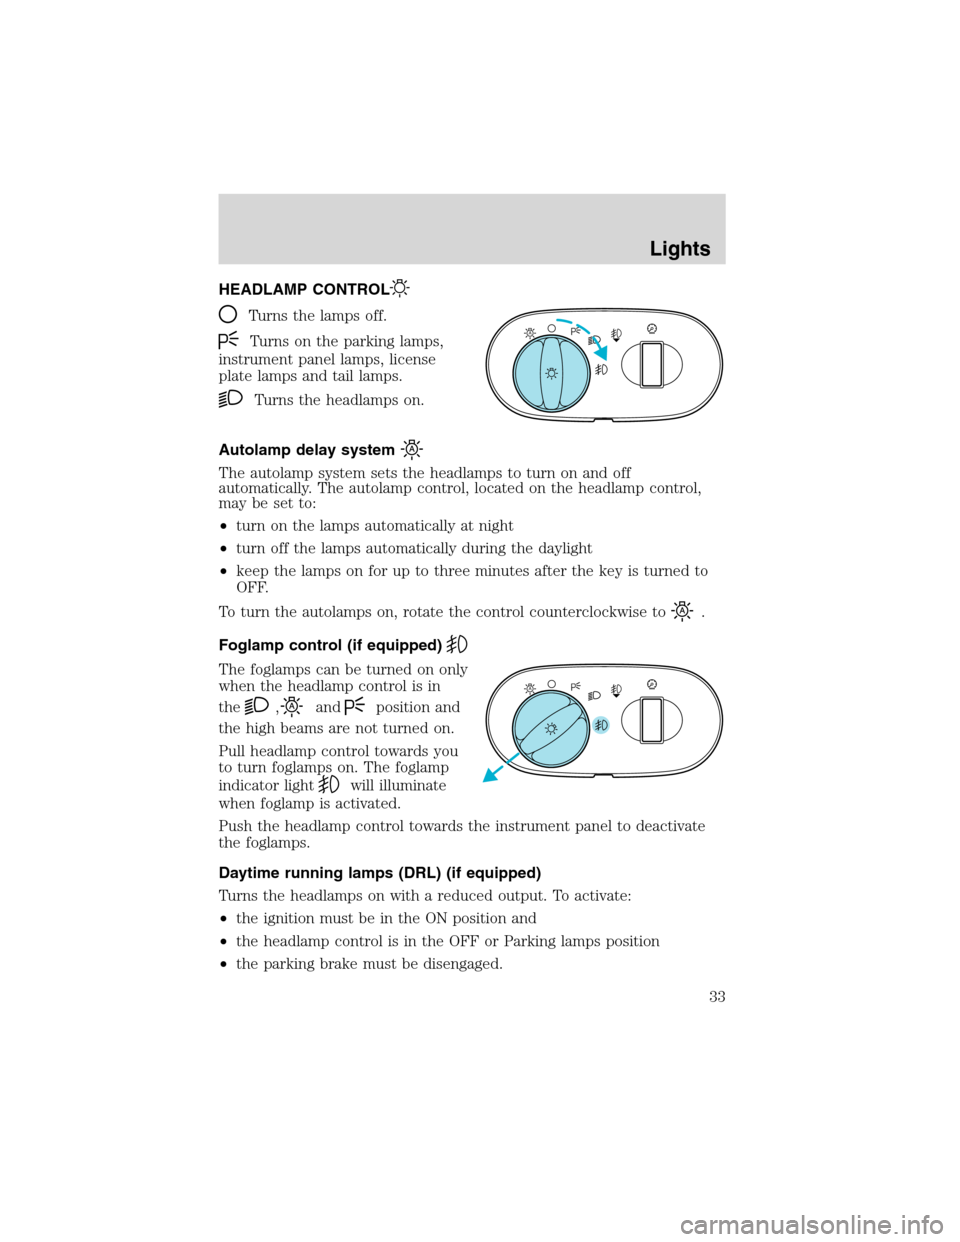
HEADLAMP CONTROL
Turns the lamps off.
Turns on the parking lamps,
instrument panel lamps, license
plate lamps and tail lamps.
Turns the headlamps on.
Autolamp delay system
The autolamp system sets the headlamps to turn on and off
automatically. The autolamp control, located on the headlamp control,
may be set to:
•turn on the lamps automatically at night
•turn off the lamps automatically during the daylight
•keep the lamps on for up to three minutes after the key is turned to
OFF.
To turn the autolamps on, rotate the control counterclockwise to
.
Foglamp control (if equipped)
The foglamps can be turned on only
when the headlamp control is in
the
,andposition and
the high beams are not turned on.
Pull headlamp control towards you
to turn foglamps on. The foglamp
indicator light
will illuminate
when foglamp is activated.
Push the headlamp control towards the instrument panel to deactivate
the foglamps.
Daytime running lamps (DRL) (if equipped)
Turns the headlamps on with a reduced output. To activate:
•the ignition must be in the ON position and
•the headlamp control is in the OFF or Parking lamps position
•the parking brake must be disengaged.
A
A
Lights
33
Page 40 of 272
Replacing front parking lamp/turn signal/sidemarker bulbs
1. Turn off the headlamp switch to
off.
2. Remove headlamp screw from the
bulb assembly.
3. Disengage lamp assembly.
4. Rotate the bulb socket
counterclockwise and remove it
from the lamp assembly.
5. Pull the bulb straight out.
Reverse steps to reinstall bulb(s).
Replacing tail/brake/turn/backup lamp bulbs
1. Turn the headlamp switch to OFF
and open the liftgate.
2. Remove the two screws from the
lamp assembly.
3. Remove the lamp assembly.
4. Rotate the bulb socket
counterclockwise and remove it
from the lamp assembly.
5. Pull the bulb straight out of the
socket.
Reverse steps to reinstall bulb(s).
Lights
40
Page 41 of 272
Replacing foglamp bulbs
1. Make sure the headlamp switch is
in the OFF position and then
remove the plastic splash shield, by
removing the two screws on the
front of the fenderwell.
2. Remove the bulb socket from the
foglamp by turning it
counterclockwise.
3. Disconnect the electrical connector.
Reverse steps to reinstall bulb(s).
Replacing license plate lamp bulbs
1. Make sure the headlamp switch is
in the OFF position and then
remove two screws and the license
plate lamp assembly.
2. Remove the bulb socket from the
lamp assembly by turning
counterclockwise and pull the bulb
straight out.
Reverse steps to reinstall bulb(s).
Replacing high-mount brakelamp bulb
1. Remove the two screws and lamp
assembly from vehicle.
2. Remove the bulb socket from the
lamp assembly by depressing the
snaps and pull the bulb straight out.
Reverse steps to reinstall bulb(s).
Lights
41
Page 50 of 272
POWER ADJUSTABLE FOOT PEDALS (IF EQUIPPED)
The accelerator and brake pedal
should only be adjusted when the
vehicle is stopped and the gearshift
lever is in the P(Park) position.
Press and hold the rocker control to
adjust accelerator and brake pedal
toward you or away from you.
The adjustment allows for approximately 76 mm (3 inches) of maximum
travel.
Never adjust the accelerator and brake pedal with feet on the
pedals while the vehicle is moving.
SPEED CONTROL (IF EQUIPPED)
With speed control set, you can maintain a speed of 48 km/h (30 mph)
or more without keeping your foot on the pedal. Speed control does not
work at speeds below 48 km/h (30 mph).
Do not use the speed control in heavy traffic or on roads that
are winding, slippery or unpaved.
Setting speed control
The controls for using your speed
control are located on the steering
wheel for your convenience.
1. Press the ON control and release
it.
2. Accelerate to the desired speed.
Driver Controls
50