Page 51 of 272
3. Press the SET + control and
release it.
4. Take your foot off the accelerator
pedal.
5. The indicator light
on the
instrument cluster will turn on.
Note:
•Vehicle speed may vary momentarily when driving up and down a
steep hill.
•If the vehicle speed increases above the set speed on a downhill, you
may want to apply the brakes to reduce the speed.
•If the vehicle speed decreases more than 16 km/h (10 mph) below
your set speed on an uphill, your speed control will disengage.
Resuming a set speed
Press the RES (resume) control and
release it. This will automatically
return the vehicle to the previously
set speed. The RES control will not
work if the vehicle speed is not
faster than 48 km/h (30 mph).
RES
SET
COAST+
RES
SET
COAST+
Driver Controls
51
Page 52 of 272

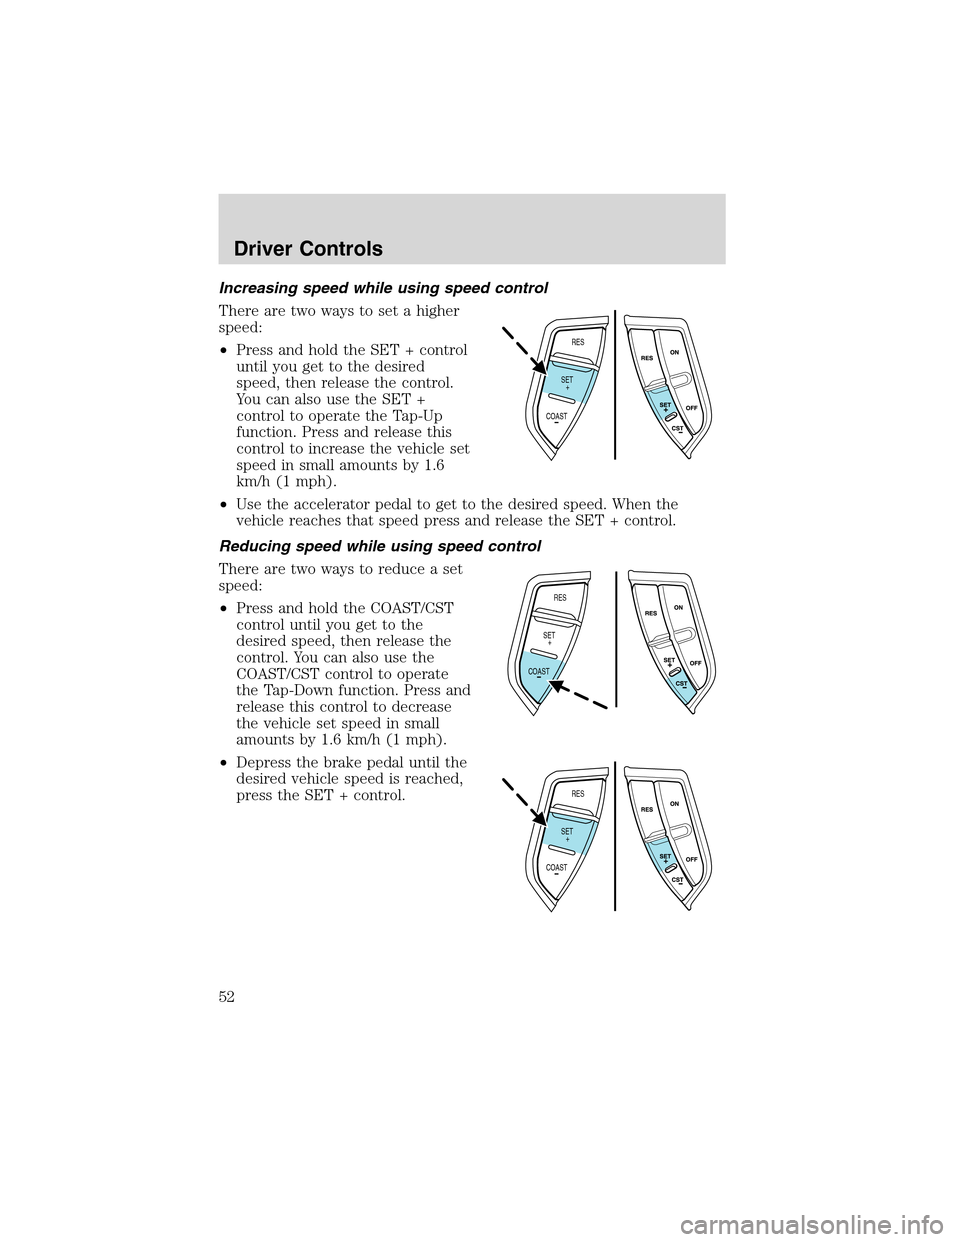
Increasing speed while using speed control
There are two ways to set a higher
speed:
•Press and hold the SET + control
until you get to the desired
speed, then release the control.
You can also use the SET +
control to operate the Tap-Up
function. Press and release this
control to increase the vehicle set
speed in small amounts by 1.6
km/h (1 mph).
•Use the accelerator pedal to get to the desired speed. When the
vehicle reaches that speed press and release the SET + control.
Reducing speed while using speed control
There are two ways to reduce a set
speed:
•Press and hold the COAST/CST
control until you get to the
desired speed, then release the
control. You can also use the
COAST/CST control to operate
the Tap-Down function. Press and
release this control to decrease
the vehicle set speed in small
amounts by 1.6 km/h (1 mph).
•Depress the brake pedal until the
desired vehicle speed is reached,
press the SET + control.
RES
SET
COAST+
RES
SET
COAST+
RES
SET
COAST+
Driver Controls
52
Page 53 of 272
Turning off speed control
There are two ways to turn off the speed control:
•Depress the brake pedal. This will not erase your vehicles previously
set speed.
•Press the speed control OFF
control.
Note:When you turn off the speed
control or the ignition, your speed
control set speed memory is erased.
STEERING WHEEL CONTROLS (IF EQUIPPED)
These controls allow you to operate some radio and climate control
features.
Audio control features
Press
to select:
•AM, FM1, FM2,
•TAPE (if equipped),
•CD (if equipped), or
•DVD (if equipped).
Driver Controls
53
Page 68 of 272

The sequence of the system check report and how it appears in the
message center is as follows:
1. FUEL LEVEL
2. WASHER FLUID LEVEL
3. OIL LIFE IN XX%
4. ENGINE TEMP
5. OIL PRESSURE6. TIRE PRESSURE SYSTEM (if
equipped)
7. BRAKE FLUID LEVEL
8. CHARGING SYSTEM
System warnings
System warnings alert you to possible problems or malfunctions in your
vehicle’s operating systems.
In the event of a multiple warning situation, the message center will
cycle the display to show all warnings by displaying each one for several
seconds.
The message center will display the last selected feature if there are no
more warning messages. This allows you to use the full functionality of
the message center after you acknowledge the warning by pressing the
RESET control and clearing the warning message.
Warning messages that have been reset are divided into three categories:
•They will reappear on the display every minute from the reset.
•They will reappear on the display ten minutes from the reset.
•They will not reappear until an ignition OFF-ON cycle has been
completed.
This acts as a reminder that these warning conditions still exist within
the vehicle.
Warning display Status
Warning-tire very low (if equipped)Warning returns every minute
Check engine temperature Warning returns after 10 minutes
Transmission overheated
Check transmission
Low fuel level
Check fuel cap
Check charging system
Low brake fluid level
Low oil pressure
Driver Controls
68
Page 70 of 272

when the engine is idling at a low speed, turn off as many of the
electrical loads as possible. If the warning stays on or comes on when the
engine is operating at normal speeds, have the electrical system checked
as soon as possible.
LOW BRAKE FLUID LEVEL.Indicates the brake fluid level is low and
the brake system should be inspected immediately. Refer toChecking
and adding brake fluidin theMaintenance and specifications
chapter.
LOW OIL PRESSURE.Displayed when the engine oil level is low. If
this warning message is displayed, check the level of the engine oil.
Refer toEngine oilin theMaintenance and specificationschapter for
information about adding engine oil.
WARNING-TIRE VERY LOW (if equipped).Displayed when one or
more tires have very low pressure. When this warning message is
displayed, a warning chime will sound reminding you to stop the vehicle
as soon as safely possible and check your tires for proper pressure, leaks
and damage. Refer toServicing your tiresin theMaintenance and
specificationschapter.
CHECK TIRE PRESSURE (if equipped).Displayed when any of the
tire pressures are low. Refer toChecking the tire pressurein the
Maintenance and specificationschapter.
CHECK SPARE TIRE PRESSURE (if equipped).Displayed when the
spare tire pressure is low. Refer toChecking the tire pressurein the
Maintenance and specificationschapter.
TIRE PRESSURE SYSTEM FAULT (if equipped).Displayed when
the Tire pressure monitoring system is malfunctioning. If the warning
stays on or continues to come on, have the system checked by your
dealer.
TIRE PRESSURE SENSOR FAULT (if equipped).Displayed when a
Tire pressure sensor is malfunctioning. If the warning stays on or
continues to come on, have the system checked by your dealer.
LOW WASHER FLUID LEVEL.Indicates the washer fluid reservoir is
less than one quarter full. Check the washer fluid level. Refer to
Windshield washer fluidin theMaintenance and specifications
chapter.
CHECK ADVANCETRAC�(if equipped).Displayed when the
AdvanceTrac�system is not operating properly. If this message is
displayed on the message center the AdvanceTrac�system will be
partially operable. If this warning stays on while the engine is running,
Driver Controls
70
Page 72 of 272
To reset the oil monitoring system to your personalized oil life %:
1. Press the SETUP control to
access the System Check function.
2. Press and release the RESET
control to display“OIL LIFE XX%
HOLD RESET NEW”.
3. Press and hold the RESET
control for 2 seconds to display“IF
NEW OIL HOLD RESET”.
4. Release the RESET control
momentarily, then press RESET and
SETUP controls at the same time to
activate a service mode which will
display OIL LIFE XX% RESET TO
ALTER.
5. Press RESET until you find your personalized OIL LIFE XX%.
6. With your personalized OIL LIFE XX% displayed, press SETUP to
continue the system check.
DATA ERR.These messages indicate improper operation of the vehicle
network communication between electronic modules.
•Fuel computer
•Oil life
•Charging system
•Door sensor•Washer fluid
•Brake fluid
•Compass
•Outside temperature
•Engine sensor
Contact your dealer as soon as possible if these messages occur on a
regular basis.
Driver Controls
72
Page 73 of 272

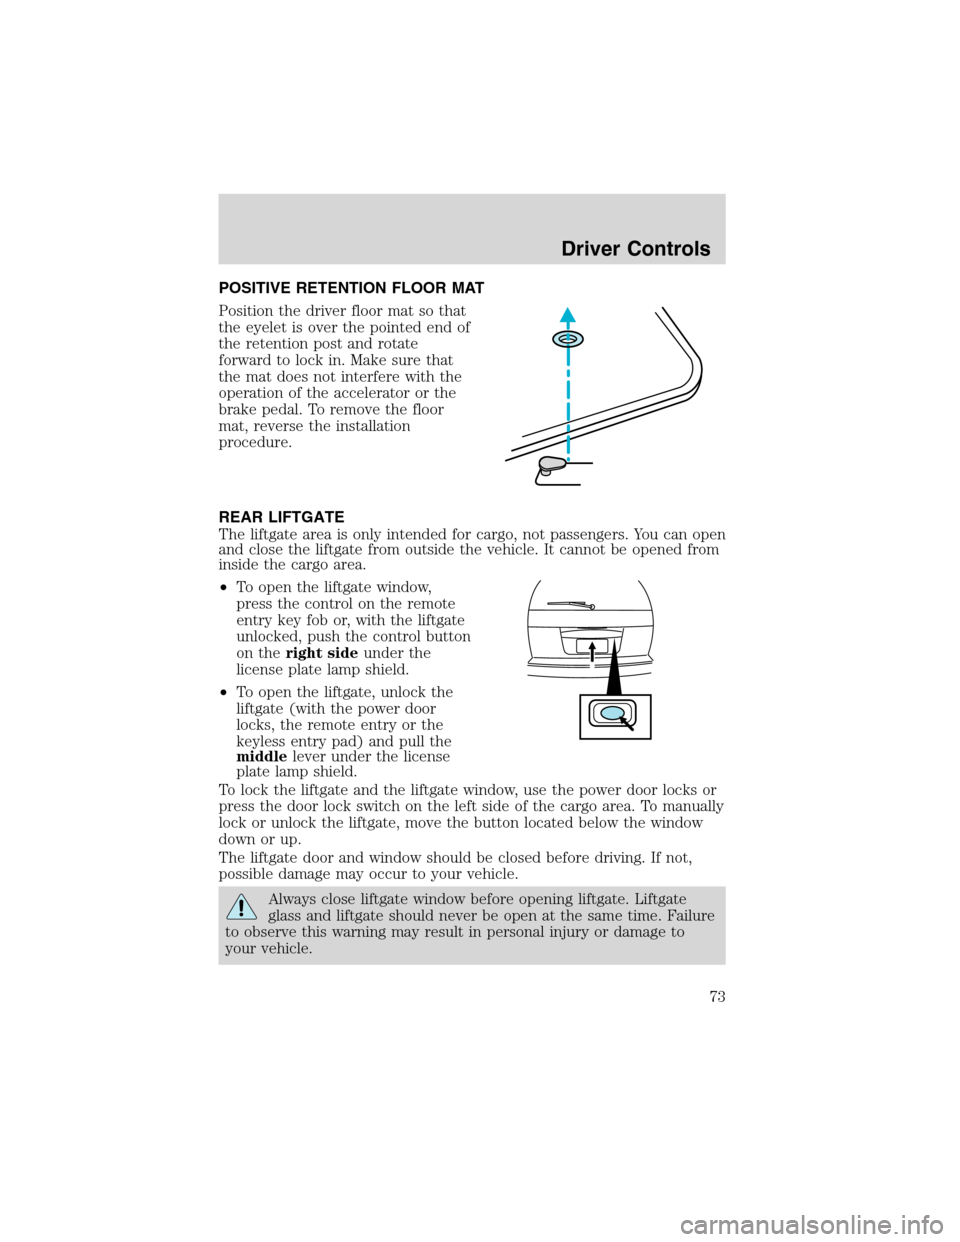
POSITIVE RETENTION FLOOR MAT
Position the driver floor mat so that
the eyelet is over the pointed end of
the retention post and rotate
forward to lock in. Make sure that
the mat does not interfere with the
operation of the accelerator or the
brake pedal. To remove the floor
mat, reverse the installation
procedure.
REAR LIFTGATE
The liftgate area is only intended for cargo, not passengers. You can open
and close the liftgate from outside the vehicle. It cannot be opened from
inside the cargo area.
•To open the liftgate window,
press the control on the remote
entry key fob or, with the liftgate
unlocked, push the control button
on theright sideunder the
license plate lamp shield.
•To open the liftgate, unlock the
liftgate (with the power door
locks, the remote entry or the
keyless entry pad) and pull the
middlelever under the license
plate lamp shield.
To lock the liftgate and the liftgate window, use the power door locks or
press the door lock switch on the left side of the cargo area. To manually
lock or unlock the liftgate, move the button located below the window
down or up.
The liftgate door and window should be closed before driving. If not,
possible damage may occur to your vehicle.
Always close liftgate window before opening liftgate. Liftgate
glass and liftgate should never be open at the same time. Failure
to observe this warning may result in personal injury or damage to
your vehicle.
Driver Controls
73
Page 84 of 272

2. Press and hold the 1•2 for two seconds. This must be done within
five seconds of completing step 1.
3. Press the 7•8 and the 9•0 at the same time. This must be done
within five seconds of completing step 2.
Your personal code is now erased and only the factory set 5–digit code
will work.
Anti-scan feature
If the wrong code has been entered 35 times, the keypad will go into an
anti-scan mode. This mode disables the keypad for one minute and the
keypad lamp will flash.
The anti-scan feature will turn off after:
•one minute of keypad inactivity.
•pressing the UNLOCK
control on the remote entry transmitter.
•the ignition is turned to the ON position.
•a key turned to the UNLOCK
position on the driver’s door (if the
vehicle is equipped with a perimeter anti-theft system).
Unlocking and locking the doors, liftgate and liftgate window using
keyless entry
To unlock the driver’s door,enter the factory set 5-digit code or your
personal code. Each number must be pressed within five seconds of each
other. The interior lamps will illuminate.
To unlock all doors and liftgate,press the 3•4 control within five
seconds.
To open the liftgate window,press the 5•6 control within five
seconds.
To lock all doors, liftgate and liftgate window,press the 7•8 and
the 9•0 at the same time.Note:The driver’s door must be closed. You
do notneed to enter the keypad code first.
Autolock
This feature will automatically lock all the doors when:
•all the doors are closed,
•the ignition key is in the ON position,
•the gearshift lever is shifted into R reverse or a forward gear and
•the brake pedal is released.
Locks and Security
84