Page 57 of 320

The audio system automatically switches to single channel reception if it
will improve the reception of a station normally received in stereo.
AUDIO SYSTEM WARRANTIES AND SERVICE
Refer to theWarranty Guidefor audio system warranty information.
If service is necessary, see your dealer or a qualified technician.
REAR SEAT ENTERTAINMENT DVD SYSTEM (IF EQUIPPED)
Your vehicle may be equipped with a Rear Seat Entertainment DVD
System which allows you to watch DVDs, play music CDs and to plug in
and play video game systems. Please review this material to become
familiar with the system features and safety information.
DVD player controls
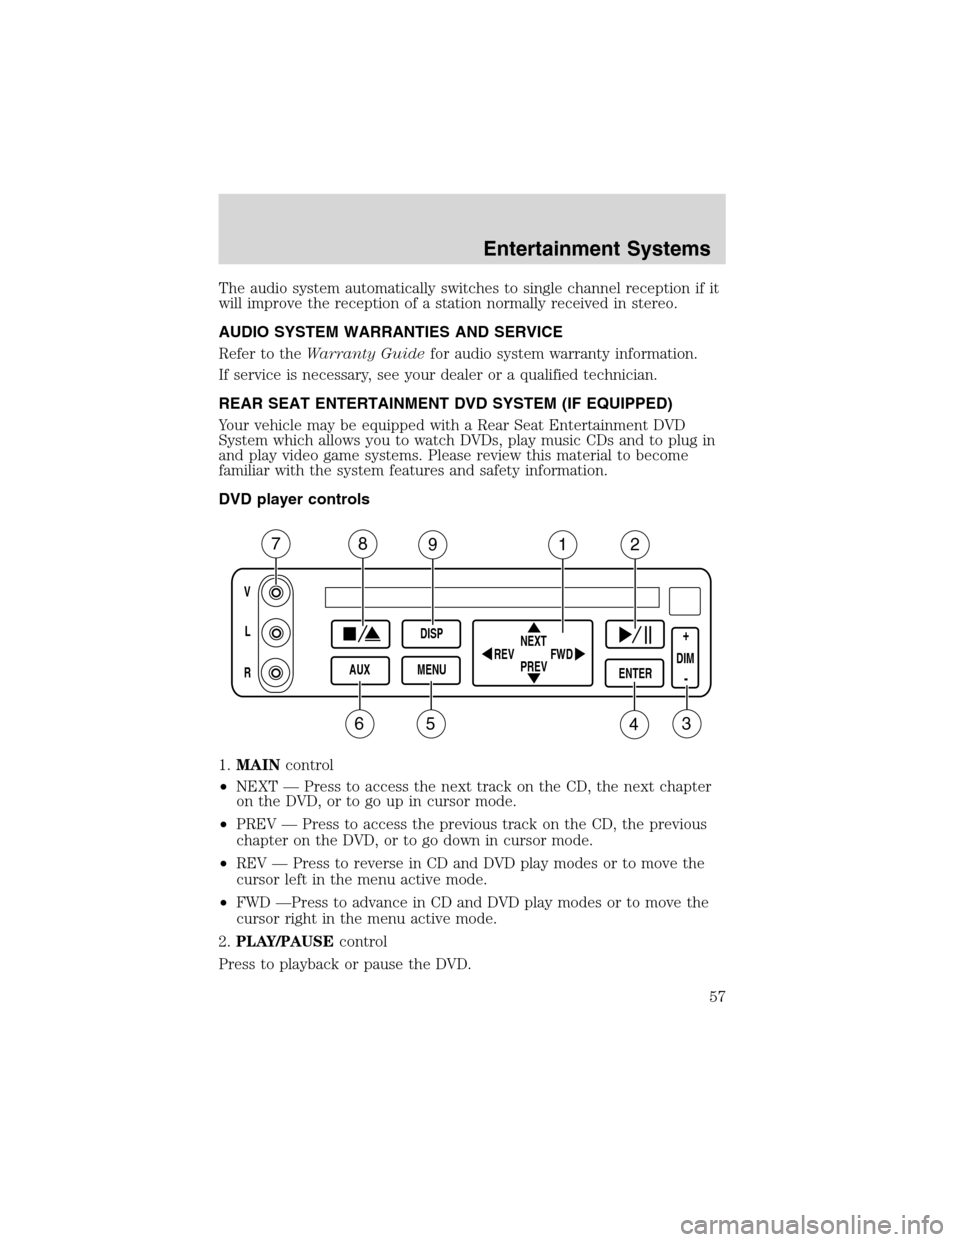
1.MAINcontrol
•NEXT—Press to access the next track on the CD, the next chapter
on the DVD, or to go up in cursor mode.
•PREV—Press to access the previous track on the CD, the previous
chapter on the DVD, or to go down in cursor mode.
•REV—Press to reverse in CD and DVD play modes or to move the
cursor left in the menu active mode.
•FWD—Press to advance in CD and DVD play modes or to move the
cursor right in the menu active mode.
2.PLAY/PAUSEcontrol
Press to playback or pause the DVD.
V
L
R
AUXDISP
MENUNEXT
PREV REV
FWDENTERDIM
+
-
78912
3456
Entertainment Systems
57
Page 58 of 320
3.DIMcontrol
Adjust to increase (+) or decrease (-) the amount of brightness on the
screen.
4.ENTERcontrol
Press to select the function pointed to within the active menu. May also
be used by some user interactive discs during movie play.
5.MENUcontrol
Press to bring up the disc menu.
6.AUXcontrol
Press to switch DVD player from play mode to auxiliary mode.
7.Auxiliary jacks
Insert lines for standard video game players.
8.STOP/EJECTcontrol
Press once to stop DVD play. Press again to eject the DVD.
9.DISPLAY (DISP)control
Press to enable on screen display of player menu and user display
adjustments.
DVD control features
Menu control
Press the MENU control to enter
into MENU mode. This allows you to
move and choose within the DVD
generated menu structure. Once in
MENU mode:
•Press the NEXT control to move
the cursor one position upward
NEXT
PREV REV
FWD
Entertainment Systems
58
Page 65 of 320

Inserting a CD/DVD
Inserting a CD/DVD into the DVD player automatically turns the power
ON and playback should begin.
The counter is automatically reset to 0:00:00.
Ensure that the overhead screen is down for viewing.
Removing a CD/DVD
1. Press the STOP/EJECT control to stop playback.
2. Press the STOP/EJECT control again to eject the CD/DVD.
If the CD/DVD is not removed within the allotted time, the system will
pull the CD/DVD back into the system for safety purposes. If the
CD/DVD will not eject from the system, press and hold the EJECT
control for approximately 2 seconds. The disc should eject whether the
vehicle ignition is ON or OFF.
Playing a video game/auxiliary device
1. Connect the video line from your video game device to the YELLOW
auxiliary input jack.
2. Connect the left and right audio lines to the WHITE and RED auxiliary
input jacks respectively.
3. Press the MODE control until DVD/CD AUX (no disc in player) or
DVD/CD play (disc in player) illuminates in the radio display. If a disc is
in the system, playback should begin. To enable the aux inputs, press the
STOP control or press the AUX control on the DVD player.
Entertainment Systems
65
Page 67 of 320

Do not expose the liquid crystal display (LCD) flip-down screen
to direct sunlight or intensive ultraviolet rays for extensive
periods of time. Ultraviolet rays deteriorate the liquid crystal.
Be sure to review User Manuals for video games and video game
equipment when used as auxiliary inputs for your Rear Seat
Entertainment DVD System.
Do not operate video games or video equipment if the power cords
and/or cables are broken, split or damaged. Carefully place cords and/or
cables where they will not be stepped on or interfere with the operation
of seats and/or compartments.
Disconnect video games and video equipment power cords and/or cables
when not in use.
Avoid touching auxiliary input jacks with your fingers. Do not blow on
them or allow them to get wet or dirty.
Do not clean any part of the DVD layer with benzene, paint thinner or
any other solvent.
Federal Communication Commission (FCC) Compliance
Changes or modifications not approved by Ford Motor Company could
void user’s authority to operate the equipment. This equipment has been
tested and found to comply with the limits for a Class B digital device,
pursuant to Part 15 of the FCC Rules. These limits are designed to
provide reasonable protection against harmful interference in a residential
installation. This equipment generates, uses and can radiate radio
frequency energy and, if not installed and used in accordance with the
instructions, may cause harmful interference and radio communications.
However, there is no guarantee that interference will not occur in a
particular installation. If this equipment does cause harmful interference
to radio or television reception, which can be determined by turning the
equipment off and on, the user is encouraged to consult the dealer or an
experienced radio/TV technician for help.
Care and service of the DVD player
Environmental extremes
DVD players that are subjected to harsh environmental conditions may
be damaged or perform at less than maximum capability. To avoid these
outcomes, whenever possible avoid exposing your DVD player to:
•extremely hot or cold temperatures.
•direct sunlight.
Entertainment Systems
67
Page 78 of 320

Operating tips
•To reduce fogging in humid weather conditions, unless in Defrost and
Floor & Defrost, press the A/C control before driving as the air
conditioning removes moisture form the air.
•To reduce humidity buildup inside the vehicle in warm weather
conditions, don’t drive with the climate control system in the OFF
position.
•To reduce humidity buildup inside the vehicle in cold weather
conditions, don’t drive with the climate control system in the
recirculation mode or OFF mode.
•Remove any snow, ice or leaves from the exterior base of the
windshield.
•To increase the efficiency of the A/C, drive with the windows slightly
open for 2–3 minutes after start up or until the vehicle has been
“aired out.”
•Do not place objects under the front seat or over the defroster ducts.
They may reduce visibility, fall into the ducts, or degrade the
performance of your climate control system.
Do not place objects on top of the instrument panel, as these
objects may become projectiles in a collision or sudden stop.
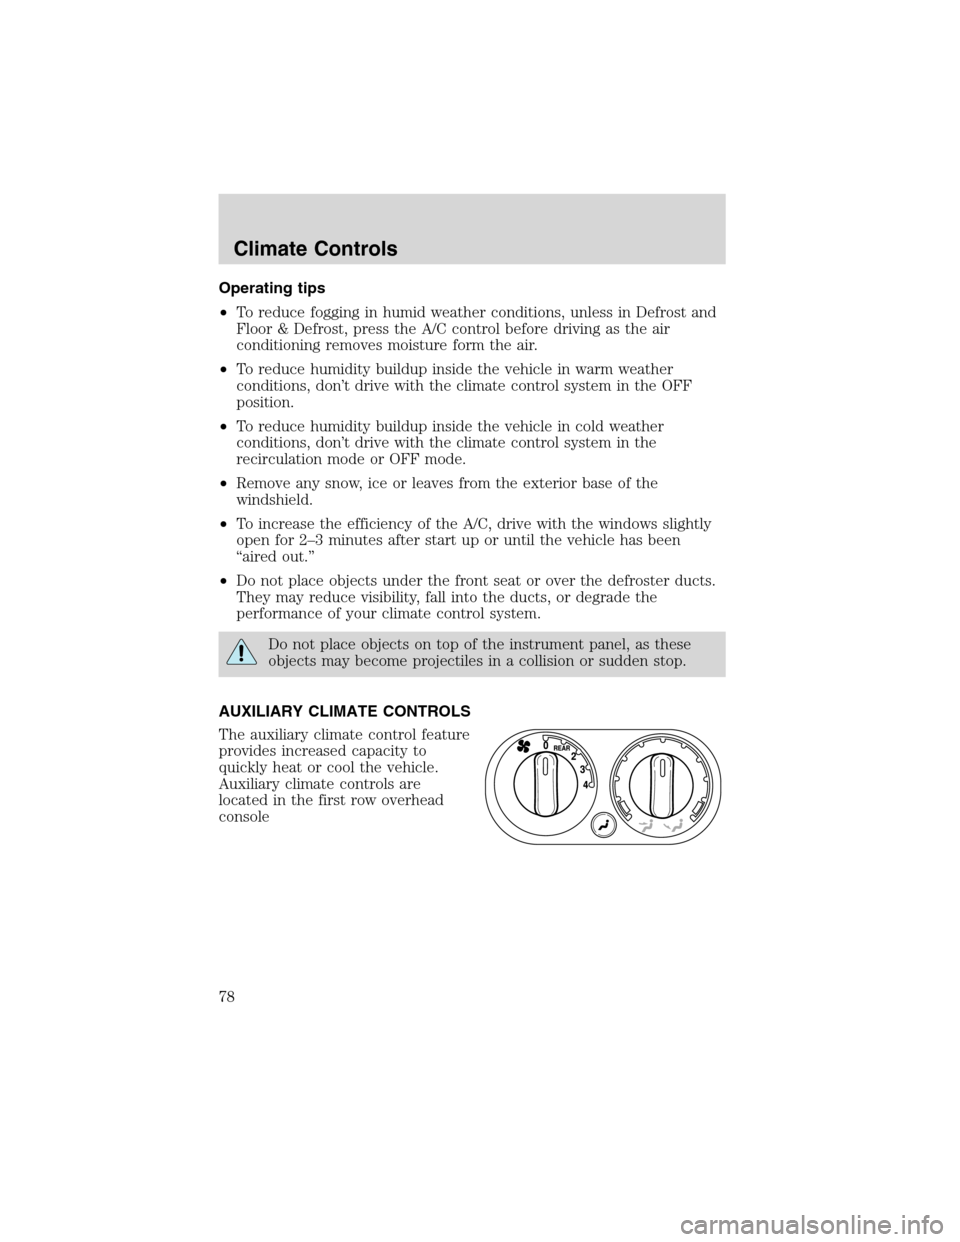
AUXILIARY CLIMATE CONTROLS
The auxiliary climate control feature
provides increased capacity to
quickly heat or cool the vehicle.
Auxiliary climate controls are
located in the first row overhead
console
Climate Controls
78
Page 79 of 320
and in the floor console on the back
of the front row console.
The auxiliary climate control system is dependent on the main climate
control system. If the main climate control system is in the Off position,
the auxiliary climate control will not operate. If the main climate control
system is on, the auxiliary air will not be cooled unless the air
conditioning is functioning on the main climate control system.
The auxiliary unit can be controlled either by the front seat using
the front auxiliary control or by the rear seat passenger(s) using
the rear auxiliary control but not both. To control the auxiliary
unit using the rear control, the front control must be in the
REAR position.
FAN SPEED CONTROL
Controls the fan speed in the rear of
the vehicle.
TEMPERATURE CONTROL
Controls the temperature of the
airflow in the rear of the vehicle.
4 3 2 1 0
Climate Controls
79
Page 80 of 320
MODE SELECTOR
Press the mode selector once to
select air distribution through the
overhead vents. The Panel icon will
illuminate on the temperature
control selector. Press the mode selector again to select air distribution
through the floor vents. The Floor icon will illuminate on the
temperature control selector. Only the auxiliary control head (front or
rear) that is active will have the icons illuminated.
REAR WINDOW DEFROSTER
Used to manually enable or disable
rear window defrost in all modes.
After approximately 10 minutes of
rear defrost operation, the climate
control system will automatically
disable the rear defrost operation. If
desired, the rear defrost can be
manually disabled through the use
of the rear defrost button. When
operating, the rear defrost indicator will be lit. The rear window
defroster switch also activates the standard exterior mirror defrost
feature.
R
Climate Controls
80
Page 97 of 320
Power quarter rear windows (if equipped)
•Without a moon roof
•With a moon roof
Press the
portion of the VENT control to open the power rear
quarter windows.
Press the
portion of the VENT control to close the power rear
quarter windows.
AUXILIARY POWER POINT
Power outlets are designed for
accessory plugs only. Do not
hang any type of accessory or
accessory bracket from the plug.
Improper use of the power
outlet can cause damage not
covered by your warranty.
An auxiliary power point is located
on the passenger’s side of the center
console (if equipped) or on the
instrument panel on the ash tray
door on vehicles without a center console.
Do not plug optional electrical accessories into the cigarette
lighter. Use the power point.
Driver Controls
97