Page 35 of 240
•Push and hold bottom of control
to dim.
AIMING THE HEADLAMPS
The headlamps on your vehicle are properly aimed at the assembly plant.
If your vehicle has been in an accident the alignment of your headlamps
should be checked by a qualified service technician.
Vertical aim adjustment
1. Park the vehicle on a level surface approximately 7.6 meters (25 feet)
from a vertical wall or screen directly in front of it.
•(1) Eight feet
•(2) Center height of lamp to ground
•(3) Twenty five feet
•(4) Horizontal reference line
2. Measure the height from the center of your headlamp to the ground
and mark a 2.4 meter (8 foot) horizontal reference line on the vertical
wall or screen at this height (a piece of masking tape works well). The
center of the lamp is marked by a 3.0 mm circle on the headlamp lens.
3. Turn on the low beam headlamps to illuminate the wall or screen and
open the hood. Cover the left-hand headlamp with an opaque cloth.
Lights
35
Page 36 of 240

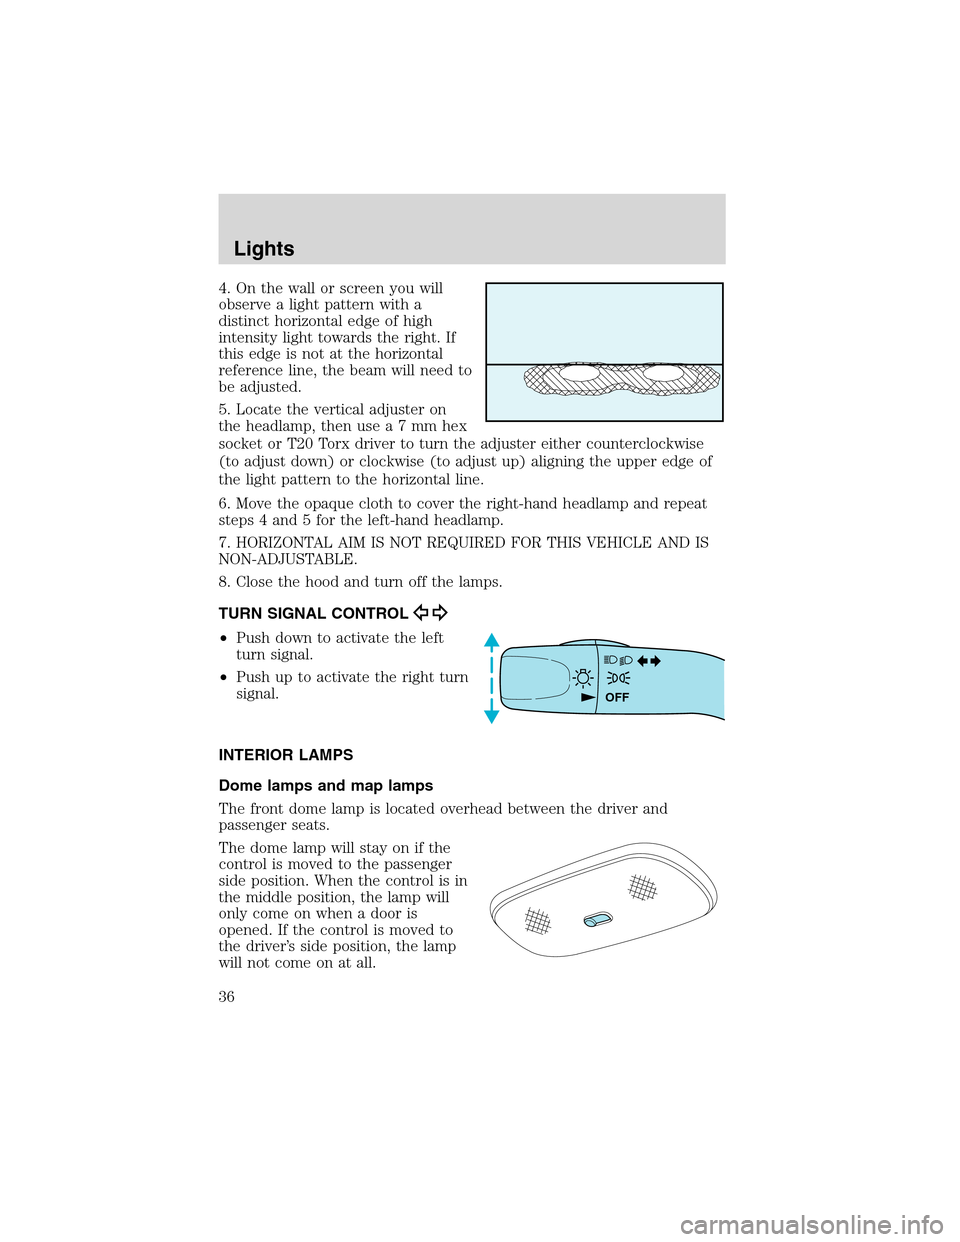
4. On the wall or screen you will
observe a light pattern with a
distinct horizontal edge of high
intensity light towards the right. If
this edge is not at the horizontal
reference line, the beam will need to
be adjusted.
5. Locate the vertical adjuster on
the headlamp, then usea7mmhex
socket or T20 Torx driver to turn the adjuster either counterclockwise
(to adjust down) or clockwise (to adjust up) aligning the upper edge of
the light pattern to the horizontal line.
6. Move the opaque cloth to cover the right-hand headlamp and repeat
steps 4 and 5 for the left-hand headlamp.
7. HORIZONTAL AIM IS NOT REQUIRED FOR THIS VEHICLE AND IS
NON-ADJUSTABLE.
8. Close the hood and turn off the lamps.
TURN SIGNAL CONTROL
•Push down to activate the left
turn signal.
•Push up to activate the right turn
signal.
INTERIOR LAMPS
Dome lamps and map lamps
The front dome lamp is located overhead between the driver and
passenger seats.
The dome lamp will stay on if the
control is moved to the passenger
side position. When the control is in
the middle position, the lamp will
only come on when a door is
opened. If the control is moved to
the driver’s side position, the lamp
will not come on at all.
OFF
Lights
36
Page 39 of 240
Replacing headlamp bulbs
1. Make sure that the headlamp control is in the OFF position.
2. Open the hood.
3. Press two tabs and disconnect the
electrical connector from the bulb.
4. Remove the rubber boot from the
lamp assembly by pulling on one of
the tabs.
5. Press the retainer spring forward
and spread the spring releasing it
from bulb hooks and rotate it away
from the bulb.
Lights
39
Page 64 of 240

Locking the doors
1. Turn the key in the door cylinder to lock all the doors. The park lamps
will flash once and the perimeter alarm (if equipped) will be start the
arming process. For more information concerning the perimeter alarm,
refer toPerimeter alarm system (if equipped)later in this chapter.
2. Turn the key in the door cylinder again within three seconds to
confirm that all the doors are closed and locked.Note:the doors will
lock again, the horn will chirp once, and the park lamps will flash.
If any of the doors or the hood are not properly closed the horn will not
sound and the park lamps will not flash.
Smart unlocking feature
The smart unlocking feature prevents you from locking yourself out of
the vehicle by unlocking the doors if the key is in the ignition and the
driver’s door is open/ajar when the vehicle doors were locked using the
power lock/unlock control.
The smart unlocking feature operates independent of the position of the
ignition.
Locks and Security
64
Page 73 of 240

NOTE:The hood, each door and the liftgate arm individually, and if any
of them are open, they must be closed in order to be armed.
When you lock the vehicle using any of the three methods above:
•the park lamps will flash once to indicate the hood, each door and the
liftgate are closed.
•the park lamps willnotflash if the hood, any door or the liftgate are
open. Once all doors, hood and liftgate are closed, the park lamps will
flash to confirm the alarm has been set.
When you press the
control the remote entry transmitter twice within
three seconds, the horn will chirp once to confirm the doors, hood and
liftgate are closed and locked and the alarm is set.
Disarming the system
When you disarm the system, the park lamps will flash twice to indicate
the system has been disarmed.
You can disarm the system by any of the following actions:
•Unlock the doors by pressing the
control on your remote entry
transmitter.
•Unlock the doors with a key. Turn the key full travel (toward the front
of the vehicle) to ensure the alarm disarms.
Triggering the anti-theft system
The armed system will be triggered if any door, liftgate or the hood is
opened without using the key or the remote entry transmitter.
Locks and Security
73
Page 184 of 240
•Manual transmission:
1. Set the parking brake, depress the clutch and place the gearshift in N
(Neutral).
2. Block the wheels.
Note:Do not start your engine with the air cleaner removed and do not
remove it while the engine is running.
OPENING THE HOOD
1. Inside the vehicle, pull the hood
release handle located under the
bottom of the instrument panel.
2. At the front of the vehicle, lift up on the auxiliary latch handle located
in the center between the hood and the grille.
3. Lift the hood open and secure it with the prop rod.
Maintenance and Specifications
184
Page 188 of 240
ENGINE OIL
Checking the engine oil
Refer to the scheduled maintenance guide for the appropriate intervals
for checking the engine oil.
1. Make sure the vehicle is on level ground.
2. Turn the engine off and wait a few minutes for the oil to drain into the
oil pan.
3. Set the parking brake and ensure the gearshift is securely latched in P
(Park) (automatic transmissions) or 1 (First) (manual transmissions).
4. Open the hood. Protect yourself from engine heat.
5. Locate and carefully remove the engine oil level indicator (dipstick).
•2.0L DOHC I4 Zetec engine
FULL ADD
Maintenance and Specifications
188
Page 233 of 240

Exhaust fumes ..........................117
F
Fluid capacities .........................218
Foglamps .....................................33
Four-Wheel Drive vehicles
driving off road .......................129
indicator light .........................128
preparing to drive your
vehicle .....................................119
Fuel ............................................199
calculating fuel economy .......203
cap ...........................................201
capacity ...................................218
choosing the right fuel ...........201
comparisons with EPA fuel
economy estimates .................206
detergent in fuel .....................203
filling your vehicle with
fuel ...........................199, 201, 203
filter, specifications ........203, 218
fuel pump shut-off switch .....146
improving fuel economy ........203
octane rating ...................202, 223
quality ......................................202
running out of fuel .................203
safety information relating to
automotive fuels .....................199
Fuses ..................................147–148
G
Garage door opener ....................46
Gas cap (see Fuel cap) ............201
Gas mileage (see Fuel
economy) ...................................203
Gauges .........................................13
GAWR (Gross Axle Weight
Rating) .......................................139calculating ...............................141
definition .................................139
driving with a heavy load ......139
location ....................................139
GVWR (Gross Vehicle Weight
Rating) .......................................139
calculating .......................139, 141
definition .................................139
driving with a heavy load ......139
location ....................................139
H
Hazard flashers .........................146
Head restraints .....................75, 77
Headlamps ...................................33
aiming ........................................35
autolamp system .................33, 46
bulb specifications ....................38
daytime running lights .............33
flash to pass ..............................34
high beam .................................34
replacing bulbs .........................39
turning on and off ....................33
Heating
heater only system ...................30
Hood ..........................................184
I
Ignition ...............................114, 223
Infant seats
(see Safety seats) .....................105
Inspection/maintenance (I/M)
testing ........................................207
Instrument panel
cleaning ...................................180
cluster ........................................10
lighting up panel and
interior .......................................34
Index
233