Page 101 of 156
100
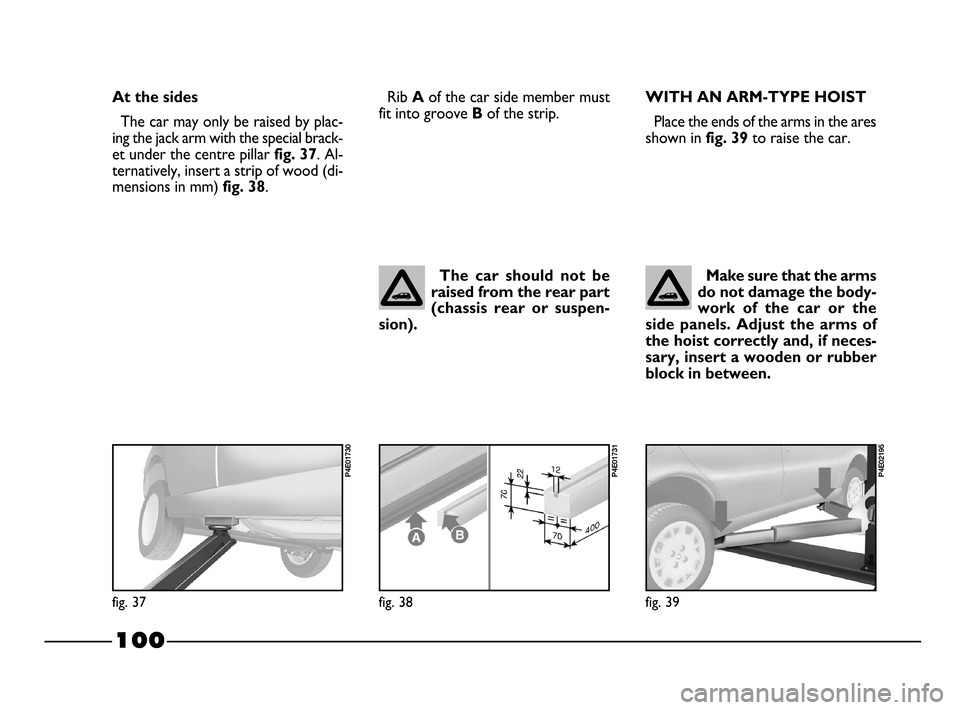
WITH AN ARM-TYPE HOIST
Place the ends of the arms in the ares
shown in
fig. 39to raise the car.
Make sure that the arms
do not damage the body-
work of the car or the
side panels. Adjust the arms of
the hoist correctly and, if neces-
sary, insert a wooden or rubber
block in between.
fig. 39
P4E02195
fig. 38
P4E01731
Rib Aof the car side member must
fit into groove
B of the strip.
The car should not be
raised from the rear part
(chassis rear or suspen-
sion).
fig. 37
P4E01730
At the sides
The car may only be raised by plac-
ing the jack arm with the special brack-
et under the centre pillar
fig. 37. Al-
ternatively, insert a strip of wood (di-
mensions in mm)
fig. 38.
80-103 03/03/2003 06:49 PM Page 100
Page 102 of 156

101
Do not tow the car by
using flexible elements
(metallic cables, ropes or
strings); only the use of a rigid
bar, with the ends supplied with
adequate joints, is allowed. Make
sure to fix the joint to the car in
order not to damage the near el-
ements.
Before starting to tow, turn the
ignition key to MAR and then to
STOP. Do not remove the key. If
the key is removed, the steering
lock engages automatically which
prevents the wheels being turned.
While the car is being towed
with the engine off, remember
that the brake pedal and steering
will require more effort as you no
longer have the benefit of the
brake booster and the power
steering.
The towing vehicle must be dri-
ven as evenly and softly as possi-
ble to prevent counterblows.IF THE CAR
NEEDS TO BE
TOWED
The tow hitch is supplied as standard
with the car. It is in the tool kit at-
tached to the spare wheel.
To fasten the tow hitch:
1)Take the tow ring.
2) Remove the cover from the rear
bumper
fig. 40or from the front
bumper
fig. 41by lever with a screw-
driver in the point shown by the ar-
row.
fig. 40
P4E02196
fig. 41
P4E02197
When towing the car,
you must comply with the
specific traffic regulations
regarding the tow hitch and how
to tow on the road.
3)Fasten the ring on the threaded
pin, rear
fig. 40or front fig. 41.
80-103 03/03/2003 06:49 PM Page 101
Page 104 of 156
103
fig. 42
P4E01906
FIRST-AID KIT
The first-aid kit must at least containfig. 42:
– sterile gauze for covering and
cleansing wounds;
– bandages of different widths; elas-
tic in nature
– antiseptic plasters of different sizes;
(water proof in nature)
– a reel of plaster; elastic in nature
– a packet of cotton wool;
– a bottle of disinfectant;
– a packet of paper handkerchiefs;
– a pair of scissor with rounded tips;
– a pair of tweezers;
– two haemostatic loops.
– a tube of antiseptic cream contain-
ing 0.5% centrimide B.P. in a non
greasy base.It is a good idea to keep a fire extin-
guisher and blanket in the car in addi-
tion to the first-aid kit.
The first-aid kits are also available in
the Lineaccessori Fiat.
80-103 03/03/2003 06:49 PM Page 103
Page 111 of 156
The jack, with which the
car is equipped, is pre-
scribed only when the
wheel must be replaced. For ex-
igencies different from this latter,
the lifting of the car must re-
spect particular modalities.
Therefore, we recommend you
to perform the operation at Fiat
Dealership.
110fig. 1 - Versions 1.2
P4E02275CHECKING
FLUID LEVELS
1.Engine oil - 2.Battery -3. Brake-
clutch fluid -
4.Windscreen/rear mir-
ror washer fluid -
5. Engine coolant -
6.Power steering fluid.
Pay attention, during
refilling operations, not to
confuse the different
types of fluids: they are all in-
compatible and the car could be
seriously damaged if there is
wrong usage.
Pay attention to scarves,
ties and clothes which are
not tight: they could get
entangled in the moving parts.Never smoke during the
interventions in the en-
gine compartment: flam-
mable gas and vapours could be
present, with the risk of a fire.
104-127 03/03/2003 06:53 PM Page 110
Page 112 of 156
111
fig. 3 - 1.9 D versions
P4E02674
1.Engine oil- 2.Battery -3.Brake-
clutch fluid -
4.Windscreen/rear mir-
ror washer fluid -
5. Engine coolant -
6.Power steering fluid.
fig. 2 - Versions 1.6
P4E02276
1.Engine oil- 2.Battery -3.Brake-
clutch fluid -
4.Windscreen/rear mir-
ror washer fluid -
5. Engine coolant -
6.Power steering fluid
104-127 03/03/2003 06:53 PM Page 111
Page 113 of 156

112
ENGINE OIL
Fig. 4
: versions 1.2
Fig. 5: versions 1.6
Fig. 6: versions 1.9 D
Check the oil level with the car
parked on level ground and with the
engine still hot (about 10 minutes af-
ter having stopped the engine).
The oil level must be between the
MINIMUMand MAXIMUMmarks
on the control dipstick. The space be-
tween
MINand MAXcorresponds
to roughly one litre of oil.
IMPORTANT Check the level and
replace the engine oil respecting the
frequency indicated in the “Scheduled
Servicing Plan” and “Additional Inter-
vention”.
If the oil level is close to or even be-
low the
MIN mark, add oil through
the filler hole until the level reaches
the
MAXmark. The oil level must
never exceed the
MAX line.
IMPORTANTAfter adding or
changing the oil, let the engine run for
a few seconds then wait a few minutes
after you have turned it off before
checking the level.
IMPORTANT If the level of the en-
gine oil, when checked, is found to be
over the
MAXmark, go to a Fiat
Dealership
to have it put right.
ENGINE OIL CONSUMPTION
When the car is new, the engine
needs to run in, therefore the engine
oil consumption can only be consid-
ered stabilised after the first 5000 -
6000 km.
IMPORTANTOil consumption
depends on the driving style and the
conditions of use.
fig. 5
P4E01435
fig. 4
P4E01477
fig. 6 - 1.9 D versions
P4E02327
104-127 03/03/2003 06:53 PM Page 112
Page 114 of 156

113
ENGINE COOLANT TANK
Fig. 7
: Petrol versions
Fig. 8: Diesel versionsIf the level is low, pour a 70:30 mix-
ture of distilled water and
PARAFLU11produced by the FL
Group
slowly through the filler hole.
fig. 7 - petrol versions
P4E02290
Do not take the cap of
the reservoir off when the
engine is very hot as you
run the risk of scalding yourself.
The coolant level must be checked
while the engine is cold and must be
above the
MIN mark visible on the
reservoir.
Do not add oil with dif-
ferent specifications from
the oil already in the en-
gine.
Used engine oil an re-
placed oil filters contain
substances which can
harm the environment. We rec-
ommend you have the car seen
to at a Fiat Dealership for the oil
and filter change. It is suitably
equipped for disposing of used oil
and filters in an environmentally
-friendly way that complies with
the law.
When the engine is hot
be very careful under the
bonnet: you risk burning
yourself. Remember that when
the engine is hot, the fan may cut
in and cause injuries.
The cooling system is
under pressure. When
changing the cap, use on-
ly genuine spare parts to avoid
damaging the system.
fig. 8 - diesel versions
P4E02675
104-127 03/03/2003 06:53 PM Page 113
Page 115 of 156

114
WINDSCREEN/
REAR WINDOW WASHER
FLUID fig. 9
To add fluid, remove the cap and
pour a mixture of water and 10% of
DPI fluid.
IMPORTANT Do not travel with
the window washer reservoir empty:
the use of the windscreen washer is
fundamental for improving visibility.
fig. 9
P4E01438
fig. 10
P4E01439
Some windscreen wash-
er additives are inflam-
mable. The fluid could ig-
nite if it comes into contact with
parts in the engine compart-
ment.
A dipstick fig. 10 indicates the
amount of fluid in the washer reser-
voir.
When the fluid is fin-
ished, do not operate the
windscreen washer in or-
der to avoid damaging the pump
motor.
fig. 11
P4E02073
POWER STEERING FLUID
Fig. 11:
1.2 version
Fig. 12: 1.6 16v - 1.9 D version
Check that the level is between the
MINand MAXmarks on the reser-
voir or in correspondence of the up-
per mark (max level) on the dipstick
integral with the reservoir plug, with
the car parked on flat ground and the
engine cold.
When the fluid is hot the level may
rise over the
MAX mark.
If necessary, top up ensuring that the
fluid has the same specifications as that
in the reservoir.
104-127 03/03/2003 06:53 PM Page 114