2003 DODGE RAM lock
[x] Cancel search: lockPage 196 of 2895
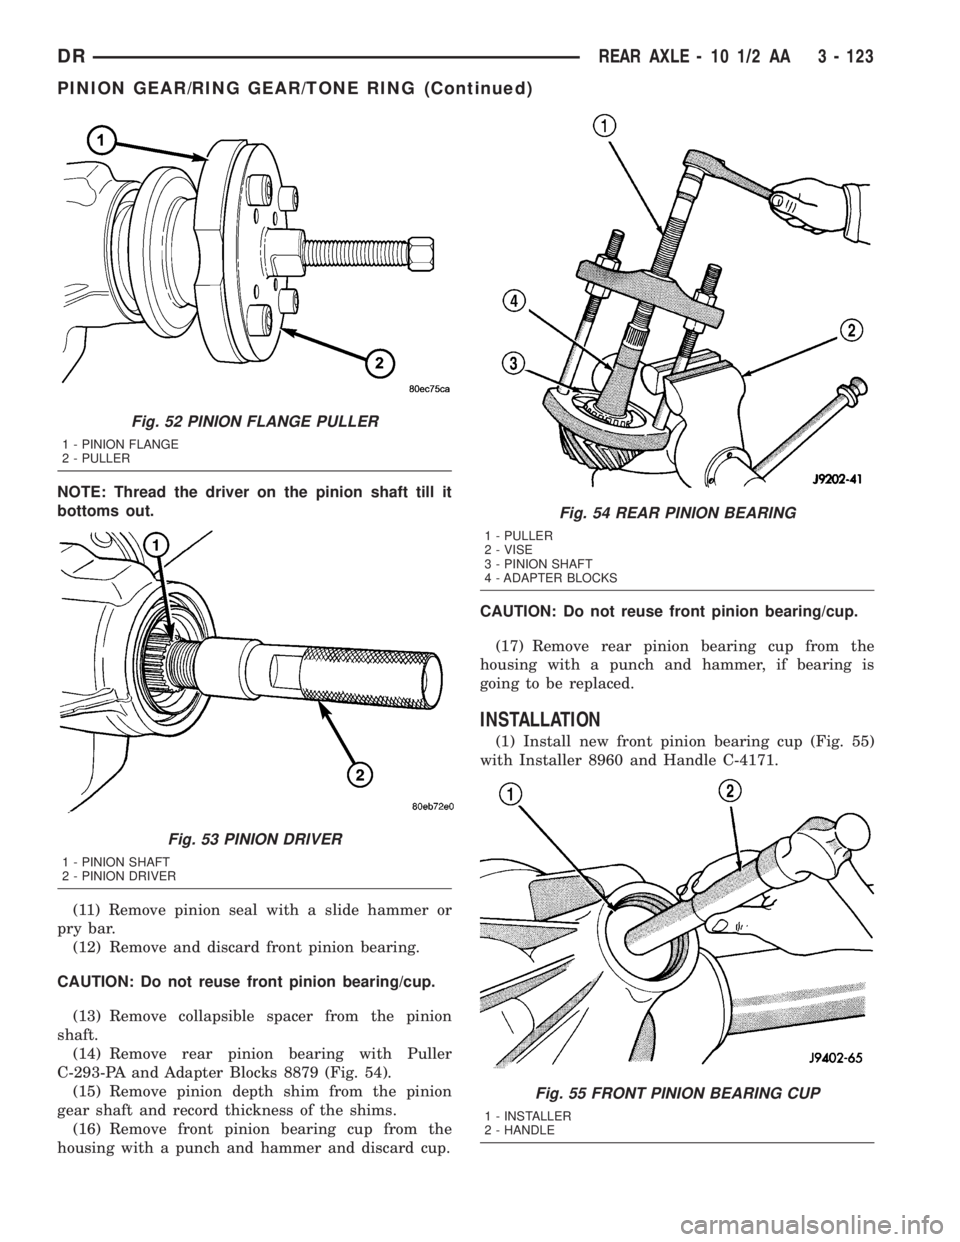
NOTE: Thread the driver on the pinion shaft till it
bottoms out.
(11) Remove pinion seal with a slide hammer or
pry bar.
(12) Remove and discard front pinion bearing.
CAUTION: Do not reuse front pinion bearing/cup.
(13) Remove collapsible spacer from the pinion
shaft.
(14) Remove rear pinion bearing with Puller
C-293-PA and Adapter Blocks 8879 (Fig. 54).
(15) Remove pinion depth shim from the pinion
gear shaft and record thickness of the shims.
(16) Remove front pinion bearing cup from the
housing with a punch and hammer and discard cup.CAUTION: Do not reuse front pinion bearing/cup.
(17) Remove rear pinion bearing cup from the
housing with a punch and hammer, if bearing is
going to be replaced.
INSTALLATION
(1) Install new front pinion bearing cup (Fig. 55)
with Installer 8960 and Handle C-4171.
Fig. 52 PINION FLANGE PULLER
1 - PINION FLANGE
2 - PULLER
Fig. 53 PINION DRIVER
1 - PINION SHAFT
2 - PINION DRIVER
Fig. 54 REAR PINION BEARING
1 - PULLER
2 - VISE
3 - PINION SHAFT
4 - ADAPTER BLOCKS
Fig. 55 FRONT PINION BEARING CUP
1 - INSTALLER
2 - HANDLE
DRREAR AXLE - 10 1/2 AA 3 - 123
PINION GEAR/RING GEAR/TONE RING (Continued)
Page 203 of 2895

Condition Possible Causes Correction
Gear Teeth Broke 1. Overloading. 1. Replace gears. Examine other
gears and bearings for possible
damage.
2. Erratic clutch operation. 2. Replace gears and examine the
remaining parts for damage. Avoid
erratic clutch operation.
3. Ice-spotted pavement. 3. Replace gears and examine
remaining parts for damage.
4. Improper adjustments. 4. Replace gears and examine
remaining parts for damage. Ensure
ring gear backlash is correct.
Axle Noise 1. Insufficient lubricant. 1. Fill differential with the correct
fluid type and quantity.
2. Improper ring gear and pinion
adjustment.2. Check ring gear and pinion
contact pattern. Adjust backlash or
pinion depth.
3. Unmatched ring gear and pinion. 3. Replace gears with a matched
ring gear and pinion.
4. Worn teeth on ring gear and/or
pinion.4. Replace ring gear and pinion.
5. Loose pinion bearings. 5. Adjust pinion bearing pre-load.
6. Loose differential bearings. 6. Adjust differential bearing
pre-load.
7. Mis-aligned or sprung ring gear. 7. Measure ring gear run-out.
Replace components as necessary.
8. Loose differential bearing cap
bolts.8. Inspect differential components
and replace as necessary. Ensure
that the bearing caps are torqued
tot he proper specification.
9. Housing not machined properly. 9. Replace housing.
REMOVAL
(1) Raise and support the vehicle.
(2) Position a lifting device under the axle.
(3) Secure axle to device.
(4) Remove wheels and tires assemblies.
(5) Remove RWAL sensor from the differential
housing.
(6) Remove brake hose at the axle junction block
and axle vent hose.
(7) Disconnect parking brake cables and cable
brackets.
(8) Remove brake calipers.
(9) Mark propeller shaft and companion flange for
installation alignment reference.
(10) Remove propeller shaft.
(11) Remove shock absorbers from axle.
(12) Remove U-bolets from axle.
(13) Separate the axle from the vehicle.
INSTALLATION
(1) Raise axle with lifting device and align to the
leaf spring centering bolts.
(2) Install axle U-bolts and tighten to 149 N´m
(110 ft. lbs.).
(3) Install shock absorbers to axle and tighten to
specification.
(4) Install the RWAL sensor to the differential
housing.
(5) Connect the parking brake cables and cable
brackets.
(6) Connect brake hose to the axle junction block
and axle vent hose.
(7) Align propeller shaft and pinion companion
flange reference marks and tighten companion flange
bolts to 115 N´m (85 ft. lbs.).
(8) Install the wheels and tires.
(9) Fill differential to specifications.
3 - 130 REAR AXLE - 11 1/2 AADR
REAR AXLE - 11 1/2 AA (Continued)
Page 204 of 2895
(10) Remove lifting device from axle and lower the
vehicle.
ADJUSTMENTS
Ring and pinion gears are supplied as matched
sets only. Compensation for pinion depth variance is
achieved with a select shim. The shim is located
between the rear pinion bearing and the pinion gear
head.
PINION DEPTH MEASUREMENT AND ADJUSTMENT
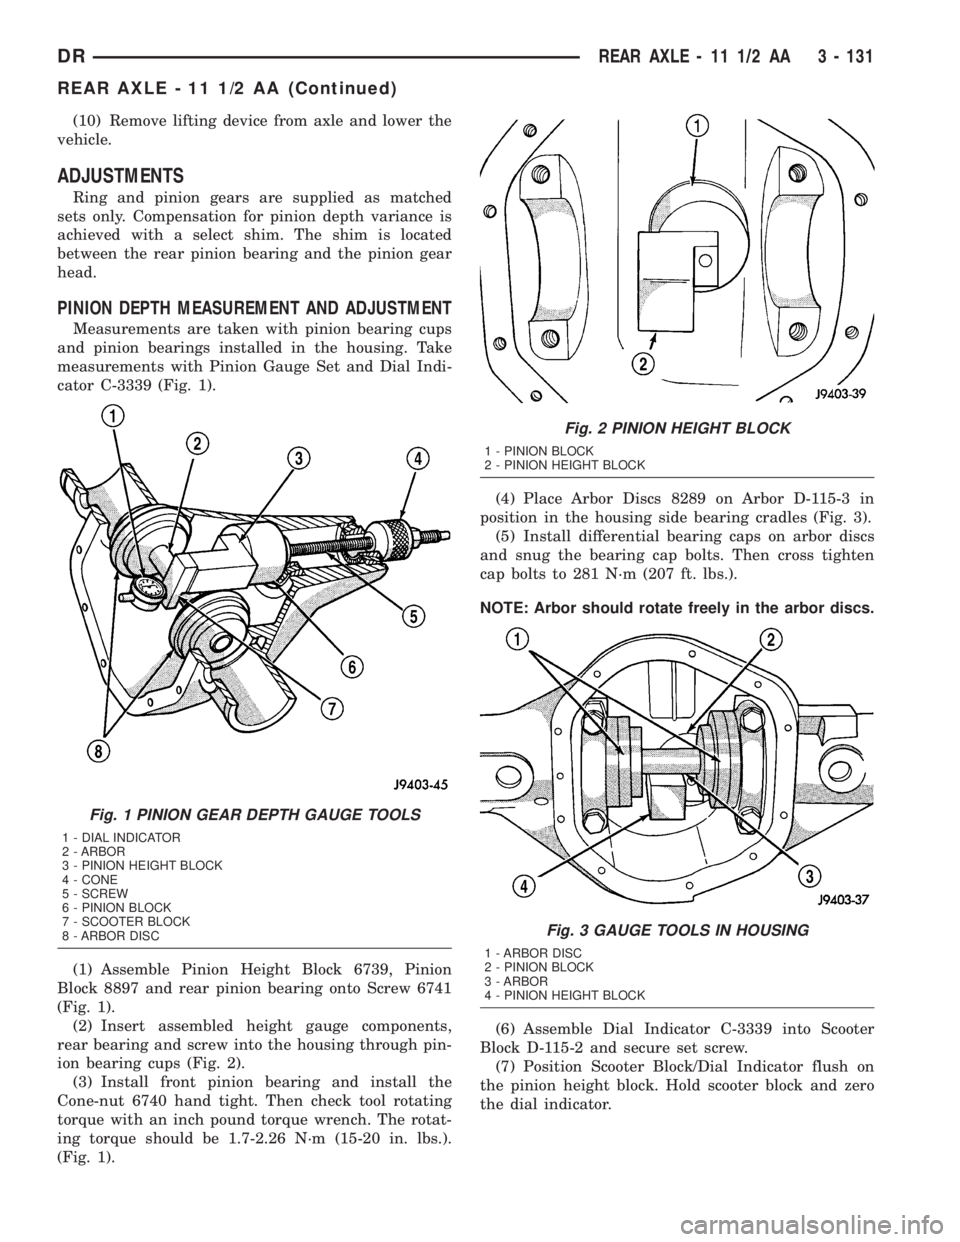
Measurements are taken with pinion bearing cups
and pinion bearings installed in the housing. Take
measurements with Pinion Gauge Set and Dial Indi-
cator C-3339 (Fig. 1).
(1) Assemble Pinion Height Block 6739, Pinion
Block 8897 and rear pinion bearing onto Screw 6741
(Fig. 1).
(2) Insert assembled height gauge components,
rear bearing and screw into the housing through pin-
ion bearing cups (Fig. 2).
(3) Install front pinion bearing and install the
Cone-nut 6740 hand tight. Then check tool rotating
torque with an inch pound torque wrench. The rotat-
ing torque should be 1.7-2.26 N´m (15-20 in. lbs.).
(Fig. 1).(4) Place Arbor Discs 8289 on Arbor D-115-3 in
position in the housing side bearing cradles (Fig. 3).
(5) Install differential bearing caps on arbor discs
and snug the bearing cap bolts. Then cross tighten
cap bolts to 281 N´m (207 ft. lbs.).
NOTE: Arbor should rotate freely in the arbor discs.
(6) Assemble Dial Indicator C-3339 into Scooter
Block D-115-2 and secure set screw.
(7) Position Scooter Block/Dial Indicator flush on
the pinion height block. Hold scooter block and zero
the dial indicator.
Fig. 1 PINION GEAR DEPTH GAUGE TOOLS
1 - DIAL INDICATOR
2 - ARBOR
3 - PINION HEIGHT BLOCK
4 - CONE
5 - SCREW
6 - PINION BLOCK
7 - SCOOTER BLOCK
8 - ARBOR DISC
Fig. 2 PINION HEIGHT BLOCK
1 - PINION BLOCK
2 - PINION HEIGHT BLOCK
Fig. 3 GAUGE TOOLS IN HOUSING
1 - ARBOR DISC
2 - PINION BLOCK
3 - ARBOR
4 - PINION HEIGHT BLOCK
DRREAR AXLE - 11 1/2 AA 3 - 131
REAR AXLE - 11 1/2 AA (Continued)
Page 205 of 2895
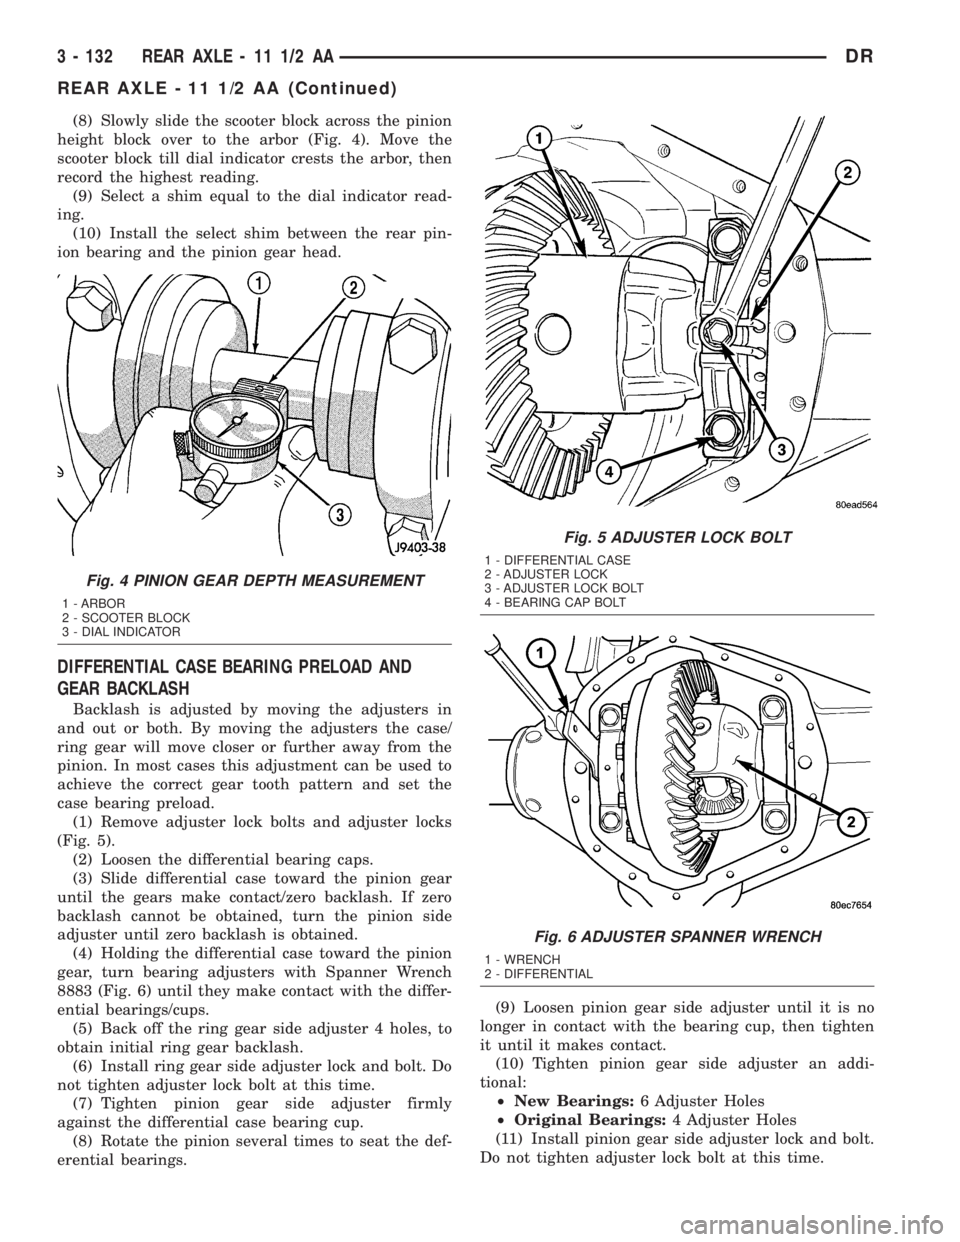
(8) Slowly slide the scooter block across the pinion
height block over to the arbor (Fig. 4). Move the
scooter block till dial indicator crests the arbor, then
record the highest reading.
(9) Select a shim equal to the dial indicator read-
ing.
(10) Install the select shim between the rear pin-
ion bearing and the pinion gear head.
DIFFERENTIAL CASE BEARING PRELOAD AND
GEAR BACKLASH
Backlash is adjusted by moving the adjusters in
and out or both. By moving the adjusters the case/
ring gear will move closer or further away from the
pinion. In most cases this adjustment can be used to
achieve the correct gear tooth pattern and set the
case bearing preload.
(1) Remove adjuster lock bolts and adjuster locks
(Fig. 5).
(2) Loosen the differential bearing caps.
(3) Slide differential case toward the pinion gear
until the gears make contact/zero backlash. If zero
backlash cannot be obtained, turn the pinion side
adjuster until zero backlash is obtained.
(4) Holding the differential case toward the pinion
gear, turn bearing adjusters with Spanner Wrench
8883 (Fig. 6) until they make contact with the differ-
ential bearings/cups.
(5) Back off the ring gear side adjuster 4 holes, to
obtain initial ring gear backlash.
(6) Install ring gear side adjuster lock and bolt. Do
not tighten adjuster lock bolt at this time.
(7) Tighten pinion gear side adjuster firmly
against the differential case bearing cup.
(8) Rotate the pinion several times to seat the def-
erential bearings.(9) Loosen pinion gear side adjuster until it is no
longer in contact with the bearing cup, then tighten
it until it makes contact.
(10) Tighten pinion gear side adjuster an addi-
tional:
²New Bearings:6 Adjuster Holes
²Original Bearings:4 Adjuster Holes
(11) Install pinion gear side adjuster lock and bolt.
Do not tighten adjuster lock bolt at this time.
Fig. 4 PINION GEAR DEPTH MEASUREMENT
1 - ARBOR
2 - SCOOTER BLOCK
3 - DIAL INDICATOR
Fig. 5 ADJUSTER LOCK BOLT
1 - DIFFERENTIAL CASE
2 - ADJUSTER LOCK
3 - ADJUSTER LOCK BOLT
4 - BEARING CAP BOLT
Fig. 6 ADJUSTER SPANNER WRENCH
1 - WRENCH
2 - DIFFERENTIAL
3 - 132 REAR AXLE - 11 1/2 AADR
REAR AXLE - 11 1/2 AA (Continued)
Page 206 of 2895
(12) Tighten bearing cap bolts to 115 N´m (85 ft.
lbs.).
(13) Tighten adjuster lock bolts to 33 N´m (24 ft.
lbs.).
(14) Measure ring gear backlash with a Dial Indi-
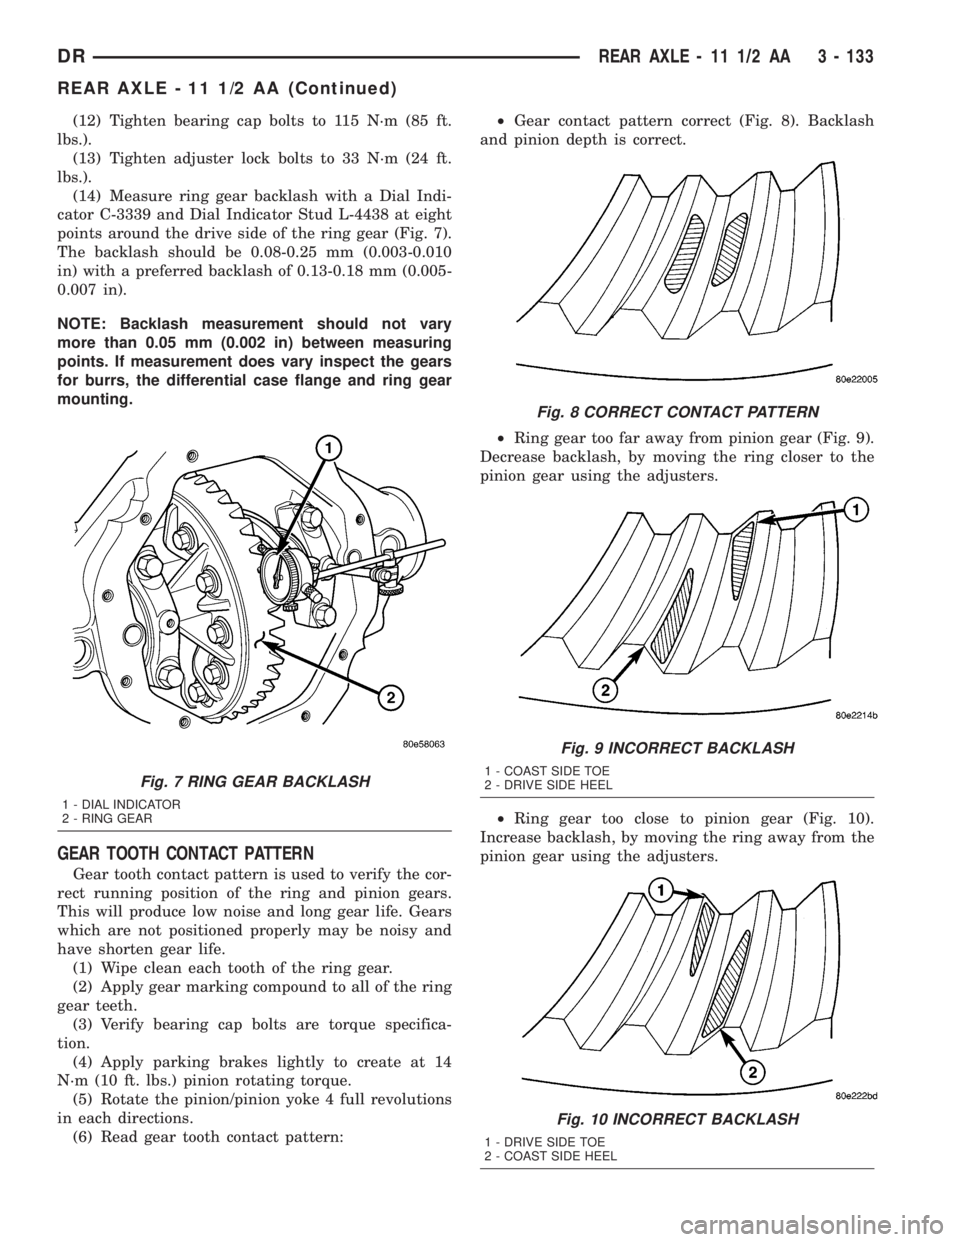
cator C-3339 and Dial Indicator Stud L-4438 at eight
points around the drive side of the ring gear (Fig. 7).
The backlash should be 0.08-0.25 mm (0.003-0.010
in) with a preferred backlash of 0.13-0.18 mm (0.005-
0.007 in).
NOTE: Backlash measurement should not vary
more than 0.05 mm (0.002 in) between measuring
points. If measurement does vary inspect the gears
for burrs, the differential case flange and ring gear
mounting.
GEAR TOOTH CONTACT PATTERN
Gear tooth contact pattern is used to verify the cor-
rect running position of the ring and pinion gears.
This will produce low noise and long gear life. Gears
which are not positioned properly may be noisy and
have shorten gear life.
(1) Wipe clean each tooth of the ring gear.
(2) Apply gear marking compound to all of the ring
gear teeth.
(3) Verify bearing cap bolts are torque specifica-
tion.
(4) Apply parking brakes lightly to create at 14
N´m (10 ft. lbs.) pinion rotating torque.
(5) Rotate the pinion/pinion yoke 4 full revolutions
in each directions.
(6) Read gear tooth contact pattern:²Gear contact pattern correct (Fig. 8). Backlash
and pinion depth is correct.
²Ring gear too far away from pinion gear (Fig. 9).
Decrease backlash, by moving the ring closer to the
pinion gear using the adjusters.
²Ring gear too close to pinion gear (Fig. 10).
Increase backlash, by moving the ring away from the
pinion gear using the adjusters.
Fig. 7 RING GEAR BACKLASH
1 - DIAL INDICATOR
2 - RING GEAR
Fig. 8 CORRECT CONTACT PATTERN
Fig. 9 INCORRECT BACKLASH
1 - COAST SIDE TOE
2 - DRIVE SIDE HEEL
Fig. 10 INCORRECT BACKLASH
1 - DRIVE SIDE TOE
2 - COAST SIDE HEEL
DRREAR AXLE - 11 1/2 AA 3 - 133
REAR AXLE - 11 1/2 AA (Continued)
Page 208 of 2895
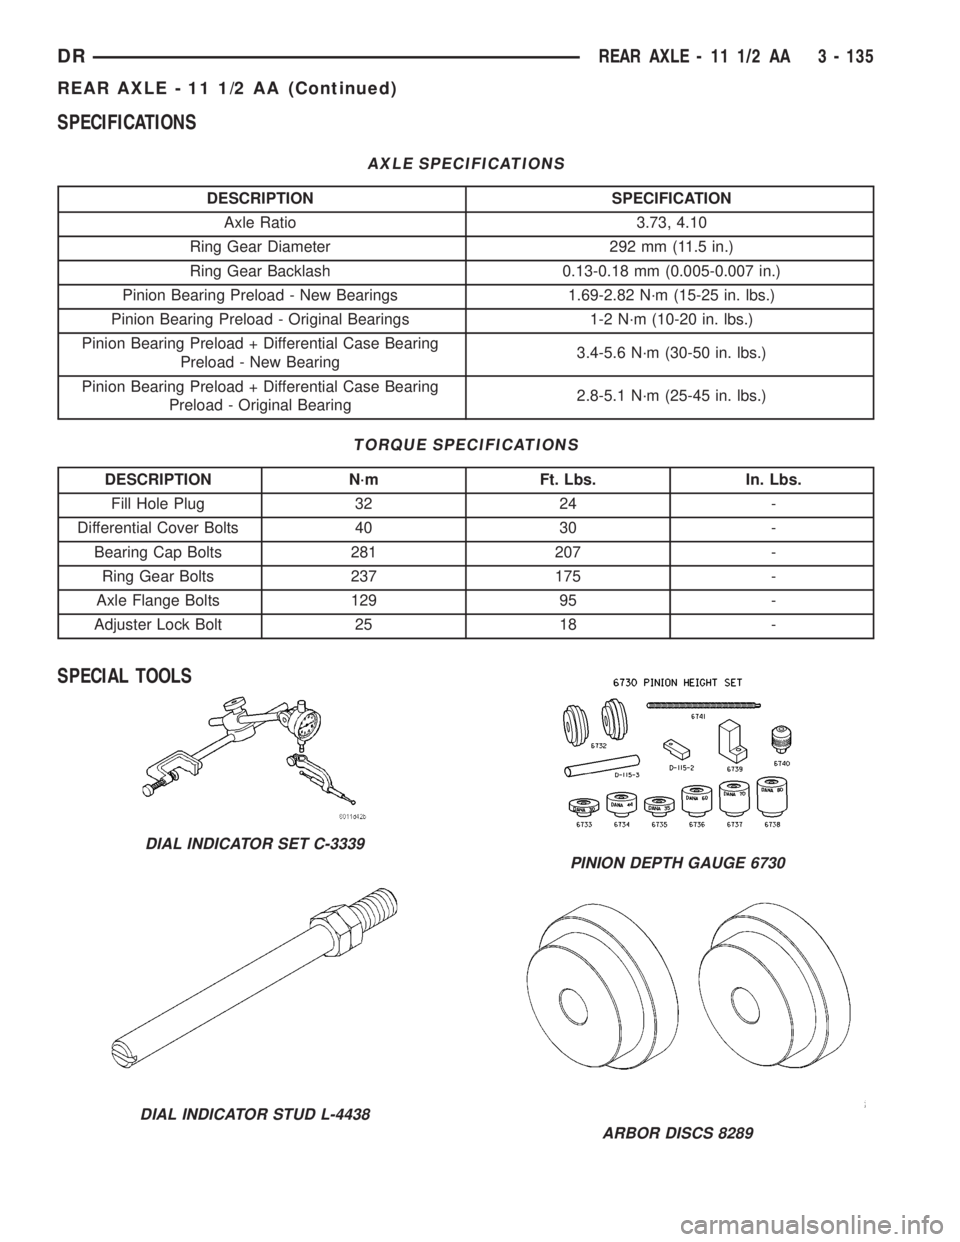
SPECIFICATIONS
AXLE SPECIFICATIONS
DESCRIPTION SPECIFICATION
Axle Ratio 3.73, 4.10
Ring Gear Diameter 292 mm (11.5 in.)
Ring Gear Backlash 0.13-0.18 mm (0.005-0.007 in.)
Pinion Bearing Preload - New Bearings 1.69-2.82 N´m (15-25 in. lbs.)
Pinion Bearing Preload - Original Bearings 1-2 N´m (10-20 in. lbs.)
Pinion Bearing Preload + Differential Case Bearing
Preload - New Bearing3.4-5.6 N´m (30-50 in. lbs.)
Pinion Bearing Preload + Differential Case Bearing
Preload - Original Bearing2.8-5.1 N´m (25-45 in. lbs.)
TORQUE SPECIFICATIONS
DESCRIPTION N´m Ft. Lbs. In. Lbs.
Fill Hole Plug 32 24 -
Differential Cover Bolts 40 30 -
Bearing Cap Bolts 281 207 -
Ring Gear Bolts 237 175 -
Axle Flange Bolts 129 95 -
Adjuster Lock Bolt 25 18 -
SPECIAL TOOLS
DIAL INDICATOR SET C-3339
DIAL INDICATOR STUD L-4438
PINION DEPTH GAUGE 6730
ARBOR DISCS 8289
DRREAR AXLE - 11 1/2 AA 3 - 135
REAR AXLE - 11 1/2 AA (Continued)
Page 209 of 2895
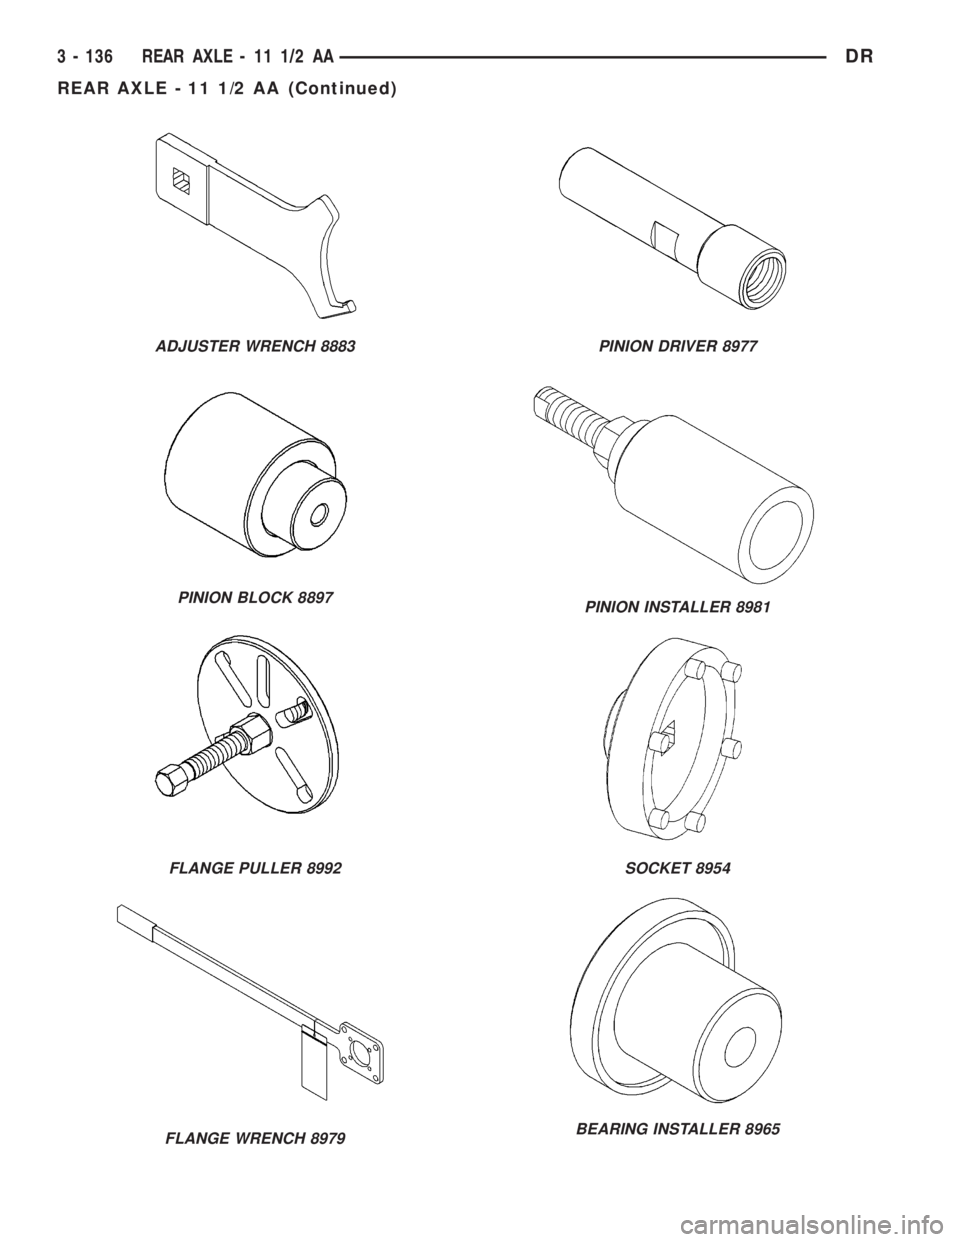
ADJUSTER WRENCH 8883
PINION BLOCK 8897
FLANGE PULLER 8992
FLANGE WRENCH 8979
PINION DRIVER 8977
PINION INSTALLER 8981
SOCKET 8954
BEARING INSTALLER 8965
3 - 136 REAR AXLE - 11 1/2 AADR
REAR AXLE - 11 1/2 AA (Continued)
Page 211 of 2895
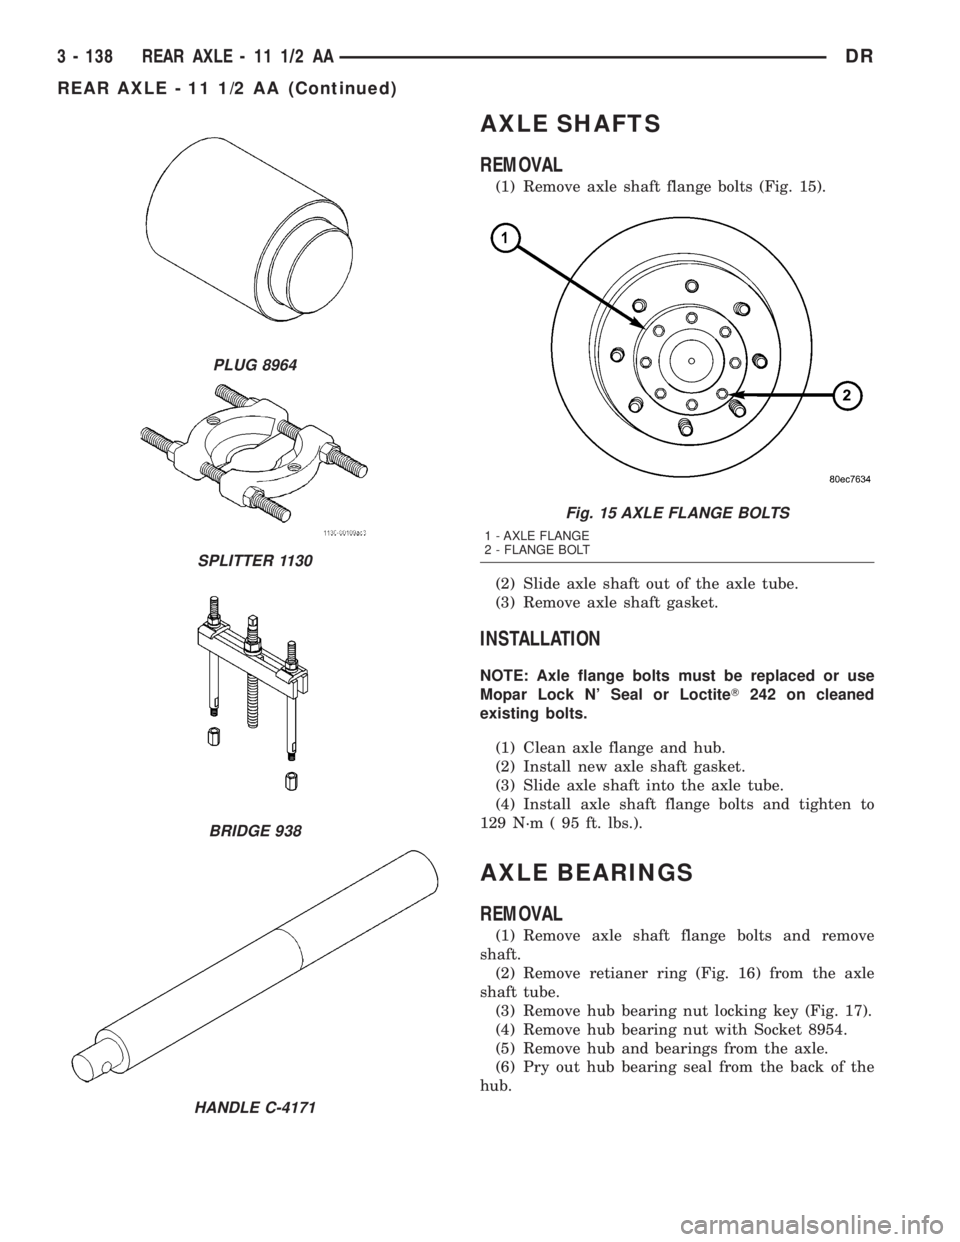
AXLE SHAFTS
REMOVAL
(1) Remove axle shaft flange bolts (Fig. 15).
(2) Slide axle shaft out of the axle tube.
(3) Remove axle shaft gasket.
INSTALLATION
NOTE: Axle flange bolts must be replaced or use
Mopar Lock N' Seal or LoctiteT242 on cleaned
existing bolts.
(1) Clean axle flange and hub.
(2) Install new axle shaft gasket.
(3) Slide axle shaft into the axle tube.
(4) Install axle shaft flange bolts and tighten to
129 N´m ( 95 ft. lbs.).
AXLE BEARINGS
REMOVAL
(1) Remove axle shaft flange bolts and remove
shaft.
(2) Remove retianer ring (Fig. 16) from the axle
shaft tube.
(3) Remove hub bearing nut locking key (Fig. 17).
(4) Remove hub bearing nut with Socket 8954.
(5) Remove hub and bearings from the axle.
(6) Pry out hub bearing seal from the back of the
hub.
PLUG 8964
SPLITTER 1130
BRIDGE 938
HANDLE C-4171
Fig. 15 AXLE FLANGE BOLTS
1 - AXLE FLANGE
2 - FLANGE BOLT
3 - 138 REAR AXLE - 11 1/2 AADR
REAR AXLE - 11 1/2 AA (Continued)