2003 DODGE RAM cooling
[x] Cancel search: coolingPage 335 of 2895

OPERATION
The wax pellet is located in a sealed container at
the spring end of the thermostat. When heated, the
pellet expands, overcoming closing spring tension
and water pump pressure to force the valve to open.
DIAGNOSIS AND TESTINGÐTHERMOSTAT
ON-BOARD DIAGNOSTICS
Allgasoline powered modelsare equipped with
On-Board Diagnostics for certain cooling system com-
ponents. Refer to On-Board Diagnostics (OBD) in the
Diagnosis section of this group for additional infor-
mation. If the powertrain control module (PCM)
detects low engine coolant temperature, it will record
a Diagnostic Trouble Code (DTC) in the PCM mem-
ory. Do not change a thermostat for lack of heat as
indicated by the instrument panel gauge or by poor
heater performance unless a DTC is present. Refer to
the Diagnosis section of this group for other probable
causes.
The DTC can also be accessed through the
DRBIIItscan tool. Refer to the appropriate Power-
train Diagnostic Procedures information for diagnos-
tic information and operation of the DRBIIItscan
tool.
REMOVAL
WARNING: DO NOT LOOSEN THE RADIATOR
DRAINCOCK WITH THE COOLING SYSTEM HOT
AND PRESSURIZED. SERIOUS BURNS FROM THE
COOLANT CAN OCCUR.
Do not waste reusable coolant. If the solution is
clean, drain the coolant into a clean container for
reuse.
If the thermostat is being replaced, be sure that
the replacement is the specified thermostat for the
vehicle model and engine type.
Factory installed thermostat housings on 5.9L
engine is installed on a gasket with an anti-stick
coating. This will aid in gasket removal and clean-up.
(1) Disconnect the negative battery cable.
(2) Drain the cooling system until the coolant level
is below the thermostat (Refer to 7 - COOLING -
STANDARD PROCEDURE).
(3) Air Conditioned vehicles: Remove the support
bracket (generator mounting bracket-to-intake mani-
fold) located near the rear of the generator (Fig. 19).
NOTE: On air conditioning equipped vehicles, the
generator must be partially removed.
(4) Remove the accessory drive belt (Refer to 7 -
COOLING/ACCESSORY DRIVE/DRIVE BELTS -
REMOVAL) (Fig. 20).
(5) Remove the generator mounting bolts. Do not
remove any of the wiring at the generator. If
equipped with 4WD, unplug the 4WD indicator lamp
wiring harness (located near rear of generator).
(6) Remove the generator. Position the generator
to gain access for the thermostat gasket removal.
Fig. 18 Thermostat - 5.7L/5.9L Gas Powered
Engines
1 - THERMOSTAT HOUSING
2 - GASKET
3 - INTAKE MANIFOLD
4 - THERMOSTAT
5 - MACHINED GROOVE
Fig. 19 Generator Support Bracket ± 5.9L Engine
1 - IDLER PULLEY BUSHING
2 - A/C AND/OR GENERATOR MOUNTING BRACKET
3 - IDLER PULLEY
4 - SCREW AND WASHER
7 - 48 ENGINEDR
ENGINE COOLANT THERMOSTAT- 5.7L/5.9L (Continued)
Page 336 of 2895
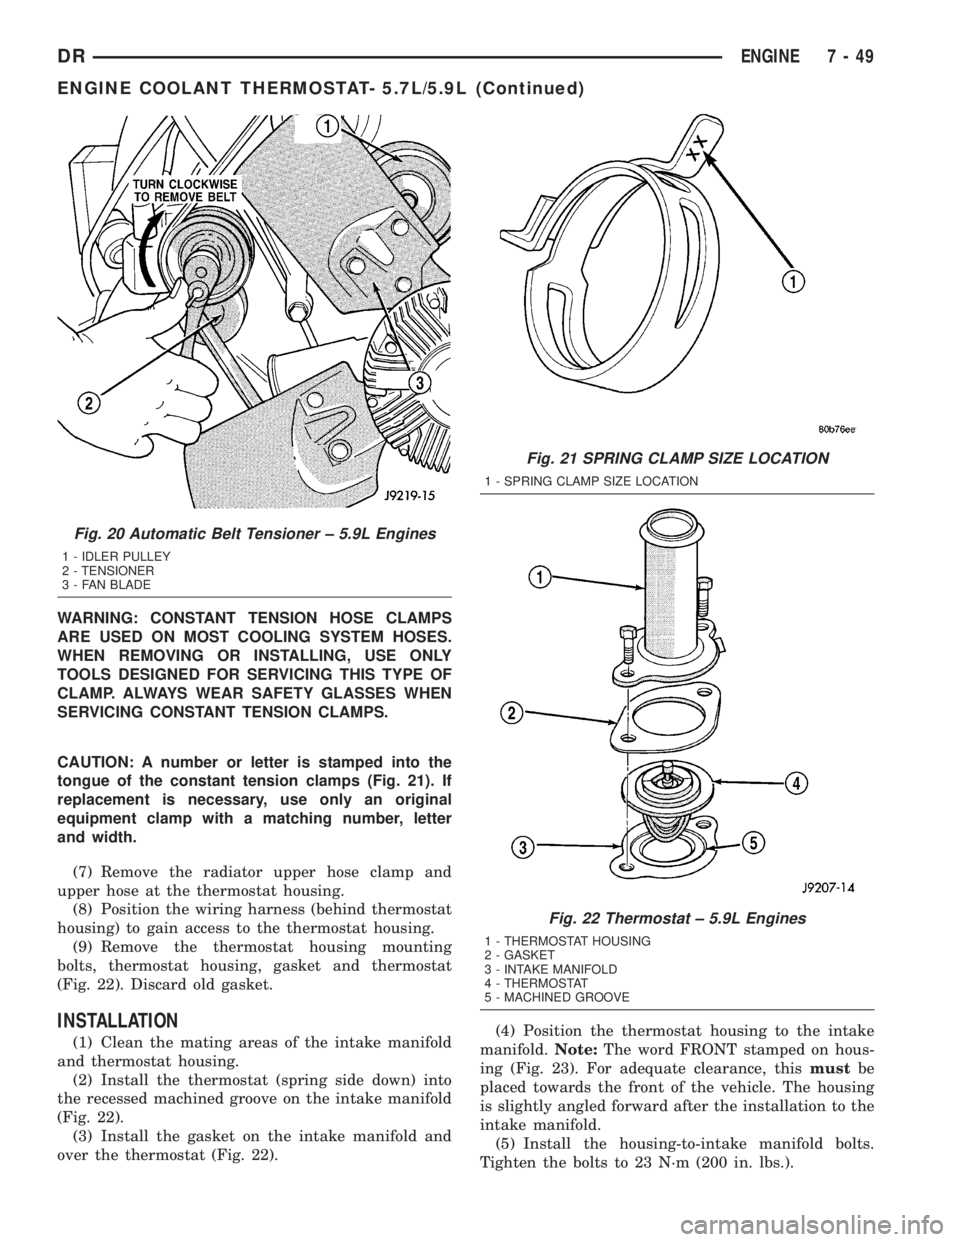
WARNING: CONSTANT TENSION HOSE CLAMPS
ARE USED ON MOST COOLING SYSTEM HOSES.
WHEN REMOVING OR INSTALLING, USE ONLY
TOOLS DESIGNED FOR SERVICING THIS TYPE OF
CLAMP. ALWAYS WEAR SAFETY GLASSES WHEN
SERVICING CONSTANT TENSION CLAMPS.
CAUTION: A number or letter is stamped into the
tongue of the constant tension clamps (Fig. 21). If
replacement is necessary, use only an original
equipment clamp with a matching number, letter
and width.
(7) Remove the radiator upper hose clamp and
upper hose at the thermostat housing.
(8) Position the wiring harness (behind thermostat
housing) to gain access to the thermostat housing.
(9) Remove the thermostat housing mounting
bolts, thermostat housing, gasket and thermostat
(Fig. 22). Discard old gasket.
INSTALLATION
(1) Clean the mating areas of the intake manifold
and thermostat housing.
(2) Install the thermostat (spring side down) into
the recessed machined groove on the intake manifold
(Fig. 22).
(3) Install the gasket on the intake manifold and
over the thermostat (Fig. 22).(4) Position the thermostat housing to the intake
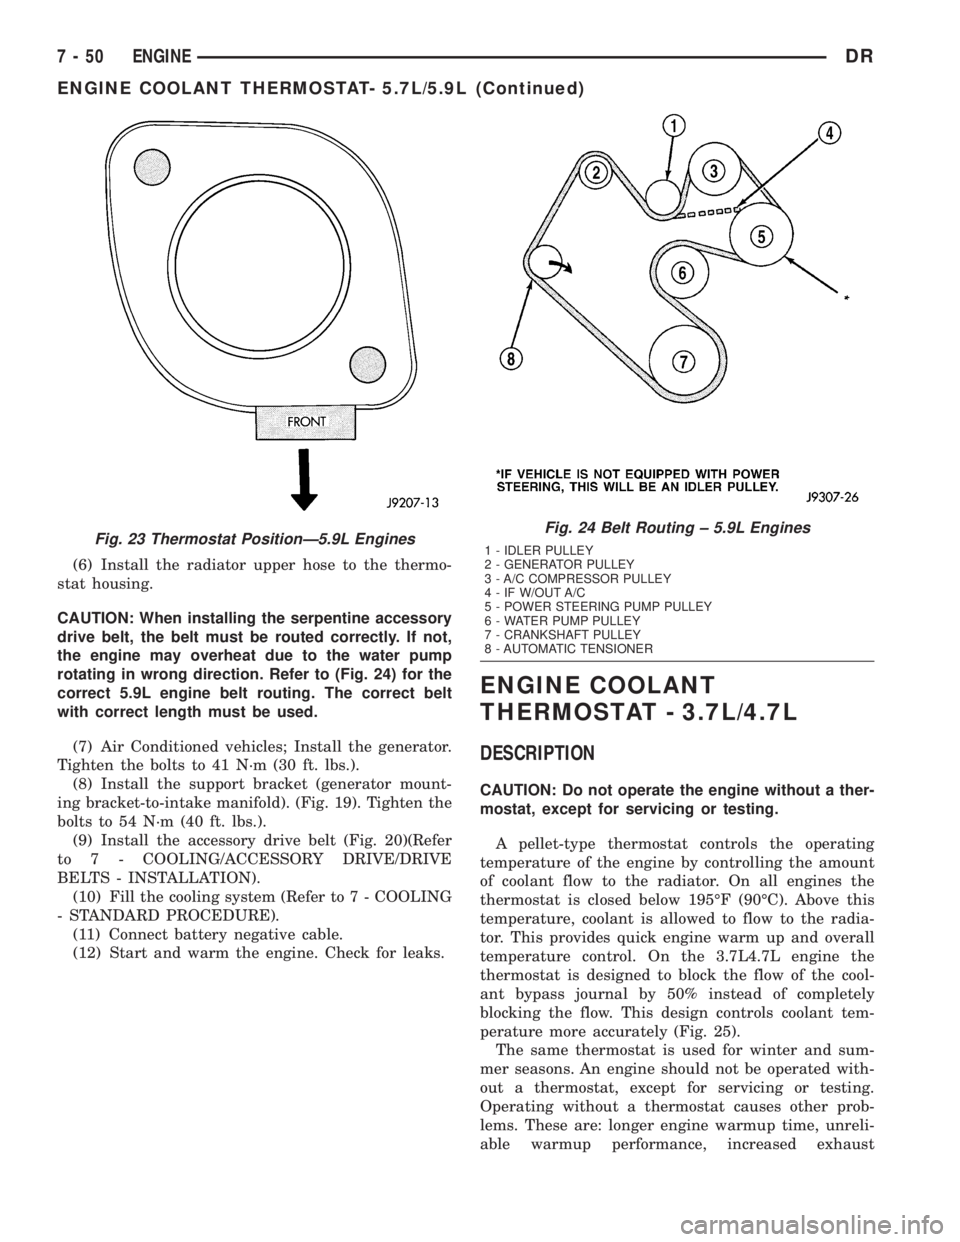
manifold.Note:The word FRONT stamped on hous-
ing (Fig. 23). For adequate clearance, thismustbe
placed towards the front of the vehicle. The housing
is slightly angled forward after the installation to the
intake manifold.
(5) Install the housing-to-intake manifold bolts.
Tighten the bolts to 23 N´m (200 in. lbs.).
Fig. 20 Automatic Belt Tensioner ± 5.9L Engines
1 - IDLER PULLEY
2 - TENSIONER
3 - FAN BLADE
Fig. 21 SPRING CLAMP SIZE LOCATION
1 - SPRING CLAMP SIZE LOCATION
Fig. 22 Thermostat ± 5.9L Engines
1 - THERMOSTAT HOUSING
2 - GASKET
3 - INTAKE MANIFOLD
4 - THERMOSTAT
5 - MACHINED GROOVE
DRENGINE 7 - 49
ENGINE COOLANT THERMOSTAT- 5.7L/5.9L (Continued)
Page 337 of 2895
(6) Install the radiator upper hose to the thermo-
stat housing.
CAUTION: When installing the serpentine accessory
drive belt, the belt must be routed correctly. If not,
the engine may overheat due to the water pump
rotating in wrong direction. Refer to (Fig. 24) for the
correct 5.9L engine belt routing. The correct belt
with correct length must be used.
(7) Air Conditioned vehicles; Install the generator.
Tighten the bolts to 41 N´m (30 ft. lbs.).
(8) Install the support bracket (generator mount-
ing bracket-to-intake manifold). (Fig. 19). Tighten the
bolts to 54 N´m (40 ft. lbs.).
(9) Install the accessory drive belt (Fig. 20)(Refer
to 7 - COOLING/ACCESSORY DRIVE/DRIVE
BELTS - INSTALLATION).
(10) Fill the cooling system (Refer to 7 - COOLING
- STANDARD PROCEDURE).
(11) Connect battery negative cable.
(12) Start and warm the engine. Check for leaks.
ENGINE COOLANT
THERMOSTAT - 3.7L/4.7L
DESCRIPTION
CAUTION: Do not operate the engine without a ther-
mostat, except for servicing or testing.
A pellet-type thermostat controls the operating
temperature of the engine by controlling the amount
of coolant flow to the radiator. On all engines the
thermostat is closed below 195ÉF (90ÉC). Above this
temperature, coolant is allowed to flow to the radia-
tor. This provides quick engine warm up and overall
temperature control. On the 3.7L4.7L engine the
thermostat is designed to block the flow of the cool-
ant bypass journal by 50% instead of completely
blocking the flow. This design controls coolant tem-
perature more accurately (Fig. 25).
The same thermostat is used for winter and sum-
mer seasons. An engine should not be operated with-
out a thermostat, except for servicing or testing.
Operating without a thermostat causes other prob-
lems. These are: longer engine warmup time, unreli-
able warmup performance, increased exhaust
Fig. 23 Thermostat PositionÐ5.9L EnginesFig. 24 Belt Routing ± 5.9L Engines
1 - IDLER PULLEY
2 - GENERATOR PULLEY
3 - A/C COMPRESSOR PULLEY
4 - IF W/OUT A/C
5 - POWER STEERING PUMP PULLEY
6 - WATER PUMP PULLEY
7 - CRANKSHAFT PULLEY
8 - AUTOMATIC TENSIONER
7 - 50 ENGINEDR
ENGINE COOLANT THERMOSTAT- 5.7L/5.9L (Continued)
Page 338 of 2895

emissions and crankcase condensation. This conden-
sation can result in sludge formation.
OPERATION
The wax pellet is located in a sealed container at
the spring end of the thermostat. When heated, the
pellet expands, overcoming closing spring tension
and water pump pressure to force the valve to open.
DIAGNOSIS AND TESTINGÐTHERMOSTAT
ON-BOARD DIAGNOSTICS
Allgasoline powered modelsare equipped with
On-Board Diagnostics for certain cooling system com-
ponents. Refer to On-Board Diagnostics (OBD) in the
Diagnosis section of this group for additional infor-
mation. If the powertrain control module (PCM)
detects low engine coolant temperature, it will record
a Diagnostic Trouble Code (DTC) in the PCM mem-
ory. Do not change a thermostat for lack of heat as
indicated by the instrument panel gauge or by poor
heater performance unless a DTC is present. Refer tothe Diagnosis section of this group for other probable
causes.
The DTC can also be accessed through the
DRBIIItscan tool. Refer to the appropriate Power-
train Diagnostic Procedures information for diagnos-
tic information and operation of the DRBIIItscan
tool.
REMOVAL
WARNING: DO NOT LOOSEN THE RADIATOR
DRAINCOCK WITH THE COOLING SYSTEM HOT
AND PRESSURIZED. SERIOUS BURNS FROM THE
COOLANT CAN OCCUR.
Do not waste reusable coolant. If the solution is
clean, drain the coolant into a clean container for
reuse.
If the thermostat is being replaced, be sure that
the replacement is the specified thermostat for the
vehicle model and engine type.
(1) Disconnect the negative battery cable.
(2) Drain the cooling system (Refer to 7 - COOL-
ING - STANDARD PROCEDURE).
(3) Raise and support the vehicle.
(4) Remove the splash shield.
(5) Remove the lower radiator hose clamp and the
lower radiator hose at the thermostat housing.
(6) Remove the thermostat housing mounting
bolts, thermostat housing and thermostat (Fig. 26).
INSTALLATION
(1) Clean the mating areas of the timing chain
cover and the thermostat housing.
(2) Install the thermostat (spring side down) into
the recessed machined groove on the timing chain
cover (Fig. 26).
(3) Position the thermostat housing on the timing
chain cover.
(4) Install the housing-to-timing chain cover bolts.
Tighten the bolts to 13 N´m (112 in. lbs.).
CAUTION: The housing must be tightened evenly
and the thermostat must be centered into the
recessed groove in the timimg chain cover. If not, it
may result in a cracked housing, damaged timing
chain cover threads or coolant leaks.
(5) Install the lower radiator hose on the thermo-
stat housing.
(6) Install the splash shield.
(7) Lower the vehicle.
(8) Fill the cooling system (Refer to 7 - COOLING
- STANDARD PROCEDURE).
(9) Connect negative battery cable.
(10) Start and warm the engine. Check for leaks.
Fig. 25 Thermostat Cross Section View 3.7L/4.7L
1 - FROM HEATER AND DEGAS CONTAINER
2 - FROM RADIATOR
3 - TO WATER PUMP
4 - ENGINE BYPASS
5 - THERMOSTAT
DRENGINE 7 - 51
ENGINE COOLANT THERMOSTAT - 3.7L/4.7L (Continued)
Page 339 of 2895
ENGINE COOLANT
THERMOSTAT - 5.9L DIESEL
DESCRIPTION
CAUTION: Do not operate an engine without a ther-
mostat, except for servicing or testing. An engine
with the thermostat removed will operate in the
radiator bypass mode, causing an overheat condi-
tion.
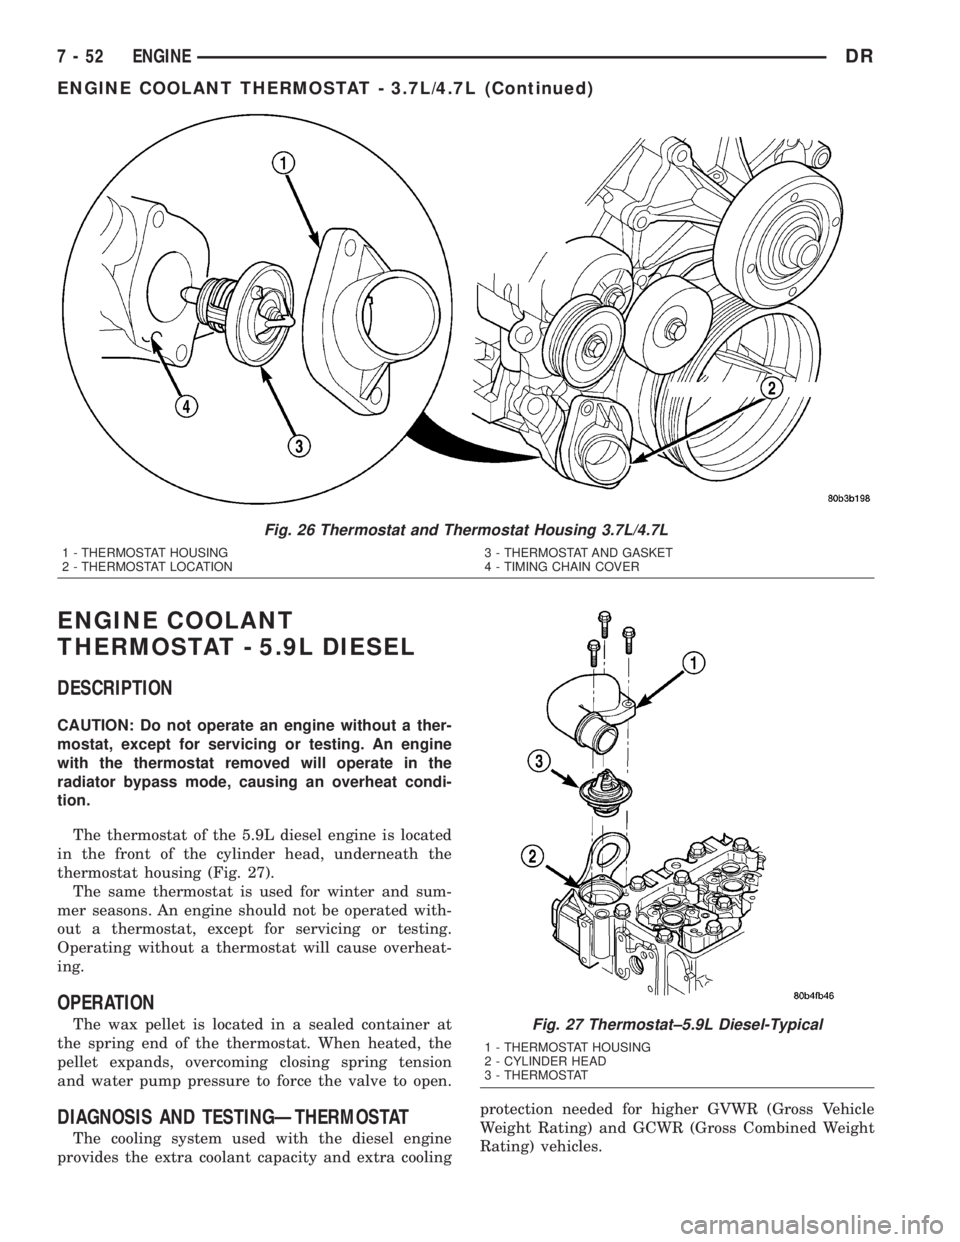
The thermostat of the 5.9L diesel engine is located
in the front of the cylinder head, underneath the
thermostat housing (Fig. 27).
The same thermostat is used for winter and sum-
mer seasons. An engine should not be operated with-
out a thermostat, except for servicing or testing.
Operating without a thermostat will cause overheat-
ing.
OPERATION
The wax pellet is located in a sealed container at
the spring end of the thermostat. When heated, the
pellet expands, overcoming closing spring tension
and water pump pressure to force the valve to open.
DIAGNOSIS AND TESTINGÐTHERMOSTAT
The cooling system used with the diesel engine
provides the extra coolant capacity and extra coolingprotection needed for higher GVWR (Gross Vehicle
Weight Rating) and GCWR (Gross Combined Weight
Rating) vehicles.
Fig. 26 Thermostat and Thermostat Housing 3.7L/4.7L
1 - THERMOSTAT HOUSING
2 - THERMOSTAT LOCATION3 - THERMOSTAT AND GASKET
4 - TIMING CHAIN COVER
Fig. 27 Thermostat±5.9L Diesel-Typical
1 - THERMOSTAT HOUSING
2 - CYLINDER HEAD
3 - THERMOSTAT
7 - 52 ENGINEDR
ENGINE COOLANT THERMOSTAT - 3.7L/4.7L (Continued)
Page 340 of 2895
This system capacity will not effect warm up or
cold weather operating characteristics if the thermo-
stat is operating properly. This is because coolant
will be held in the engine until it reaches the ther-
mostat ªsetº temperature.
Diesel engines, due to their inherent efficiency are
slower to warm up than gasoline powered engines,
and will operate at lower temperatures when the
vehicle is unloaded. Because of this, lower tempera-
ture gauge readings for diesel versus gasoline
engines may, at times be normal.
Typically, complaints of low engine coolant temper-
ature are observed as low heater output when com-
bined with cool or cold outside temperatures.
To help promote faster engine warm-up, the elec-
tric engine block heater must be used with cool or
cold outside temperatures. This will help keep the
engine coolant warm when the vehicle is parked. Use
the block heater if the outside temperature is below
4ÉC (40ÉF).Do not use the block heater if the
outside temperature is above 4ÉC (40ÉF).
A ªCold Weather Coverº is available from the parts
department through the Mopar Accessories product
line. This accessory cover is designed to block airflow
entering the radiator and engine compartment to
promote faster engine warm-up. It attaches to the
front of the vehicle at the grill opening.The cover is
to be used with cool or cold temperatures only.
If used with high outside temperatures, serious
engine damage could result.Refer to the litera-
ture supplied with the cover for additional informa-
tion.
(1) To determine if the thermostat is defective, it
must be removed from the vehicle (Refer to 7 -
COOLING/ENGINE/ENGINE COOLANT THERMO-
STAT - REMOVAL).
(2) After the thermostat has been removed, exam-
ine the thermostat and inside of thermostat housing
for contaminants. If contaminants are found, the
thermostat may already be in a ªstuck openº position.
Flush the cooling system before replacing thermostat
(Refer to 7 - COOLING - STANDARD PROCE-
DURE).
(3) Place the thermostat into a container filled
with water.
(4) Place the container on a hot plate or other suit-
able heating device.
(5) Place a commercially available radiator ther-
mometer into the water.
(6) Apply heat to the water while observing the
thermostat and thermometer.
(7) The thermostat will begin to open at 85.5 Ð
89.4ÉC. (186 Ð193ÉF ). If the valve starts to move
before this temperature is reached, it is opening too
early. Replace thermostat. The thermostat should be
fully open (valve will stop moving) at 97ÉC (207ÉF). Ifthe valve is still moving when the water temperature
reaches 97ÉC (207ÉF), it is opening too late. Replace
thermostat. If the valve refuses to move at any time,
replace thermostat.
REMOVAL
WARNING: DO NOT LOOSEN THE RADIATOR
DRAINCOCK WITH THE SYSTEM HOT AND PRES-
SURIZED. SERIOUS BURNS FROM THE COOLANT
CAN OCCUR.
Do not waste reusable coolant. If the solution is
clean, drain the coolant into a clean container for
reuse.
(1) Disconnect the battery negative cables.
(2) Drain cooling system until coolant level is
below thermostat (Refer to 7 - COOLING - STAN-
DARD PROCEDURE).
WARNING: CONSTANT TENSION HOSE CLAMPS
ARE USED ON MOST COOLING SYSTEM HOSES.
WHEN REMOVING OR INSTALLING, USE ONLY
TOOLS DESIGNED FOR SERVICING THIS TYPE OF
CLAMP, SUCH AS SPECIAL CLAMP TOOL (NUMBER
6094). SNAP-ON CLAMP TOOL (NUMBER HPC-20)
MAY BE USED FOR LARGER CLAMPS. ALWAYS
WEAR SAFETY GLASSES WHEN SERVICING CON-
STANT TENSION CLAMPS.
CAUTION: A number or letter is stamped into the
tongue of constant tension clamps. If replacement
is necessary, use only an original equipment clamp
with a matching number or letter.
(3) Remove radiator hose clamp and hose from
thermostat housing.
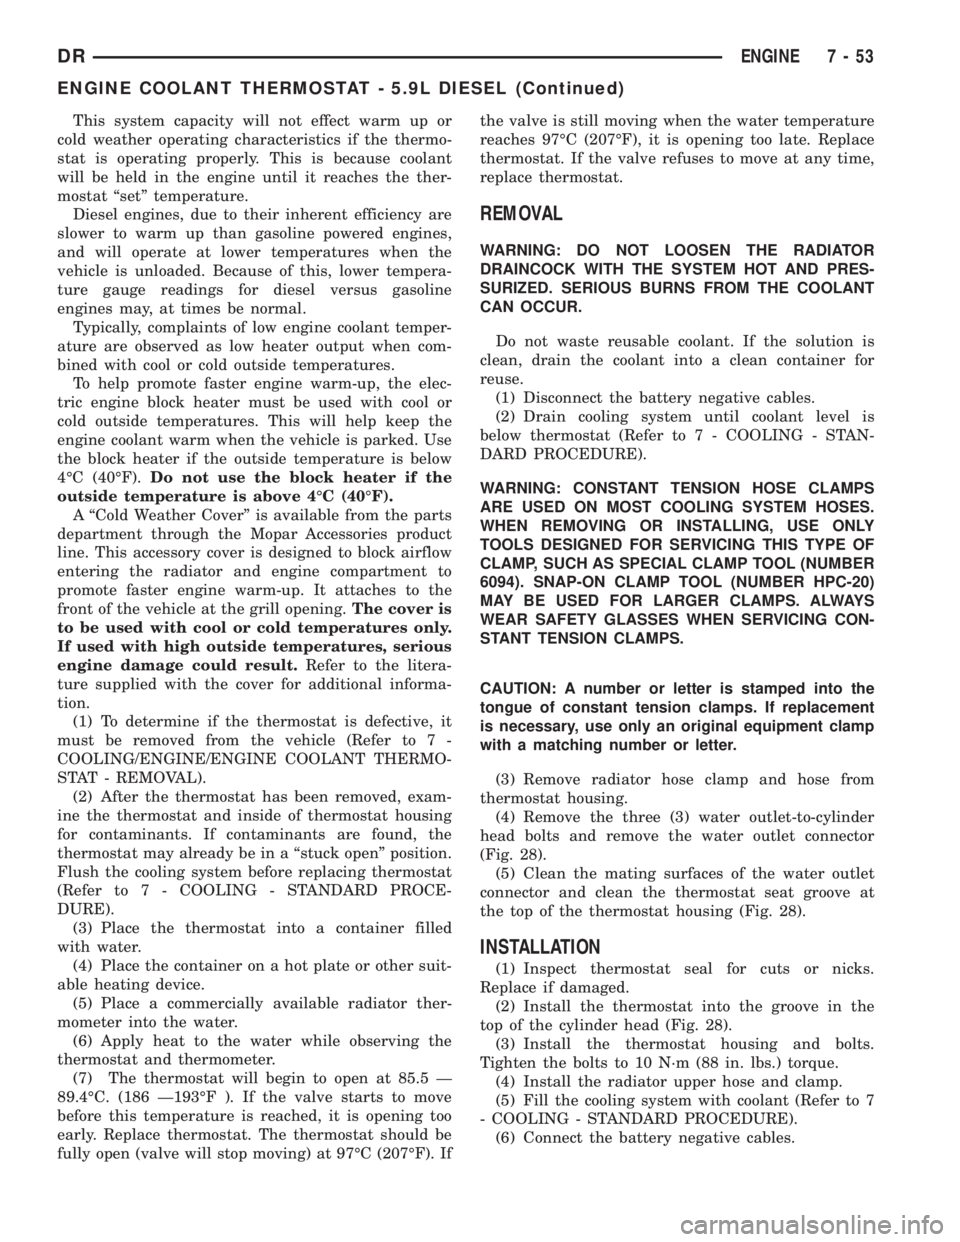
(4) Remove the three (3) water outlet-to-cylinder
head bolts and remove the water outlet connector
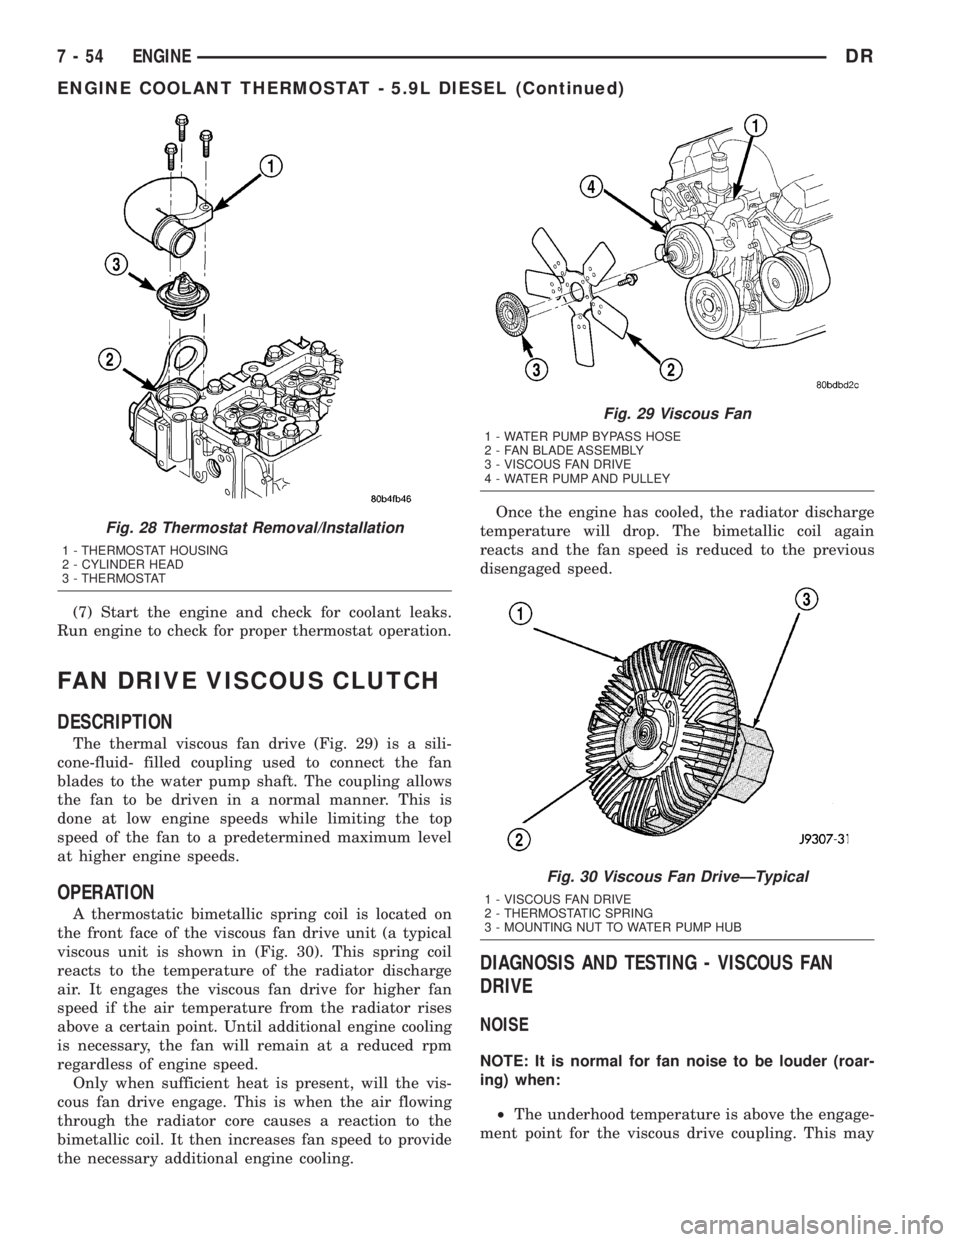
(Fig. 28).
(5) Clean the mating surfaces of the water outlet
connector and clean the thermostat seat groove at
the top of the thermostat housing (Fig. 28).
INSTALLATION
(1) Inspect thermostat seal for cuts or nicks.
Replace if damaged.
(2) Install the thermostat into the groove in the
top of the cylinder head (Fig. 28).
(3) Install the thermostat housing and bolts.
Tighten the bolts to 10 N´m (88 in. lbs.) torque.
(4) Install the radiator upper hose and clamp.
(5) Fill the cooling system with coolant (Refer to 7
- COOLING - STANDARD PROCEDURE).
(6) Connect the battery negative cables.
DRENGINE 7 - 53
ENGINE COOLANT THERMOSTAT - 5.9L DIESEL (Continued)
Page 341 of 2895
(7) Start the engine and check for coolant leaks.
Run engine to check for proper thermostat operation.
FAN DRIVE VISCOUS CLUTCH
DESCRIPTION
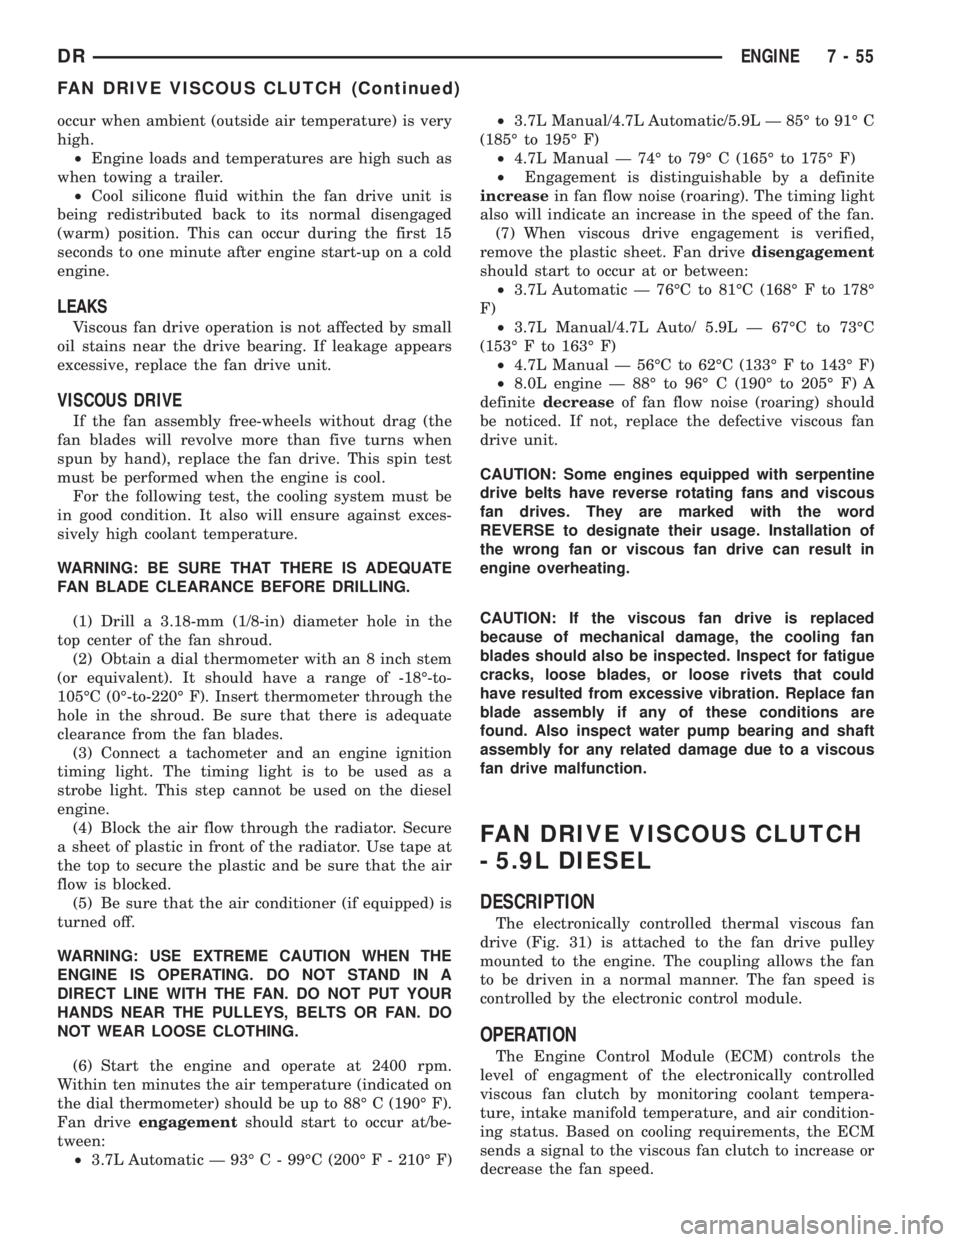
The thermal viscous fan drive (Fig. 29) is a sili-
cone-fluid- filled coupling used to connect the fan
blades to the water pump shaft. The coupling allows
the fan to be driven in a normal manner. This is
done at low engine speeds while limiting the top
speed of the fan to a predetermined maximum level
at higher engine speeds.
OPERATION
A thermostatic bimetallic spring coil is located on
the front face of the viscous fan drive unit (a typical
viscous unit is shown in (Fig. 30). This spring coil
reacts to the temperature of the radiator discharge
air. It engages the viscous fan drive for higher fan
speed if the air temperature from the radiator rises
above a certain point. Until additional engine cooling
is necessary, the fan will remain at a reduced rpm
regardless of engine speed.
Only when sufficient heat is present, will the vis-
cous fan drive engage. This is when the air flowing
through the radiator core causes a reaction to the
bimetallic coil. It then increases fan speed to provide
the necessary additional engine cooling.Once the engine has cooled, the radiator discharge
temperature will drop. The bimetallic coil again
reacts and the fan speed is reduced to the previous
disengaged speed.
DIAGNOSIS AND TESTING - VISCOUS FAN
DRIVE
NOISE
NOTE: It is normal for fan noise to be louder (roar-
ing) when:
²The underhood temperature is above the engage-
ment point for the viscous drive coupling. This may
Fig. 28 Thermostat Removal/Installation
1 - THERMOSTAT HOUSING
2 - CYLINDER HEAD
3 - THERMOSTAT
Fig. 29 Viscous Fan
1 - WATER PUMP BYPASS HOSE
2 - FAN BLADE ASSEMBLY
3 - VISCOUS FAN DRIVE
4 - WATER PUMP AND PULLEY
Fig. 30 Viscous Fan DriveÐTypical
1 - VISCOUS FAN DRIVE
2 - THERMOSTATIC SPRING
3 - MOUNTING NUT TO WATER PUMP HUB
7 - 54 ENGINEDR
ENGINE COOLANT THERMOSTAT - 5.9L DIESEL (Continued)
Page 342 of 2895
occur when ambient (outside air temperature) is very
high.
²Engine loads and temperatures are high such as
when towing a trailer.
²Cool silicone fluid within the fan drive unit is
being redistributed back to its normal disengaged
(warm) position. This can occur during the first 15
seconds to one minute after engine start-up on a cold
engine.
LEAKS
Viscous fan drive operation is not affected by small
oil stains near the drive bearing. If leakage appears
excessive, replace the fan drive unit.
VISCOUS DRIVE
If the fan assembly free-wheels without drag (the
fan blades will revolve more than five turns when
spun by hand), replace the fan drive. This spin test
must be performed when the engine is cool.
For the following test, the cooling system must be
in good condition. It also will ensure against exces-
sively high coolant temperature.
WARNING: BE SURE THAT THERE IS ADEQUATE
FAN BLADE CLEARANCE BEFORE DRILLING.
(1) Drill a 3.18-mm (1/8-in) diameter hole in the
top center of the fan shroud.
(2) Obtain a dial thermometer with an 8 inch stem
(or equivalent). It should have a range of -18É-to-
105ÉC (0É-to-220É F). Insert thermometer through the
hole in the shroud. Be sure that there is adequate
clearance from the fan blades.
(3) Connect a tachometer and an engine ignition
timing light. The timing light is to be used as a
strobe light. This step cannot be used on the diesel
engine.
(4) Block the air flow through the radiator. Secure
a sheet of plastic in front of the radiator. Use tape at
the top to secure the plastic and be sure that the air
flow is blocked.
(5) Be sure that the air conditioner (if equipped) is
turned off.
WARNING: USE EXTREME CAUTION WHEN THE
ENGINE IS OPERATING. DO NOT STAND IN A
DIRECT LINE WITH THE FAN. DO NOT PUT YOUR
HANDS NEAR THE PULLEYS, BELTS OR FAN. DO
NOT WEAR LOOSE CLOTHING.
(6) Start the engine and operate at 2400 rpm.
Within ten minutes the air temperature (indicated on
the dial thermometer) should be up to 88É C (190É F).
Fan driveengagementshould start to occur at/be-
tween:
²3.7L Automatic Ð 93É C - 99ÉC (200É F - 210É F)²3.7L Manual/4.7L Automatic/5.9L Ð 85É to 91É C
(185É to 195É F)
²4.7L Manual Ð 74É to 79É C (165É to 175É F)
²Engagement is distinguishable by a definite
increasein fan flow noise (roaring). The timing light
also will indicate an increase in the speed of the fan.
(7) When viscous drive engagement is verified,
remove the plastic sheet. Fan drivedisengagement
should start to occur at or between:
²3.7L Automatic Ð 76ÉC to 81ÉC (168É F to 178É
F)
²3.7L Manual/4.7L Auto/ 5.9L Ð 67ÉC to 73ÉC
(153É F to 163É F)
²4.7L Manual Ð 56ÉC to 62ÉC (133É F to 143É F)
²8.0L engine Ð 88É to 96É C (190É to 205É F) A
definitedecreaseof fan flow noise (roaring) should
be noticed. If not, replace the defective viscous fan
drive unit.
CAUTION: Some engines equipped with serpentine
drive belts have reverse rotating fans and viscous
fan drives. They are marked with the word
REVERSE to designate their usage. Installation of
the wrong fan or viscous fan drive can result in
engine overheating.
CAUTION: If the viscous fan drive is replaced
because of mechanical damage, the cooling fan
blades should also be inspected. Inspect for fatigue
cracks, loose blades, or loose rivets that could
have resulted from excessive vibration. Replace fan
blade assembly if any of these conditions are
found. Also inspect water pump bearing and shaft
assembly for any related damage due to a viscous
fan drive malfunction.
FAN DRIVE VISCOUS CLUTCH
- 5.9L DIESEL
DESCRIPTION
The electronically controlled thermal viscous fan
drive (Fig. 31) is attached to the fan drive pulley
mounted to the engine. The coupling allows the fan
to be driven in a normal manner. The fan speed is
controlled by the electronic control module.
OPERATION
The Engine Control Module (ECM) controls the
level of engagment of the electronically controlled
viscous fan clutch by monitoring coolant tempera-
ture, intake manifold temperature, and air condition-
ing status. Based on cooling requirements, the ECM
sends a signal to the viscous fan clutch to increase or
decrease the fan speed.
DRENGINE 7 - 55
FAN DRIVE VISCOUS CLUTCH (Continued)