2003 DODGE RAM mirror
[x] Cancel search: mirrorPage 1415 of 2895
Engine base timing can be verified by the following
procedure:
(1) Remove the cylinder head covers (Refer to 9 -
ENGINE/CYLINDER HEAD/CYLINDER HEAD
COVER(S) - REMOVAL).
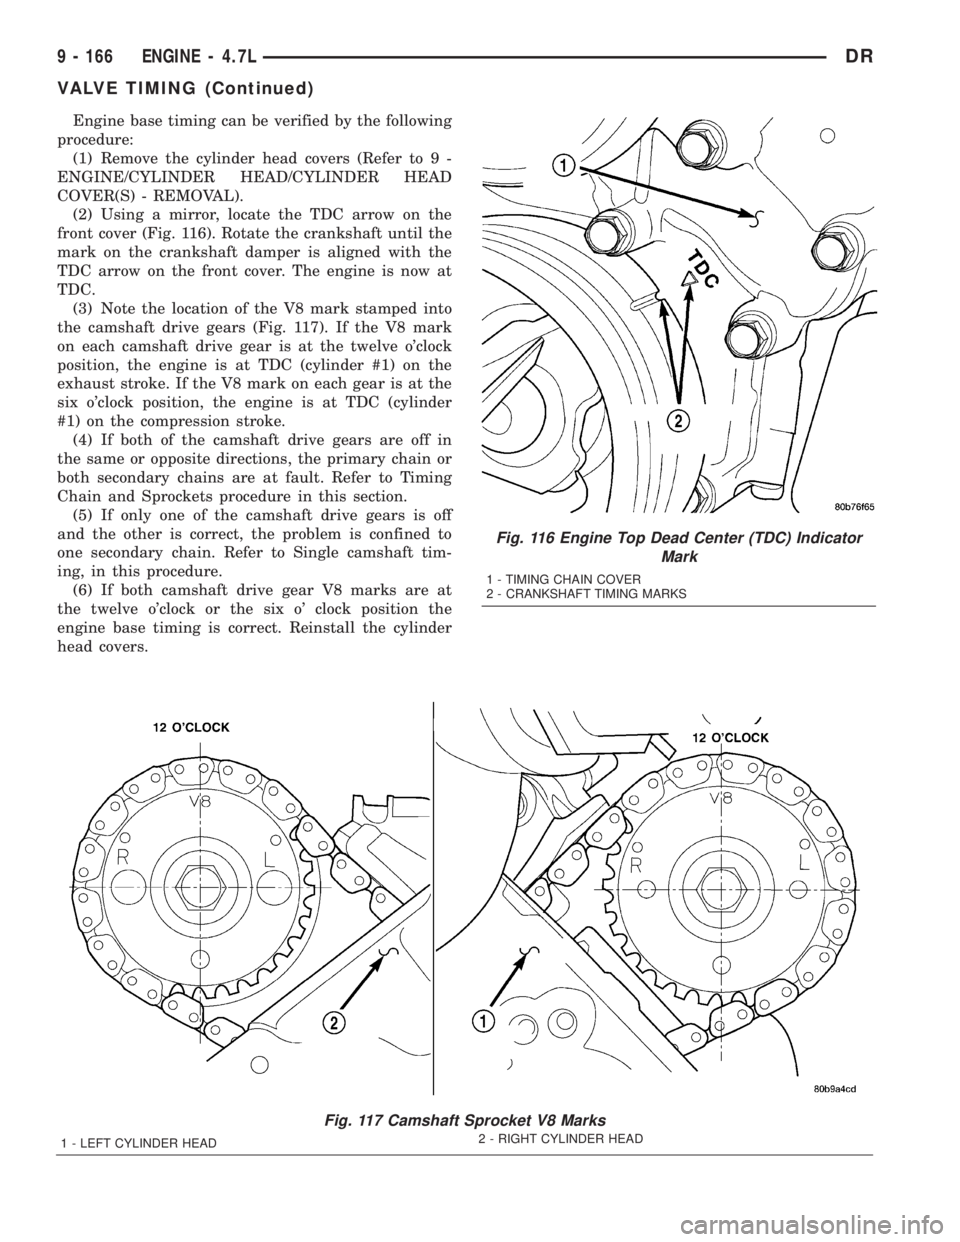
(2) Using a mirror, locate the TDC arrow on the
front cover (Fig. 116). Rotate the crankshaft until the
mark on the crankshaft damper is aligned with the
TDC arrow on the front cover. The engine is now at
TDC.
(3) Note the location of the V8 mark stamped into
the camshaft drive gears (Fig. 117). If the V8 mark
on each camshaft drive gear is at the twelve o'clock
position, the engine is at TDC (cylinder #1) on the
exhaust stroke. If the V8 mark on each gear is at the
six o'clock position, the engine is at TDC (cylinder
#1) on the compression stroke.
(4) If both of the camshaft drive gears are off in
the same or opposite directions, the primary chain or
both secondary chains are at fault. Refer to Timing
Chain and Sprockets procedure in this section.
(5) If only one of the camshaft drive gears is off
and the other is correct, the problem is confined to
one secondary chain. Refer to Single camshaft tim-
ing, in this procedure.
(6) If both camshaft drive gear V8 marks are at
the twelve o'clock or the six o' clock position the
engine base timing is correct. Reinstall the cylinder
head covers.
Fig. 116 Engine Top Dead Center (TDC) Indicator
Mark
1 - TIMING CHAIN COVER
2 - CRANKSHAFT TIMING MARKS
Fig. 117 Camshaft Sprocket V8 Marks
1 - LEFT CYLINDER HEAD2 - RIGHT CYLINDER HEAD
9 - 166 ENGINE - 4.7LDR
VALVE TIMING (Continued)
Page 2577 of 2895
VISUAL INSPECTION BEFORE WATER LEAK TESTS
Verify that floor and body plugs are in place, body
drains are clear, and body components are properly
aligned and sealed. If component alignment or seal-
ing is necessary, refer to the appropriate section of
this group for proper procedures.
WATER LEAK TESTS
WARNING: DO NOT USE ELECTRIC SHOP LIGHTS
OR TOOLS IN WATER TEST AREA. PERSONAL
INJURY CAN RESULT.
When the conditions causing a water leak have
been determined, simulate the conditions as closely
as possible.
²If a leak occurs with the vehicle parked in a
steady light rain, flood the leak area with an open-
ended garden hose.
²If a leak occurs while driving at highway speeds
in a steady rain, test the leak area with a reasonable
velocity stream or fan spray of water. Direct the
spray in a direction comparable to actual conditions.
²If a leak occurs when the vehicle is parked on an
incline, hoist the end or side of the vehicle to simu-
late this condition. This method can be used when
the leak occurs when the vehicle accelerates, stops or
turns. If the leak occurs on acceleration, hoist the
front of the vehicle. If the leak occurs when braking,
hoist the back of the vehicle. If the leak occurs on left
turns, hoist the left side of the vehicle. If the leak
occurs on right turns, hoist the right side of the vehi-
cle. For hoisting recommendations (Refer to LUBRI-
CATION & MAINTENANCE/HOISTING -
STANDARD PROCEDURE).
WATER LEAK DETECTION
To detect a water leak point-of-entry, do a water
test and watch for water tracks or droplets forming
on the inside of the vehicle. If necessary, remove inte-
rior trim covers or panels to gain visual access to the
leak area. If the hose cannot be positioned without
being held, have someone help do the water test.
Some water leaks must be tested for a considerable
length of time to become apparent. When a leak
appears, find the highest point of the water track or
drop. The highest point usually will show the point of
entry. After leak point has been found, repair the
leak and water test to verify that the leak has
stopped.
Locating the entry point of water that is leaking
into a cavity between panels can be difficult. The
trapped water may splash or run from the cavity,
often at a distance from the entry point. Most water
leaks of this type become apparent after accelerating,
stopping, turning, or when on an incline.MIRROR INSPECTION METHOD
When a leak point area is visually obstructed, use
a suitable mirror to gain visual access. A mirror can
also be used to deflect light to a limited-access area
to assist in locating a leak point.
BRIGHT LIGHT LEAK TEST METHOD
Some water leaks in the luggage compartment can
be detected without water testing. Position the vehi-
cle in a brightly lit area. From inside the darkened
luggage compartment inspect around seals and body
seams. If necessary, have a helper direct a drop light
over the suspected leak areas around the luggage
compartment. If light is visible through a normally
sealed location, water could enter through the open-
ing.
PRESSURIZED LEAK TEST METHOD
When a water leak into the passenger compart-
ment cannot be detected by water testing, pressurize
the passenger compartment and soap test exterior of
the vehicle. To pressurize the passenger compart-
ment, close all doors and windows, start engine, and
set heater control to high blower in HEAT position. If
engine can not be started, connect a charger to the
battery to ensure adequate voltage to the blower.
With interior pressurized, apply dish detergent solu-
tion to suspected leak area on the exterior of the
vehicle. Apply detergent solution with spray device or
soft bristle brush. If soap bubbles occur at a body
seam, joint, seal or gasket, the leak entry point could
be at that location.
DIAGNOSIS AND TESTING - WIND NOISE
Wind noise is the result of most air leaks. Air leaks
can be caused by poor sealing, improper body compo-
nent alignment, body seam porosity, or missing plugs
in the engine compartment or door hinge pillar areas.
All body sealing points should be airtight in normal
driving conditions. Moving sealing surfaces will not
always seal airtight under all conditions. At times,
side glass or door seals will allow wind noise to be
noticed in the passenger compartment during high
cross winds. Over compensating on door or glass
adjustments to stop wind noise that occurs under
severe conditions can cause premature seal wear and
excessive closing or latching effort. After a repair pro-
cedure has been performed, test vehicle to verify
noise has stopped before returning vehicle to use.
VISUAL INSPECTION BEFORE TESTS
Verify that floor and body plugs are in place and
body components are aligned and sealed. If compo-
nent alignment or sealing is necessary, refer to the
appropriate section of this group for proper proce-
dures.
23 - 2 BODYDR
BODY (Continued)
Page 2588 of 2895
Description N´m Ft. Lbs. In. Lbs.
Instrument panel top bolts 12 9 Ð
Load floor nuts 25 18 Ð
Load floor/rear seat bolts 40 30 Ð
Overhead/b-pillar grab handle bolts 6 Ð 55
Radiator and condenser to radiator crossmember bolts 8 Ð 75
Radiator upper crossmember bolts 28 21 Ð
Rear door glass lift plate nuts 10 Ð 89
Rear door glass run channels 10 Ð 89
Rear door hinge to b-pillar bolts 28 21 Ð
Rear door hinge to door bolts/nuts 28 21 Ð
Rear door inside handle bolt 9 Ð 80
Rear door latch adjustment screw 3 Ð 30
Rear door latch bolts 10 Ð 89
Rear door latch striker bolts 28 21 Ð
Rear door regulator bolts 10 Ð 89
Rear door regulator stabilizer nuts 10 Ð 89
Rear door remote handle actuator nuts 10 Ð 89
Rear fender bottom screws 7 Ð 60
Rear fender nuts 7 Ð 60
Rear fender support bracket bolts 11 8 Ð
Rear seat assembly bolts*40 30 Ð
Rear seat back hinge bolts*25 18 Ð
Rear seat cushion hinge bolts*32 24 Ð
Rear shoulder belt anchor bolts 40 30 Ð
Rear view mirror set screw 1 Ð 15
Shifter knob nut 27 20 Ð
Side view mirror nuts 7 Ð 60
Tailgate check cable bolt 23 17 Ð
Tailgate hinge/pivot screws 34 25 Ð
Tailgate latch bolts 23 17 Ð
Tailgate latch striker 34 25 Ð
Tailgate release handle nuts 7 Ð 60
NOTE: *Seat fasteners should be discarded and
replaced with new fasteners during assembly.
DRBODY 23 - 13
BODY (Continued)
Page 2593 of 2895
DOOR - FRONT
TABLE OF CONTENTS
page page
DOOR
REMOVAL.............................18
INSTALLATION.........................18
ADJUSTMENTS
ADJUSTMENT........................19
DOOR GLASS
REMOVAL.............................20
INSTALLATION.........................20
EXTERIOR HANDLE
REMOVAL.............................20
INSTALLATION.........................20
GLASS RUN CHANNEL
REMOVAL.............................21
INSTALLATION.........................21
HINGE
REMOVAL.............................22
INSTALLATION.........................22
INSIDE HANDLE ACTUATOR
REMOVAL.............................22
INSTALLATION.........................22
LATCH
REMOVAL.............................23
INSTALLATION.........................23
ADJUSTMENTS
ADJUSTMENT........................23LATCH STRIKER
REMOVAL.............................24
INSTALLATION.........................24
ADJUSTMENTS
ADJUSTMENT........................24
LOCK CYLINDER
REMOVAL.............................24
INSTALLATION.........................24
TRIM PANEL
REMOVAL.............................24
INSTALLATION.........................24
WATERDAM
REMOVAL.............................25
INSTALLATION.........................25
WINDOW REGULATOR - POWER
REMOVAL.............................25
INSTALLATION.........................25
WINDOW REGULATOR - MANUAL
REMOVAL.............................26
INSTALLATION.........................26
SIDE VIEW MIRROR FLAG
REMOVAL.............................27
INSTALLATION.........................27
DOOR
REMOVAL
(1) Disconnect the door wire harness electrical con-
nector at the A-pillar. (Fig. 1)
(2) Using a grease pencil or equivalent, mark the
outline of the door hinges on the door to aid in instal-
lation.
(3) Support the door with a suitable lifting device.
NOTE: The epoxy bonded washers should not be
seperated from the hinge. If the washers are
removed the door may have to be re-adjusted.
(4) Remove the nuts and bolts attaching the door
hinges to the door.
INSTALLATION
(1) Support the door with a suitable lifting device
and install the door onto the hinges.
(2) Install the washers, if there were removed pre-
viously, nuts and tighten to 28 N´m (21 ft. lbs.).
(3) Connect the electrical connectors.
(4) Adjust the door as necessary. (Refer to 23 -
BODY/DOOR - FRONT/DOOR - ADJUSTMENTS)
23 - 18 DOOR - FRONTDR
Page 2599 of 2895
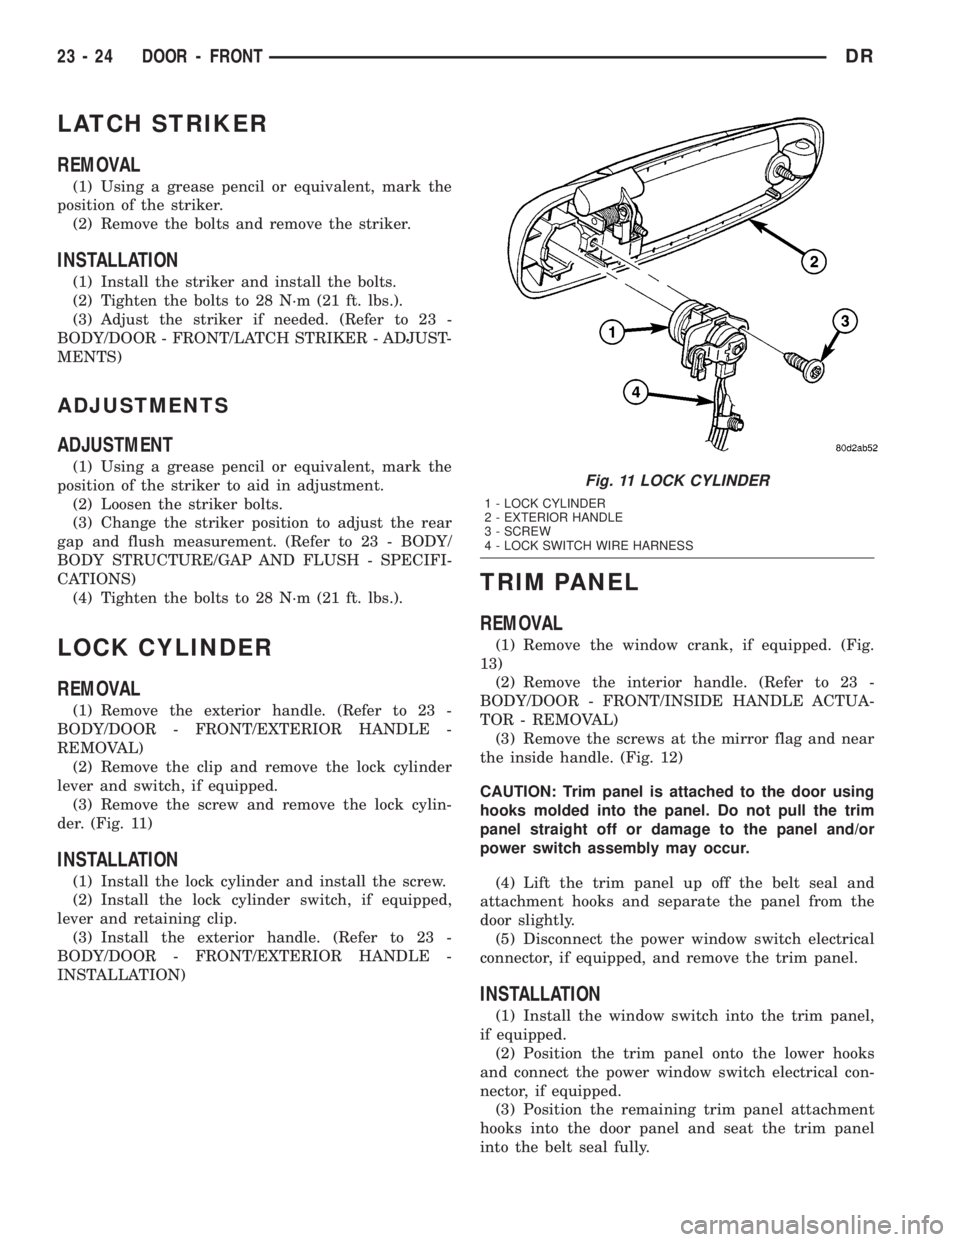
LATCH STRIKER
REMOVAL
(1) Using a grease pencil or equivalent, mark the
position of the striker.
(2) Remove the bolts and remove the striker.
INSTALLATION
(1) Install the striker and install the bolts.
(2) Tighten the bolts to 28 N´m (21 ft. lbs.).
(3) Adjust the striker if needed. (Refer to 23 -
BODY/DOOR - FRONT/LATCH STRIKER - ADJUST-
MENTS)
ADJUSTMENTS
ADJUSTMENT
(1) Using a grease pencil or equivalent, mark the
position of the striker to aid in adjustment.
(2) Loosen the striker bolts.
(3) Change the striker position to adjust the rear
gap and flush measurement. (Refer to 23 - BODY/
BODY STRUCTURE/GAP AND FLUSH - SPECIFI-
CATIONS)
(4) Tighten the bolts to 28 N´m (21 ft. lbs.).
LOCK CYLINDER
REMOVAL
(1) Remove the exterior handle. (Refer to 23 -
BODY/DOOR - FRONT/EXTERIOR HANDLE -
REMOVAL)
(2) Remove the clip and remove the lock cylinder
lever and switch, if equipped.
(3) Remove the screw and remove the lock cylin-
der. (Fig. 11)
INSTALLATION
(1) Install the lock cylinder and install the screw.
(2) Install the lock cylinder switch, if equipped,
lever and retaining clip.
(3) Install the exterior handle. (Refer to 23 -
BODY/DOOR - FRONT/EXTERIOR HANDLE -
INSTALLATION)
TRIM PANEL
REMOVAL
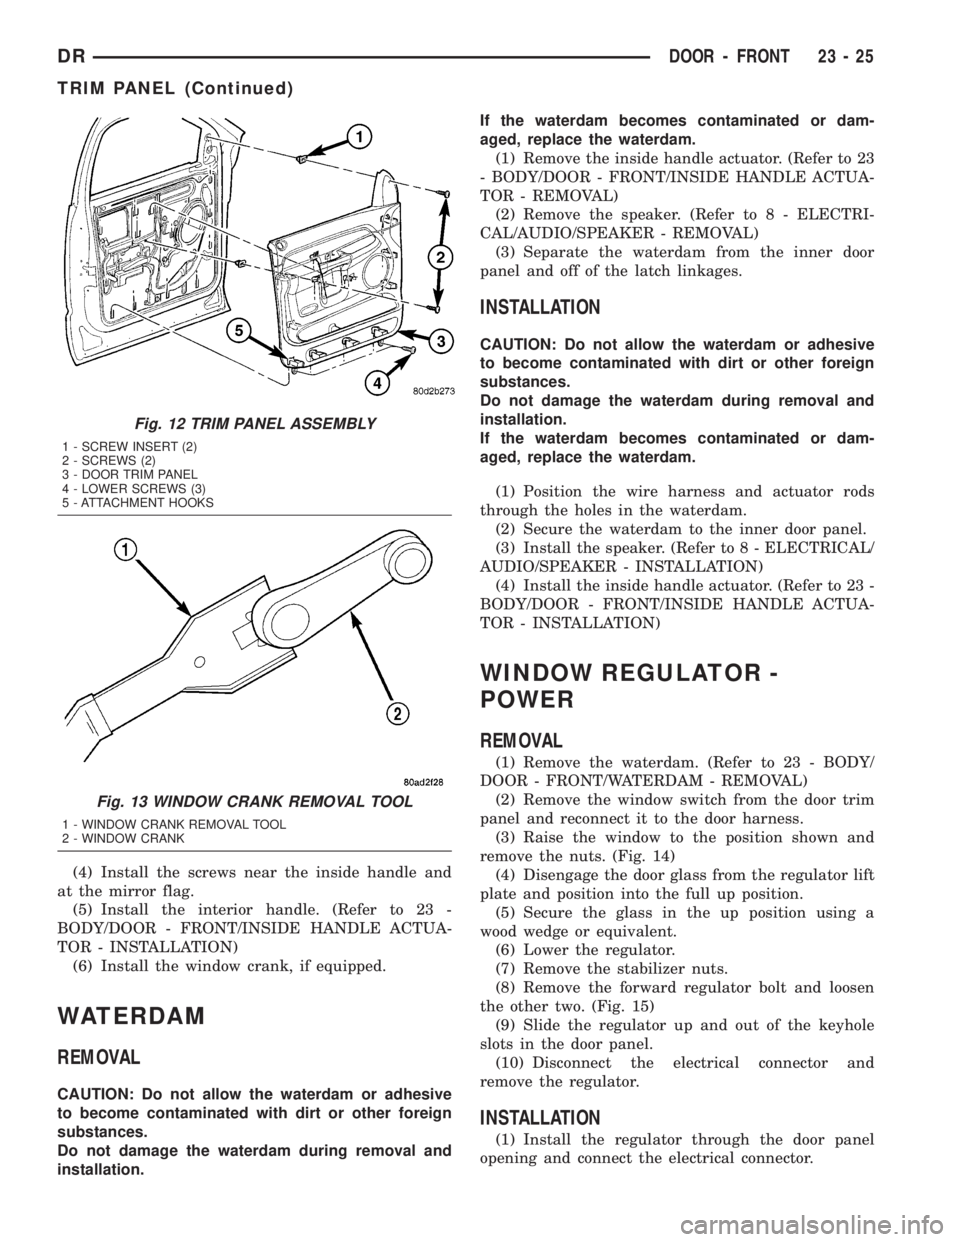
(1) Remove the window crank, if equipped. (Fig.
13)
(2) Remove the interior handle. (Refer to 23 -
BODY/DOOR - FRONT/INSIDE HANDLE ACTUA-
TOR - REMOVAL)
(3) Remove the screws at the mirror flag and near
the inside handle. (Fig. 12)
CAUTION: Trim panel is attached to the door using
hooks molded into the panel. Do not pull the trim
panel straight off or damage to the panel and/or
power switch assembly may occur.
(4) Lift the trim panel up off the belt seal and
attachment hooks and separate the panel from the
door slightly.
(5) Disconnect the power window switch electrical
connector, if equipped, and remove the trim panel.
INSTALLATION
(1) Install the window switch into the trim panel,
if equipped.
(2) Position the trim panel onto the lower hooks
and connect the power window switch electrical con-
nector, if equipped.
(3) Position the remaining trim panel attachment
hooks into the door panel and seat the trim panel
into the belt seal fully.
Fig. 11 LOCK CYLINDER
1 - LOCK CYLINDER
2 - EXTERIOR HANDLE
3 - SCREW
4 - LOCK SWITCH WIRE HARNESS
23 - 24 DOOR - FRONTDR
Page 2600 of 2895
(4) Install the screws near the inside handle and
at the mirror flag.
(5) Install the interior handle. (Refer to 23 -
BODY/DOOR - FRONT/INSIDE HANDLE ACTUA-
TOR - INSTALLATION)
(6) Install the window crank, if equipped.
WATERDAM
REMOVAL
CAUTION: Do not allow the waterdam or adhesive
to become contaminated with dirt or other foreign
substances.
Do not damage the waterdam during removal and
installation.If the waterdam becomes contaminated or dam-
aged, replace the waterdam.
(1) Remove the inside handle actuator. (Refer to 23
- BODY/DOOR - FRONT/INSIDE HANDLE ACTUA-
TOR - REMOVAL)
(2) Remove the speaker. (Refer to 8 - ELECTRI-
CAL/AUDIO/SPEAKER - REMOVAL)
(3) Separate the waterdam from the inner door
panel and off of the latch linkages.
INSTALLATION
CAUTION: Do not allow the waterdam or adhesive
to become contaminated with dirt or other foreign
substances.
Do not damage the waterdam during removal and
installation.
If the waterdam becomes contaminated or dam-
aged, replace the waterdam.
(1) Position the wire harness and actuator rods
through the holes in the waterdam.
(2) Secure the waterdam to the inner door panel.
(3) Install the speaker. (Refer to 8 - ELECTRICAL/
AUDIO/SPEAKER - INSTALLATION)
(4) Install the inside handle actuator. (Refer to 23 -
BODY/DOOR - FRONT/INSIDE HANDLE ACTUA-
TOR - INSTALLATION)
WINDOW REGULATOR -
POWER
REMOVAL
(1) Remove the waterdam. (Refer to 23 - BODY/
DOOR - FRONT/WATERDAM - REMOVAL)
(2) Remove the window switch from the door trim
panel and reconnect it to the door harness.
(3) Raise the window to the position shown and
remove the nuts. (Fig. 14)
(4) Disengage the door glass from the regulator lift
plate and position into the full up position.
(5) Secure the glass in the up position using a
wood wedge or equivalent.
(6) Lower the regulator.
(7) Remove the stabilizer nuts.
(8) Remove the forward regulator bolt and loosen
the other two. (Fig. 15)
(9) Slide the regulator up and out of the keyhole
slots in the door panel.
(10) Disconnect the electrical connector and
remove the regulator.
INSTALLATION
(1) Install the regulator through the door panel
opening and connect the electrical connector.
Fig. 12 TRIM PANEL ASSEMBLY
1 - SCREW INSERT (2)
2 - SCREWS (2)
3 - DOOR TRIM PANEL
4 - LOWER SCREWS (3)
5 - ATTACHMENT HOOKS
Fig. 13 WINDOW CRANK REMOVAL TOOL
1 - WINDOW CRANK REMOVAL TOOL
2 - WINDOW CRANK
DRDOOR - FRONT 23 - 25
TRIM PANEL (Continued)
Page 2602 of 2895
SIDE VIEW MIRROR FLAG
REMOVAL
(1) Remove the door trim panel. (Refer to 23 -
BODY/DOOR - FRONT/TRIM PANEL - REMOVAL)
CAUTION: Do not use a drill to remove the heat
stakes.
(2) Remove the heat stakes using a razor knife or
equivalent.
(3) Release the tabs and remove the mirror flag.
INSTALLATION
NOTE: Clean the excess heat staking off of the
studs to aid installation.
(1) Install the new mirror flag over the tabs and
install the screws into the heat stake studs.
(2) Install the door trim panel. (Refer to 23 -
BODY/DOOR - FRONT/TRIM PANEL - INSTALLA-
TION)
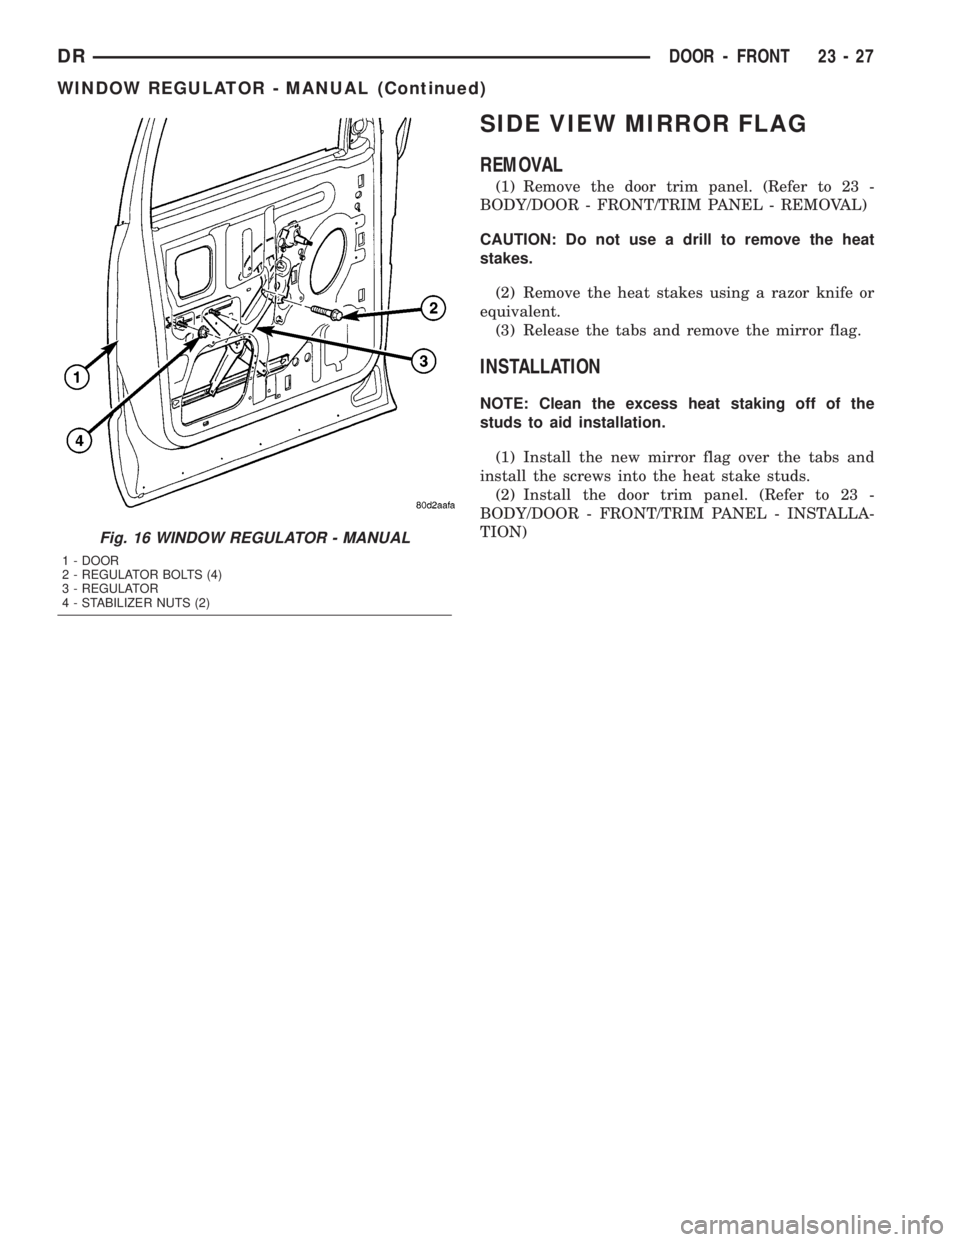
Fig. 16 WINDOW REGULATOR - MANUAL
1 - DOOR
2 - REGULATOR BOLTS (4)
3 - REGULATOR
4 - STABILIZER NUTS (2)
DRDOOR - FRONT 23 - 27
WINDOW REGULATOR - MANUAL (Continued)
Page 2611 of 2895
EXTERIOR
TABLE OF CONTENTS
page page
BODY SIDE MOLDINGS
REMOVAL.............................36
INSTALLATION.........................36
BODY ISOLATORS
REMOVAL.............................36
INSTALLATION.........................37
CARGO BOX
REMOVAL.............................37
INSTALLATION.........................37
CARGO BOX - TIE DOWN
REMOVAL.............................37
INSTALLATION.........................37
COWL GRILLE
REMOVAL.............................38
INSTALLATION.........................38
EXTERIOR NAME PLATES
REMOVAL.............................38
INSTALLATION.........................38
FRONT FENDER
REMOVAL.............................39
INSTALLATION.........................39
FUEL FILL DOOR
REMOVAL.............................39
INSTALLATION.........................39GRILLE
REMOVAL.............................39
INSTALLATION.........................40
GRILLE FRAME
REMOVAL.............................40
INSTALLATION.........................40
FRONT WHEELHOUSE SPLASH SHIELD
REMOVAL.............................40
INSTALLATION.........................41
REAR WHEELHOUSE SPLASH SHIELD
REMOVAL.............................41
INSTALLATION.........................41
SIDE VIEW MIRROR
REMOVAL.............................41
INSTALLATION.........................41
UPPER RADIATOR CROSSMEMBER
REMOVAL.............................42
INSTALLATION.........................42
SIDE VIEW MIRROR GLASS
REMOVAL.............................42
INSTALLATION.........................44
REAR FENDER
REMOVAL.............................44
INSTALLATION.........................44
BODY SIDE MOLDINGS
REMOVAL
NOTE: Body side moldings are attached to the body
panels with adhesive tape.
(1) Apply a length of masking tape on the body
panel, parallel to the top edge of the molding and to
one end to use as a guide for installation, if neces-
sary.
(2) If temperature is below 21ÉC (70ÉF) warm
molding with a heat lamp or gun. Do not exceed 52ÉC
(120ÉF) when heating molding.
(3) Using a trim stick C-4755 or equivalent,
remove and discard the molding from the outside of
the body panel.
INSTALLATION
(1) Thoroughly clean all residue from the body side
molding attachment area of the body panel.(2) Wipe area with a clean lint free cloth moist-
ened with a 50% solution of water and alcohol and
wipe dry immediately with a dry lint free cloth.
(3) Apply new body side molding using the guide
tape on the body panel and apply consistent and uni-
form pressure of approximately 40 p.s.i. over the
entire surface of the molding.
BODY ISOLATORS
REMOVAL
(1) Loosen all cab to frame mounting bolts (six
standard cab, eight quad cab). (Fig. 1)
(2) Remove the mounting bolts and rebound cush-
ions
(3) Using a floor jack and block of wood under the
cab sill, lift the body to gain access to the isolators.
(4) Remove the isolators.
(5) Install new isolators and repeat steps one
through 4, for the opposite side.
23 - 36 EXTERIORDR