2003 DODGE RAM belt
[x] Cancel search: beltPage 1135 of 2895
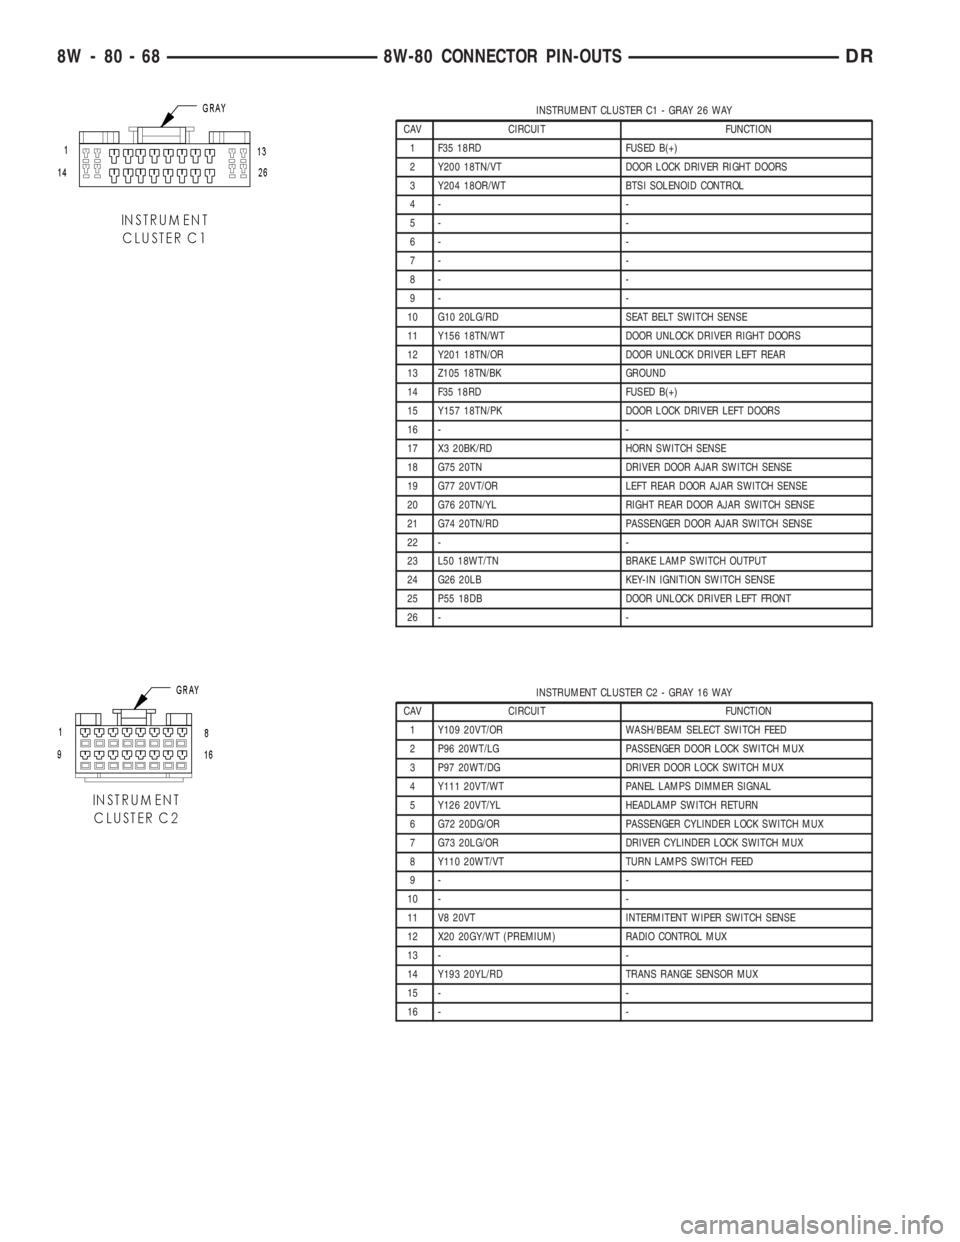
INSTRUMENT CLUSTER C1 - GRAY 26 WAY
CAV CIRCUIT FUNCTION
1 F35 18RD FUSED B(+)
2 Y200 18TN/VT DOOR LOCK DRIVER RIGHT DOORS
3 Y204 18OR/WT BTSI SOLENOID CONTROL
4- -
5- -
6- -
7- -
8- -
9- -
10 G10 20LG/RD SEAT BELT SWITCH SENSE
11 Y156 18TN/WT DOOR UNLOCK DRIVER RIGHT DOORS
12 Y201 18TN/OR DOOR UNLOCK DRIVER LEFT REAR
13 Z105 18TN/BK GROUND
14 F35 18RD FUSED B(+)
15 Y157 18TN/PK DOOR LOCK DRIVER LEFT DOORS
16 - -
17 X3 20BK/RD HORN SWITCH SENSE
18 G75 20TN DRIVER DOOR AJAR SWITCH SENSE
19 G77 20VT/OR LEFT REAR DOOR AJAR SWITCH SENSE
20 G76 20TN/YL RIGHT REAR DOOR AJAR SWITCH SENSE
21 G74 20TN/RD PASSENGER DOOR AJAR SWITCH SENSE
22 - -
23 L50 18WT/TN BRAKE LAMP SWITCH OUTPUT
24 G26 20LB KEY-IN IGNITION SWITCH SENSE
25 P55 18DB DOOR UNLOCK DRIVER LEFT FRONT
26 - -
INSTRUMENT CLUSTER C2 - GRAY 16 WAY
CAV CIRCUIT FUNCTION
1 Y109 20VT/OR WASH/BEAM SELECT SWITCH FEED
2 P96 20WT/LG PASSENGER DOOR LOCK SWITCH MUX
3 P97 20WT/DG DRIVER DOOR LOCK SWITCH MUX
4 Y111 20VT/WT PANEL LAMPS DIMMER SIGNAL
5 Y126 20VT/YL HEADLAMP SWITCH RETURN
6 G72 20DG/OR PASSENGER CYLINDER LOCK SWITCH MUX
7 G73 20LG/OR DRIVER CYLINDER LOCK SWITCH MUX
8 Y110 20WT/VT TURN LAMPS SWITCH FEED
9- -
10 - -
11 V8 20VT INTERMITENT WIPER SWITCH SENSE
12 X20 20GY/WT (PREMIUM) RADIO CONTROL MUX
13 - -
14 Y193 20YL/RD TRANS RANGE SENSOR MUX
15 - -
16 - -
8W - 80 - 68 8W-80 CONNECTOR PIN-OUTSDR
Page 1165 of 2895
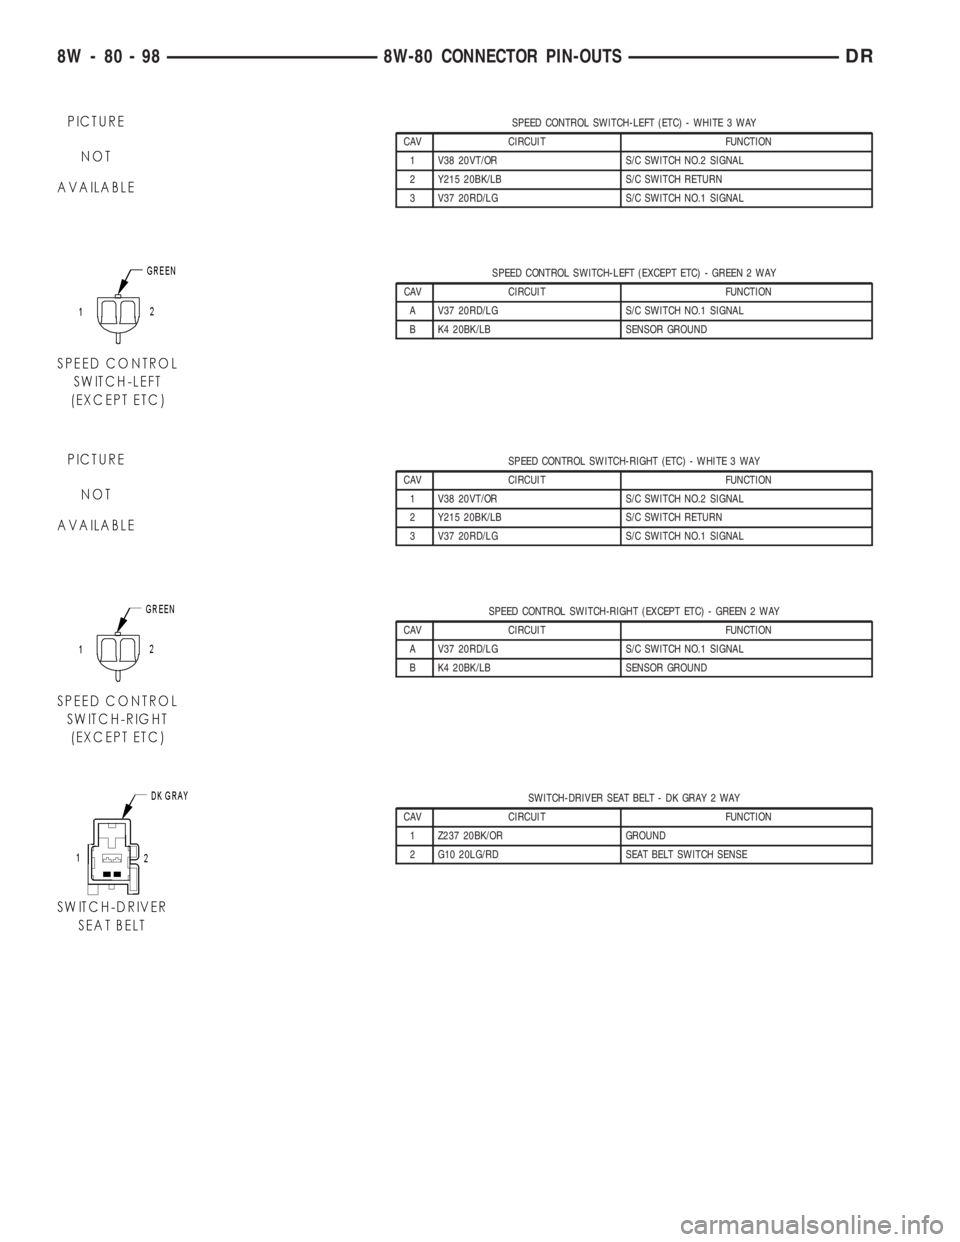
SPEED CONTROL SWITCH-LEFT (ETC) - WHITE 3 WAY
CAV CIRCUIT FUNCTION
1 V38 20VT/OR S/C SWITCH NO.2 SIGNAL
2 Y215 20BK/LB S/C SWITCH RETURN
3 V37 20RD/LG S/C SWITCH NO.1 SIGNAL
SPEED CONTROL SWITCH-LEFT (EXCEPT ETC) - GREEN 2 WAY
CAV CIRCUIT FUNCTION
A V37 20RD/LG S/C SWITCH NO.1 SIGNAL
B K4 20BK/LB SENSOR GROUND
SPEED CONTROL SWITCH-RIGHT (ETC) - WHITE 3 WAY
CAV CIRCUIT FUNCTION
1 V38 20VT/OR S/C SWITCH NO.2 SIGNAL
2 Y215 20BK/LB S/C SWITCH RETURN
3 V37 20RD/LG S/C SWITCH NO.1 SIGNAL
SPEED CONTROL SWITCH-RIGHT (EXCEPT ETC) - GREEN 2 WAY
CAV CIRCUIT FUNCTION
A V37 20RD/LG S/C SWITCH NO.1 SIGNAL
B K4 20BK/LB SENSOR GROUND
SWITCH-DRIVER SEAT BELT - DK GRAY 2 WAY
CAV CIRCUIT FUNCTION
1 Z237 20BK/OR GROUND
2 G10 20LG/RD SEAT BELT SWITCH SENSE
8W - 80 - 98 8W-80 CONNECTOR PIN-OUTSDR
Page 1166 of 2895
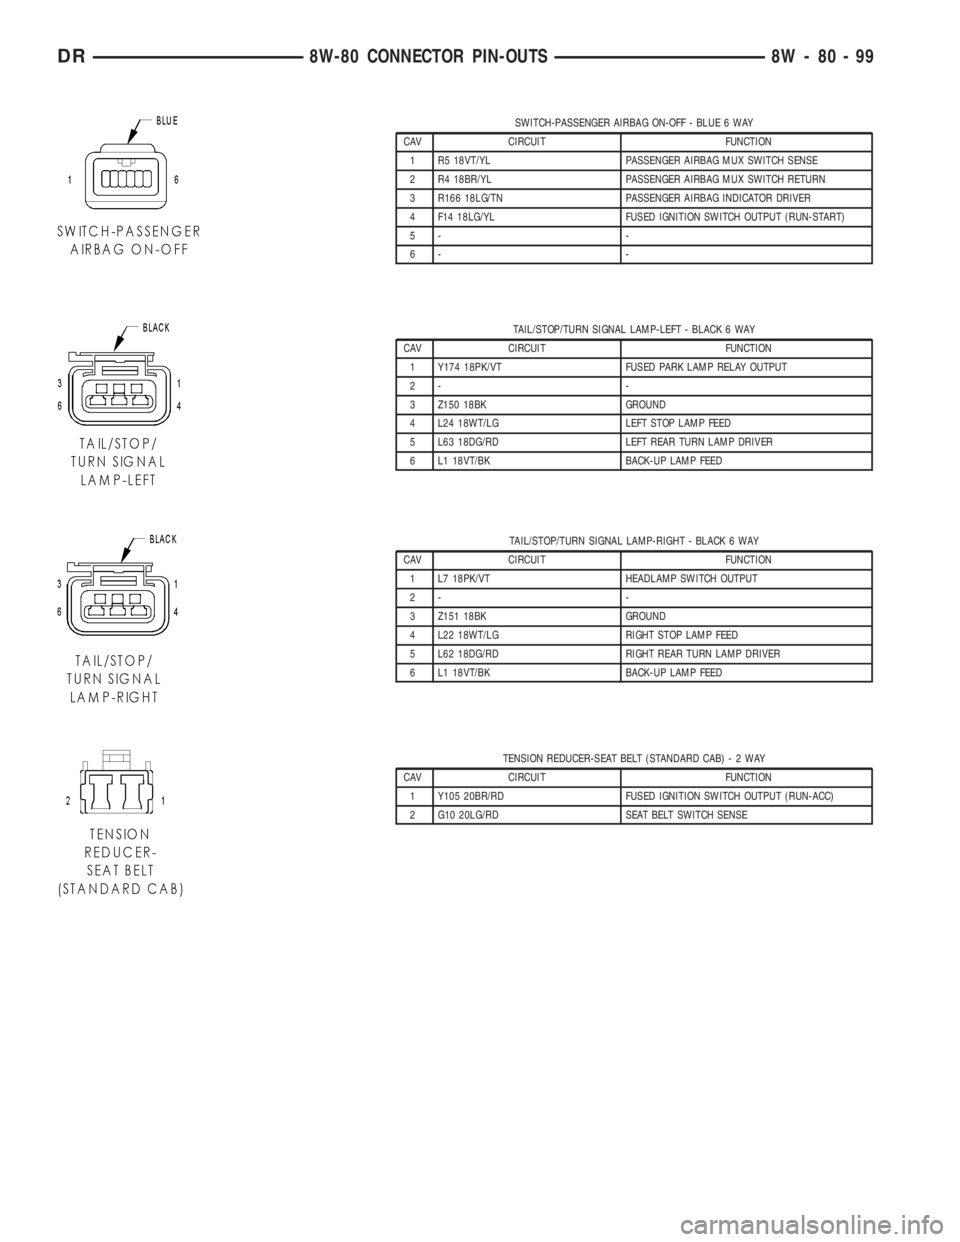
SWITCH-PASSENGER AIRBAG ON-OFF - BLUE 6 WAY
CAV CIRCUIT FUNCTION
1 R5 18VT/YL PASSENGER AIRBAG MUX SWITCH SENSE
2 R4 18BR/YL PASSENGER AIRBAG MUX SWITCH RETURN
3 R166 18LG/TN PASSENGER AIRBAG INDICATOR DRIVER
4 F14 18LG/YL FUSED IGNITION SWITCH OUTPUT (RUN-START)
5- -
6- -
TAIL/STOP/TURN SIGNAL LAMP-LEFT - BLACK 6 WAY
CAV CIRCUIT FUNCTION
1 Y174 18PK/VT FUSED PARK LAMP RELAY OUTPUT
2- -
3 Z150 18BK GROUND
4 L24 18WT/LG LEFT STOP LAMP FEED
5 L63 18DG/RD LEFT REAR TURN LAMP DRIVER
6 L1 18VT/BK BACK-UP LAMP FEED
TAIL/STOP/TURN SIGNAL LAMP-RIGHT - BLACK 6 WAY
CAV CIRCUIT FUNCTION
1 L7 18PK/VT HEADLAMP SWITCH OUTPUT
2- -
3 Z151 18BK GROUND
4 L22 18WT/LG RIGHT STOP LAMP FEED
5 L62 18DG/RD RIGHT REAR TURN LAMP DRIVER
6 L1 18VT/BK BACK-UP LAMP FEED
TENSION REDUCER-SEAT BELT (STANDARD CAB)-2WAY
CAV CIRCUIT FUNCTION
1 Y105 20BR/RD FUSED IGNITION SWITCH OUTPUT (RUN-ACC)
2 G10 20LG/RD SEAT BELT SWITCH SENSE
DR8W-80 CONNECTOR PIN-OUTS 8W - 80 - 99
Page 1167 of 2895
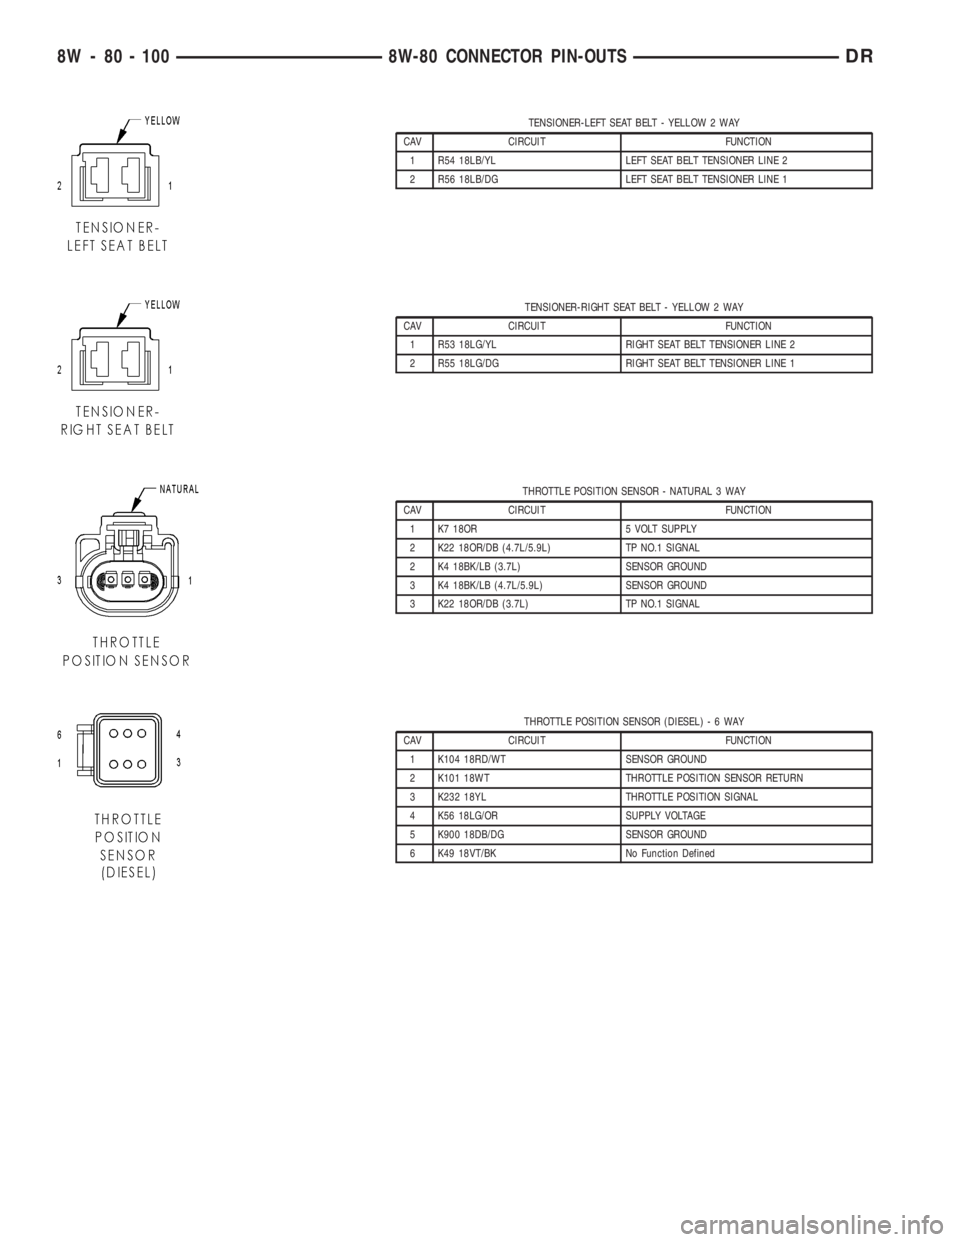
TENSIONER-LEFT SEAT BELT - YELLOW 2 WAY
CAV CIRCUIT FUNCTION
1 R54 18LB/YL LEFT SEAT BELT TENSIONER LINE 2
2 R56 18LB/DG LEFT SEAT BELT TENSIONER LINE 1
TENSIONER-RIGHT SEAT BELT - YELLOW 2 WAY
CAV CIRCUIT FUNCTION
1 R53 18LG/YL RIGHT SEAT BELT TENSIONER LINE 2
2 R55 18LG/DG RIGHT SEAT BELT TENSIONER LINE 1
THROTTLE POSITION SENSOR - NATURAL 3 WAY
CAV CIRCUIT FUNCTION
1 K7 18OR 5 VOLT SUPPLY
2 K22 18OR/DB (4.7L/5.9L) TP NO.1 SIGNAL
2 K4 18BK/LB (3.7L) SENSOR GROUND
3 K4 18BK/LB (4.7L/5.9L) SENSOR GROUND
3 K22 18OR/DB (3.7L) TP NO.1 SIGNAL
THROTTLE POSITION SENSOR (DIESEL)-6WAY
CAV CIRCUIT FUNCTION
1 K104 18RD/WT SENSOR GROUND
2 K101 18WT THROTTLE POSITION SENSOR RETURN
3 K232 18YL THROTTLE POSITION SIGNAL
4 K56 18LG/OR SUPPLY VOLTAGE
5 K900 18DB/DG SENSOR GROUND
6 K49 18VT/BK No Function Defined
8W - 80 - 100 8W-80 CONNECTOR PIN-OUTSDR
Page 1184 of 2895
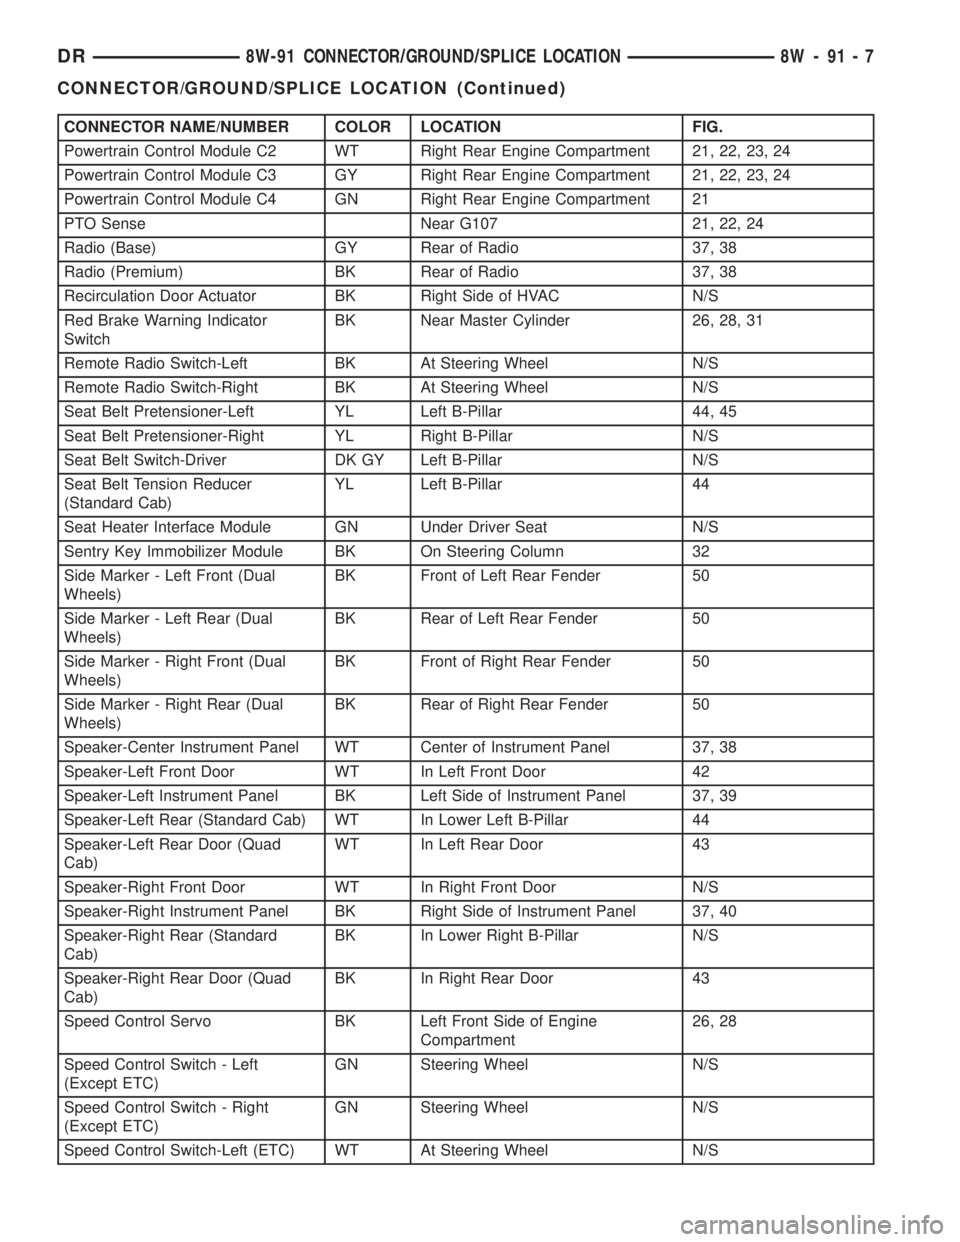
CONNECTOR NAME/NUMBER COLOR LOCATION FIG.
Powertrain Control Module C2 WT Right Rear Engine Compartment 21, 22, 23, 24
Powertrain Control Module C3 GY Right Rear Engine Compartment 21, 22, 23, 24
Powertrain Control Module C4 GN Right Rear Engine Compartment 21
PTO Sense Near G107 21, 22, 24
Radio (Base) GY Rear of Radio 37, 38
Radio (Premium) BK Rear of Radio 37, 38
Recirculation Door Actuator BK Right Side of HVAC N/S
Red Brake Warning Indicator
SwitchBK Near Master Cylinder 26, 28, 31
Remote Radio Switch-Left BK At Steering Wheel N/S
Remote Radio Switch-Right BK At Steering Wheel N/S
Seat Belt Pretensioner-Left YL Left B-Pillar 44, 45
Seat Belt Pretensioner-Right YL Right B-Pillar N/S
Seat Belt Switch-Driver DK GY Left B-Pillar N/S
Seat Belt Tension Reducer
(Standard Cab)YL Left B-Pillar 44
Seat Heater Interface Module GN Under Driver Seat N/S
Sentry Key Immobilizer Module BK On Steering Column 32
Side Marker - Left Front (Dual
Wheels)BK Front of Left Rear Fender 50
Side Marker - Left Rear (Dual
Wheels)BK Rear of Left Rear Fender 50
Side Marker - Right Front (Dual
Wheels)BK Front of Right Rear Fender 50
Side Marker - Right Rear (Dual
Wheels)BK Rear of Right Rear Fender 50
Speaker-Center Instrument Panel WT Center of Instrument Panel 37, 38
Speaker-Left Front Door WT In Left Front Door 42
Speaker-Left Instrument Panel BK Left Side of Instrument Panel 37, 39
Speaker-Left Rear (Standard Cab) WT In Lower Left B-Pillar 44
Speaker-Left Rear Door (Quad
Cab)WT In Left Rear Door 43
Speaker-Right Front Door WT In Right Front Door N/S
Speaker-Right Instrument Panel BK Right Side of Instrument Panel 37, 40
Speaker-Right Rear (Standard
Cab)BK In Lower Right B-Pillar N/S
Speaker-Right Rear Door (Quad
Cab)BK In Right Rear Door 43
Speed Control Servo BK Left Front Side of Engine
Compartment26, 28
Speed Control Switch - Left
(Except ETC)GN Steering Wheel N/S
Speed Control Switch - Right
(Except ETC)GN Steering Wheel N/S
Speed Control Switch-Left (ETC) WT At Steering Wheel N/S
DR8W-91 CONNECTOR/GROUND/SPLICE LOCATION 8W - 91 - 7
CONNECTOR/GROUND/SPLICE LOCATION (Continued)
Page 1252 of 2895
IDLER SHAFT
REMOVAL.............................79
INSTALLATION.........................80
TIMING BELT / CHAIN COVER(S)
REMOVAL.............................80INSTALLATION.........................81
TIMING BELT/CHAIN AND SPROCKETS
REMOVAL.............................81
INSPECTION..........................83
INSTALLATION.........................84
ENGINE - 3.7L
DESCRIPTION
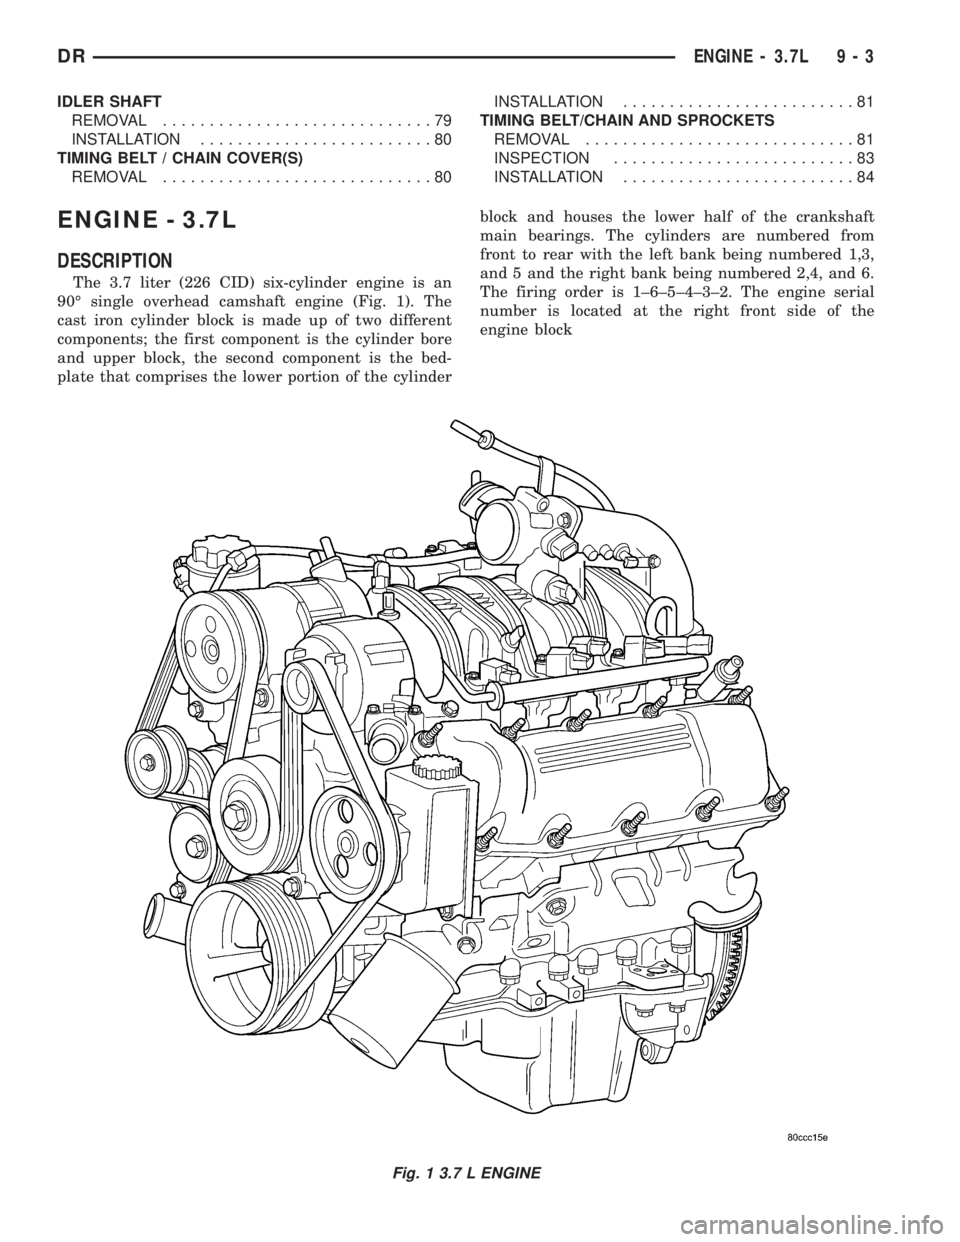
The 3.7 liter (226 CID) six-cylinder engine is an
90É single overhead camshaft engine (Fig. 1). The
cast iron cylinder block is made up of two different
components; the first component is the cylinder bore
and upper block, the second component is the bed-
plate that comprises the lower portion of the cylinderblock and houses the lower half of the crankshaft
main bearings. The cylinders are numbered from
front to rear with the left bank being numbered 1,3,
and 5 and the right bank being numbered 2,4, and 6.
The firing order is 1±6±5±4±3±2. The engine serial
number is located at the right front side of the
engine block
Fig. 1 3.7 L ENGINE
DRENGINE - 3.7L 9 - 3
Page 1259 of 2895
of oil and coolant. Can be used on threaded and
machined parts under all temperatures. This mate-
rial is used on engines with multi-layer steel (MLS)
cylinder head gaskets. This material also will pre-
vent corrosion. MopartGasket Sealant is available in
a 13 oz. aerosol can or 4oz./16 oz. can w/applicator.
FORM-IN-PLACE GASKET AND SEALER
APPLICATION
Assembling parts using a form-in-place gasket
requires care but it's easier than using precut gas-
kets.
MopartGasket Maker material should be applied
sparingly 1 mm (0.040 in.) diameter or less of sealant
to one gasket surface. Be certain the material sur-
rounds each mounting hole. Excess material can eas-
ily be wiped off. Components should be torqued in
place within 15 minutes. The use of a locating dowel
is recommended during assembly to prevent smear-
ing material off the location.
MopartEngine RTV GEN II or ATF RTV gasket
material should be applied in a continuous bead
approximately 3 mm (0.120 in.) in diameter. All
mounting holes must be circled. For corner sealing, a
3.17 or 6.35 mm (1/8 or 1/4 in.) drop is placed in the
center of the gasket contact area. Uncured sealant
may be removed with a shop towel. Components
should be torqued in place while the sealant is still
wet to the touch (within 10 minutes). The usage of a
locating dowel is recommended during assembly to
prevent smearing material off the location.
MopartGasket Sealant in an aerosol can should be
applied using a thin, even coat sprayed completely
over both surfaces to be joined, and both sides of a
gasket. Then proceed with assembly. Material in a
can w/applicator can be brushed on evenly over the
sealing surfaces. Material in an aerosol can should be
used on engines with multi-layer steel gaskets.
STANDARD PROCEDURE - ENGINE GASKET
SURFACE PREPARATION
To ensure engine gasket sealing, proper surface
preparation must be performed, especially with the
use of aluminum engine components and multi-layer
steel cylinder head gaskets.
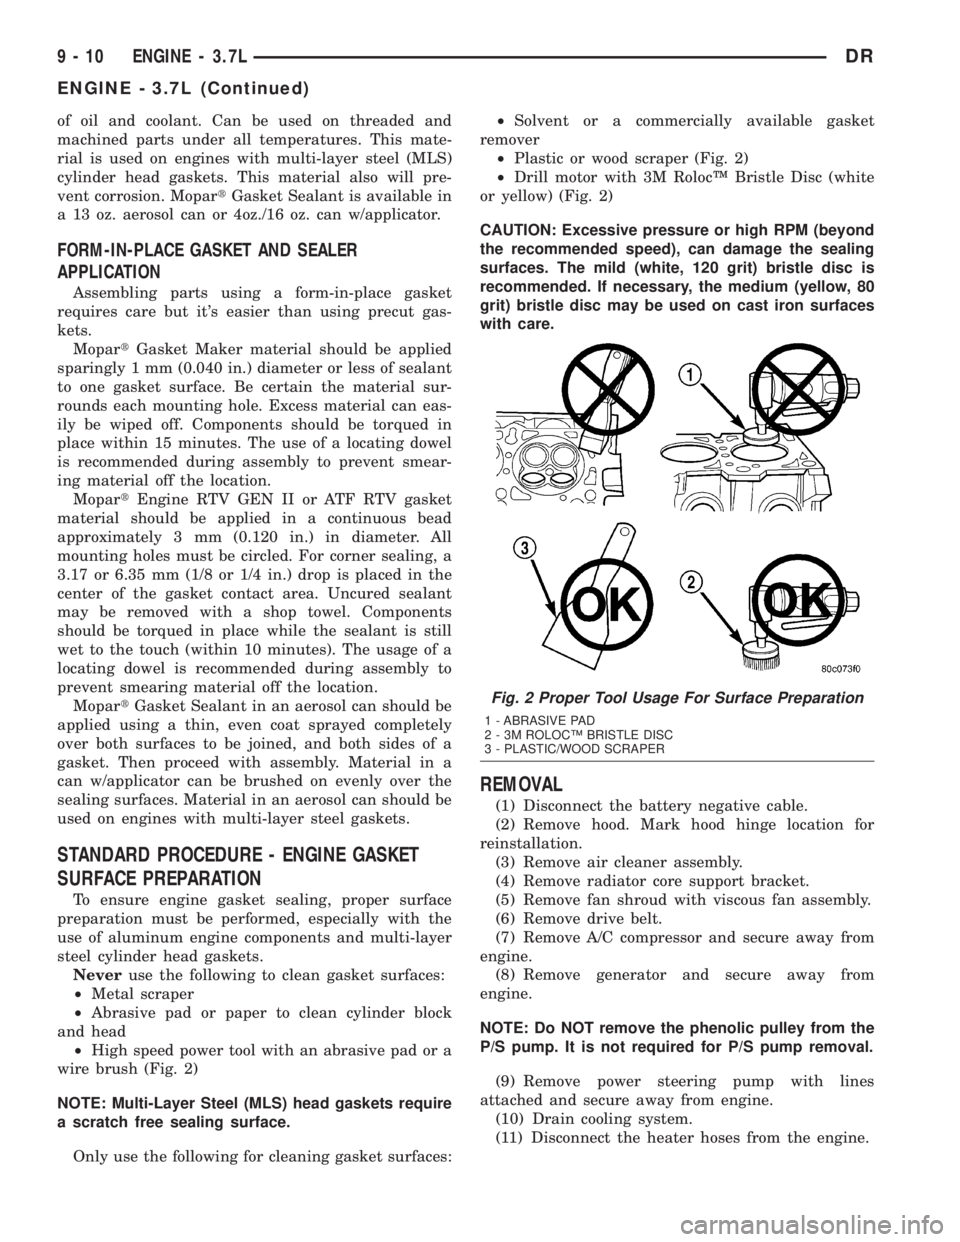
Neveruse the following to clean gasket surfaces:
²Metal scraper
²Abrasive pad or paper to clean cylinder block
and head
²High speed power tool with an abrasive pad or a
wire brush (Fig. 2)
NOTE: Multi-Layer Steel (MLS) head gaskets require
a scratch free sealing surface.
Only use the following for cleaning gasket surfaces:²Solvent or a commercially available gasket
remover
²Plastic or wood scraper (Fig. 2)
²Drill motor with 3M RolocŸ Bristle Disc (white
or yellow) (Fig. 2)
CAUTION: Excessive pressure or high RPM (beyond
the recommended speed), can damage the sealing
surfaces. The mild (white, 120 grit) bristle disc is
recommended. If necessary, the medium (yellow, 80
grit) bristle disc may be used on cast iron surfaces
with care.
REMOVAL
(1) Disconnect the battery negative cable.
(2) Remove hood. Mark hood hinge location for
reinstallation.
(3) Remove air cleaner assembly.
(4) Remove radiator core support bracket.
(5) Remove fan shroud with viscous fan assembly.
(6) Remove drive belt.
(7) Remove A/C compressor and secure away from
engine.
(8) Remove generator and secure away from
engine.
NOTE: Do NOT remove the phenolic pulley from the
P/S pump. It is not required for P/S pump removal.
(9) Remove power steering pump with lines
attached and secure away from engine.
(10) Drain cooling system.
(11) Disconnect the heater hoses from the engine.
Fig. 2 Proper Tool Usage For Surface Preparation
1 - ABRASIVE PAD
2 - 3M ROLOCŸ BRISTLE DISC
3 - PLASTIC/WOOD SCRAPER
9 - 10 ENGINE - 3.7LDR
ENGINE - 3.7L (Continued)
Page 1261 of 2895
(17) Connect the engine to body ground straps at
the left side of the cowl.
(18) Install the intake manifold.
(19) Install the engine oil dipstick tube.
(20) Install the power brake booster vacuum hose.
(21) Install the breather hoses.
(22) Install the PCV hose.
(23) Install the fuel rail.
(24) Install the coil over plugs.
(25) Connect the engine wiring harness at the fol-
lowing points:
²Intake air temperature (IAT) sensor
²Fuel Injectors
²Throttle Position (TPS) Switch
²Idle Air Control (IAC) Motor
²Engine Oil Pressure Switch
²Engine Coolant Temperature (ECT) Sensor
²Manifold Absolute Pressure MAP) Sensor
²Camshaft Position (CMP) Sensor
²Coil Over Plugs
²Crankshaft Position Sensor
(26) Reinstall the radiator/cooling module assem-
bly.
(27) Connect lower radiator hose.
(28) Connect upper radiator hose.
(29) Connect throttle and speed control cables.
(30) Install the heater hose assembly.
(31) Install coolant recovery bottle.
(32) Install the power steering pump.
(33) Install the generator.
(34) Install the A/C compressor.
(35) Install the drive belt.
(36) Install the fan shroud with the viscous fan
assembly.
(37) Install the radiator core support bracket.
(38) Install the air cleaner assembly.
(39) Refill the engine cooling system.
(40) Recharge the air conditioning.
(41) Install the hood.
(42) Check and fill engine oil.
(43) Connect the battery negative cable.
(44) Start the engine and check for leaks.SPECIFICATIONS
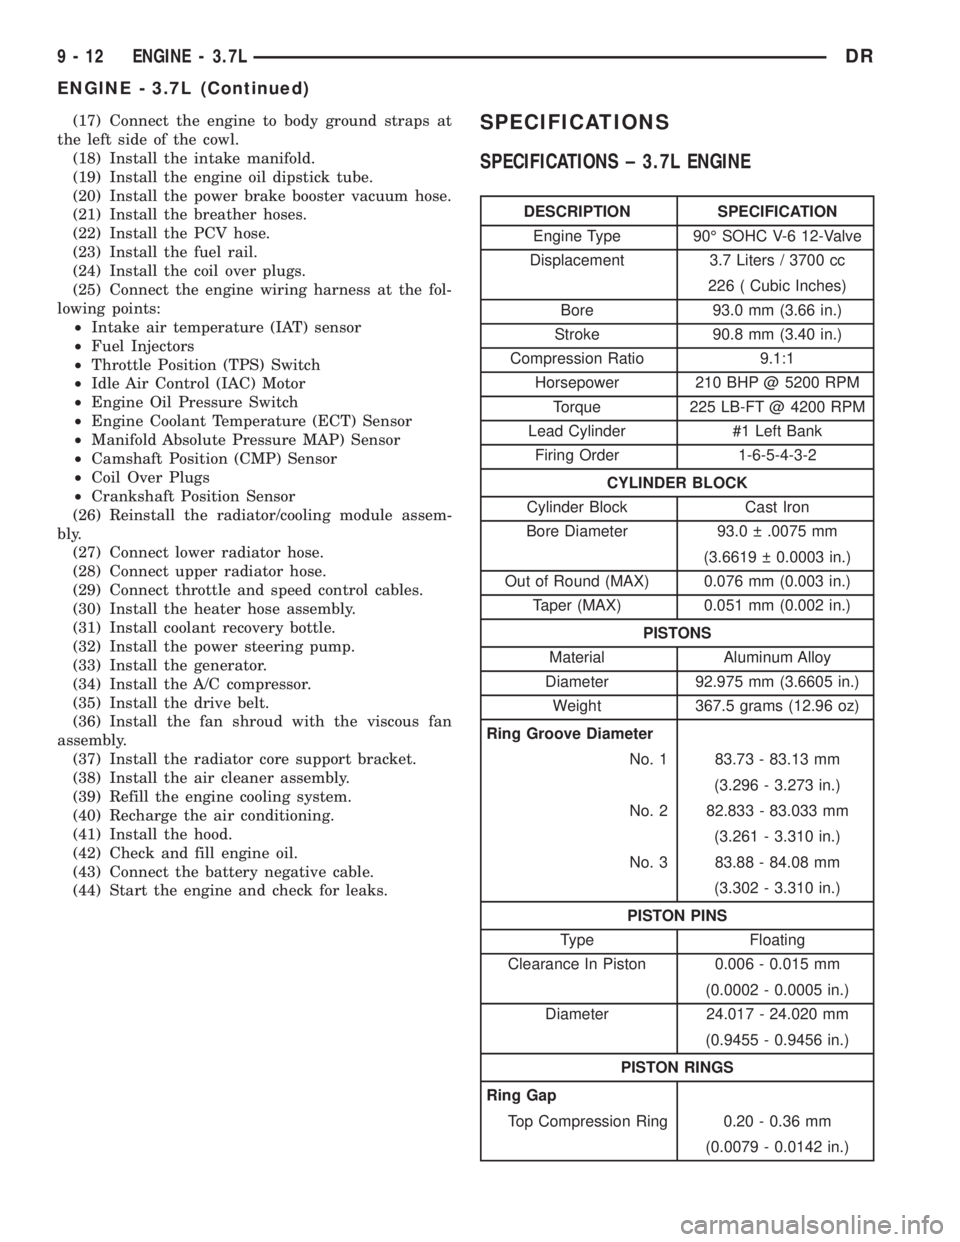
SPECIFICATIONS ± 3.7L ENGINE
DESCRIPTION SPECIFICATION
Engine Type 90É SOHC V-6 12-Valve
Displacement 3.7 Liters / 3700 cc
226 ( Cubic Inches)
Bore 93.0 mm (3.66 in.)
Stroke 90.8 mm (3.40 in.)
Compression Ratio 9.1:1
Horsepower 210 BHP @ 5200 RPM
Torque 225 LB-FT @ 4200 RPM
Lead Cylinder #1 Left Bank
Firing Order 1-6-5-4-3-2
CYLINDER BLOCK
Cylinder Block Cast Iron
Bore Diameter 93.0 .0075 mm
(3.6619 0.0003 in.)
Out of Round (MAX) 0.076 mm (0.003 in.)
Taper (MAX) 0.051 mm (0.002 in.)
PISTONS
Material Aluminum Alloy
Diameter 92.975 mm (3.6605 in.)
Weight 367.5 grams (12.96 oz)
Ring Groove Diameter
No. 1 83.73 - 83.13 mm
(3.296 - 3.273 in.)
No. 2 82.833 - 83.033 mm
(3.261 - 3.310 in.)
No. 3 83.88 - 84.08 mm
(3.302 - 3.310 in.)
PISTON PINS
Type Floating
Clearance In Piston 0.006 - 0.015 mm
(0.0002 - 0.0005 in.)
Diameter 24.017 - 24.020 mm
(0.9455 - 0.9456 in.)
PISTON RINGS
Ring Gap
Top Compression Ring 0.20 - 0.36 mm
(0.0079 - 0.0142 in.)
9 - 12 ENGINE - 3.7LDR
ENGINE - 3.7L (Continued)