Page 1581 of 2177
(28) Remove 2/4 clutch retainer (Fig. 44).
(29) Remove 2/4 clutch return spring (Fig. 45).(30) Remove 2/4 clutch pack (Fig. 46).Tag 2/4
clutch pack for reassembly identification.
(31) Remove tapered snap ring (Fig. 47).
Fig. 44 2/4 Clutch Retainer
1 - 2/4 CLUTCH RETAINER
2 - 2/4 CLUTCH RETURN SPRING
Fig. 45 Remove 2/4 Clutch Return Spring
1 - 2/4 CLUTCH RETURN SPRING
Fig. 46 Remove 2/4 Clutch Pack
1 - CLUTCH PLATE (4)
2 - CLUTCH DISC (4)
Fig. 47 Remove Tapered Snap Ring
1 - LOW/REVERSE CLUTCH REACTION PLATE
2 - SCREWDRIVER
3 - LOW/REVERSE TAPERED SNAP RING (TAPERED SIDE UP)
4 - OIL PAN FACE
5 - LONG TAB
21 - 134 41TE AUTOMATIC TRANSAXLERS
41TE AUTOMATIC TRANSAXLE (Continued)
ProCarManuals.com
Page 1585 of 2177
(43) Remove transfer shaft bearing cup from
retainer using Tool 6062 (Fig. 60).
(44) Using Tool 6051, remove transfer shaft bear-
ing snap ring (Fig. 61).(45) Using tool 5049A, remove transfer shaft from
transaxle (Fig. 62).
(46) Slip bearing cup retainer and oil baffle off of
shaft (Fig. 63).
Fig. 60 Remove Transfer Shaft Bearing Cup
1 - WRENCHES
2 - TOOL 6062
3 - TRANSFER SHAFT BEARING CUP RETAINER
Fig. 61 Remove Transfer Shaft Bearing Snap Ring
1 - SNAP RING PLIERS TOOL 6051
2 - TRANSFER SHAFT BEARING SNAP RING
3 - TRANSFER SHAFT
Fig. 62 Remove Transfer Shaft
1 - SPECIAL TOOL 5049±A
2 - TRANSFER SHAFT
3 - OUTPUT GEAR
Fig. 63 Bearing Cup Removed
1 - BEARING CUP
2 - BEARING CONE
3 - TRANSFER SHAFT
4 - OIL BAFFLE
5 - O-RING
21 - 138 41TE AUTOMATIC TRANSAXLERS
41TE AUTOMATIC TRANSAXLE (Continued)
ProCarManuals.com
Page 1599 of 2177
(23) Bend tabs on strap up against flats of bolts
(Fig. 112).
(24) Install transfer shaft bearing cone using Tool
6052 (Fig. 113).(25) Install bearing cup and oil baffle to transfer
shaft (Fig. 114).
(26) Using Tool 5049A, install transfer shaft (Fig.
115).
Fig. 112 Bend Tabs On Strap Up Against Flats Of
Bolts
1 - RETAINING STRAP TABS
2 - RETAINING STRAP
3 - STIRRUP
Fig. 113 Install Transfer Shaft Bearing Cone
1 - TOOL 6052
2 - NEW BEARING CONE
3 - TRANSFER SHAFT
4 - ARBOR PRESS RAM
Fig. 114 Install Bearing Cup to Shaft
1 - BEARING CUP
2 - BEARING CONE
3 - TRANSFER SHAFT
4 - OIL BAFFLE
5 - O-RING
Fig. 115 Install Transfer Shaft
1 - SPECIAL TOOL 5049±A
2 - TRANSFER SHAFT
3 - OUTPUT GEAR
21 - 152 41TE AUTOMATIC TRANSAXLERS
41TE AUTOMATIC TRANSAXLE (Continued)
ProCarManuals.com
Page 1607 of 2177

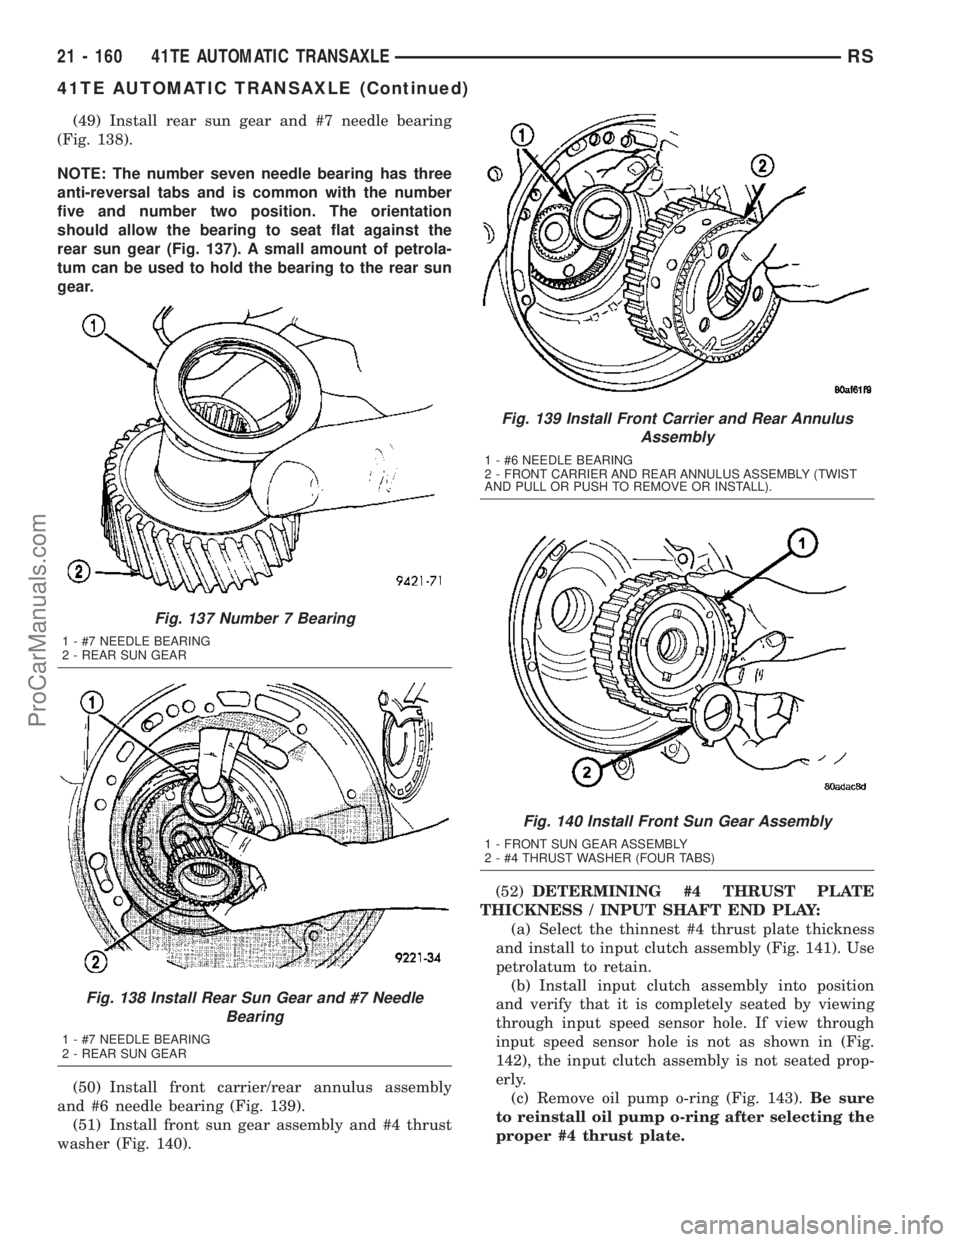
(49) Install rear sun gear and #7 needle bearing
(Fig. 138).
NOTE: The number seven needle bearing has three
anti-reversal tabs and is common with the number
five and number two position. The orientation
should allow the bearing to seat flat against the
rear sun gear (Fig. 137). A small amount of petrola-
tum can be used to hold the bearing to the rear sun
gear.
(50) Install front carrier/rear annulus assembly
and #6 needle bearing (Fig. 139).
(51) Install front sun gear assembly and #4 thrust
washer (Fig. 140).(52)DETERMINING #4 THRUST PLATE
THICKNESS / INPUT SHAFT END PLAY:
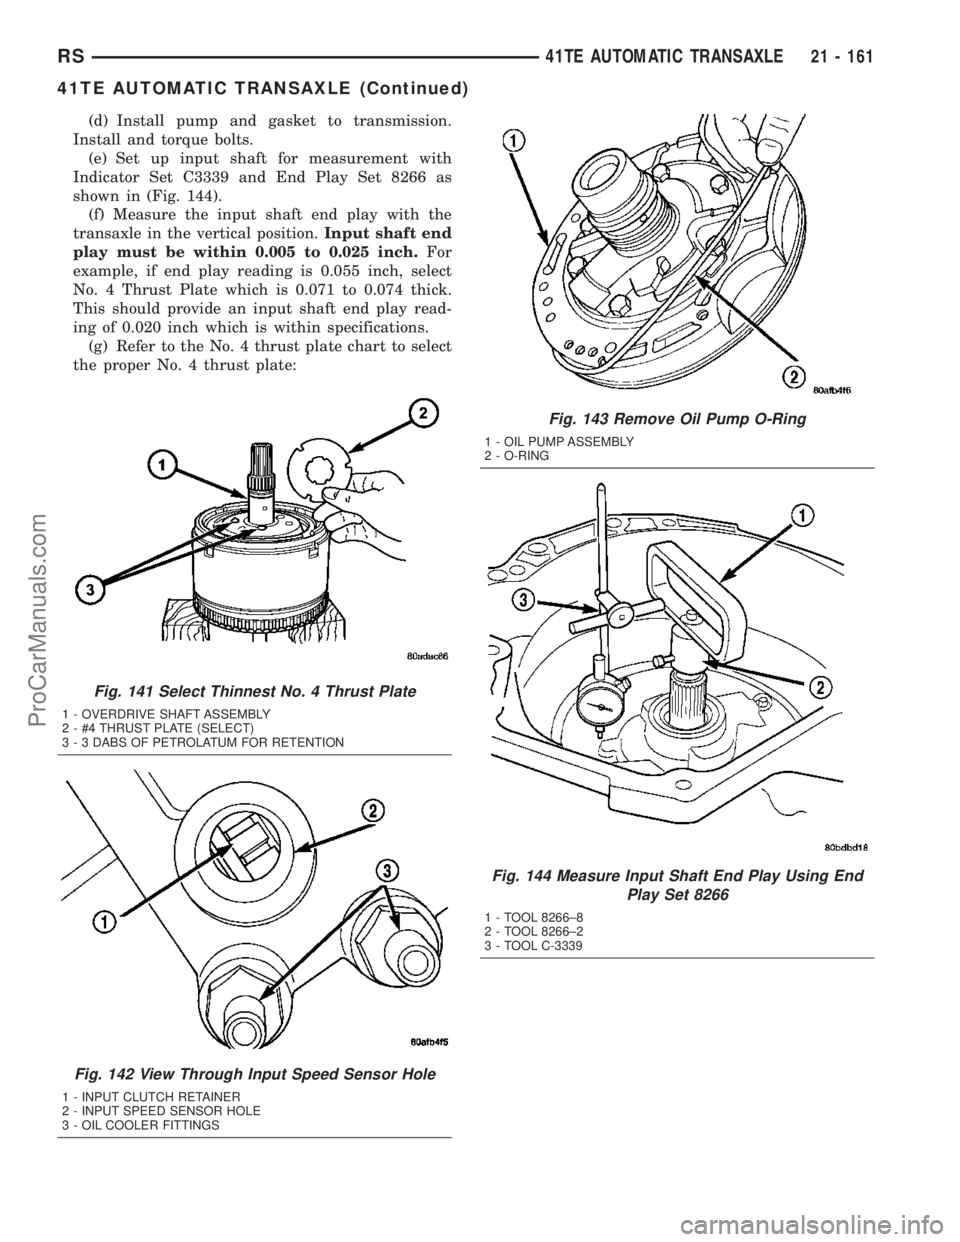
(a) Select the thinnest #4 thrust plate thickness
and install to input clutch assembly (Fig. 141). Use
petrolatum to retain.
(b) Install input clutch assembly into position
and verify that it is completely seated by viewing
through input speed sensor hole. If view through
input speed sensor hole is not as shown in (Fig.
142), the input clutch assembly is not seated prop-
erly.
(c) Remove oil pump o-ring (Fig. 143).Be sure
to reinstall oil pump o-ring after selecting the
proper #4 thrust plate.
Fig. 137 Number 7 Bearing
1 - #7 NEEDLE BEARING
2 - REAR SUN GEAR
Fig. 138 Install Rear Sun Gear and #7 Needle
Bearing
1 - #7 NEEDLE BEARING
2 - REAR SUN GEAR
Fig. 139 Install Front Carrier and Rear Annulus
Assembly
1 - #6 NEEDLE BEARING
2 - FRONT CARRIER AND REAR ANNULUS ASSEMBLY (TWIST
AND PULL OR PUSH TO REMOVE OR INSTALL).
Fig. 140 Install Front Sun Gear Assembly
1 - FRONT SUN GEAR ASSEMBLY
2 - #4 THRUST WASHER (FOUR TABS)
21 - 160 41TE AUTOMATIC TRANSAXLERS
41TE AUTOMATIC TRANSAXLE (Continued)
ProCarManuals.com
Page 1608 of 2177

(d) Install pump and gasket to transmission.
Install and torque bolts.
(e) Set up input shaft for measurement with
Indicator Set C3339 and End Play Set 8266 as
shown in (Fig. 144).
(f) Measure the input shaft end play with the
transaxle in the vertical position.Input shaft end
play must be within 0.005 to 0.025 inch.For
example, if end play reading is 0.055 inch, select
No. 4 Thrust Plate which is 0.071 to 0.074 thick.
This should provide an input shaft end play read-
ing of 0.020 inch which is within specifications.
(g) Refer to the No. 4 thrust plate chart to select
the proper No. 4 thrust plate:
Fig. 141 Select Thinnest No. 4 Thrust Plate
1 - OVERDRIVE SHAFT ASSEMBLY
2 - #4 THRUST PLATE (SELECT)
3 - 3 DABS OF PETROLATUM FOR RETENTION
Fig. 142 View Through Input Speed Sensor Hole
1 - INPUT CLUTCH RETAINER
2 - INPUT SPEED SENSOR HOLE
3 - OIL COOLER FITTINGS
Fig. 143 Remove Oil Pump O-Ring
1 - OIL PUMP ASSEMBLY
2 - O-RING
Fig. 144 Measure Input Shaft End Play Using End
Play Set 8266
1 - TOOL 8266±8
2 - TOOL 8266±2
3 - TOOL C-3339
RS41TE AUTOMATIC TRANSAXLE21 - 161
41TE AUTOMATIC TRANSAXLE (Continued)
ProCarManuals.com
Page 1609 of 2177

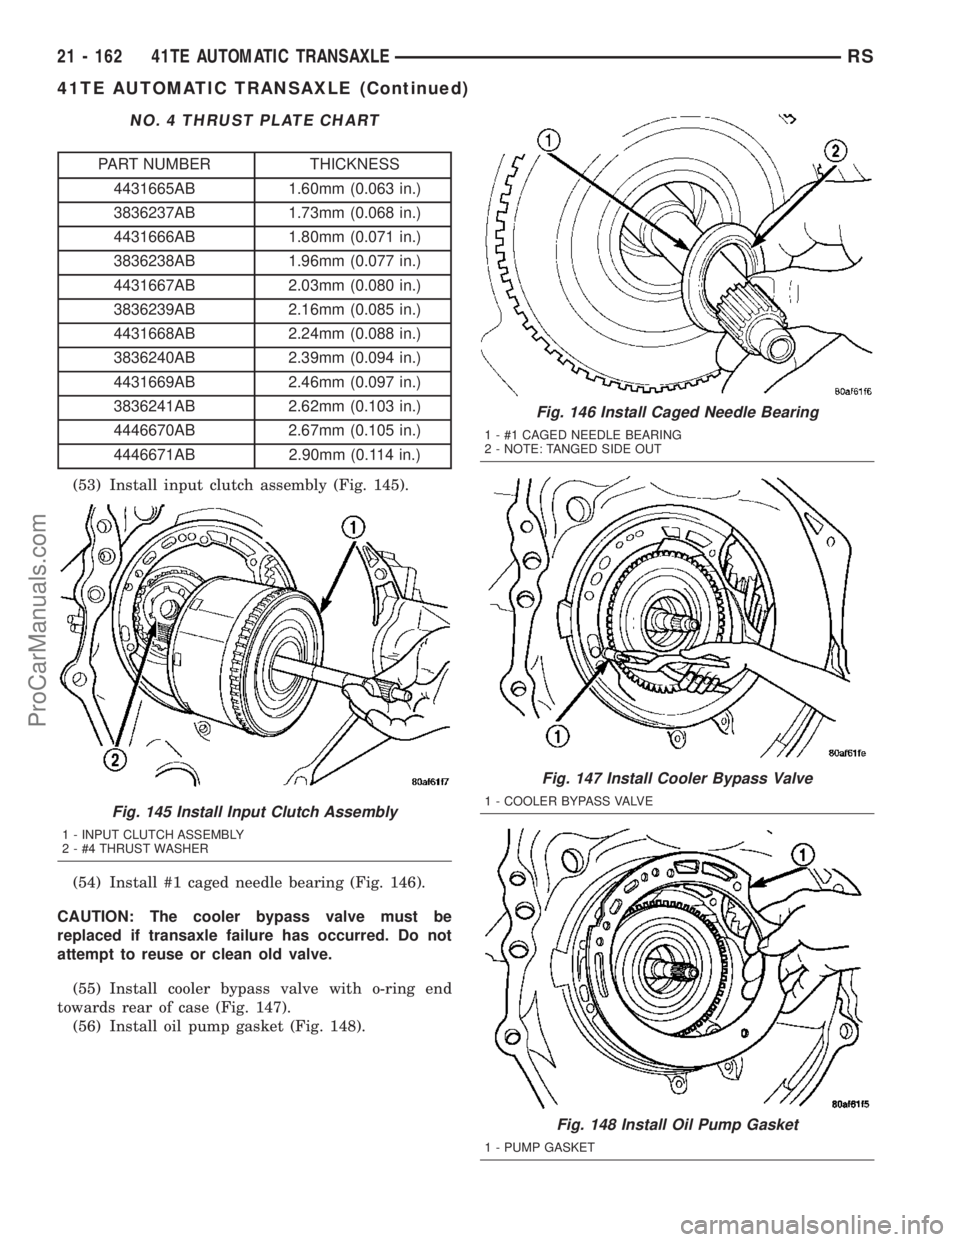
NO. 4 THRUST PLATE CHART
PART NUMBER THICKNESS
4431665AB 1.60mm (0.063 in.)
3836237AB 1.73mm (0.068 in.)
4431666AB 1.80mm (0.071 in.)
3836238AB 1.96mm (0.077 in.)
4431667AB 2.03mm (0.080 in.)
3836239AB 2.16mm (0.085 in.)
4431668AB 2.24mm (0.088 in.)
3836240AB 2.39mm (0.094 in.)
4431669AB 2.46mm (0.097 in.)
3836241AB 2.62mm (0.103 in.)
4446670AB 2.67mm (0.105 in.)
4446671AB 2.90mm (0.114 in.)
(53) Install input clutch assembly (Fig. 145).
(54) Install #1 caged needle bearing (Fig. 146).
CAUTION: The cooler bypass valve must be
replaced if transaxle failure has occurred. Do not
attempt to reuse or clean old valve.
(55) Install cooler bypass valve with o-ring end
towards rear of case (Fig. 147).
(56) Install oil pump gasket (Fig. 148).
Fig. 145 Install Input Clutch Assembly
1 - INPUT CLUTCH ASSEMBLY
2 - #4 THRUST WASHER
Fig. 146 Install Caged Needle Bearing
1 - #1 CAGED NEEDLE BEARING
2 - NOTE: TANGED SIDE OUT
Fig. 147 Install Cooler Bypass Valve
1 - COOLER BYPASS VALVE
Fig. 148 Install Oil Pump Gasket
1 - PUMP GASKET
21 - 162 41TE AUTOMATIC TRANSAXLERS
41TE AUTOMATIC TRANSAXLE (Continued)
ProCarManuals.com
Page 1610 of 2177
(57) Install oil pump assembly (Fig. 149).
(58) Install oil pump-to-case bolts and torque to 27
N´m (20 ft. lbs.) (Fig. 150).(59) Install low/reverse accumulator (Fig. 151).
(60) Install low/reverse accumulator plug (Fig.
152).
Fig. 149 Install Oil Pump
1 - OIL PUMP
2 - GASKET
Fig. 150 Install Pump-to-Case Bolts
1 - PUMP ATTACHING BOLTS
2 - PUMP HOUSING
Fig. 151 Install Low/Reverse Accumulator
1 - ACCUMULATOR PISTON
2 - SEAL RINGS
3 - RETURN SPRINGS
4 - (NOTE NOTCH)
Fig. 152 Install Low/Reverse Accumulator Plug
(Cover)
1 - ADJUSTABLE PLIERS
2 - PLUG
RS41TE AUTOMATIC TRANSAXLE21 - 163
41TE AUTOMATIC TRANSAXLE (Continued)
ProCarManuals.com
Page 1612 of 2177
(63) Install valve body to transaxle (Fig. 157).
Rotate manual valve shaft fully clockwise to ease
installation. Make sure park rod rollers are posi-
tioned within park guide bracket.
(64) Install and torque valve body-to-case bolts to
12 N´m (105 in. lbs.) (Fig. 158).(65) Install oil filter and new o-ring (Fig. 159).
(66) Apply an 1/8º bead of MopartATF RTV (MS-
GF41) to oil pan and immediately install to case (Fig.
160).
Fig. 157 Install Valve Body
1 - VALVE BODY
Fig. 158 Install Valve Body-to-Case Bolts
1 - VALVE BODY ATTACHING BOLTS (18)
2 - VALVE BODY
Fig. 159 Install Oil Filter
1 - OIL FILTER
2 - O-RING
Fig. 160 Install Oil Pan
1 - OIL PAN
2 - 1/8 INCH BEAD OF MOPARTATF RTV (MS-GF41)
3 - OIL FILTER
RS41TE AUTOMATIC TRANSAXLE21 - 165
41TE AUTOMATIC TRANSAXLE (Continued)
ProCarManuals.com