Page 1478 of 2177

Misassembled synchronizer components also cause
shifting problems. Incorrectly installed synchronizer
sleeves, keys, balls, or springs can cause shift prob-
lems.
NOISY OPERATION
Transaxle noise is most often a result of worn or
damaged components. Chipped, broken gear or syn-
chronizer teeth, and brinnelled, spalled bearings all
cause noise.
Abnormal wear and damage to the internal compo-
nents is frequently the end result of insufficient
lubricant.
SLIPS OUT OF GEAR
Transaxle disengagement may be caused by mis-
aligned or damaged shift components, or worn teeth
on the drive gears or synchronizer components. Incor-
rect assembly also causes gear disengagement. Check
for missing snap rings.
LOW LUBRICANT LEVEL
Insufficient transaxle lubricant is usually the
result of leaks, or inaccurate fluid level check or refill
method. Leakage is evident by the presence of oil
around the leak point. If leakage is not evident, the
condition is probably the result of an underfill.
If air±powered lubrication equipment is used to fill
a transaxle, be sure the equipment is properly cali-
brated. Equipment out of calibration can lead to an
underfill condition.
CLUTCH PROBLEMS
Worn, damaged, or misaligned clutch components
can cause difficult shifting, gear clash, and noise.
A worn or damaged clutch disc, pressure plate, or
release bearing can cause hard shifting and gear
clash.
REMOVAL
REMOVAL - 2.4L GAS
(1) Raise hood.
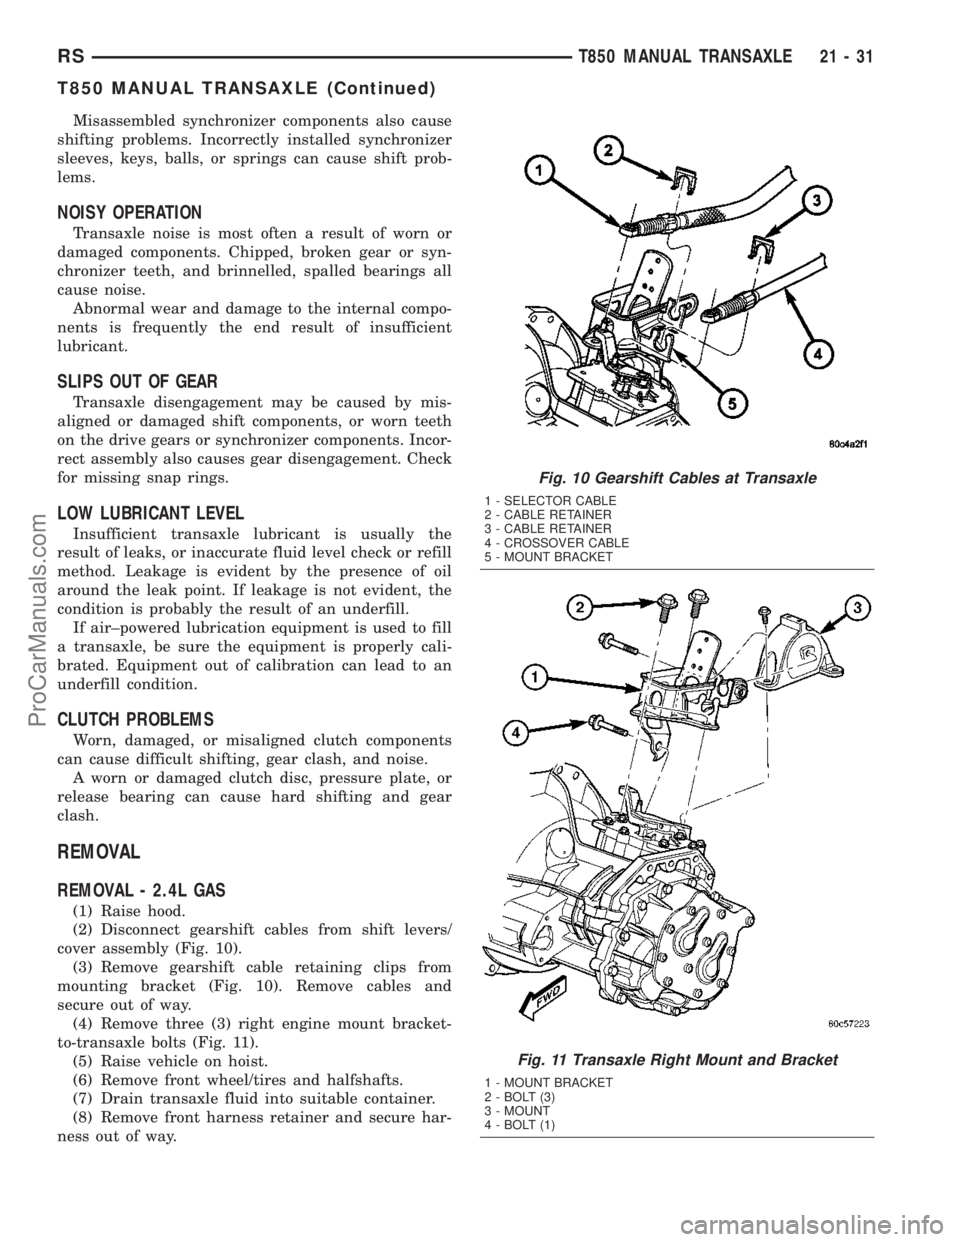
(2) Disconnect gearshift cables from shift levers/
cover assembly (Fig. 10).
(3) Remove gearshift cable retaining clips from
mounting bracket (Fig. 10). Remove cables and
secure out of way.
(4) Remove three (3) right engine mount bracket-
to-transaxle bolts (Fig. 11).
(5) Raise vehicle on hoist.
(6) Remove front wheel/tires and halfshafts.
(7) Drain transaxle fluid into suitable container.
(8) Remove front harness retainer and secure har-
ness out of way.
Fig. 10 Gearshift Cables at Transaxle
1 - SELECTOR CABLE
2 - CABLE RETAINER
3 - CABLE RETAINER
4 - CROSSOVER CABLE
5 - MOUNT BRACKET
Fig. 11 Transaxle Right Mount and Bracket
1 - MOUNT BRACKET
2 - BOLT (3)
3 - MOUNT
4 - BOLT (1)
RST850 MANUAL TRANSAXLE21-31
T850 MANUAL TRANSAXLE (Continued)
ProCarManuals.com
Page 1479 of 2177

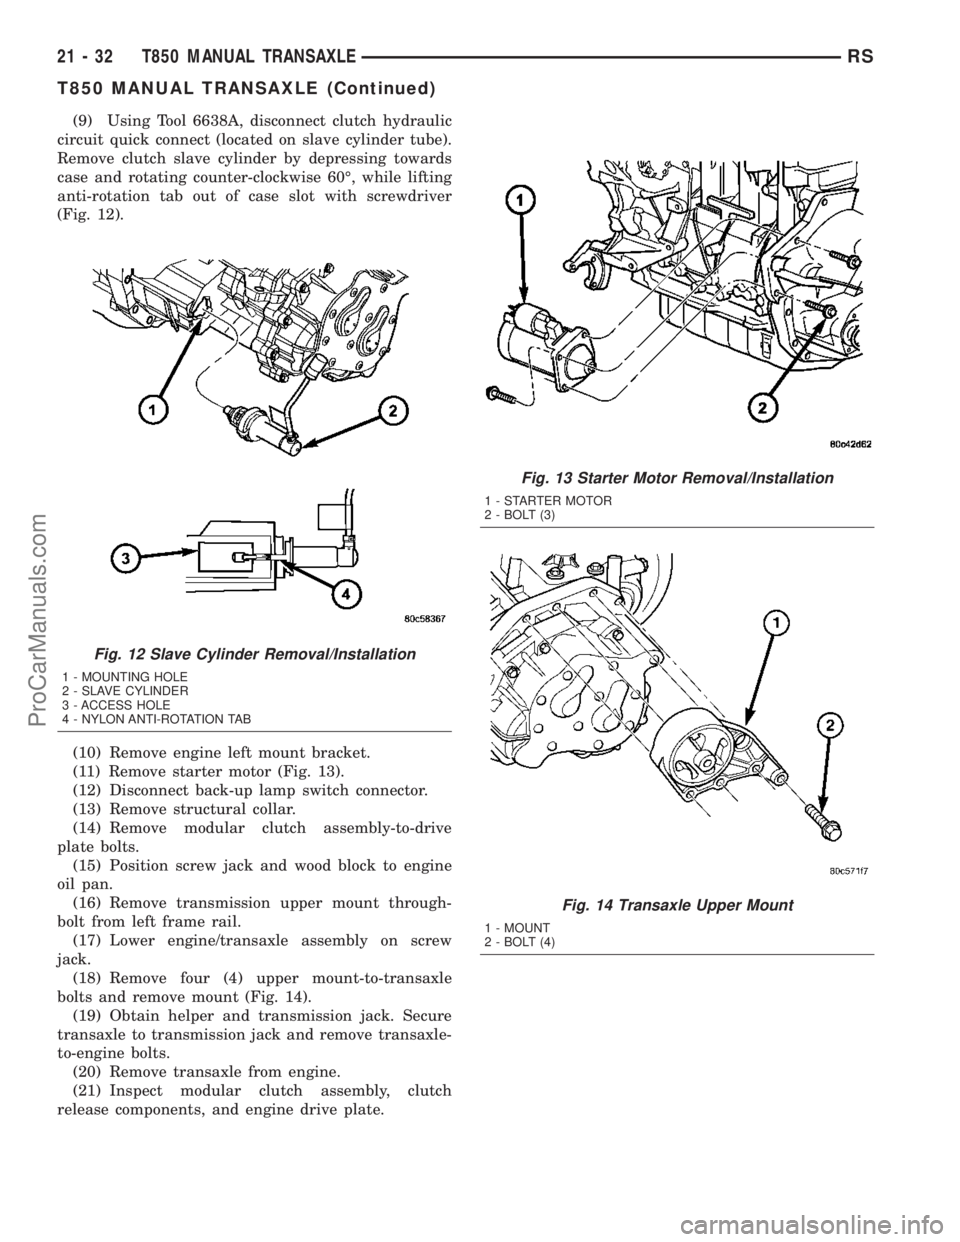
(9) Using Tool 6638A, disconnect clutch hydraulic
circuit quick connect (located on slave cylinder tube).
Remove clutch slave cylinder by depressing towards
case and rotating counter-clockwise 60É, while lifting
anti-rotation tab out of case slot with screwdriver
(Fig. 12).
(10) Remove engine left mount bracket.
(11) Remove starter motor (Fig. 13).
(12) Disconnect back-up lamp switch connector.
(13) Remove structural collar.
(14) Remove modular clutch assembly-to-drive
plate bolts.
(15) Position screw jack and wood block to engine
oil pan.
(16) Remove transmission upper mount through-
bolt from left frame rail.
(17) Lower engine/transaxle assembly on screw
jack.
(18) Remove four (4) upper mount-to-transaxle
bolts and remove mount (Fig. 14).
(19) Obtain helper and transmission jack. Secure
transaxle to transmission jack and remove transaxle-
to-engine bolts.
(20) Remove transaxle from engine.
(21) Inspect modular clutch assembly, clutch
release components, and engine drive plate.
Fig. 12 Slave Cylinder Removal/Installation
1 - MOUNTING HOLE
2 - SLAVE CYLINDER
3 - ACCESS HOLE
4 - NYLON ANTI-ROTATION TAB
Fig. 13 Starter Motor Removal/Installation
1 - STARTER MOTOR
2 - BOLT (3)
Fig. 14 Transaxle Upper Mount
1 - MOUNT
2 - BOLT (4)
21 - 32 T850 MANUAL TRANSAXLERS
T850 MANUAL TRANSAXLE (Continued)
ProCarManuals.com
Page 1481 of 2177

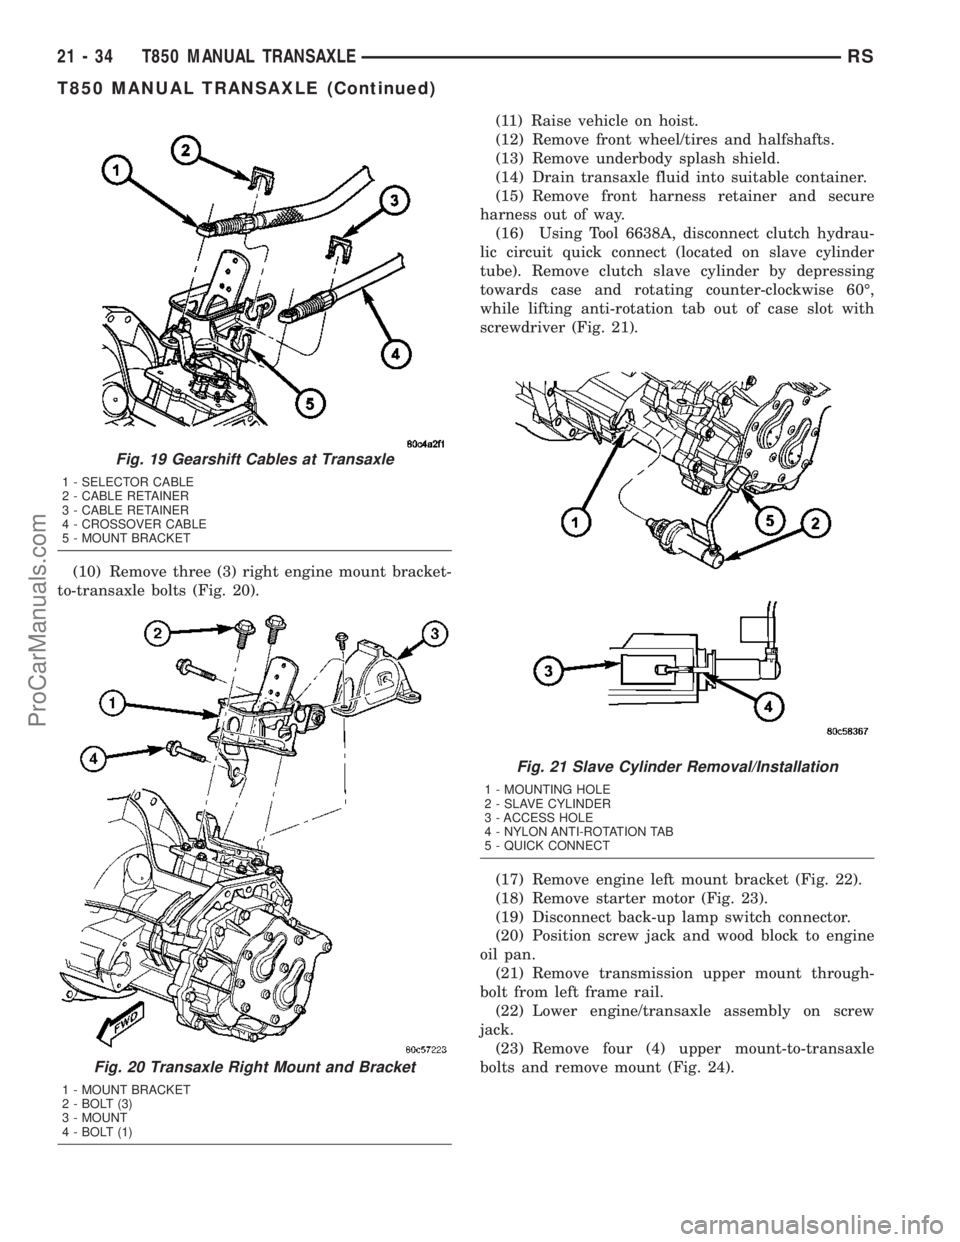
(10) Remove three (3) right engine mount bracket-
to-transaxle bolts (Fig. 20).(11) Raise vehicle on hoist.
(12) Remove front wheel/tires and halfshafts.
(13) Remove underbody splash shield.
(14) Drain transaxle fluid into suitable container.
(15) Remove front harness retainer and secure
harness out of way.
(16) Using Tool 6638A, disconnect clutch hydrau-
lic circuit quick connect (located on slave cylinder
tube). Remove clutch slave cylinder by depressing
towards case and rotating counter-clockwise 60É,
while lifting anti-rotation tab out of case slot with
screwdriver (Fig. 21).
(17) Remove engine left mount bracket (Fig. 22).
(18) Remove starter motor (Fig. 23).
(19) Disconnect back-up lamp switch connector.
(20) Position screw jack and wood block to engine
oil pan.
(21) Remove transmission upper mount through-
bolt from left frame rail.
(22) Lower engine/transaxle assembly on screw
jack.
(23) Remove four (4) upper mount-to-transaxle
bolts and remove mount (Fig. 24).
Fig. 19 Gearshift Cables at Transaxle
1 - SELECTOR CABLE
2 - CABLE RETAINER
3 - CABLE RETAINER
4 - CROSSOVER CABLE
5 - MOUNT BRACKET
Fig. 20 Transaxle Right Mount and Bracket
1 - MOUNT BRACKET
2 - BOLT (3)
3 - MOUNT
4 - BOLT (1)
Fig. 21 Slave Cylinder Removal/Installation
1 - MOUNTING HOLE
2 - SLAVE CYLINDER
3 - ACCESS HOLE
4 - NYLON ANTI-ROTATION TAB
5 - QUICK CONNECT
21 - 34 T850 MANUAL TRANSAXLERS
T850 MANUAL TRANSAXLE (Continued)
ProCarManuals.com
Page 1484 of 2177
(2) Remove input shaft bearing retainer (Fig. 29).
NOTE: Place transaxle in neutral before shift cover
removal.(3) Remove shift cover-to-case bolts and remove
shift cover assembly (Fig. 30).
(4) Using a suitable screwdriver, remove extension
housing axle oil seal (Fig. 31).
Fig. 28 Pivot Ball Removal/Installation
1 - C-3752 SLIDE HAMMER
2 - REMOVER/INSTALLER 6891
3 - PIVOT BALL
Fig. 29 Input Bearing Retainer
1 - INPUT BEARING RETAINER
Fig. 30 Shift Cover Removal/Installation
1 - SHIFT COVER ASSEMBLY
Fig. 31 Extension Housing Seal
1 - SCREWDRIVER
2 - EXTENSION HOUSING
3 - SEAL
RST850 MANUAL TRANSAXLE21-37
T850 MANUAL TRANSAXLE (Continued)
ProCarManuals.com
Page 1486 of 2177
(12) Remove lifting bar 8489.
(13) Remove end cover-to-case bolts (12) (Fig. 36).
(14) Remove end cover from transaxle (Fig. 37).(15) Remove 3/4 shift rail bushing from end cover
using slide hammer C-3752 and remover 6786 (Fig.
38).
(16) Remove reverse idler bolt (Fig. 39). Remove
reverse idler gear, washers, and shaft upon geartrain
removal.
Fig. 36 End Cover Bolts
1 - BOLT (12)
Fig. 37 End Cover Removal/Installation
1 - END COVER
2 - OIL TROUGH
Fig. 38 3/4 Shift Rail Bushing Removal
1 - SLIDE HAMMER C-3752
2 - REMOVER 6786
Fig. 39 Reverse Idler Shaft Bolt
RST850 MANUAL TRANSAXLE21-39
T850 MANUAL TRANSAXLE (Continued)
ProCarManuals.com
Page 1487 of 2177

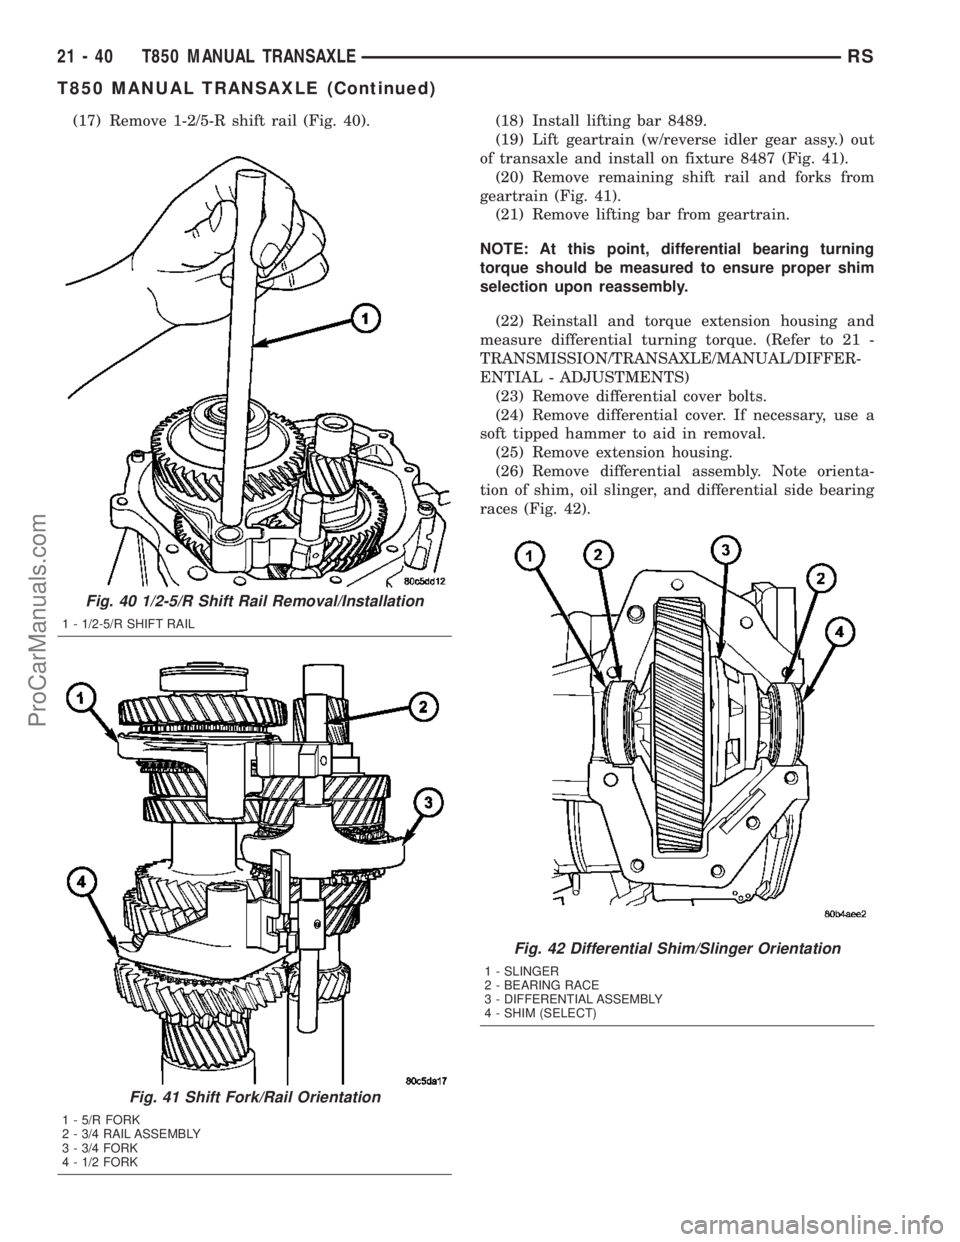
(17) Remove 1-2/5-R shift rail (Fig. 40). (18) Install lifting bar 8489.
(19) Lift geartrain (w/reverse idler gear assy.) out
of transaxle and install on fixture 8487 (Fig. 41).
(20) Remove remaining shift rail and forks from
geartrain (Fig. 41).
(21) Remove lifting bar from geartrain.
NOTE: At this point, differential bearing turning
torque should be measured to ensure proper shim
selection upon reassembly.
(22) Reinstall and torque extension housing and
measure differential turning torque. (Refer to 21 -
TRANSMISSION/TRANSAXLE/MANUAL/DIFFER-
ENTIAL - ADJUSTMENTS)
(23) Remove differential cover bolts.
(24) Remove differential cover. If necessary, use a
soft tipped hammer to aid in removal.
(25) Remove extension housing.
(26) Remove differential assembly. Note orienta-
tion of shim, oil slinger, and differential side bearing
races (Fig. 42).
Fig. 40 1/2-5/R Shift Rail Removal/Installation
1 - 1/2-5/R SHIFT RAIL
Fig. 41 Shift Fork/Rail Orientation
1 - 5/R FORK
2 - 3/4 RAIL ASSEMBLY
3 - 3/4 FORK
4 - 1/2 FORK
Fig. 42 Differential Shim/Slinger Orientation
1 - SLINGER
2 - BEARING RACE
3 - DIFFERENTIAL ASSEMBLY
4 - SHIM (SELECT)
21 - 40 T850 MANUAL TRANSAXLERS
T850 MANUAL TRANSAXLE (Continued)
ProCarManuals.com
Page 1493 of 2177
(14) Install input shaft sealed roller bearing using
installer 8482 (Fig. 58).
(15) Installnewinput shaft bearing snap ring
(Fig. 59).(16) Install shift rail bushing to end cover using
installer 8475 (Fig. 60).
(17) Applya1mm(0.04 in.) bead of MopartGas-
ket Maker to transaxle end cover and install to
transaxle case (Fig. 61).While installing end
cover, be sure to guide oil trough into pocket
(Fig. 62).Torque end cover-to-case bolts to 28 N´m
(250 in. lbs.) (Fig. 63).
Fig. 58 Install Input Shaft Sealed Roller Bearing
1 - INSTALLER 8482
2 - SEALED ROLLER BEARING
Fig. 59 Input Shaft Bearing Snap Ring
1 - SNAP RING
Fig. 60 Shift Rail Bushing Installation
1 - INSTALLER 8475
Fig. 61 End Cover Removal/Installation
1 - END COVER
2 - OIL TROUGH
21 - 46 T850 MANUAL TRANSAXLERS
T850 MANUAL TRANSAXLE (Continued)
ProCarManuals.com
Page 1494 of 2177
(18) Install lifting bar 8489 to geartrain.
(19) Lift up on bar (input shaft side) and install
input shaft bearing snap ring (Fig. 64).
(20) Lift up on bar (intermediate shaft side) and
install intermediate shaft bearing snap ring.
(21) Remove lifting bar 8489.
(22) Install a bead of MopartGear Lube RTV to
end plate and immediately install to case. Install and
torque bolts to 28 N´m (250 in. lbs.) (Fig. 65).
Fig. 62 Oil Trough Pocket
1 - OIL TROUGH
2 - POCKET
Fig. 63 End Cover Bolts
1 - BOLT (12)
Fig. 64 Input Bearing Snap Ring
1 - SNAP RING PLIERS
2 - LIFTING BAR 8489
3 - SNAP RING
Fig. 65 End Cover Bolts
1 - BOLT (11)
RST850 MANUAL TRANSAXLE21-47
T850 MANUAL TRANSAXLE (Continued)
ProCarManuals.com