2003 CHEVROLET VENTURE seats
[x] Cancel search: seatsPage 208 of 486
Rear Window Defogger
The rear window defogger uses a warming grid to
remove fog from the rear window.
will come on to let you know that the rear window
defogger is activated.
The rear window defogger will turn off about 10 minutes
after the button is pressed. If turned on again, the
defogger will only run for about ®ve minutes before
turning off. The defogger can also be turned off
by pressing the button again or by turning off the engine.
Notice:Don't use anything sharp on the inside of
the rear window. If you do, you could cut or damage
the warming grid, and the repairs wouldn't be
covered by your warranty. Do not attach a temporary
vehicle license, tape, a decal or anything similar
to the defogger grid.
Outlet Adjustment
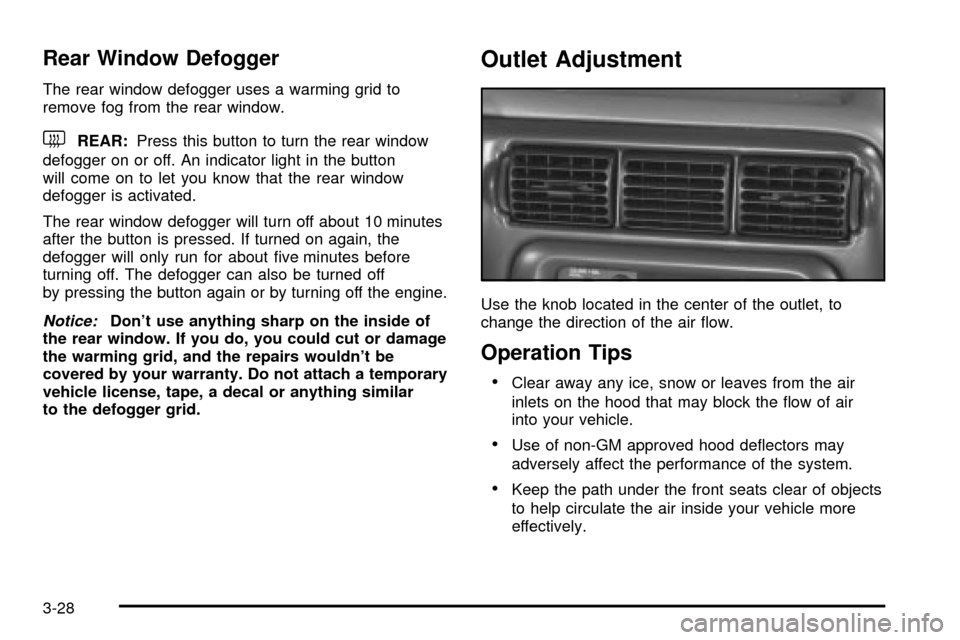
Use the knob located in the center of the outlet, to
change the direction of the air ¯ow.
Operation Tips
·Clear away any ice, snow or leaves from the air
inlets on the hood that may block the ¯ow of air
into your vehicle.
·Use of non-GM approved hood de¯ectors may
adversely affect the performance of the system.
·Keep the path under the front seats clear of objects
to help circulate the air inside your vehicle more
effectively.
3-28
Page 210 of 486

Directing the Air¯ow
To direct the air¯ow to the rear-seating area, use the
right knob located on the main climate-control panel.
·Select vent or bi-level mode to direct air to the
rear of the vehicle through the overhead outlets.
·Select ¯oor, defog or defrost mode to direct air to
the rear of the vehicle through the ¯oor outlets.
Generally the upper outlets are used for air conditioning
and the ¯oor outlets are used for heating.
Selecting the Fan Speed
9
(Fan):Turn the fan knob on either rear fan control
to numeral 1, 2, or 3 to increase or decrease air¯ow
to the rear-seating area. Turn the fan knob on either rear
fan control to 0 or OFF to turn off the fan.
Setting the Temperature
If the driver is adjusting the temperature, do the
following:
To increase or decrease the temperature for the entire
vehicle, use the temperature controls located on the
main climate-control panel.If using the main climate-control panel, then the
air-conditioning system must be on to direct cooled air
to the rear of the vehicle. If it is not on, then the
temperature in the rear of the vehicle will remain at
cabin temperature.
If a rear-seat passenger is adjusting the temperature, do
the following:
Turn the right knob, located on the overhead rear-control
panel, behind the driver's seat, clockwise or
counterclockwise to raise or lower the temperature in
the rear-seating area only.
Rear Air Outlets
To increase air¯ow through the rear ¯oor outlets, place
the left bucket seat in the second row in the forward
position. For more information, see
Rear Seat Operation
on page 1-7.
The outlet behind the left rear seat is the cold air return
outlet. Be sure to keep it free from obstructions.
Also, keep the area around the base of the center
instrument panel console, between and under the front
seats, free of objects that could also obstruct air¯ow
to the rear-seating area.
For more information on how to use the main climate
control system, see ªClimate Control Systemº listed
previously in this section. For information on ventilation,
see ªOutlet Adjustmentº under ªClimate Control
Systemº listed previously in this section.
3-30
Page 211 of 486
Rear Climate Control System
(With Entertainment System)
Your vehicle may have a rear climate-control system
that allows the driver to adjust the fan speed or a
rear-seat passenger to set a separate temperature and
adjust the fan speed, for the rear-seating area. This
system works with the main climate-control system in
your vehicle.
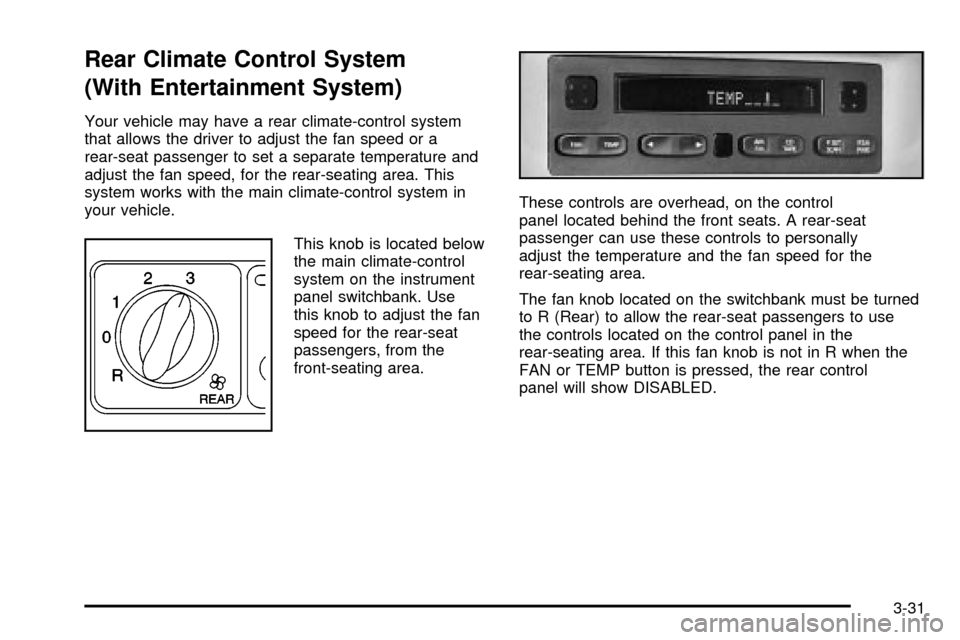
This knob is located below
the main climate-control
system on the instrument
panel switchbank. Use
this knob to adjust the fan
speed for the rear-seat
passengers, from the
front-seating area.These controls are overhead, on the control
panel located behind the front seats. A rear-seat
passenger can use these controls to personally
adjust the temperature and the fan speed for the
rear-seating area.
The fan knob located on the switchbank must be turned
to R (Rear) to allow the rear-seat passengers to use
the controls located on the control panel in the
rear-seating area. If this fan knob is not in R when the
FAN or TEMP button is pressed, the rear control
panel will show DISABLED.
3-31
Page 213 of 486
Rear Air Outlets
To increase air¯ow through the rear ¯oor outlets, place
the left bucket seat in the second row in the forward
position. For more information, see
Rear Seat Operation
on page 1-7.
The outlet behind the left rear seat is the cold air return
outlet. Be sure to keep it free from obstructions.
Also, keep the area around the base of the center
instrument panel console, between and under the front
seats, free of objects that could also obstruct air¯ow
to the rear-seating area.
For more information on how to use the main climate
control system, see ªClimate Control Systemº listed
previously in this section. For information on ventilation,
see ªOutlet Adjustmentº under ªClimate Control
Systemº listed previously in this section.
Passenger Compartment Air Filter
Passenger compartment air, both outside and
recirculated air, is routed through a passenger
compartment ®lter. The ®lter removes certain
contaminants from the air, including pollen and dust
particles. Reductions in air¯ow, which may occur more
quickly in dusty areas, indicate that the ®lter needs
to be replaced early. For how often to change the air
®lter, see
Part A: Scheduled Maintenance Services
on page 6-4.The access panel for the passenger compartment air
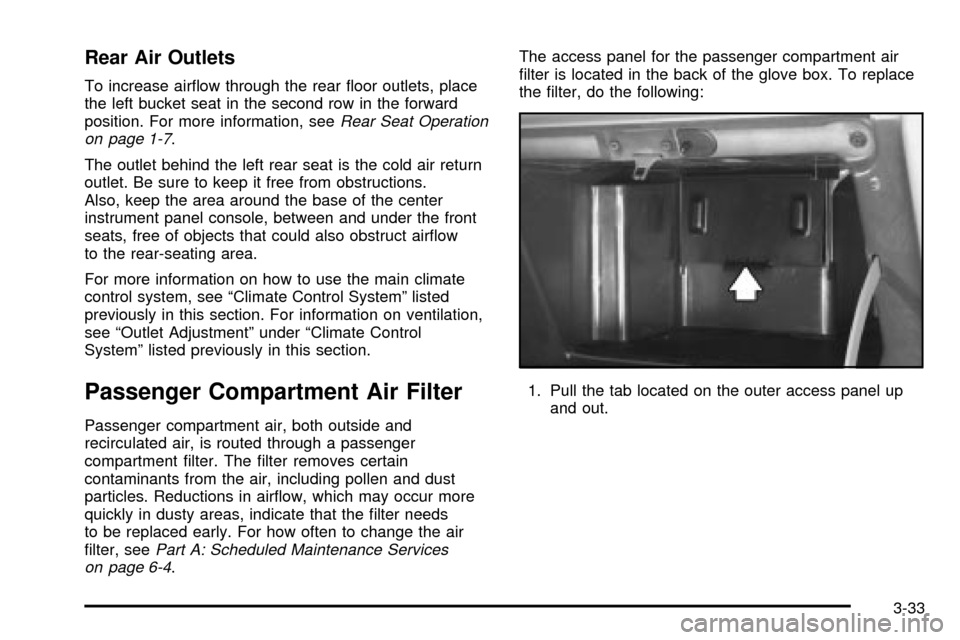
®lter is located in the back of the glove box. To replace
the ®lter, do the following:
1. Pull the tab located on the outer access panel up
and out.
3-33
Page 272 of 486

Compact Disc Messages
CHECK CD:If this message appears on the radio
display, it could be due to one of the following reasons:
·You're driving on a very rough road. When the
road becomes smoother, the disc should play.
·The disc is dirty, scratched, wet or upside down.
·The air is very humid. If so, wait about an hour and
try again.
·There may have been a problem while burning
the CD.
·The label may be caught in the CD player.
If the CD is not playing correctly, for any other reason,
try a known good CD.
If any error occurs repeatedly or if an error can't be
corrected, contact your dealer. If your radio displays an
error message, write it down and provide it to your
dealer when reporting the problem.
Entertainment System
Your vehicle may have an optional Digital Video
Disc (DVD) entertainment system. The entertainment
system works with the vehicle's audio system and
includes a DVD player, a video display screen,
headphones and a remote control. The entertainment
system also integrates the rear climate control and rear
seat audio functions.
Before You Drive
The video entertainment system is for passengers in the
second and third row seats only. The driver cannot
safely view the video screen while driving and should
not try to do so.
In severe or extreme weather conditions your
entertainment system will shut down until the
temperature is within the operating range. This
protection feature will keep your video components from
being damaged while the temperature is below
-4ÉF (-20ÉC) or above 140ÉF (60ÉC). To resume
operation, shut off the entertainment system, pull down
the video screen and then heat or cool the vehicle
until the temperature is within the operating range.
3-92
Page 321 of 486
If you put things inside your vehicle ± like suitcases,
tools, packages, or anything else ± they will go as fast
as the vehicle goes. If you have to stop or turn
quickly, or if there is a crash, they'll keep going.
{CAUTION:
Things you put inside your vehicle can strike
and injure people in a sudden stop or turn, or
in a crash.
·Put things in the cargo area of your
vehicle. Try to spread the weight evenly.
·Never stack heavier things, like suitcases,
inside the vehicle so that some of them
are above the tops of the seats.
·Don't leave an unsecured child restraint in
your vehicle.
·When you carry something inside the
vehicle, secure it whenever you can.
·Don't leave a seat folded down unless you
need to.
Automatic Level Control
On vehicles equipped with the automatic level control,
the rear of the vehicle is automatically kept level as you
load or unload your vehicle. However, you should still
not exceed the GVWR or the GAWR.
If the engine is running or the ignition key is in
ACCESSORY or when Retained Accessory Power
(RAP) is active, you may hear the compressor operating
when you load or unload your vehicle, and periodically
as the system self-adjusts. This is normal. See
ªRetained Accessory Powerº under
Ignition Positions on
page 2-31.
The compressor should operate for brief periods of time.
If the sound continues for an extended period of time,
your vehicle needs service.
Using heavier suspension components to get added
durability might not change your weight ratings. Ask your
dealer to help you load your vehicle the right away.
4-35
Page 429 of 486
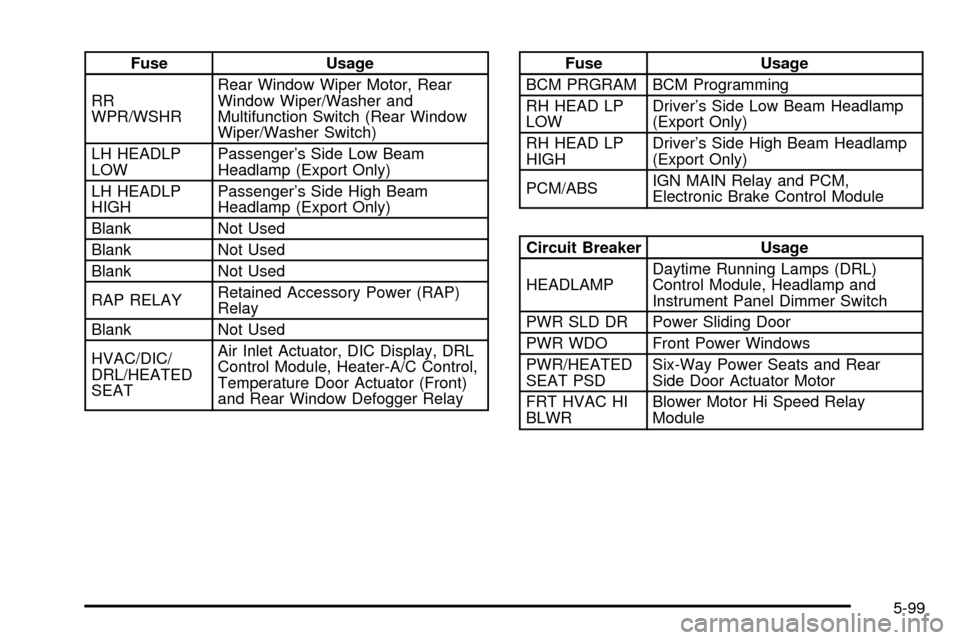
Fuse Usage
RR
WPR/WSHRRear Window Wiper Motor, Rear
Window Wiper/Washer and
Multifunction Switch (Rear Window
Wiper/Washer Switch)
LH HEADLP
LOWPassenger's Side Low Beam
Headlamp (Export Only)
LH HEADLP
HIGHPassenger's Side High Beam
Headlamp (Export Only)
Blank Not Used
Blank Not Used
Blank Not Used
RAP RELAYRetained Accessory Power (RAP)
Relay
Blank Not Used
HVAC/DIC/
DRL/HEATED
SEATAir Inlet Actuator, DIC Display, DRL
Control Module, Heater-A/C Control,
Temperature Door Actuator (Front)
and Rear Window Defogger RelayFuse Usage
BCM PRGRAM BCM Programming
RH HEAD LP
LOWDriver's Side Low Beam Headlamp
(Export Only)
RH HEAD LP
HIGHDriver's Side High Beam Headlamp
(Export Only)
PCM/ABSIGN MAIN Relay and PCM,
Electronic Brake Control Module
Circuit Breaker Usage
HEADLAMPDaytime Running Lamps (DRL)
Control Module, Headlamp and
Instrument Panel Dimmer Switch
PWR SLD DR Power Sliding Door
PWR WDO Front Power Windows
PWR/HEATED
SEAT PSDSix-Way Power Seats and Rear
Side Door Actuator Motor
FRT HVAC HI
BLWRBlower Motor Hi Speed Relay
Module
5-99
Page 446 of 486
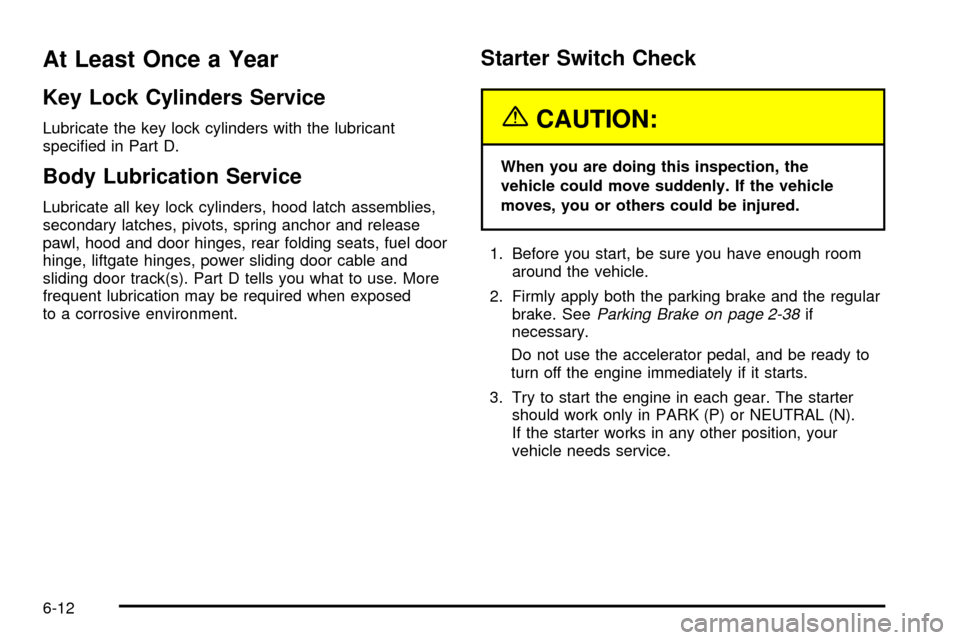
At Least Once a Year
Key Lock Cylinders Service
Lubricate the key lock cylinders with the lubricant
speci®ed in Part D.
Body Lubrication Service
Lubricate all key lock cylinders, hood latch assemblies,
secondary latches, pivots, spring anchor and release
pawl, hood and door hinges, rear folding seats, fuel door
hinge, liftgate hinges, power sliding door cable and
sliding door track(s). Part D tells you what to use. More
frequent lubrication may be required when exposed
to a corrosive environment.
Starter Switch Check
{CAUTION:
When you are doing this inspection, the
vehicle could move suddenly. If the vehicle
moves, you or others could be injured.
1. Before you start, be sure you have enough room
around the vehicle.
2. Firmly apply both the parking brake and the regular
brake. See
Parking Brake on page 2-38if
necessary.
Do not use the accelerator pedal, and be ready to
turn off the engine immediately if it starts.
3. Try to start the engine in each gear. The starter
should work only in PARK (P) or NEUTRAL (N).
If the starter works in any other position, your
vehicle needs service.
6-12