Page 381 of 486
Carrier Assembly-Differential
(Rear Drive Module)
When to Check and Change Lubricant
Refer to the Maintenance Schedule to determine how
often to check the lubricant and when to change it. See
Part A: Scheduled Maintenance Services on page 6-4.
How to Check Lubricant
To get an accurate reading, the vehicle should be on a
level surface.
If the level is below the bottom of the ®ller plug hole,
you'll need to add some lubricant. Add enough lubricant
to raise the level to the bottom of the ®ller plug hole.
A ¯uid loss could indicate a problem; check and have it
repaired, if needed.
What to Use
Refer to the Maintenance Schedule to determine what
kind of lubricant to use. SeePart D: Recommended
Fluids and Lubricants on page 6-17.
5-51
Page 388 of 486
Windshield Wiper Blade
Replacement
Windshield wiper blades should be inspected at least
twice a year for wear or cracking. See ªWiper Blade
Checkº in
At Least Twice a Year on page 6-11for more
information.
Replacement blades come in different types and are
removed in different ways. For proper type and length,
see
Normal Maintenance Replacement Parts on
page 5-104.To remove the windshield wiper blade(s):
1. Turn the wipers on to the lowest intermittent setting.
2. Turn the ignition to OFF while the wipers are at
the outer position of the wipe pattern.
3. Pull the windshield wiper arm away from the
windshield or backglass.
4. While holding the wiper
arm away from the
glass, push the release
clip from under the
blade.
5-58
Page 392 of 486

Tire Inspection and Rotation
Tires should be rotated every 7,500 miles (12 500 km).
Any time you notice unusual wear, rotate your tires
as soon as possible and check wheel alignment. Also
check for damaged tires or wheels. See
When It Is Time
for New Tires on page 5-63andWheel Replacement
on page 5-66for more information.
Make sure the spare tire is stored securely. Push, pull,
and then try to rotate or turn the tire, If it moves,
use the folding wrench to tighten the cable. See
Changing a Flat Tire on page 5-71.
The purpose of regular rotation is to achieve more
uniform wear for all tires on the vehicle. The ®rst rotation
is the most important. See ªPart A: Scheduled
Maintenance Services,º in Section 6, for scheduled
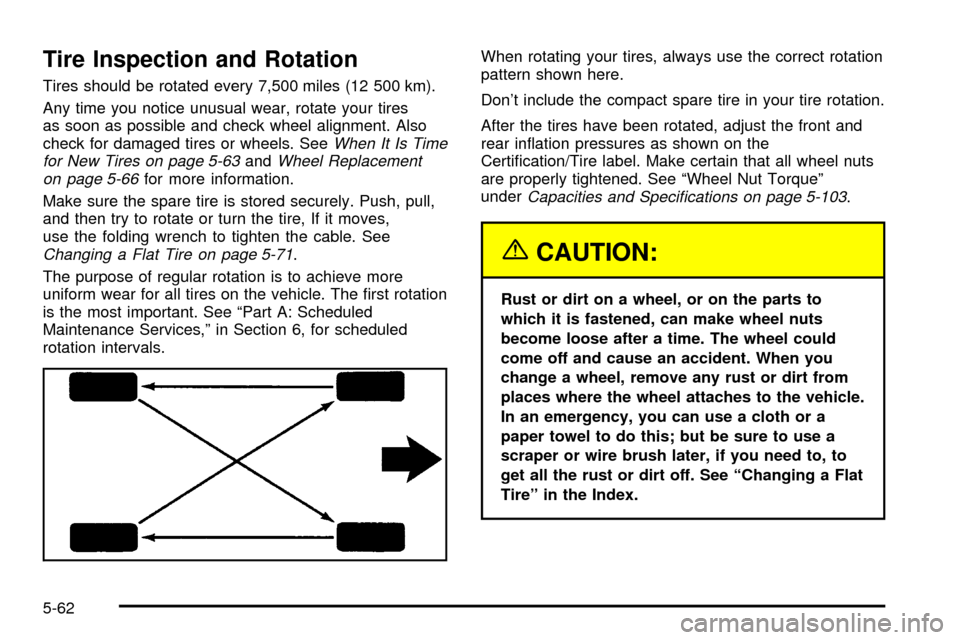
rotation intervals.When rotating your tires, always use the correct rotation
pattern shown here.
Don't include the compact spare tire in your tire rotation.
After the tires have been rotated, adjust the front and
rear in¯ation pressures as shown on the
Certi®cation/Tire label. Make certain that all wheel nuts
are properly tightened. See ªWheel Nut Torqueº
under
Capacities and Speci®cations on page 5-103.
{CAUTION:
Rust or dirt on a wheel, or on the parts to
which it is fastened, can make wheel nuts
become loose after a time. The wheel could
come off and cause an accident. When you
change a wheel, remove any rust or dirt from
places where the wheel attaches to the vehicle.
In an emergency, you can use a cloth or a
paper towel to do this; but be sure to use a
scraper or wire brush later, if you need to, to
get all the rust or dirt off. See ªChanging a Flat
Tireº in the Index.
5-62
Page 400 of 486

If a Tire Goes Flat
It's unusual for a tire to ªblowoutº while you're driving,
especially if you maintain your tires properly. If air goes
out of a tire, it's much more likely to leak out slowly.
But if you should ever have a ªblowout,º here are a few
tips about what to expect and what to do:
If a front tire fails, the ¯at tire will create a drag that
pulls the vehicle toward that side. Take your foot off the
accelerator pedal and grip the steering wheel ®rmly.
Steer to maintain lane position, and then gently brake to
a stop well out of the traffic lane.
A rear blowout, particularly on a curve, acts much like a
skid and may require the same correction you'd use
in a skid. In any rear blowout, remove your foot from the
accelerator pedal. Get the vehicle under control by
steering the way you want the vehicle to go. It may be
very bumpy and noisy, but you can still steer. Gently
brake to a stop, well off the road if possible.{CAUTION:
Lifting a vehicle and getting under it to do
maintenance or repairs is dangerous without
the appropriate safety equipment and training.
The jack provided with your vehicle is
designed only for changing a ¯at tire. If it is
used for anything else, you or others could be
badly injured or killed if the vehicle slips off
the jack. Use the jack provided with your
vehicle only for changing a ¯at tire.
If a tire goes ¯at, the next part shows how to use your
jacking equipment to change a ¯at tire safely.
5-70
Page 423 of 486

Sheet Metal Damage
If your vehicle is damaged and requires sheet metal
repair or replacement, make sure the body repair shop
applies anti-corrosion material to parts repaired or
replaced to restore corrosion protection.
Original manufacturer replacement parts will provide the
corrosion protection while maintaining the warranty.
Finish Damage
Any stone chips, fractures or deep scratches in the
®nish should be repaired right away. Bare metal
will corrode quickly and may develop into major repair
expense.
Minor chips and scratches can be repaired with touch-up
materials avaliable from your dealer. Larger areas of
®nish damage can be corrected in your dealer's
body and paint shop.
Underbody Maintenance
Chemicals used for ice and snow removal and dust
control can collect on the underbody. If these are not
removed, corrosion and rust can develop on the
underbody parts such as fuel lines, frame, ¯oor pan and
exhaust system even though they have corrosion
protection.At least every spring, ¯ush these materials from the
underbody with plain water. Clean any areas where mud
and debris can collect. Dirt packed in close areas of
the frame should be loosened before being ¯ushed.
Your dealer or an underbody car washing system can
do this for you.
Chemical Paint Spotting
Some weather and atmospheric conditions can create a
chemical fallout. Airborne pollutants can fall upon and
attack painted surfaces on your vehicle. This damage
can take two forms: blotchy, ring-shaped discolorations,
and small, irregular dark spots etched into the paint
surface.
Although no defect in the paint job causes this, GM will
repair, at no charge to the owner, the surfaces of
new vehicles damaged by this fallout condition within
12 months or 12,000 miles (20 000 km) of purchase,
whichever occurs ®rst.
5-93
Page 434 of 486
Engine Speci®cations
Engine VIN Code Transaxle Spark Plug Gap Firing Order
V6 E Automatic0.060 inches
(1.52 mm)1±2±3±4±5±6
Normal Maintenance Replacement Parts
Part Number
Engine Air Cleaner/Filter A-1208C*
Engine Oil FilterPF47
Passenger Compartment Air Filter Kit GM Part No. 52482929
Spark Plugs41-101*
Windshield Wiper Blades
Length
Type24.0 inches (60.0 cm)
Shepherd's Hook
Wiper Blade (Backglass)
Length
Type16.0 inches (40.6 cm)
Shepherd's Hook
*ACDelco
žpart number.
5-104
Page 435 of 486

Maintenance Schedule......................................6-2
Introduction...................................................6-2
Your Vehicle and the Environment....................6-2
Maintenance Requirements..............................6-2
How This Section is Organized.........................6-3
Part A: Scheduled Maintenance Services...........6-4
Using Your Maintenance Schedule....................6-4
Scheduled Maintenance...................................6-5
Part B: Owner Checks and Services................6-10
At Each Fuel Fill..........................................6-10
At Least Once a Month.................................6-10
At Least Twice a Year...................................6-11At Least Once a Year...................................6-12
Part C: Periodic MaintenanceInspections.........6-15
Steering, Suspension and Front Drive Axle
Boot and Seal Inspection............................6-15
Exhaust System Inspection............................6-15
Fuel System Inspection..................................6-16
Engine Cooling System Inspection...................6-16
Throttle System Inspection.............................6-16
All-Wheel Drive Inspection..............................6-16
Brake System Inspection................................6-16
Part D: Recommended Fluids and Lubricants. . . .6-17
Part E: Maintenance Record...........................6-19
Section 6 Maintenance Schedule
6-1
Page 436 of 486

Maintenance Schedule
Introduction
Important: Keep engine oil at the proper level and
change as recommended.
Have you purchased the GM Protection Plan? The Plan
supplements your new vehicle warranties. See your
Warranty and Owner Assistance booklet or your dealer
for details.
Your Vehicle and the Environment
Proper vehicle maintenance not only helps to keep your
vehicle in good working condition, but also helps the
environment. Improper vehicle maintenance can
even affect the quality of the air we breathe. Improper
¯uid levels or the wrong tire in¯ation can increase
the level of emissions from your vehicle. To help protect
our environment, and to keep your vehicle in good
condition, be sure to maintain your vehicle properly.
Maintenance Requirements
Maintenance intervals, checks, inspections and
recommended ¯uids and lubricants as prescribed in this
manual are necessary to keep your vehicle in good
working condition. Any damage caused by failure
to follow scheduled maintenance may not be covered by
warranty.
6-2