2003 CHEVROLET VENTURE stop start
[x] Cancel search: stop startPage 221 of 486
If the air bag readiness light stays on after you start the
vehicle or comes on when you are driving, your air
bag system may not work properly. Have your vehicle
serviced right away.
{CAUTION:
If the air bag readiness light stays on after you
start your vehicle, it means the air bag system
may not be working properly. The air bags in
your vehicle may not in¯ate in a crash, or they
could even in¯ate without a crash. To help
avoid injury to yourself or others, have your
vehicle serviced right away if the air bag
readiness light stays on after you start your
vehicle.
The air bag readiness light should ¯ash for a few
seconds when you turn the ignition key to RUN. If the
light doesn't come on then, have it ®xed so it will
be ready to warn you if there is a problem.
Brake System Warning Light
When the ignition is on, the brake system warning light
will come on when you set your parking brake. The
light will stay on if your parking brake doesn't release
fully. If it stays on after your parking brake is fully
released, it means you have a brake problem.
Your vehicle's hydraulic brake system is divided into two
parts. If one part isn't working, the other part can still
work and stop you. For good braking, though, you need
both parts working well.
If the warning light comes on, there could be a brake
problem. Have your brake system inspected right away.
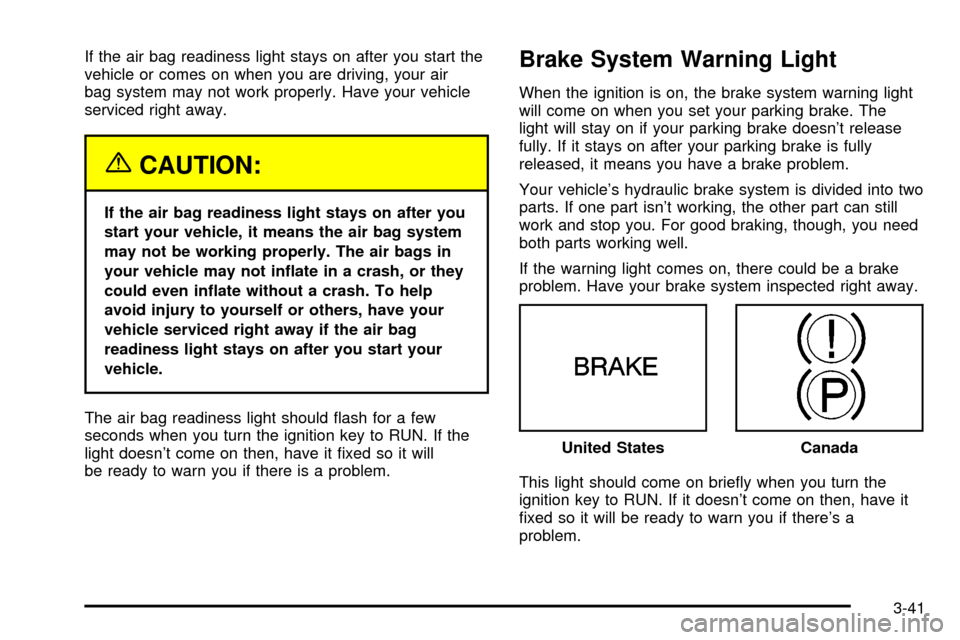
This light should come on brie¯y when you turn the
ignition key to RUN. If it doesn't come on then, have it
®xed so it will be ready to warn you if there's a
problem.United States
Canada
3-41
Page 222 of 486
If the light comes on while you are driving, pull off the
road and stop carefully. You may notice that the pedal is
harder to push. Or, the pedal may go closer to the
¯oor. It may take longer to stop. If the light is still on,
have the vehicle towed for service. See
Anti-Lock Brake
System Warning Light on page 3-42andTowing Your
Vehicle on page 4-32.
{CAUTION:
Your brake system may not be working
properly if the brake system warning light is
on. Driving with the brake system warning light
on can lead to an accident. If the light is still
on after you have pulled off the road and
stopped carefully, have the vehicle towed
for service.
Anti-Lock Brake System
Warning Light
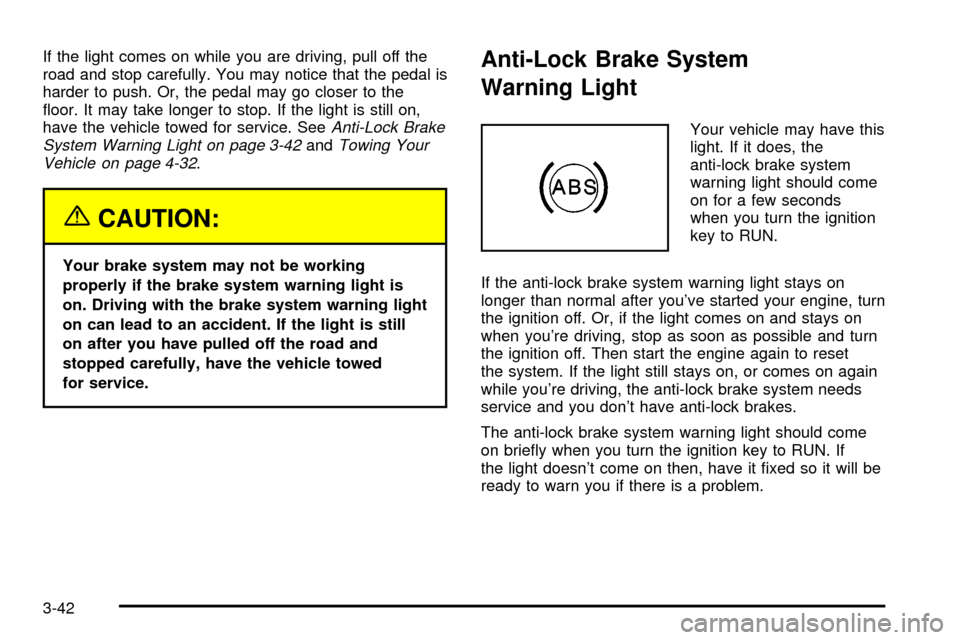
Your vehicle may have this
light. If it does, the
anti-lock brake system
warning light should come
on for a few seconds
when you turn the ignition
key to RUN.
If the anti-lock brake system warning light stays on
longer than normal after you've started your engine, turn
the ignition off. Or, if the light comes on and stays on
when you're driving, stop as soon as possible and turn
the ignition off. Then start the engine again to reset
the system. If the light still stays on, or comes on again
while you're driving, the anti-lock brake system needs
service and you don't have anti-lock brakes.
The anti-lock brake system warning light should come
on brie¯y when you turn the ignition key to RUN. If
the light doesn't come on then, have it ®xed so it will be
ready to warn you if there is a problem.
3-42
Page 226 of 486
This light should come on, as a check to show you it is
working, when the ignition is on and the engine is
not running. If the light does not come on, have it
repaired. This light will also come on during a
malfunction in one of two ways:
·Light FlashingÐ A mis®re condition has been
detected. A mis®re increases vehicle emissions
and may damage the emission control system on
your vehicle. Diagnosis and service may be
required.
·Light On SteadyÐ An emission control system
malfunction has been detected on your vehicle.
Diagnosis and service may be required.
If the Light Is Flashing
The following may prevent more serious damage to
your vehicle:
·Reducing vehicle speed.
·Avoiding hard accelerations.
·Avoiding steep uphill grades.
·If you are towing a trailer, reduce the amount of
cargo being hauled as soon as it is possible.
If the light stops ¯ashing and remains on steady, see ªIf
the Light Is On Steadyº following.
If the light continues to ¯ash, when it is safe to do so,
stop the vehicle.Find a safe place to park your vehicle.
Turn the key off, wait at least 10 seconds and restart
the engine. If the light remains on steady, see ªIf
the Light Is On Steadyº following. If the light is still
¯ashing, follow the previous steps, and see your dealer
for service as soon as possible.
3-46
Page 251 of 486
6 RDM (Random):Press this pushbutton to hear the
tracks in random, rather than sequential, order. RDM ON
will appear on the display. RDM T and the track
number will appear on the display when each track
starts to play. Press RDM again to turn off random play.
RDM OFF will appear on the display.
qSEEKr:Press the left arrow to go to the start of
the current or of the previous track. Press the right
arrow to go to the start of the next track. If either of the
arrows is held or pressed more than once, the player
will continue moving backward or forward through
the CD.
DISPL (Display):Press this knob to see how long the
current track has been playing. ET and the elapsed
time will appear on the display. To change the default
on the display (track or elapsed time), push the
knob until you see the display you want, then hold the
knob for two seconds. The radio will produce one
beep and selected display will now be the default.
BAND:Press this button to listen to the radio when a
CD is playing. The CD will stop but remain in the player.
CD AUX (Auxiliary):Press this button to play a CD
when listening to the radio.
ZEJT (Eject):Press this button to eject a CD. Eject
may be activated with either the ignition or radio off.
CDs may be loaded with the radio and ignition off if this
button is pressed ®rst.
Compact Disc Messages
If the disc comes out or CHECK CD appears on the
display, it could be for one of the following reasons:
·You're driving on a very rough road. When the road
becomes smoother, the disc should play.
·It's very hot. When the temperature returns to
normal, the disc should play.
·The disc is dirty, scratched, wet or upside down.
·The air is very humid. If so, wait about an hour and
try again.
·There may have been a problem while burning
the CD.
·The label may be caught in the CD player.
If the CD is not playing correctly, for any other reason,
try a known good CD.
If any error occurs repeatedly or if an error can't be
corrected, contact your dealer.
3-71
Page 257 of 486
Traffic Interrupt Feature:Your radio can interrupt the
play of a cassette, or CD. Press the TRAF button.
The radio will seek to a station that broadcasts traffic
announcements. When the radio ®nds a station
that broadcasts traffic announcements, it will stop.
TRAF will appear on the display. When a traffic
announcement comes on the station that was found,
you will hear it. When the traffic announcement is over,
the radio will resume play of the cassette, or CD. If
no station is found, NO TRAF will appear on the display.
Radio Messages
CAL ERR (Calibration Error):This message is
displayed when the radio has not been calibrated
properly for the vehicle. You must return to the
dealership for service.
LOCKED:This message is displayed when the
THEFTLOCK
žsystem has locked up. You must return
to the dealership for service.
Playing a Cassette Tape
Your tape player is built to work best with tapes that are
up to 30 to 45 minutes long on each side. Tapes
longer than that are so thin they may not work well in
this player. The longer side with the tape visible should
face to the right. If the ignition is on, but the radio is
off, the tape can be inserted and will begin playing. A
tape symbol is shown on the display whenever a tape isinserted. If you hear nothing but a garbled sound, the
tape may not be in squarely. Press EJT to remove
the tape and start over.
While the tape is playing, use the VOL, AUDIO and
SEEK controls just as you do for the radio. The display
will show TAPE and an arrow showing which side of
the tape is playing.
If you want to insert a tape while the ignition is off, ®rst
press EJT or DISPL.
If an error appears on the display, see ªCassette Tape
Messagesº later in this section.
1 PREV (Previous):Your tape must have at least three
seconds of silence between each selection for previous
to work. Press this pushbutton to go to the previous
selection on the tape if the current selection has been
playing for less than three seconds. If pressed when the
current selection has been playing from 3 to 13 seconds,
it will go to the beginning of the previous selection or
the beginning of the current selection, depending upon
the position on the tape. If pressed when the current
selection has been playing for more than 13 seconds, it
will go to the beginning of the current selection.
SEEK and a negative number will appear on the display
while the cassette player is in the previous mode.
Pressing this pushbutton multiple times or holding it will
increase the number of selections to be searched
back, up to -9.
3-77
Page 260 of 486
1 PREV (Previous):Press this pushbutton to go to the
previous track if the current track has been playing
for less than eight seconds. If pressed when the current
track has been playing for more than eight seconds,
it will go to the beginning of the current track. TRACK
and the track number will appear on the display. If
you hold this pushbutton or press it more than once, the
player will continue moving back through the disc.
2 NEXT:Press this pushbutton to go to the next track.
TRACK. The track number will appear on the display.
If you hold this pushbutton or press it more than
once, the player will continue moving forward through
the disc.
3 REV (Reverse):Press and hold this pushbutton to
reverse quickly within a track. Press and hold this
pushbutton for less than two seconds to reverse at six
times the normal playing speed. Press and hold it
for more than two seconds to reverse at 17 times the
normal playing speed. Release it to play the passage.
The display will show ET and the elapsed time.
4 FWD (Forward):Press and hold this pushbutton to
advance quickly within a track. Press and hold this
pushbutton for less than two seconds to advance at six
times the normal playing speed. Press and hold it for
more than two seconds to advance at 17 times the
normal playing speed. Release it to play the passage.
The display will show ET and the elapsed time.6 RDM (Random):Press this pushbutton to hear the
tracks in random, rather than sequential, order. RDM ON
will appear on the display. RDM T and the track
number will appear on the display when each track
starts to play. Press it again to turn off random play.
RDM OFF will appear on the display.
qSEEKr:The right arrow is the same as the
NEXT pushbutton, and the left arrow is the same as the
PREV pushbutton. If either of the SEEK arrows is
held or pressed more than once, the player will continue
moving backward or forward through the CD.
DISPL (Display):Press this knob to see how long the
current track has been playing. ET and the elapsed
time will appear on the display. To change the default
on the display (track or elapsed time), push the
knob until you see the display you want, then hold the
knob for two seconds. The radio will produce one
beep and selected display will now be the default.
BAND:Press this button to listen to the radio when a
disc is playing. The disc will stop but remain in the
player.
3-80
Page 268 of 486
3. Once the light stops ¯ashing and turns green, load
a disc. Insert the disc partway into the slot, label
side up. The player will pull the disc in.
Once the disc is loaded, the light will begin ¯ashing
again. Once the light stops ¯ashing and turns
green you can load another disc. The disc player
takes up to six discs. Do not try to load more
than six.
To load more than one disc but less than six, complete
Steps 1 through 3. When you have ®nished loading
discs, with the radio on or off, press the LOAD side of
the LOAD CD button to cancel the loading function. The
radio will begin to play the last CD loaded.
When a disc is inserted, the CD symbol will be
displayed. If more than one disc has been loaded, a
number for each disc will be displayed. If you select an
equalization setting for your disc, it will be activated
each time you play a disc.
If the radio is on or off, the last disc loaded will begin to
play automatically.
As each new track starts to play, the track number will
appear on the display.Playing a Speci®c Loaded
Compact Disc
For every CD loaded, a number will appear on the radio
display. To play a speci®c CD, ®rst press the CD AUX
button to start playing a CD. Then press the numbered
pushbutton that corresponds to the CD you want to
play. A small bar will appear under the CD number that
is playing, and the track number will appear.
If an error appears on the radio display, see ªCompact
Disc Messagesº later in this section.
LOAD CD
Z(Eject):Pressing the CD eject side of
this button will eject a single disc or multiple discs.
To eject the disc that is currently playing, press
and release this button. To eject multiple discs, press
and hold this button for two seconds. You will hear
a beep and the light will ¯ash to let you know when a
disc is being ejected.
REMOVE CD will be displayed. You can now remove
the disc. If the disc is not removed, after 25 seconds, the
disc will be automatically pulled back into the receiver.
If you try to push the disc back into the receiver,
before the 25 second time period is complete, the
receiver will sense an error and will try to eject the disc
several times before stopping.
3-88
Page 269 of 486
Do not repeatedly press the CD eject side of the
LOAD CD eject button to eject a disc after you have
tried to push it in manually. The receivers 25-second
eject timer will reset at each press of eject, which
will cause the receiver to not eject the disc until the
25-second time period has elapsed.
Once the player stops and the disc is ejected, remove
the disc. After removing the disc, press the PWR
knob off and then on again. This will clear the
disc-sensing feature and enable discs to be loaded into
the player again.
{REV (Reverse):Press and hold this button to
reverse quickly within a track. You will hear sound at a
reduced volume. Release it to play the passage.
The display will show elapsed time.
FWD
|(Forward):Press and hold this button to
advance quickly within a track. You will hear sound at a
reduced volume. Release it to play the passage. The
display will show elapsed time.
RPT (Repeat):With repeat, you can repeat one track
or an entire disc. To use repeat, do the following:
·To repeat the track you are listening to, press and
release the RPT button. RPT will appear on the
display. Press RPT again to turn it off.
·To repeat the disc you are listening to, press and
hold the RPT button for two seconds. RPT will
appear on the display. Press RPT again to turn it off.RDM (Random):With random, you can listen to the
tracks in random, rather than sequential, order, on one
disc or on all of the discs. To use random, do one
of the following:
·To play the tracks on the disc you are listening to in
random order, press and release the RDM button.
RANDOM ONE will appear on the display. Press
RDM again to turn it off.
·To play the tracks on all of the discs that are
loaded in random order, press and hold RDM
for more than two seconds. You will hear a beep
and RANDOM ALL will appear on the display. Press
RDM again to turn it off.
AUTO EQ (Automatic Equalization):Press AUTO EQ
to select the desired equalization setting while playing
a compact disc. The equalization will be automatically
set whenever you play a compact disc. For more
information on AUTO EQ, see ªAUTO EQº listed
previously in this section.
sSEEKt:Press the left arrow to go to the start of
the current track, if more than ten seconds have passed.
Press the right arrow to go to the next track. If you
press the button more than once, the player will continue
moving backward or forward through the disc.
3-89