2003 CHEVROLET EXPRESS CARGO VAN ESP
[x] Cancel search: ESPPage 235 of 386

Driving with a Trailer
{CAUTION:
If you have a rear-most window open and you
pull a trailer with your vehicle, carbon
monoxide (CO) could come into your vehicle.
You can't see or smell CO. It can cause
unconsciousness or death. See ªEngine
Exhaustº in the Index. To maximize your safety
when towing a trailer:
·Have your exhaust system inspected for
leaks, and make necessary repairs before
starting on your trip.
·Keep the rear-most windows closed.
·If exhaust does come into your vehicle
through a window in the rear or another
opening, drive with your front, main
heating or cooling system on and with the
fan on any speed. This will bring fresh,
outside air into your vehicle. Do not use
the climate control setting for maximum air
because it only recirculates the air inside
your vehicle. See ªClimate Controlsº in
the Index.Towing a trailer requires a certain amount of experience.
Before setting out for the open road, you'll want to get
to know your rig. Acquaint yourself with the feel of
handling and braking with the added weight of the trailer.
And always keep in mind that the vehicle you are
driving is now a good deal longer and not nearly as
responsive as your vehicle is by itself.
Before you start, check the trailer hitch and platform
(and attachments), safety chains, electrical connector,
lamps, tires and mirror adjustment. If the trailer has
electric brakes, start your vehicle and trailer moving and
then apply the trailer brake controller by hand to be
sure the brakes are working. This lets you check your
electrical connection at the same time.
During your trip, check occasionally to be sure that the
load is secure, and that the lamps and any trailer
brakes are still working.Following Distance
Stay at least twice as far behind the vehicle ahead as
you would when driving your vehicle without a trailer.
This can help you avoid situations that require
heavy braking and sudden turns.
4-41
Page 237 of 386

Parking on Hills
{CAUTION:
You really should not park your vehicle, with a
trailer attached, on a hill. If something goes
wrong, your rig could start to move. People
can be injured, and both your vehicle and the
trailer can be damaged.
But if you ever have to park your rig on a hill, here's
how to do it:
1. Apply your regular brakes, but don't shift into
PARK (P) yet. Then turn your wheels into the curb
if facing downhill or into traffic if facing uphill.
2. Have someone place chocks under the trailer
wheels.
3. When the wheel chocks are in place, release the
regular brakes until the chocks absorb the load.
4. Reapply the regular brakes. Then apply your
parking brake and then shift to PARK (P).
5. Release the regular brakes.
When You Are Ready to Leave After
Parking on a Hill
1. Apply your regular brakes and hold the pedal down
while you:
·start your engine,
·shift into a gear, and
·release the parking brake.
2. Let up on the brake pedal.
3. Drive slowly until the trailer is clear of the chocks.
4. Stop and have someone pick up and store the
chocks.
Maintenance When Trailer Towing
Your vehicle will need service more often when you're
pulling a trailer. See the Maintenance Schedule for more
on this. Things that are especially important in trailer
operation are automatic transmission ¯uid (don't over®ll),
engine oil, axle lubricant, belt, cooling system and
brake system. Each of these is covered in this manual,
and the Index will help you ®nd them quickly. If
you're trailering, it's a good idea to review these sections
before you start your trip.
Check periodically to see that all hitch nuts and bolts
are tight.
4-43
Page 257 of 386

Usage Fluid/Lubricant
Front and
Rear AxleSAE 75W-90 Synthetic
Axle Lubricant
(GM Part No. U.S. 12378261, in
Canada 10953455) or equivalent
meeting GM Speci®cation 9986115.
Transfer CaseDEXRON
ž-III Automatic
Transmission Fluid.
One-Piece
Propshaft Slip
Yoke Spline,
Two-Piece
Propshaft
Slip-in-Tube
SplineSpline Lubricant, Special Lubricant
(GM Part No. U.S. 12345879, in
Canada 10953511) or lubricant
meeting requirements of
GM 9985830.
Usage Fluid/Lubricant
Hood HingesMulti-Purpose Lubricant, Superlube
(GM Part No. U.S. 12346241, in
Canada 10953474, or equivalent).
Weatherstrip
ConditioningDielectric Silicone Grease
(GM Part No. U.S. 12345579, in
Canada 10953014, or equivalent).
Weatherstrip
SqueaksSynthetic Grease with
Te¯on, Superlube
(GM Part No. U.S. 12371287, in
Canada 10953437, or equivalent).
6-19
Page 262 of 386

Customer Assistance
Information
Customer Satisfaction Procedure
Your satisfaction and goodwill are important to
your dealer and to Chevrolet. Normally, any concerns
with the sales transaction or the operation of your
vehicle will be resolved by your dealer's sales or service
departments. Sometimes, however, despite the best
intentions of all concerned, misunderstandings can
occur. If your concern has not been resolved to your
satisfaction, the following steps should be taken:
STEP ONE:Discuss your concern with a member of
dealership management. Normally, concerns can
be quickly resolved at that level. If the matter has
already been reviewed with the sales, service or parts
manager, contact the owner of the dealership or
the general manager.
STEP TWO:If after contacting a member of dealership
management, it appears your concern cannot be
resolved by the dealership without further help, contact
the Chevrolet Customer Assistance Center by calling
1-800-222-1020. In Canada, contact GM of Canada
Customer Communication Centre in Oshawa by calling
1-800-263-3777 (English) or 1-800-263-7854 (French).We encourage you to call the toll-free number in order
to give your inquiry prompt attention. Please have
the following information available to give the Customer
Assistance Representative:
·Vehicle Identi®cation Number (This is available from
the vehicle registration or title, or the plate at the
top left of the instrument panel and visible through
the windshield.)
·Dealership name and location
·Vehicle delivery date and present mileage
When contacting Chevrolet, please remember that your
concern will likely be resolved at a dealer's facility.
That is why we suggest you follow Step One ®rst if you
have a concern.
STEP THREE:Both General Motors and your dealer
are committed to making sure you are completely
satis®ed with your new vehicle. However, if you continue
to remain unsatis®ed after following the procedure
outlined in Steps One and Two, you should ®le with the
GM/BBB Auto Line Program to enforce any additional
rights you may have. Canadian owners refer to
your Warranty and Owner Assistance Information
booklet for information on the Canadian Motor Vehicle
Arbitration Plan (CAMVAP).
7-2
Page 268 of 386

Courtesy Rental Vehicle
When your vehicle is unavailable due to overnight
warranty repairs, your dealer may arrange to provide
you with a courtesy rental vehicle or reimburse you for a
rental vehicle you obtained, at actual cost, up to a
maximum of $30.00 per day supported by receipts. This
requires that you sign and complete a rental agreement
and meet state, local and rental vehicle provider
requirements. Requirements vary and may include
minimum age requirements, insurance coverage, credit
card, etc. You are responsible for fuel usage charges
and may also be responsible for taxes, levies,
usage fees, excessive mileage or rental usage beyond
the completion of the repair.
Generally it is not possible to provide a like-vehicle as a
courtesy rental.
Additional Program Information
Courtesy Transportation is available during the
Bumper-to-Bumper warranty coverage period, but itis
notpart of the New Vehicle Limited Warranty. A
separate booklet entitled ªWarranty and Owner
Assistance Informationº furnished with each new vehicle
provides detailed warranty coverage information.
Courtesy Transportation is available only at participating
dealers and all program options, such as shuttle
service, may not be available at every dealer.Please contact you dealer for speci®c information about
availability. All Courtesy Transportation arrangements
will be administered by appropriate dealer personnel.
Canadian Vehicles:For warranty repairs during
the Complete Vehicle Coverage period of the General
Motors of Canada New Vehicle Limited Warranty,
alternative transportation may be available under the
Courtesy Transportation Program. Please consult
your dealer for details.
General Motors reserves the right to unilaterally modify,
change or discontinue Courtesy Transportation at
any time and to resolve all questions of claim eligibility
pursuant to the terms and conditions described
herein at its sole discretion.
Reporting Safety Defects
Reporting Safety Defects to the
United States Government
If you believe that your vehicle has a defect which could
cause a crash or could cause injury or death, you
should immediately inform the National Highway Traffic
Safety Administration (NHTSA), in addition to notifying
General Motors.
7-8
Page 289 of 386

Automatic Transmission Fluid
When to Check and Change
A good time to check your automatic transmission ¯uid
level is when the engine oil is changed.
Change both the ¯uid and ®lter every 50,000 miles
(83,000 km) if the vehicle's GVWR is over 8,600 or if
the vehicle is mainly driven under one or more of these
conditions:
·In heavy city traffic where the outside temperature
regularly reaches 90ÉF (32ÉC) or higher.
·In hilly or mountainous terrain.
·When doing frequent trailer towing.
·Uses such as found in taxi, police or delivery
service.
If your vehicle's GVWR is not over 8,600 and you do
not use your vehicle under any of these conditions,
change the ¯uid and ®lter every 100,000 miles
(166 000 km).
See
Part A: Scheduled Maintenance Services on
page 6-4.
How to Check
Because this operation can be a little difficult, you may
choose to have this done at the dealership service
department.
If you do it yourself, be sure to follow all the instructions
here, or you could get a false reading on the dipstick.
Notice:Too much or too little ¯uid can damage
your transmission. Too much can mean that some
of the ¯uid could come out and fall on hot engine
part or exhaust system parts, starting a ®re.
Too little ¯uid could cause the transmission to
overheat. Be sure to get an accurate reading if you
check your transmission ¯uid.
Wait at least 30 minutes before checking the
transmission ¯uid level if you have been driving:
·When outside temperatures are above 90ÉF (32ÉC).
·At high speed for quite a while.
·In heavy traffic ± especially in hot weather.
·While pulling a trailer.
To get the right reading, the ¯uid should be at
normal operating temperature, which is 180ÉF to 200ÉF
(82ÉC to 93ÉC).
5-19
Page 291 of 386

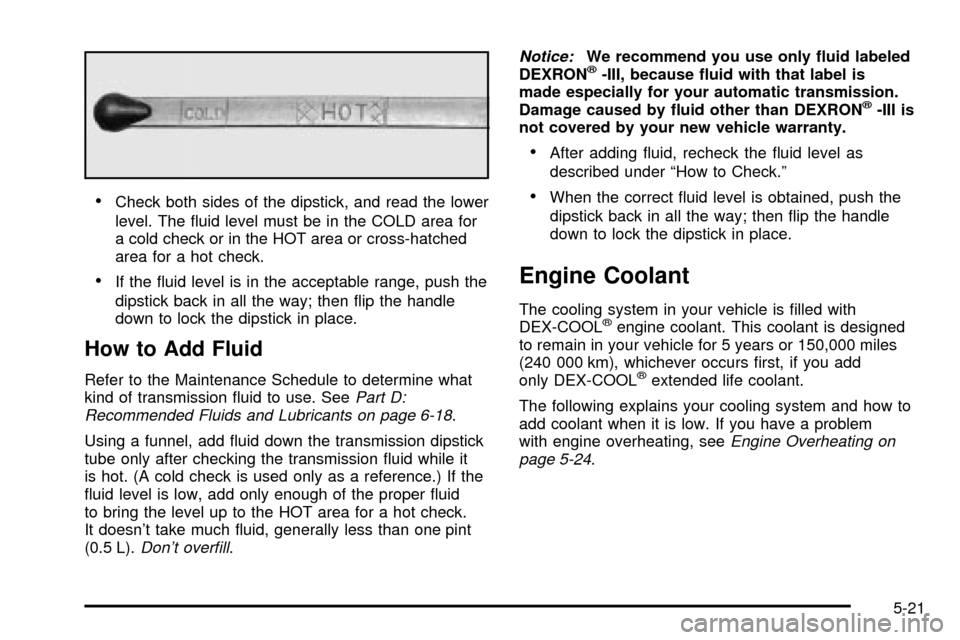
·Check both sides of the dipstick, and read the lower
level. The ¯uid level must be in the COLD area for
a cold check or in the HOT area or cross-hatched
area for a hot check.
·If the ¯uid level is in the acceptable range, push the
dipstick back in all the way; then ¯ip the handle
down to lock the dipstick in place.
How to Add Fluid
Refer to the Maintenance Schedule to determine what
kind of transmission ¯uid to use. SeePart D:
Recommended Fluids and Lubricants on page 6-18.
Using a funnel, add ¯uid down the transmission dipstick
tube only after checking the transmission ¯uid while it
is hot. (A cold check is used only as a reference.) If the
¯uid level is low, add only enough of the proper ¯uid
to bring the level up to the HOT area for a hot check.
It doesn't take much ¯uid, generally less than one pint
(0.5 L).
Don't over®ll.
Notice:We recommend you use only ¯uid labeled
DEXRONž-III, because ¯uid with that label is
made especially for your automatic transmission.
Damage caused by ¯uid other than DEXRON
ž-III is
not covered by your new vehicle warranty.
·After adding ¯uid, recheck the ¯uid level as
described under ªHow to Check.º
·When the correct ¯uid level is obtained, push the
dipstick back in all the way; then ¯ip the handle
down to lock the dipstick in place.
Engine Coolant
The cooling system in your vehicle is ®lled with
DEX-COOLžengine coolant. This coolant is designed
to remain in your vehicle for 5 years or 150,000 miles
(240 000 km), whichever occurs ®rst, if you add
only DEX-COOL
žextended life coolant.
The following explains your cooling system and how to
add coolant when it is low. If you have a problem
with engine overheating, see
Engine Overheating on
page 5-24.
5-21
Page 331 of 386

Uniform Tire Quality Grading
Quality grades can be found where applicable on the
tire sidewall between tread shoulder and maximum
section width. For example:
Treadwear 200 Traction AA Temperature A
The following information relates to the system
developed by the United States National Highway
Traffic Safety Administration, which grades tires by
treadwear, traction and temperature performance.
(This applies only to vehicles sold in the United States.)
The grades are molded on the sidewalls of most
passenger car tires. The Uniform Tire Quality Grading
system does not apply to deep tread, winter-type
snow tires, space-saver or temporary use spare tires,
tires with nominal rim diameters of 10 to 12 inches
(25 to 30 cm), or to some limited-production tires.
While the tires available on General Motors passenger
cars and light trucks may vary with respect to these
grades, they must also conform to federal safety
requirements and additional General Motors Tire
Performance Criteria (TPC) standards.
Treadwear
The treadwear grade is a comparative rating based on
the wear rate of the tire when tested under controlled
conditions on a speci®ed government test course.
For example, a tire graded 150 would wear one and
a half (1.5) times as well on the government course as
a tire graded 100. The relative performance of tires
depends upon the actual conditions of their use,
however, and may depart signi®cantly from the norm
due to variations in driving habits, service practices and
differences in road characteristics and climate.
Traction ± AA, A, B, C
The traction grades, from highest to lowest, are AA, A,
B, and C. Those grades represent the tire's ability
to stop on wet pavement as measured under controlled
conditions on speci®ed government test surfaces of
asphalt and concrete. A tire marked C may have poor
traction performance. Warning: The traction grade
assigned to this tire is based on straight-ahead braking
traction tests, and does not include acceleration,
cornering, hydroplaning, or peak traction characteristics.
5-61