2003 CHEVROLET CORVETTE fuel
[x] Cancel search: fuelPage 1 of 368

Seats and Restraint Systems........................... 1-1
Front Seats
............................................... 1-2
Safety Belts
.............................................. 1-7
Child Restraints
.......................................1-21
Air Bag System
.......................................1-39
Restraint System Check
............................1-48
Features and Controls..................................... 2-1
Keys
........................................................ 2-3
Doors and Locks
....................................... 2-9
Windows
.................................................2-14
Theft-Deterrent Systems
............................2-16
Starting and Operating Your Vehicle
...........2-19
Mirrors
....................................................2-37
Storage Areas
.........................................2-39
Roof Panel
..............................................2-43
Convertible Top
.......................................2-49
Vehicle Personalization
.............................2-55
Instrument Panel............................................. 3-1
Instrument Panel Overview
.......................... 3-2
Climate Controls
......................................3-22
Warning Lights, Gages and Indicators
.........3-29
Driver Information Center (DIC)
..................3-44
Audio System(s)
.......................................3-62Driving Your Vehicle....................................... 4-1
Your Driving, the Road, and Your Vehicle
..... 4-2
Towing
...................................................4-33
Service and Appearance Care.......................... 5-1
Service
..................................................... 5-3
Fuel
......................................................... 5-4
Checking Things Under the Hood
...............5-10
Rear Axle
...............................................5-46
Bulb Replacement
....................................5-47
Windshield Wiper Blade Replacement
.........5-51
Tires
......................................................5-54
Appearance Care
.....................................5-75
Vehicle Identi®cation
.................................5-83
Electrical System
......................................5-84
Capacities and Speci®cations
.....................5-92
Normal Maintenance Replacement Parts
......5-94
Maintenance Schedule..................................... 6-1
Maintenance Schedule
................................ 6-2
Customer Assistance Information.................... 7-1
Customer Assistance Information
.................. 7-2
Reporting Safety Defects
............................ 7-9
INDEX............................................................... 1
2003 Chevrolet Corvette Owner ManualM
Page 73 of 368

Testing the Alarm
To test the system, do the following:
1. Make sure the hatch/trunk lid is latched.
2. Lower the window on the driver's door.
3. Manually arm the system.
4. Close the doors and wait 15 seconds.
5. Reach through the open window and manually
unlock the driver's door.
6. Open the door. The alarm should sound.
7. Turn off the alarm.
If the alarm is inoperative, check to see if the horn
works. If not, check the horn fuse. See
Fuses and Circuit
Breakers on page 5-86. If the horn works, but the
alarm doesn't go off, see your dealer.
Disarming the System
Always use your key or the remote keyless entry
transmitter to unlock a door. Unlocking a door any other
way will set off the alarm. If your alarm sounds, listed
below are the ways you can disarm it.
·Unlock the driver's door with your key.
·Put the key in the ignition.
·Press the unlock button on the remote keyless
entry transmitter.
PASS-Keyž
Your vehicle is equipped
with the
PASS-Key
ž(Personalized
Automotive Security
System) theft-deterrent
system. PASS-Key
žis a
passive theft-deterrent
system. It works when you
insert or remove the key
from the ignition.
PASS-Key
žuses a resistor pellet in the ignition key that
matches a decoder in your vehicle.
When the PASS-Key
žsystem senses that someone is
using the wrong key, it shuts down the vehicle's
starter and fuel systems. For about three minutes, the
starter won't work and fuel won't go to the engine.
If someone tries to start your vehicle again or uses
another key during this time, the shutdown period will
start over again. This discourages someone from
randomly trying different keys with different resistor
pellets in an attempt to make a match.
2-17
Page 79 of 368

Engine Coolant Heater
(Canada Only)
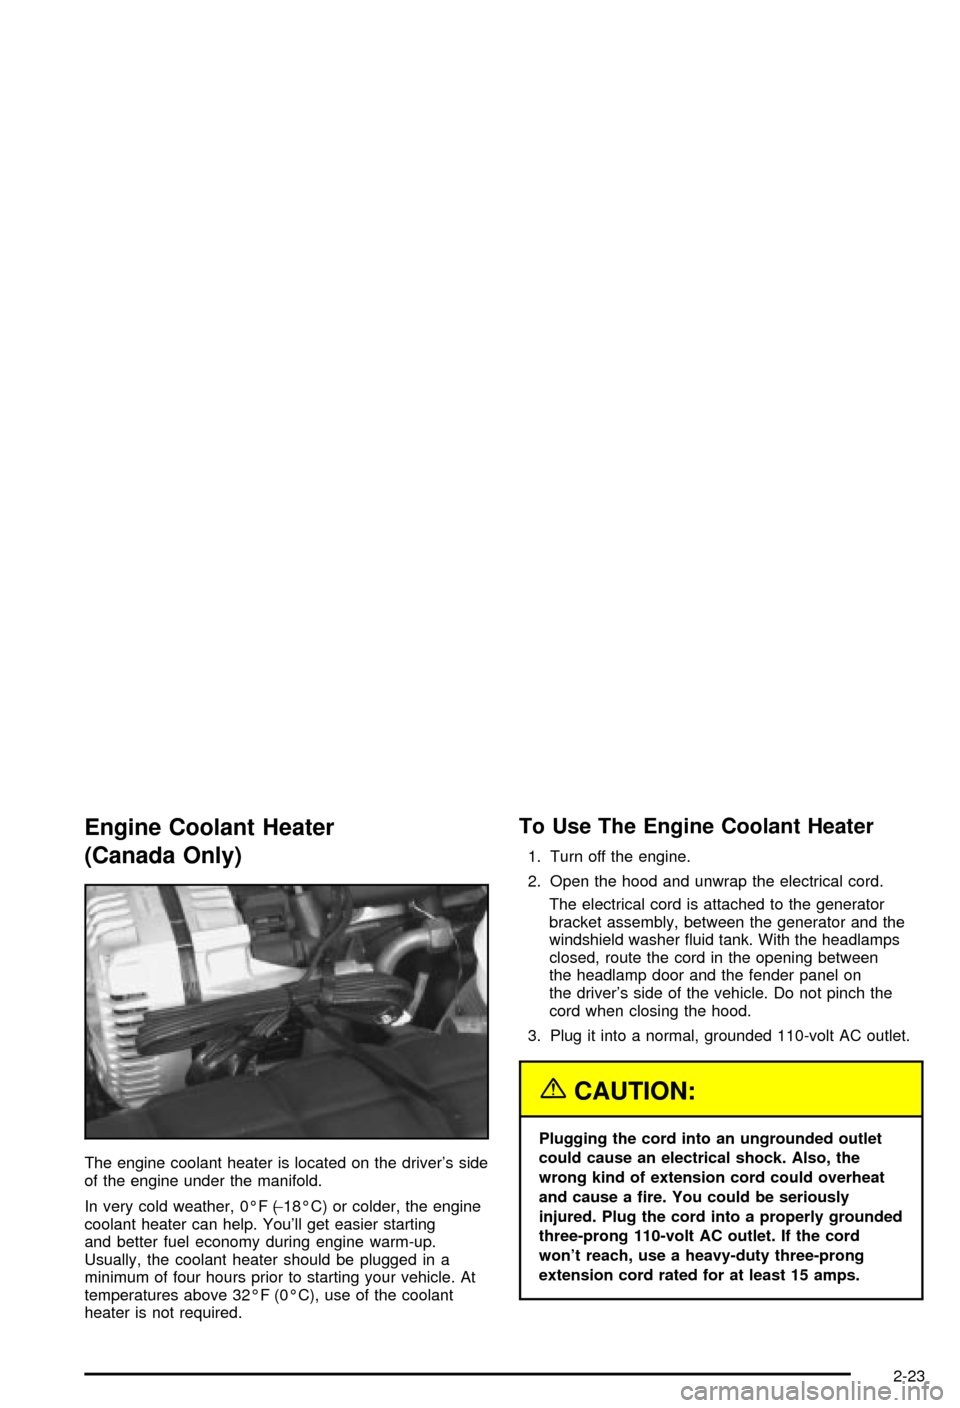
The engine coolant heater is located on the driver's side
of the engine under the manifold.
In very cold weather, 0ÉF (-18ÉC) or colder, the engine
coolant heater can help. You'll get easier starting
and better fuel economy during engine warm-up.
Usually, the coolant heater should be plugged in a
minimum of four hours prior to starting your vehicle. At
temperatures above 32ÉF (0ÉC), use of the coolant
heater is not required.
To Use The Engine Coolant Heater
1. Turn off the engine.
2. Open the hood and unwrap the electrical cord.
The electrical cord is attached to the generator
bracket assembly, between the generator and the
windshield washer ¯uid tank. With the headlamps
closed, route the cord in the opening between
the headlamp door and the fender panel on
the driver's side of the vehicle. Do not pinch the
cord when closing the hood.
3. Plug it into a normal, grounded 110-volt AC outlet.
{CAUTION:
Plugging the cord into an ungrounded outlet
could cause an electrical shock. Also, the
wrong kind of extension cord could overheat
and cause a ®re. You could be seriously
injured. Plug the cord into a properly grounded
three-prong 110-volt AC outlet. If the cord
won't reach, use a heavy-duty three-prong
extension cord rated for at least 15 amps.
2-23
Page 82 of 368

NEUTRAL (N):In this position, your engine doesn't
connect with the wheels. To restart when you're already
moving, use NEUTRAL (N) only. Also, use
NEUTRAL (N) when your vehicle is being towed.
{CAUTION:
Shifting into a drive gear while your engine is
ªracingº (running at high speed) is dangerous.
Unless your foot is ®rmly on the brake pedal,
your vehicle could move very rapidly. You
could lose control and hit people or objects.
Don't shift into a drive gear while your engine
is racing.
Notice:Damage to your transmission caused by
shifting out of PARK (P) or NEUTRAL (N) with
the engine racing isn't covered by your warranty.
AUTOMATIC OVERDRIVE (
X): This position is
for normal driving.
THIRD (3):This position is also used for normal driving.
However, it offers more power and lower fuel economy
than AUTOMATIC OVERDRIVE (
X).Here are some times you might choose THIRD (3)
instead of AUTOMATIC OVERDRIVE (
X):
·When driving on hilly, winding roads.
·When going down a steep hill.
SECOND (2):This position gives you more power but
lower fuel economy than THIRD (3). You can use
SECOND (2) on hills. It can help control your speed as
you go down steep mountain roads, but then you
would also want to use your brakes off and on.
If you manually select SECOND (2) when you start the
vehicle, the transmission will drive (and stay) in
second gear. You may use this feature for reducing
torque to the rear wheels when you are trying to start
your vehicle from a stop on slippery road surfaces, or for
preventing the transmission from downshifting into
FIRST (1) in situations where a downshift would
be undesirable.
FIRST (1):This position gives you even more power,
but lower fuel economy, than SECOND (2). You can use
it on very steep hills, in deep snow or mud. If the shift
lever is put in FIRST (1), the transmission won't shift into
®rst gear until the vehicle is going slowly enough.
2-26
Page 84 of 368

NEUTRAL:Use this position when you start or idle
your engine. Your shift lever is in NEUTRAL when it is
centered in the shift pattern, not in any gear.
REVERSE (R):To back up, press down the clutch
pedal and shift into REVERSE (R). Just apply pressure
to get the lever past FIFTH (5) and SIXTH (6) into
REVERSE (R). Let up on the clutch pedal slowly while
pressing the accelerator pedal.
Your six-speed manual transmission has a feature that
allows you to safely shift into REVERSE (R) while
the vehicle is rolling (at less than 3 mph (5 km/h)). You
will be locked out if you try to shift into REVERSE (R)
while your vehicle is moving faster than 3 mph (5 km/h).
If you have turned your ignition off and wish to park
your vehicle in REVERSE (R), you will have to move the
shift lever quickly to the right, and immediately forward
into gear.Shift Speeds (Manual Transmission)
{CAUTION:
If you skip a gear when you downshift, you
could lose control of your vehicle. You could
injure yourself or others. Don't shift down
more than one gear at a time when you
downshift.
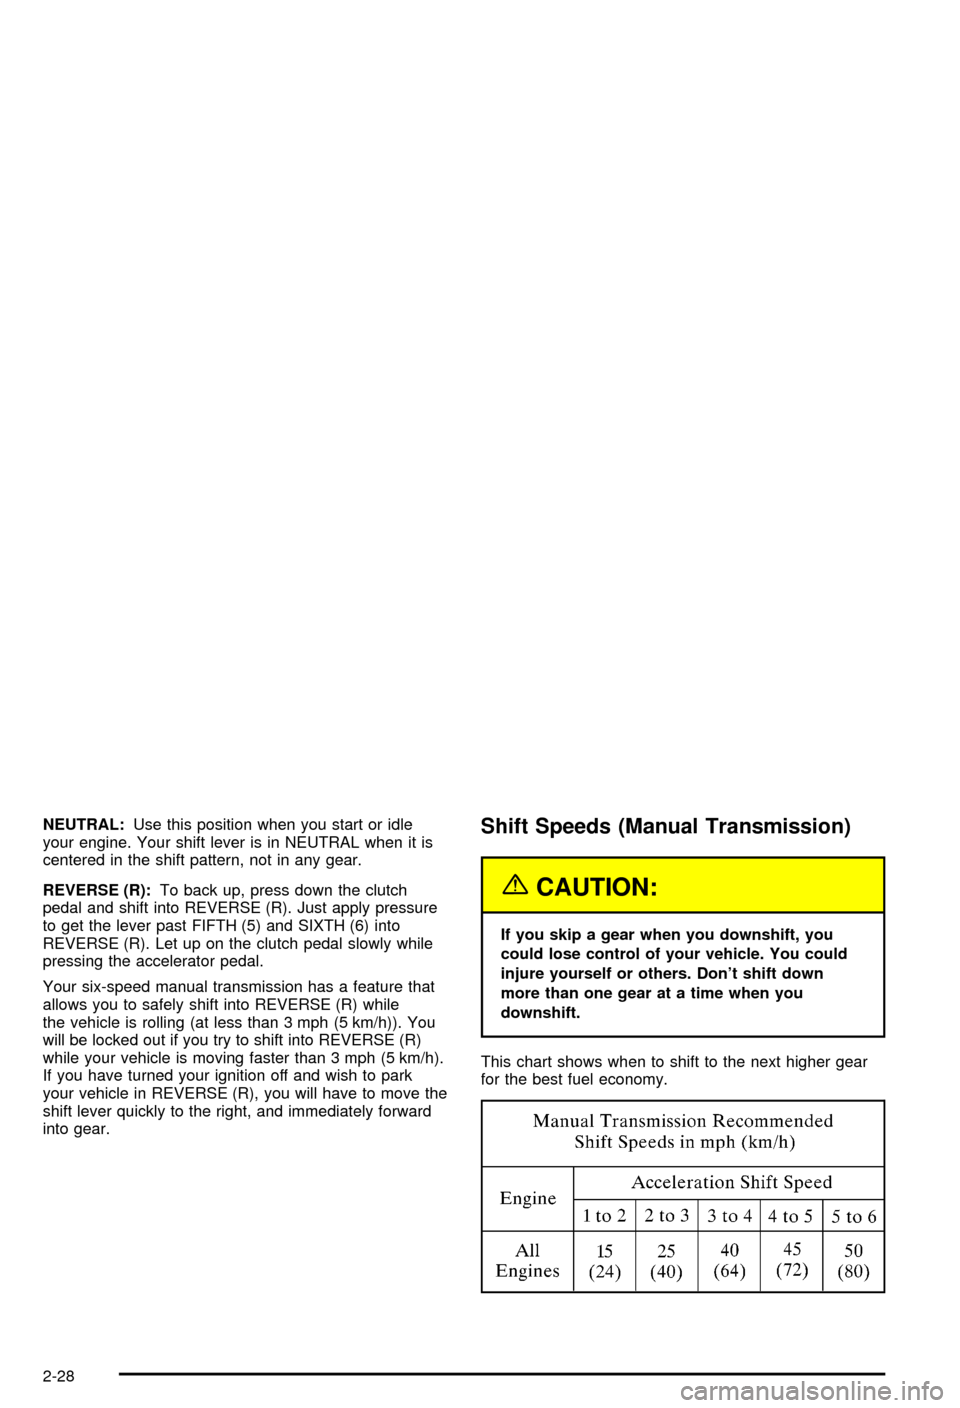
This chart shows when to shift to the next higher gear
for the best fuel economy.
2-28
Page 85 of 368

If your engine speed drops below 900 rpm, or if the
engine is not running smoothly, you should downshift to
the next lower gear. You may have to downshift two
or more gears to keep the engine running smoothly or
for good engine performance.
Notice:When you are shifting gears, don't move
the gearshift lever around needlessly. This can
damage parts of the transmission and may require
costly repair. Shift directly into the next appropriate
gear.
One to Four Shift Light
(Manual Transmission)
When this light comes on,
you can only shift from
FIRST (1) to FOURTH (4)
instead of FIRST (1) to
SECOND (2).
You must complete the shift into FOURTH (4) to turn off
this feature. This helps you get the best possible fuel
economy.After shifting to FOURTH (4), you may downshift to a
lower gear if you prefer.
Notice:Do not try to force the shift lever into
SECOND (2) or THIRD (3) when the 1 TO 4 SHIFT light
comes on. Do not try to re-engage FIRST (1) after
starting to shift into FOURTH (4). You will damage
your transmission. Shift only from FIRST (1) to
FOURTH (4) when the light comes on.
This light will come on when:
·The engine coolant temperature is higher than
169ÉF (76ÉC),
·you are going 15 to 19 mph (24 to 31 km/h) and
·you are 21 percent throttle or less.
Downshifting (Manual Transmission)
If your vehicle is a coupe or convertible, do not downshift
into the gear shown below at a speed greater than
shown in the table:
FIRST (1) 50 mph (80 km/h)
SECOND (2) 74 mph (119 km/h)
THIRD (3) 101 mph (163 km/h)
FOURTH (4) 130 mph (209 km/h)
2-29
Page 95 of 368

Storage Areas
Glove Box
To open the glove box, lift up on the lever. Use your
door key to lock or unlock it. The glove box has a light
inside.
Cupholder(s)
The cupholder is located on the center console in front
of the ashtray. To open it, place your thumb on the
left side of the lid and push down. Raise the right side
with your index ®nger.
Center Console Storage Area
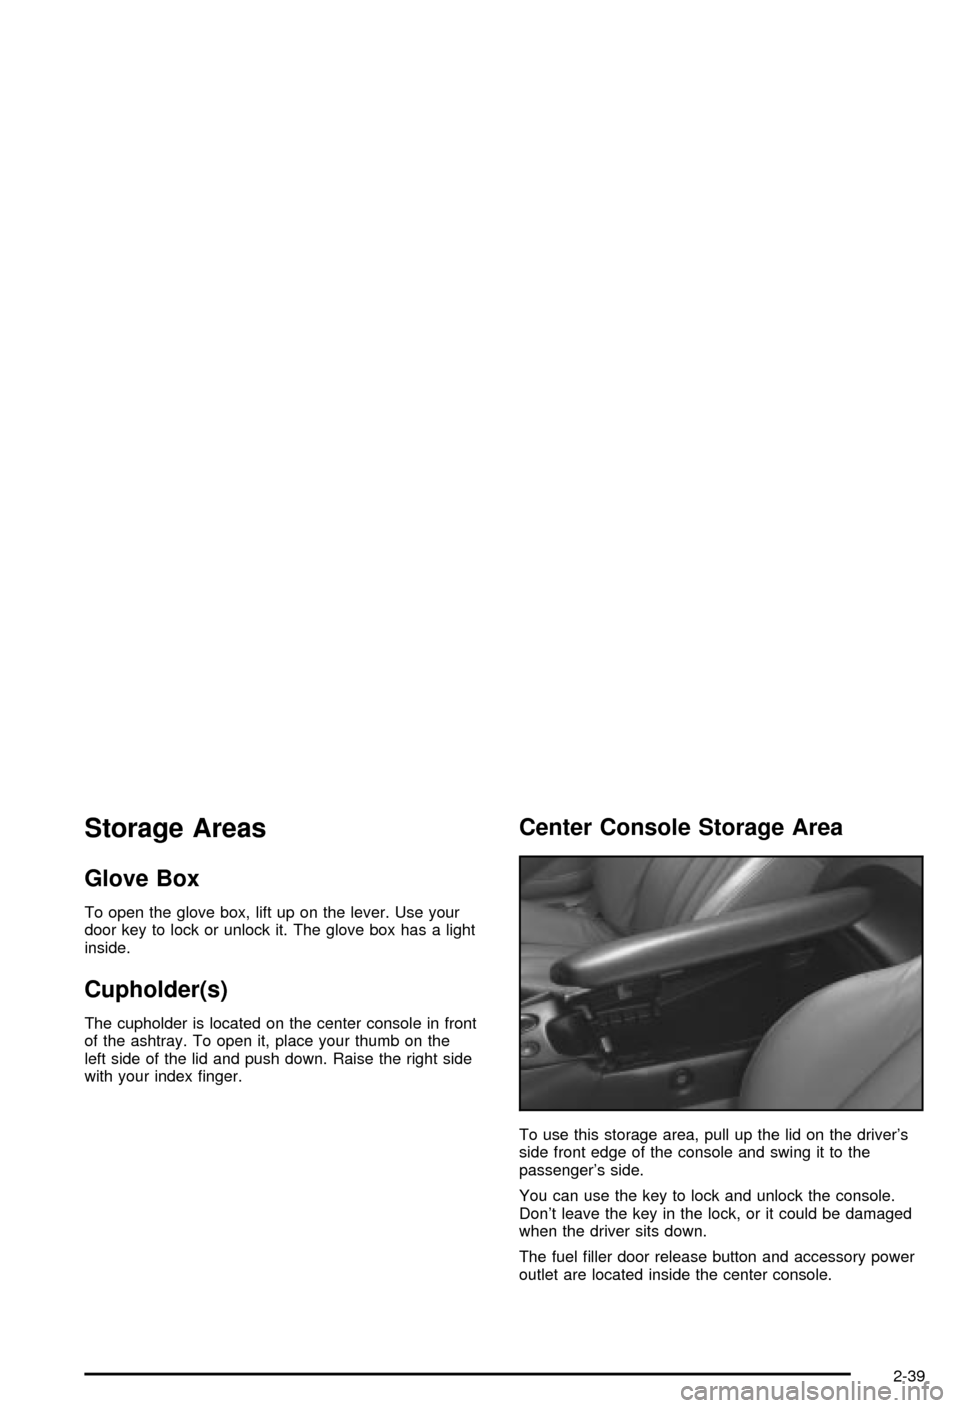
To use this storage area, pull up the lid on the driver's
side front edge of the console and swing it to the
passenger's side.
You can use the key to lock and unlock the console.
Don't leave the key in the lock, or it could be damaged
when the driver sits down.
The fuel ®ller door release button and accessory power
outlet are located inside the center console.
2-39
Page 113 of 368

Instrument Panel Overview...............................3-2
Hazard Warning Flashers................................3-4
Other Warning Devices...................................3-4
Horn.............................................................3-5
Tilt Wheel.....................................................3-5
Turn Signal/Multifunction Lever.........................3-6
Exterior Lamps.............................................3-12
Interior Lamps..............................................3-15
Head-Up Display (HUD).................................3-17
Accessory Power Outlets...............................3-20
Ashtrays and Cigarette Lighter........................3-21
Climate Controls............................................3-22
Dual Automatic Climate Control System...........3-22
Outlet Adjustment.........................................3-28
Warning Lights, Gages and Indicators.............3-29
Instrument Panel Cluster................................3-30
Speedometer and Odometer...........................3-31
Tachometer.................................................3-31
Safety Belt Reminder Light.............................3-31
Air Bag Readiness Light................................3-32
Air Bag Off Light..........................................3-33
Voltmeter Gage............................................3-34
Brake System Warning Light..........................3-35
Anti-Lock Brake System Warning Light.............3-36
Traction Control System (TCS) Warning Light . . .3-36Active Handling System Light.........................3-37
Engine Coolant Temperature Gage..................3-38
Malfunction Indicator Lamp.............................3-38
Engine Oil Pressure Gage.............................3-41
Security Light...............................................3-42
Check Gages Warning Light...........................3-42
Fuel Gage...................................................3-42
Driver Information Center (DIC).......................3-44
DIC Controls and Displays.............................3-45
DIC Warnings and Messages.........................3-53
Other Messages...........................................3-61
Audio System(s).............................................3-62
Setting the Time...........................................3-62
Radio with Cassette......................................3-63
Radio with CD..............................................3-67
Trunk-Mounted CD Changer...........................3-71
Theft-Deterrent Feature..................................3-75
Understanding Radio Reception......................3-77
Care of Your Cassette Tape Player.................3-78
Care of Your CDs.........................................3-79
Care of Your CD Player................................3-79
Fixed Mast Antenna (Z06)..............................3-79
Power Antenna Mast Care (Convertible)...........3-79
Integrated Windshield and Rear Window
Antennas (Coupe).....................................3-80
Section 3 Instrument Panel
3-1