Page 263 of 386

Replacing Brake System Parts
Te braking system on a vehicle is complex. Its many parts
have to be of top quality and work well together
if the
vehicle is to have really good braking. Your vehicle was
designed and tested with top-quality
GM brake parts.
When you replace parts of your braking system -for
example, when your brake linings wear down and you
need new ones put
in - be sure you get new approved
GM replacement parts. If you don’t, your brakes may no
longer work properly.
For example,
if someone puts in brake linings that are
wrong for your vehicle, the balance between your front
and rear brakes can change -for the worse. The braking
performance you’ve come to expect can change
in many
other ways
if someone puts in the wrong replacement
brake parts.
Battery
Your new vehicle comes with a maintenance free
ACDelco@ battery. When it’s time for a new battery,
get one that has the replacement number shown on the
original battery’s label. We recommend an ACDelco@
battery. See
Engine Compartment Overview on
page 5-74 for battery location.
Warnings Battery posts, terminals and related
accessories contain lead and lead compounds,
chemicals known to the State
of California to cause
cancer and reproductive harm. Wash hands after
handling.
5-46
Page 269 of 386
All-Wheel Drive
Lubricant checks in this section also apply to these
vehicles. However, there are two additional systems that
need lubrication.
Transfer Case
When to Check Lubricant
Refer to the Maintenance Schedule to determine how
often to check the lubricant. See
Part C: Periodic
Maintenance lnspections on page
6-30.
How to Check Lubricant
To get an accurate reading, the vehicle should be on a
level surface.
If the level is below the bottom of the filler plug hole,
you’ll need to add some lubricant. Add enough lubricant
to raise the level to the bottom of the filler plug hole.
Use care not to overtighten the plug.
What to Use
Refer to the Maintenance Schedule to determine what
kind
of lubricant to use. See Part D: Recommended
Fluids and Lubricants on page
6-32.
5-52
Page 270 of 386
If the level is below the bottom of the filler plug hole,
you’ll need to add some lubricant. Add enough lubricant
to raise the level to the bottom of the filler plug hole.
What to Use
Refer to the Maintenance Schedule to determine what
kind of lubricant to
use. See Part D: Recommended
Fluids and Lubricants on page 6-32.
5-53
Page 271 of 386
Front Axle
When to Check and Change Lubricant
Refer to the Maintenance Schedule to determine how
often to check the lubricant and when to change it.
See
Part A: Scheduled Maintenance Services on
page 6-4.
How to Check Lubricant
To get an accurate reading, the vehicle should be on a
level surface.
If the level is below the
bottom of the filler plug
hole, you may need to
add some lubricant.
When the differential is cold, add enough lubricant to
raise the level to
1/2 inch (12 mm) below the filler
plug hole.
When the differential is at operating temperature
(warm), add enough lubricant
to raise the level to the
bottom of the filler plug hole.
What to Use
Refer to the Maintenance Schedule to determine what
kind of lubricant
to use. See Part D: Recommended
Fluids and lubricants on page
6-32.
5-54
Page 279 of 386
Windshield Wiper Blade Replacement To replace your windshield
wiper blade inserts, do the
following:
Windshield wiper blades should be inspected at least
twice a year for wear and cracking. See "Wiper
Blade Check in
At Least Twice a Year on page 6-26 for
more information.
1. Lift the wiper arm away from the windshield.
2. Pinch the two tabs on the wiper arm and slide the
insert out of the blade.
3. Slide the new one in place.
Make sure the tabs are locked into position. See
Normal
Maintenance Replacement Parts
on page 5- 10 I for
the proper type of replacement blade.
5-62
Page 282 of 386

Make sure the spare tire is stored securely. Push,
pull, and then try to rotate or turn the tire.
If it moves,
use the ratchevwheel wrench to tighten the cable.
See
Changing a Flat Tire on page 5-71.
The purpose Gf regular rotation is lo achieve more
uniform wear for all tires on the vehicle. The first rotation
is the most important. See “Part
A: Scheduled
Maintenance Services,” in Section
6, for scheduled
rotation intervals. After
the tires have been rotated, adjust the front and rear
inflation pressures as shown on the CertificationA-ire
label. Make certain that all wheel nuts are properly
tightened. See “Wheel Nut Torque” under
Capacities and
Specifications
on page 5-99.
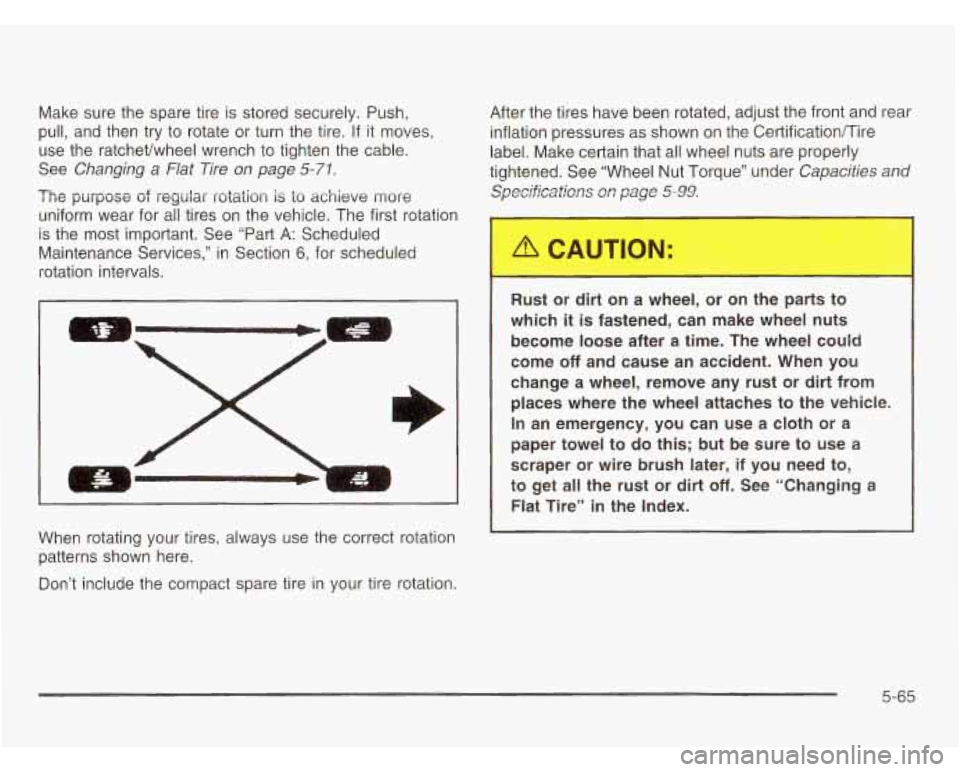
When rotating your tires, always use the correct rotation
patterns shown here.
ts to
-
Rust or dirt on a wheel, or on the par
which
it is fastened, can make wheel nuts
become loose after a time. The wheel could
come
off and cause an accident. When you
change a wheel, remove any rust or dirt from
places where the wheel attaches to the vehicle.
In an emergency, you can use a cloth or a
paper towel to do
this; but be sure to use a
scraper
or wire brush later, if you need to,
to get all the rust or dirt
off. See “Changing a
Flat Tire” in the Index.
Don’t include the compact spare tire in your tire rotation.
5-65
Page 306 of 386

Underbody Maintenance
Chemicals used for ice and snow removal and dust
control can collect on the underbody.
If these are not
removed, accelerated corrosion (rust} can occur on
the underbody parts such as fuel lines, frame, floor pan
and exhaust system even though they have corrosion
protection.
At least every spring, flush these materials from the
underbody with plain water. Clean any areas where mud
and debris can collect. Dirt packed in close areas of
the frame should be loosened before being flushed.
Your dealer or an underbody car washing system can
do this for you.
Chemical Paint Spotting
Some weather and atmospheric conditions can create a
chemical fallout. Airborne pollutants can fall upon and
attack painted surfaces on your vehicle. This damage can
take two forms; blotchy, ringlet-shaped discolorations,
and small irregular dark spots etched into the paint
surface.
Although no defect in the paint job causes this, GM will
repair, at no charge to the owner, the surfaces of
new vehicles damaged by this fallout condition within
12 months or 12,000 miles (20 000 km) of purchase,
whichever occurs first.
GM Vehicle Care/Appearance
Materials
See your GM dealer for more information on purchasing
the following products.
GM Vehicle Care/Appearance Materials
Descrbtion Usaae I
Polishing Cloth
Dolishina cloth.
Wax-Treated Interior and exterior
Tar and Road Oil
and asPhalt.
Remover Removes
tar, road oil
Chrome Cleaner
stainless steel.
and Polish Use on chrome or
White Sidewall
marks from whitewalls.
Tire Cleaner Removes
soil and black
Vinyl Cleaner Cleans
vinyl tops,
upholstery and
convertible tom.
Glass Cleaner Removes
dirt, grime,
smoke and finaerprints.
5-89
Page 318 of 386
Normal Maintenance Replacement Parts
Replacement part numbers listed in this section are based on the latest information available at the time of printing,
and are subject to change.
If a part listed in this manual is not the same as the part used in your vehicle when it
was built, or
if you have any questions, please contact your GM truck dealer.
Part Number
I Engine Oil Filter
PF47*
Positive Crankcase Ventilation (PCV) Valve CV769C*
I Spark Plugs
41 -932*
I Fuel Filter
GF481*
Wiper Blades (Front)
Type
Length Trico 221 101 58
18 inches (45.7 cm)
Wiper Blades (Rear)
Type
Length Trico 22 1 54396
14 inches (35.5 cm)
5-1 01