Page 157 of 382

If you experience one or more of these conditions,
change the fuel brand you use. It will require at least
one full tank of the proper fuel to turn the light off.
If none of the above steps have made the light turn off,
your dealer can check the vehicle. Your dealer has
the proper test equipment and diagnostic tools to ®x any
mechanical or electrical problems that may have
developed.
Emissions Inspection and Maintenance
Programs
Some state/provincial and local governments have or
may begin programs to inspect the emission control
equipment on your vehicle. Failure to pass this
inspection could prevent you from getting a vehicle
registration.
Here are some things you need to know to help your
vehicle pass an inspection:
Your vehicle will not pass this inspection if the SERVICE
ENGINE SOON or CHECK ENGINE light is on or not
working properly.Your vehicle will not pass this inspection if the OBD
(on-board diagnostic) system determines that critical
emission control systems have not been completely
diagnosed by the system. The vehicle would be
considered not ready for inspection. This can happen
if you have recently replaced your battery or if your
battery has run down. The diagnostic system is
designed to evaluate critical emission control systems
during normal driving. This may take several days
of routine driving. If you have done this and your vehicle
still does not pass the inspection for lack of OBD
system readiness, your GM dealer can prepare the
vehicle for inspection.
3-33
Page 159 of 382
Security Light
This light will come on
brie¯y when you turn the
ignition key to START.
The light will stay on until the engine starts. If the light
¯ashes, the Passlock
žSystem has entered a tamper
mode. If the vehicle fails to start, seePasslockž
on page 2-18.
If the light comes on continuously while driving and
stays on, there may be a problem with the Passlock
ž
System. Your vehicle will not be protected by Passlockž,
and you should see your GM dealer.
Service All-Wheel Drive Light
This light should come on
brie¯y when you turn on
the ignition, as a check to
show you it is working.
The SERVICE AWD light comes on to indicate that
there may be a problem with the drive system and
service is required. Malfunctions can be indicated by the
system before any problem is apparent, which may
prevent serious damage to the vehicle. This system is
also designed to assist your service technician in
correctly diagnosing a malfunction.
3-35
Page 160 of 382
Tow/Haul Mode Light
This light should come on
when the tow/haul mode
has been selected.
For more information, see ªTow/Haul Modeº in
Towing a
Trailer on page 4-31.
Check Gages Warning Light
The CHECK GAGES light
will come on brie¯y when
you are starting the
engine.
If the light comes on and stays on while you are driving,
check your coolant temperature and engine oil
pressure gages to see if they are in the warning zones.
Fuel Gage
The fuel gage tells you approximately how much fuel
you have remaining when the ignition is on.
When the gage ®rst indicates empty, you still have a
little fuel left, but you should get more fuel as soon
as possible.
United StatesCanada
3-36
Page 161 of 382
Here are things some owners ask about. None of these
indicate a problem with your fuel gage:
·At the gas station, the gas pump shuts off before
the gage reads full.
·The fuel tank will take either a little more or a little
less fuel to ®ll up than the gage shows.
·The gage moves a little when you turn a corner or
speed up.
·The gage doesn't go back to empty when you turn
off the ignition.
Low Fuel Warning Light
The LOW FUEL light will
come on brie¯y when you
are starting the engine.
This light comes on when the fuel tank is low on
fuel. To turn it off, add fuel to the fuel tank.
See
Fuel on page 5-5.
3-37
Page 165 of 382

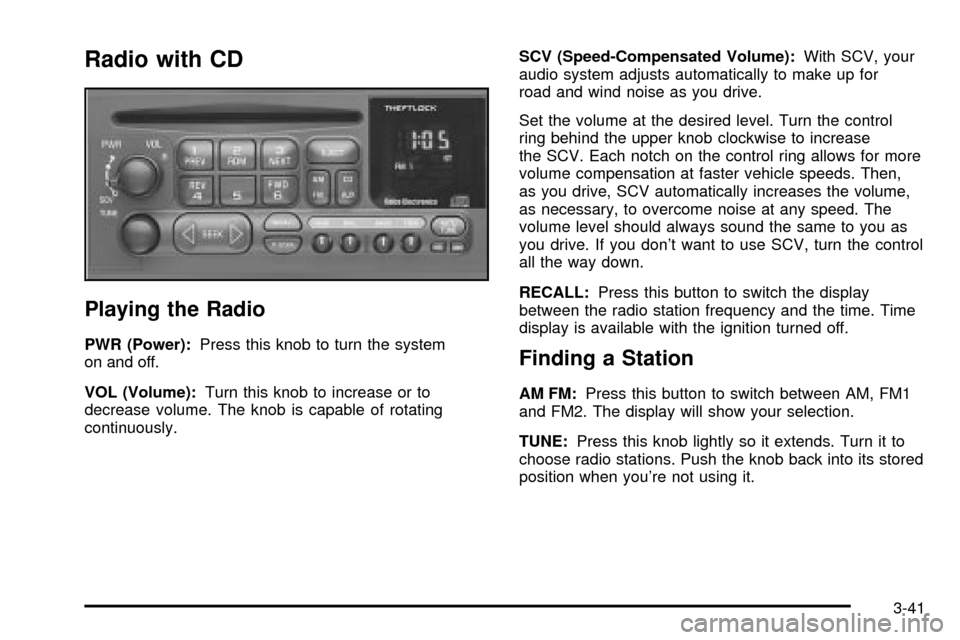
Radio with CD
Playing the Radio
PWR (Power):Press this knob to turn the system
on and off.
VOL (Volume):Turn this knob to increase or to
decrease volume. The knob is capable of rotating
continuously.SCV (Speed-Compensated Volume):With SCV, your
audio system adjusts automatically to make up for
road and wind noise as you drive.
Set the volume at the desired level. Turn the control
ring behind the upper knob clockwise to increase
the SCV. Each notch on the control ring allows for more
volume compensation at faster vehicle speeds. Then,
as you drive, SCV automatically increases the volume,
as necessary, to overcome noise at any speed. The
volume level should always sound the same to you as
you drive. If you don't want to use SCV, turn the control
all the way down.
RECALL:Press this button to switch the display
between the radio station frequency and the time. Time
display is available with the ignition turned off.Finding a Station
AM FM:Press this button to switch between AM, FM1
and FM2. The display will show your selection.
TUNE:Press this knob lightly so it extends. Turn it to
choose radio stations. Push the knob back into its stored
position when you're not using it.
3-41
Page 167 of 382

Setting the Tone (Bass/Treble)
BASS:Press this knob lightly so it extends. Turn the
knob to increase or to decrease bass.
TREB (Treble):Press this knob lightly so it extends.
Turn the knob to increase or to decrease treble. If
a station is weak or noisy, you may want to decrease
the treble.
Return these knobs to their stored positions when
you're not using them.
AUTO TONE (Automatic Tone):Press this knob to
choose bass and treble equalization settings designed
for country/western, jazz, talk, pop, rock and classical
stations.
To return the bass and treble to the manual mode, either
press and release the AUTO TONE button until the
display goes blank or press and release the BASS or
TREB knobs and turn them until the display goes blank.
Adjusting the Speakers (Balance/Fade)
BAL (Balance):Press this knob lightly so it extends.
Turn the knob to move the sound toward the right or the
left speakers.
FADE:Press this knob lightly so it extends. Turn the
knob to move the sound toward the front or the
rear speakers.
Return these knobs to their stored positions when
you're not using them.
Playing a Compact Disc
Insert a disc partway into the slot, label side up. The
player will pull it in. Wait a few seconds and the
disc should play. CD and a CD symbol will also appear
on the display. Anytime you are playing a CD, the
letters CD will be next to the CD symbol.
The integral CD player can play the smaller 8 cm single
discs with an adapter ring. Full-size compact discs
and the smaller discs are loaded in the same manner.
If playing a CD-R the sound quality may be reduced due
to CD-R quality, the method of recording, the quality
of the music that has been recorded and the way
the CD-R has been handled. You may experience an
increase in skipping, difficulty in ®nding tracks and/or
difficulty in loading and ejecting. If these problems occur
try a known good CD.
3-43
Page 170 of 382

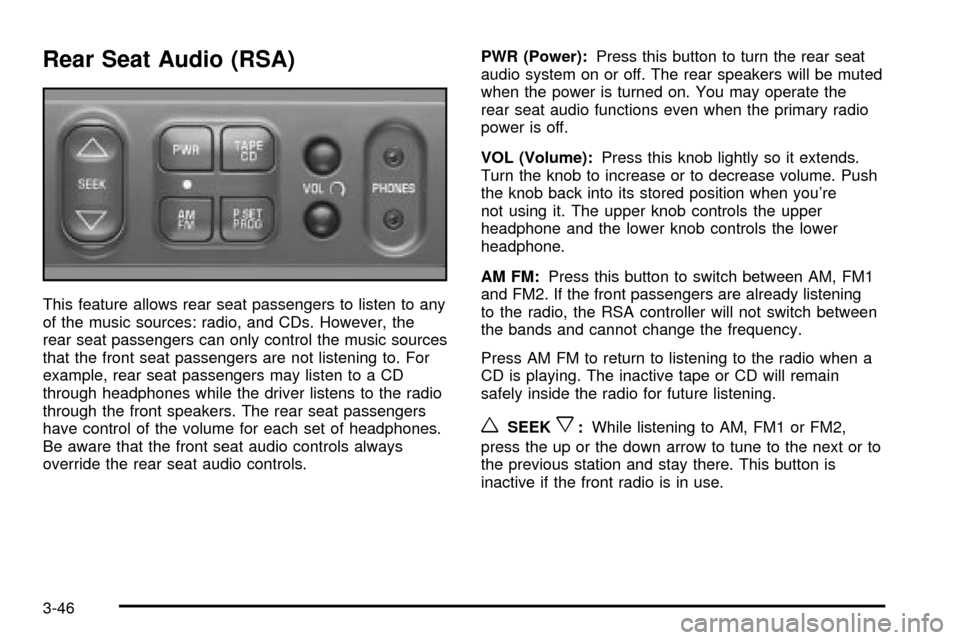
Rear Seat Audio (RSA)
This feature allows rear seat passengers to listen to any
of the music sources: radio, and CDs. However, the
rear seat passengers can only control the music sources
that the front seat passengers are not listening to. For
example, rear seat passengers may listen to a CD
through headphones while the driver listens to the radio
through the front speakers. The rear seat passengers
have control of the volume for each set of headphones.
Be aware that the front seat audio controls always
override the rear seat audio controls.PWR (Power):Press this button to turn the rear seat
audio system on or off. The rear speakers will be muted
when the power is turned on. You may operate the
rear seat audio functions even when the primary radio
power is off.
VOL (Volume):Press this knob lightly so it extends.
Turn the knob to increase or to decrease volume. Push
the knob back into its stored position when you're
not using it. The upper knob controls the upper
headphone and the lower knob controls the lower
headphone.
AM FM:Press this button to switch between AM, FM1
and FM2. If the front passengers are already listening
to the radio, the RSA controller will not switch between
the bands and cannot change the frequency.
Press AM FM to return to listening to the radio when a
CD is playing. The inactive tape or CD will remain
safely inside the radio for future listening.
wSEEKx:While listening to AM, FM1 or FM2,
press the up or the down arrow to tune to the next or to
the previous station and stay there. This button is
inactive if the front radio is in use.
3-46
Page 174 of 382

Understanding Radio Reception
AM
The range for most AM stations is greater than for FM,
especially at night. The longer range, however, can
cause stations to interfere with each other. AM can pick
up noise from things like storms and power lines. Try
reducing the treble to reduce this noise if you ever get it.
FM
FM stereo will give you the best sound, but FM signals
will reach only about 10 to 40 miles (16 to 65 km).
Tall buildings or hills can interfere with FM signals,
causing the sound to come and go.
Care of Your CDs
Handle discs carefully. Store them in their original cases
or other protective cases and away from direct sunlight
and dust. If the surface of a disc is soiled, dampen
a clean, soft cloth in a mild, neutral detergent solution
and clean it, wiping from the center to the edge.
Be sure never to touch the side without writing when
handling discs. Pick up discs by grasping the outer
edges or the edge of the hole and the outer edge.
Care of Your CD Player
The use of CD lens cleaner discs is not advised, due to
the risk of contaminating the lens of the CD optics
with lubricants internal to the CD mechanism.
Fixed Mast Antenna
The ®xed mast antenna can withstand most car washes
without being damaged. If the mast should ever
become slightly bent, you can straighten it out by hand.
If the mast is badly bent, as it might be by vandals,
you should replace it.
Check occasionally to be sure the mast is still tightened
to the fender. If tightening is required, tighten by
hand, then with a wrench one quarter turn.
3-50