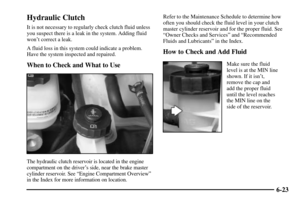
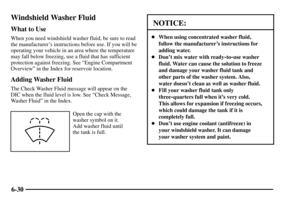
Page 225 of 435

3-4
(Passenger's Temperature Switch): This switch is
used to increase or decrease the temperature of the air
for the passengers independent of the driver's setting.
To turn the system on, press the PWR button located
on the passenger's side of the climate control panel.
To adjust the temperature, press the up or down arrow
on the PWR button. The temperature will increase or
decrease with each press of an arrow.
If the passenger's temperature switch is off, the driver's
temperature switch controls the temperature for the
entire vehicle.
The passenger's side temperature is only displayed
when the passenger's side temperature switch is on.
Automatic Operation
AUTO (Automatic Climate Control): This button is
used to select the automatic operation of the climate
control system. When the automatic operation is active,
AUTO will appear next to the fan and mode settings on
the display.There are three sensors in the climate control system.
One monitors the sun's solar radiation, another monitors
temperature of the air inside the vehicle, and a third
monitors the temperature outside the vehicle. The
climate control system will vary the fan speed, air
delivery mode and use of the air conditioning
compressor to maintain the set temperature based on the
information received from these sensors. See ªDriver's
Temperature Switchº and ªPassenger's Temperature
Switchº listed previously for more information on
setting a temperature.
To find your comfort zone, start with the 75F (24C)
setting and allow approximately 10 to 30 minutes for the
system to regulate. Adjust the temperature if necessary.
If you choose either the lowest temperature setting,
60F (16C), or the highest temperature setting,
90F (32C), the system will not cool or heat any
faster, but the system will stay at that setting without
regulating fan speed.
To avoid blowing cold air in cold weather, the system
will start at lower fan speeds until warm air is available.
The length of reduction depends on the outside air
temperature, engine coolant temperature or the time
since the engine was last started. As the engine coolant
warms up, the fan speed will gradually increase.
Page 226 of 435

3-5
Interior Temperature Sensor
This sensor
monitors the interior
temperature of the
vehicle. It is located to
the right of the
steering wheel on the
instrument panel.
While the climate control system is in AUTO, the
system uses both the interior temperature sensor and the
electronic solar sensor to automatically adjust the
temperature and airflow in the vehicle. See ªElectronic
Solar Sensorº following for more information. Be sure
not to cover the sensor with anything. If you do, the
automatic climate control system will not work properly.Electronic Solar Sensor
This sensor monitors the sun's solar radiation. It is located
on top of the instrument panel near the windshield.
While the climate control system is in AUTO, the system
uses the information collected by the electronic solar
sensor to automatically adjust the temperature and airflow
to maintain your comfort. The climate control system may
supply cooler air to one side of your vehicle, if that side is
facing the sun. Be sure not to cover the sensor on top of
the instrument panel. If you do, the automatic climate
control system will not work properly.
Page 227 of 435

3-6 Air Conditioning
On hot days, open the windows long enough to let hot
inside air escape. This reduces the time it takes for your
vehicle to cool down. Then keep your windows closed
for the air conditioner to work its best.
While the system is in AUTO, it will use recirculation
as necessary to cool the air.
Defogging and Defrosting
When the mode switch is set for floor/defrost or the
defrost button is pressed, outside air will be selected
automatically. This helps clear the windshield more
quickly. Adjust the temperature and set the fan speed to
the highest setting. When the windshield is clear, adjust
the fan speed for maximum defrosting to a lower setting
or return to AUTO mode.
Recirculation is not available in the defrost mode, and
the air conditioning compressor cannot be turned off in
this mode.
For maximum side window defogging, turn the outboard
outlet thumbwheels to the side window defogger setting.
See ªVentilation Systemº later in this section for more
information on the outlet settings.
Rear Window Defogger
When the rear window defogger is turned on, the rear
window and both outside rearview mirrors are heated to
remove fog from the surface of the glass.
The rear window defogger
button is located on the
climate control panel to the
right of the defrost button.
Press the button to turn on the rear defogger. Press the
button again to turn the system off.
The system will automatically shut off after 10 minutes
unless your vehicle is traveling more than 30 mph
(48 km/h). If further defogging is desired once the
system is off, press the button again. The system will
automatically shut off after five minutes for any cycles
after the initial activation.
Page 228 of 435
3-7
Using the rear window defogger will not cancel
automatic climate control operation.
NOTICE:
Don't use a razor blade or something else sharp
on the inside of the rear window. If you do, you
could cut or damage the warming grid or the
integrated rear window antenna, and the repairs
wouldn't be covered by your warranty.
Do not attach a temporary vehicle license, tape or decals
across the defogger grid on the rear window.
Ventilation System
There are five instrument panel outlets, three in the
center and one at each end. The outlets located at each
end of the instrument panel have a feature that the center
air outlets do not. These outlets will have air flowing to
them in all modes, including defrost, when the climate
control system is on.
Page 229 of 435

3-8
You can adjust the direction
of airflow by moving the
knobs in the center of the
outlets and by turning the
thumbwheel at the bottom
of the outlets. You may
choose from the
following positions:
(Side Window Defogger): Turn the thumbwheel
to this symbol on the outboard outlets to use the side
window defogger feature. The air coming through the
outlets will be directed toward the side windows to
prevent fogging.
(Open): Turn the thumbwheel to this symbol to
open the outlets completely and allow the maximum
amount of air to enter the vehicle. A small amount
of air will still be directed to the side window
defogger setting.
(Closed): Turn the thumbwheel to this symbol to
close the outlets and minimize the amount of air
entering the vehicle.
Ventilation Tips
Keep the hood at the base of the windshield and
front air inlet free of ice, snow or any other
obstruction (such as leaves). The heater and defroster
will work far better, reducing the chance of fogging
the inside of your windows.
When you enter a vehicle in cold weather, select the
highest fan setting for a few moments before driving
off. This helps clear the intake ducts of snow and
moisture, and reduces the chance of fogging the
inside of your windows.
Keep the air path under the front seats clear of
objects. This helps air to circulate throughout
your vehicle.
Page 230 of 435
3-9 Climate Control Steering Wheel Controls
There are four controls that can be programmed for use
with the climate control system.
The controls are located
on the left spoke of the
steering wheel.
See ªReconfigurable Steering Wheel Controlsº in
the Index for more information on programming
these controls.
Audio Systems
Your audio system has been designed to operate easily
and to give years of listening pleasure. You will get the
most enjoyment out of it if you acquaint yourself with it
first. Find out what your audio system can do and how
to operate all of its controls to be sure you're getting the
most out of the advanced engineering that went into it.
Your vehicle has a feature called Retained Accessory
Power (RAP). With RAP, you can play your audio
system even after the ignition is turned off. See
ªRetained Accessory Powerº in the Index.
Page 231 of 435
3-10 Setting the Clock
1. Press the TUNE/SEL knob to enter the main menu.
2. Turn the TUNE/SEL knob until SET CLOCK
is displayed.
3. Press the TUNE/SEL knob to select SET CLOCK.
4. Turn the TUNE/SEL knob to adjust the time setting.
5. Press the TUNE/SEL knob to update the time.
VEHICLE TIME UPDATED will appear on the
display. The time on the analog clock, located in the
instrument panel cluster, will adjust.
The time of an FM station broadcasting Radio Data
System (RDS) information will update the analog
clock automatically.
AM-FM Radio with Cassette Tape and
Compact Disc Player with Radio Data
Systems (RDS) and Digital Signal
Processing (DSP)
Six-Disc CD Player Audio System
Shown
- Single CD Player Similar
Page 232 of 435

3-11
Playing the Radio
PWR (Power): Press this knob to turn the system on
and off.
VOL (Volume): Turn this knob to increase or to
decrease the volume.
AVC (Automatic Volume Compensation): With AVC,
your audio system monitors the noise in the vehicle.
AVC will adjust the volume level so that it always
sounds the same to you. To turn AVC on and off,
perform the following steps:
1. Press the TUNE/SEL knob to enter the main menu.
2. Turn the TUNE/SEL knob until AUTO VOLUME
COMP. appears on the display.
3. Press the TUNE/SEL knob to turn AVC on
or off. An X will appear in the box when AVC is
selected on.
4. Press the BACK button to exit the display. To return
to the original display repeatedly press the BACK
button or wait for the display to time out.SOURCE: Press this button to select a source, either
radio, cassette tape or compact disc. The cassette tape or
compact disc must be loaded to select the source and to
play. Available loaded sources are shown on the display
as a disc or a cassette tape symbol. If none of the audio
sources are loaded the display will not change from the
radio source.
Finding a Station
BAND: Press this button to select AM, FM1 or FM2.
The display will show your selection.
SEEK : Press the up or the down arrow to
seek to the next or to the previous station and stay there.
SEEK will appear on the display. The sound will mute
while seeking.
The radio will seek only to stations that are in the
selected band and only to those with a strong signal.