Page 105 of 372

6. Locate in the garage, the garage door opener
receiver (motor-head unit). Locate the ªLearnº
or ªSmartº button. This can usually be found where
the hanging antenna wire is attached to the
motor-head unit.
7. Firmly press and release the ªLearnº or ªSmartº
button. The name and color of the button may
vary by manufacturer.
You will have 30 seconds to start Step 8.
8. Return to the vehicle. Firmly press and hold the
programmed HomeLink
žbutton for two seconds,
then release. Repeat the press/hold/release
sequence a second time, and depending on the
brand of the garage door opener (or other rolling
code device), repeat this sequence a third time
to complete the programming.
HomeLink
žshould now activate your rolling-code
equipped device.
To program the remaining two HomeLink
žbuttons,
begin with Step 2 of ªProgramming HomeLinkž.º Do not
repeat Step 1.
Gate Operator and Canadian
Programming
Canadian radio-frequency laws require transmitter
signals to ªtime outº or quit after several seconds of
transmission. This may not be long enough for
HomeLink
žto pick up the signal during programming.
Similarly, some U.S. gate operators are manufactured to
ªtime outº in the same manner.
If you live in Canada, or you are having difficulty
programming a gate operator by using the
ªProgramming HomeLink
žº procedures (regardless of
where you live), replace Step 3 under ªProgramming
HomeLink
žº with the following:
Continue to press and hold the HomeLink
žbutton while
you press and release every two seconds (cycle)
your hand-held transmitter until the frequency signal has
been successfully accepted by HomeLink
ž. The
indicator light will ¯ash slowly at ®rst and then rapidly.
Proceed with Step 4 under ªProgramming HomeLink
žº
to complete.
Using HomeLinkž
Press and hold the appropriate HomeLinkžbutton for at
least half of a second. The indicator light will come
on while the signal is being transmitted.
2-41
Page 106 of 372

Erasing HomeLinkžButtons
To erase programming from the three buttons do the
following:
1. Press and hold down the two outside buttons until
the indicator light begins to ¯ash, after 20 seconds.
2. Release both buttons. Do not hold for longer than
30 seconds.
HomeLink
žis now in the train (learning) mode and can
be programmed at any time beginning with Step 2
under ªProgramming HomeLink
ž.º
Individual buttons can not be erased, but they can be
reprogrammed. See ªReprogramming a Single
HomeLink
žButtonº next.
Reprogramming a Single HomeLinkž
Button
To program a device to HomeLinkžusing a HomeLinkž
button previously trained, follow these steps:
1. Press and hold the desired HomeLink
žbutton. Do
not release the button.
2. The indicator light will begin to ¯ash after
20 seconds. While still holding the HomeLink
ž
button, proceed with Step 2 under ªProgramming
HomeLinkž.º
Resetting Defaults
To reset HomeLinkžto default settings do the following:
1. Hold down the two outside buttons for about
20 seconds until the indicator light begins to ¯ash.
2. Continue to hold both buttons until the HomeLink
ž
indicator light turns off.
3. Release both buttons.
For questions or comments, contact HomeLink
žat
1-800-355-3515, or on the internet at
www.homelink.com.
Storage Areas
Glove Box
Use the key to lock and unlock the glove box. To open
the glove box, pull the handle upward until the latch
opens.
2-42
Page 107 of 372
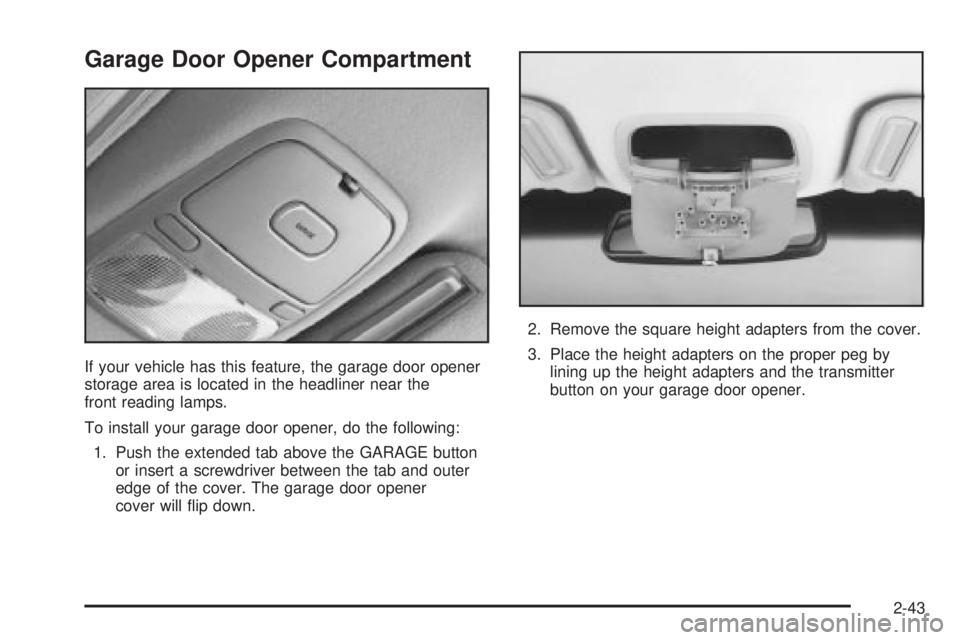
Garage Door Opener Compartment
If your vehicle has this feature, the garage door opener
storage area is located in the headliner near the
front reading lamps.
To install your garage door opener, do the following:
1. Push the extended tab above the GARAGE button
or insert a screwdriver between the tab and outer
edge of the cover. The garage door opener
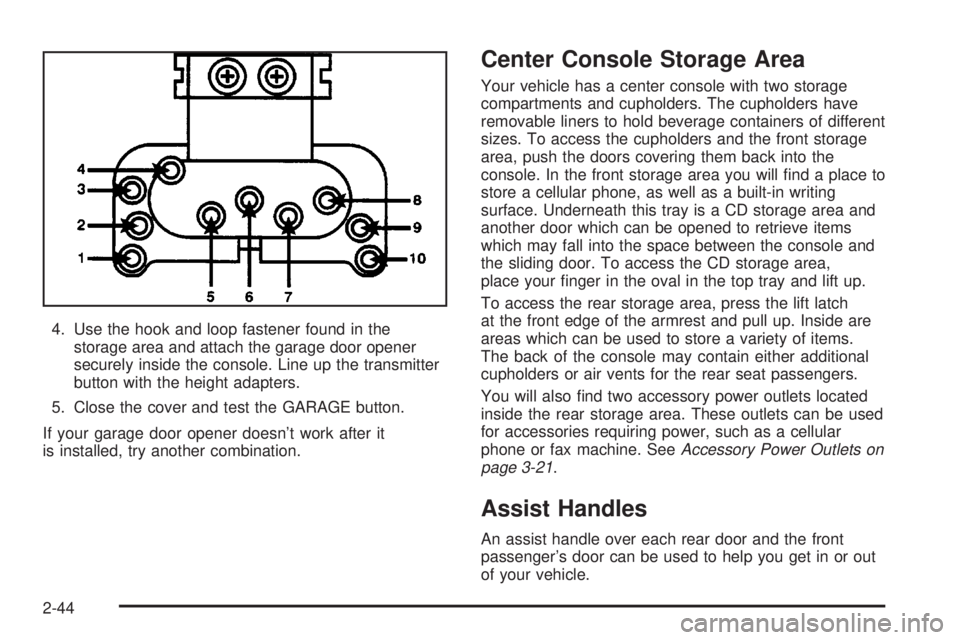
cover will ¯ip down.2. Remove the square height adapters from the cover.
3. Place the height adapters on the proper peg by
lining up the height adapters and the transmitter
button on your garage door opener.
2-43
Page 108 of 372

4. Use the hook and loop fastener found in the
storage area and attach the garage door opener
securely inside the console. Line up the transmitter
button with the height adapters.
5. Close the cover and test the GARAGE button.
If your garage door opener doesn't work after it
is installed, try another combination.
Center Console Storage Area
Your vehicle has a center console with two storage
compartments and cupholders. The cupholders have
removable liners to hold beverage containers of different
sizes. To access the cupholders and the front storage
area, push the doors covering them back into the
console. In the front storage area you will ®nd a place to
store a cellular phone, as well as a built-in writing
surface. Underneath this tray is a CD storage area and
another door which can be opened to retrieve items
which may fall into the space between the console and
the sliding door. To access the CD storage area,
place your ®nger in the oval in the top tray and lift up.
To access the rear storage area, press the lift latch
at the front edge of the armrest and pull up. Inside are
areas which can be used to store a variety of items.
The back of the console may contain either additional
cupholders or air vents for the rear seat passengers.
You will also ®nd two accessory power outlets located
inside the rear storage area. These outlets can be used
for accessories requiring power, such as a cellular
phone or fax machine. See
Accessory Power Outlets on
page 3-21.
Assist Handles
An assist handle over each rear door and the front
passenger's door can be used to help you get in or out
of your vehicle.
2-44
Page 109 of 372

Rear Storage Area
If your vehicle has this feature, the rear storage armrest
contains two cupholders. To access the cupholders,
pull the armrest down from the rear seatback.
This armrest also includes a storage area inside the
armrest. To open it, pull up on the lever at the front edge
of the armrest.
Rear Seat Armrest
Your vehicle's rear seat armrest contains two
cupholders. To access the cupholders, pull the armrest
down from the rear seatback.
Rear Seat Pass Through
Your vehicle is equipped with a rear storage armrest
with a pass-through feature that allows for trunk access.
Pull the rear armrest down, then push down on the
trunk access panel latch to open the panel. To close,
push the access panel until it latches.
Convenience Net
Your vehicle may have a convenience net. You'll see it
just inside the back wall of the trunk.
Put small loads, like grocery bags, behind the net. It can
help keep them from falling over during sharp turns or
quick starts and stops.The net isn't for larger, heavier loads. Store them in the
trunk as far forward as you can.
You can unhook the net so that it will lie ¯at when
you're not using it.
Sunroof
Your vehicle may be equipped with a sunroof. The
sunroof has both manual and express features
for opening the glass panel and sunshade.
The switch for the sunroof
is located on the headliner
between the sun visors.
The sunroof switch has four positions that control
sunroof movement.
The switch will only work when the ignition is on or
when the RAP is active. See ªRetained Accessory
Power (RAP)º under
Ignition Positions on page 2-21.
2-45
Page 110 of 372

Open:Press and hold the switch rearward to the ®rst
position to open the glass panel and sunshade. The
sunshade can also be opened manually.
Comfort Stop:Press and release the switch rearward
to the second position to express open the glass
panel to the comfort stop position. The comfort stop
position is designed to help reduce noise and make
passengers more comfortable.
Express Open:When the glass panel is express
opening, pressing the switch in any direction will stop it
in a partially-opened position. The glass panel may
be fully opened by pressing the switch rearward again.
If you press and hold the switch in the express open
position for more than one and a half seconds, the
express open operation will be overridden and
the sunroof will operate manually.
Close:To close the glass panel, press and hold the
switch forward. As the glass panel reaches the closed
position, it will open slightly toward the vent position and
then drop down to the closed position to provide a
better seal. The sunshade must be closed manually.
Vent:Once the sunroof is closed, it can be opened to
the vent position by pushing the switch upward. To
close the glass panel, pull the switch downward. The
sunshade must be opened and closed manually for vent
operation.Vehicle Personalization
Memory Seat and Mirrors
If your vehicle has this
feature, the controls are
located on the driver's door
panel, and are used to
program and recall
memory settings for the
driver's seating, outside
mirror positions and
climate controls. See
Climate Controls
Personalization on
page 3-28
for more
information.
To save your seat and mirror positions into memory,
use the following procedure:
1. First identify the DRIVER # on the Driver Information
Center (DIC) by pressing the MEMORY button
1 or 2 or by pressing the unlock button on the
remote keyless entry transmitter. See
Driver
Information Center (DIC) on page 3-43.
2-46
Page 111 of 372

2. Adjust the driver's seat and lumbar position to a
safe and comfortable driving position. Adjust both
outside mirrors to suit you. See
Outside Power
Mirrors on page 2-36.
3. Press and hold the MEMORY button 1 or 2
corresponding with your DRIVER # displayed on the
DIC for longer than three seconds. You will hear
two beeps con®rming that the seat and mirror
positions have been entered into memory.
To set the seat and mirror positions for a second driver,
follow the previous steps, but start by pressing the
unlock button on the transmitter that displays the other
DRIVER # on the DIC. Be sure to use the MEMORY
button which corresponds to the DRIVER # identi®ed by
the second transmitter.
To recall your memory positions, your vehicle must
be in PARK (P). Push and release the MEMORY
button 1 or 2 corresponding to the desired driving
position. The seat and mirrors will move to the position
previously stored for the identi®ed driver. You will
hear one beep.
To store the exit position for an easy exit, use the
following procedure:
1. First identify the DRIVER # by pressing the
MEMORY button 1 or 2 or by pressing the unlock
button on the transmitter.
2. Adjust the driver's seat to the desired exit position.3. Press and hold the EXIT button for longer than
three seconds. You will hear two beeps con®rming
that the seat exit position has been entered into
memory.
To set the exit position for a second driver, follow the
previous steps, but start by pressing the unlock
button on the transmitter that displays the other
DRIVER # on the DIC. Be sure to use the MEMORY
button which corresponds to the DRIVER # identi®ed by
the other transmitter.
To recall the exit position, your vehicle must be in
PARK (P). Push and release the EXIT button and the
seat will move to the exit position previously stored
for the currently identi®ed driver. You will hear one beep.
If an exit position has not been stored for the currently
identi®ed driver, the seat will move all the way back.
To stop recall movement of the seat at any time, press
the driver's power seat control located on the outboard
side of the front seat.
Mirrors and lumbar positions will not be stored or
recalled for the exit position.
If you would like your stored driving or exit position to
be recalled when unlocking your vehicle with the
transmitter, see
DIC Vehicle Personalization on
page 3-46.
2-47
Page 112 of 372