2003 BMW Z4 2.5I fog light
[x] Cancel search: fog lightPage 4 of 106

Contents
Contents
Notes
6About this Owner's Manual
6Symbols used
6Symbol on vehicle parts
6Your individual vehicle
6Status at time of printing
7For your own safety
7Service and warranty
8Reporting safety defects
Overview
12Cockpit
13Instrument cluster
14Indicator and warning lamps
Opening and closing
18Keys
18Central locking system
18Remote control
20Door lock
20Interior
21Luggage compartment lid
22Luggage compartment
22Electric power windows
23Manual convertible top
24Fully automatic convertible top*
26Wind deflector*
27Alarm system*
Adjustments
29Safe seating position
29Seats
30Seat memory*
31Seat heating*
31Safety belts
32Steering wheel
32Mirrors
33Airbags
34Transporting children safely
37Vehicle Memory, Key Memory
Driving
38Ignition lock
38Engine
39Parking brake
40Manual transmission
40Automatic transmission with
Steptronic*
42Electric Power Steering EPS
42Drivelogic*
42Turn signal indicators/Headlamp
flasher
43Washer/wiper system and
rain sensor*
44Cruise control*
Lamps
45Parking lamps/Low beams
46High beams/Standing lamps
46Instrument lighting
46Fog lamps
46Interior lamps
© 2002 Bayerische Motoren Werke
Aktiengesellschaft
Munich, Germany
Reprinting, including excerpts, only with the
written consent of BMW AG, Munich.
Order No. 01 41 0 156 897
US English VIII/02
Printed in Germany
Printed on environmentally friendly paper –
bleached without chlorine, suitable for recycling.
Page 14 of 106

Overview
14
Indicator and warning
lamps
Technology that monitors itself
Indicator and warning lamps that are iden-
tified by
+ are tested for proper functioning
whenever the ignition key is turned. They
each light up once for different periods of
time.
If a fault should occur in one of these sys-
tems, the corresponding lamp does not go
out after the engine is started or it lights up
again while the vehicle is moving. The indi-
cated pages provide information on what
measures to take.
Please fasten safety belts
+31
Airbags
+33
Battery charge current
+87
Engine oil pressure/Engine oil level/
Engine oil sensor
+79
Parking brake/Chassis control sys-
tem/Dynamic Brake Control/Brake
fluid
+39/ 51/ 52/ 81
Brake warning lamp for Canadian
models
Antilock Brake System ABS/Chas-
sis control system
+53/ 51
Antilock Brake System ABS/Chas-
sis control system for Canadian
modelsDynamic Stability Control DSC
+51
Dynamic Traction Control DTC
+51
Flat Tire Monitor
+53
Automatic transmission
+41
Brake pads
+66
Add coolant80
Check Gas Cap
+
Service engine soon +83
Service engine soon
+
warning lamp for Canadian
models.
Defective bulbs45
Turn signal indicators42
Fog lamps46
Headlamp flasher/
High beams42/ 46
Page 45 of 106

At a glance
Controls
Driving tips
Mobility
Reference
45
Lamps
Parking lamps/Low beams
Parking lamps
The front, rear and side vehicle
lighting is switched on. You can use
the parking lamps to signal the
position of the vehicle when it is parked.
For information on lighting on one side of
the vehicle for parking, which is available
as an additional feature, refer to page 46.
Low beams
When you switch off the ignition
with the low beam headlamps on,
only the parking lamps will remain
on.
Follow me home lamps:
When you activate the headlamp flasher
after parking the vehicle and switching off
the lights, the low beams will come on for a
brief period.
You can also have this function acti-
vated/deactivated if you wish.<
Defective bulbs
The defective bulb indicator lamp
lights up:
At least one bulb of the vehicle's
exterior lighting has failed.
For replacing bulbs: refer to page 84.
LIGHTS ON warning
Whenever you open the driver's door after
having turned the ignition key to position 0,
you will hear an acoustic signal for a few seconds to remind you that the lamps have
not been switched off
.
Daytime driving lamps*
If you wish, the light switch can be left in
the second position. When the ignition is
switched off, the external lighting is also
switched off.
You can have the activation settings
for the daytime driving lamps pro-
grammed on your vehicle.<
Automatic headlamp control*
When the switch is set to this posi-
tion, the system automatically
switches the low beams on and off
in response to changes in ambient light – in
tunnels, at dusk, etc. – as well as to rain and
snow.
The vehicle's external lights remain
on constantly when you switch on the
front fog lamps after the headlights have
come on automatically.<
Automatic headlamp control cannot
serve as a substitute for the driver's
judgement in determining when the vehicle
lights should be switched on. For example,
the sensors are not able to detect fog. To
avoid safety risks, you should respond to
these kinds of low-visibility situations by
switching the headlights on manually.<
You can have the sensitivity of your
vehicle's automatic headlamp control
adjusted.<
Page 46 of 106
Lamps
46
High beams/Standing
lamps
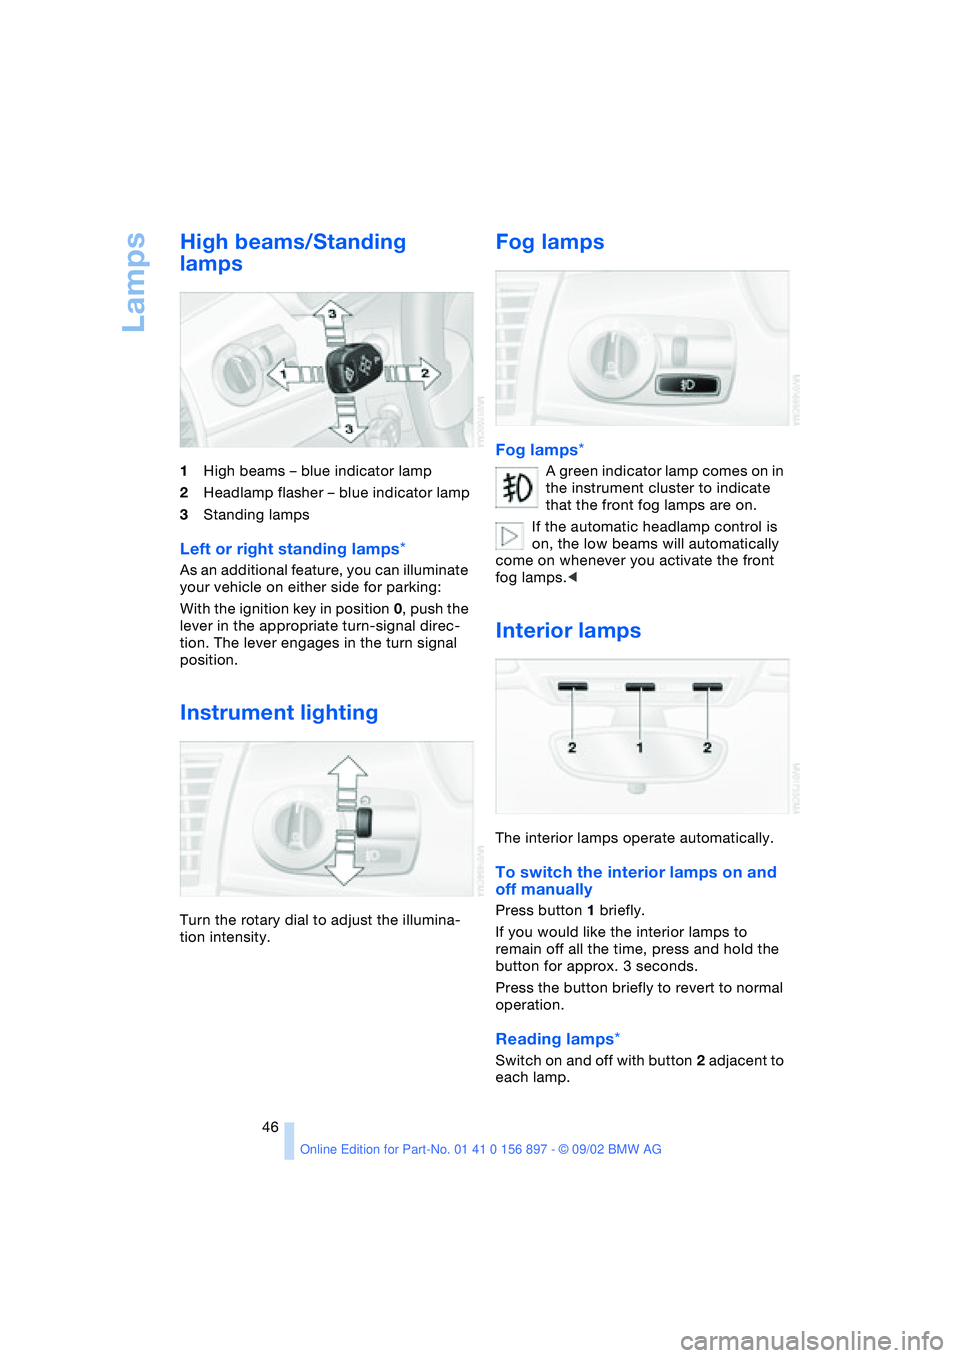
1High beams – blue indicator lamp
2Headlamp flasher – blue indicator lamp
3Standing lamps
Left or right standing lamps*
As an additional feature, you can illuminate
your vehicle on either side for parking:
With the ignition key in position 0, push the
lever in the appropriate turn-signal direc-
tion. The lever engages in the turn signal
position.
Instrument lighting
Turn the rotary dial to adjust the illumina-
tion intensity.
Fog lamps
Fog lamps*
A green indicator lamp comes on in
the instrument cluster to indicate
that the front fog lamps are on.
If the automatic headlamp control is
on, the low beams will automatically
come on whenever you activate the front
fog lamps.<
Interior lamps
The interior lamps operate automatically.
To switch the interior lamps on and
off manually
Press button 1 briefly.
If you would like the interior lamps to
remain off all the time, press and hold the
button for approx. 3 seconds.
Press the button briefly to revert to normal
operation.
Reading lamps*
Switch on and off with button 2 adjacent to
each lamp.
Page 56 of 106
Controlling the climate for pleasant driving
56
Air distribution
You can direct airflow onto the
windows , toward the upper
body and into the footwell .
All intermediate settings are pos-
sible.
Air supply/blower
You can set the blower to 8 differ-
ent levels. Both heating and ven-
tilation become more effective as
the air supply rate is increased.
Temperature
In order to increase the tempera-
ture of the passenger compart-
ment, turn to the right – red zone.
Air conditioning
The air is cooled and dehumidi-
fied and – depending on the tem-
perature setting – rewarmed.
Depending on the weather, the
windshield may fog over briefly when the
engine is started.
Condensation forms during operation
of the air conditioning system, which
then exits under the vehicle. Traces of con-
densed water on the ground underneath
the vehicle are thus normal.<
Outside-air/recirculated-air mode
If there are unpleasant odors in
the outside air, you can tempo-
rarily block the supply of incom-
ing air. The system then recircu-
lates the air currently within the vehicle.
If the windows fog over in the recircu-
lated air mode, switch this mode off
and increase the air supply as required.<
Rear window defroster
The indicator lamp lights up when
the rear window defroster is
active. The rear window defroster
switches off automatically.
Ventilation
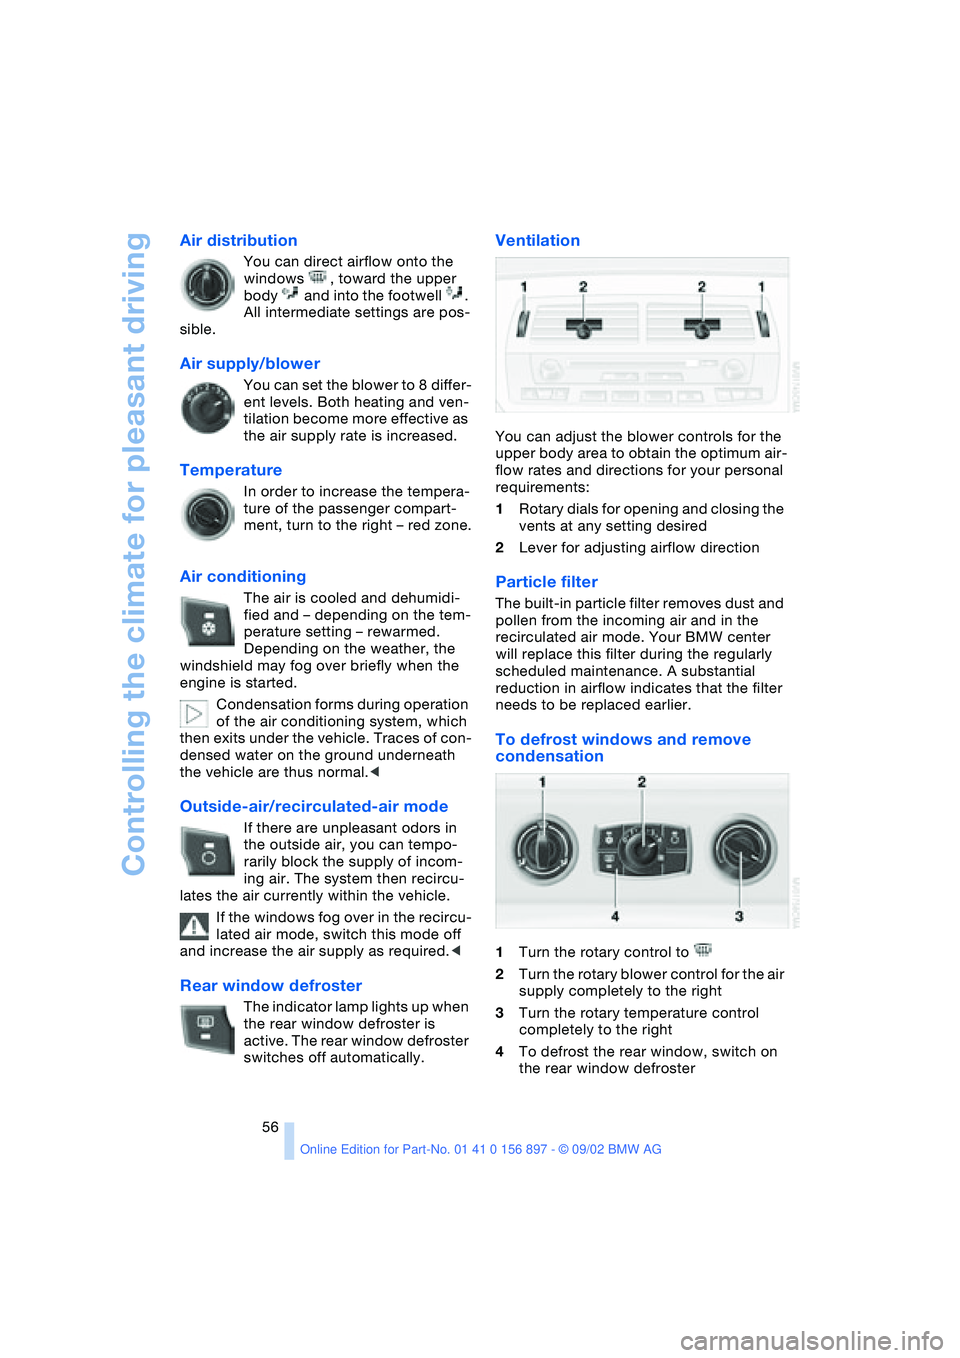
You can adjust the blower controls for the
upper body area to obtain the optimum air-
flow rates and directions for your personal
requirements:
1Rotary dials for opening and closing the
vents at any setting desired
2Lever for adjusting airflow direction
Particle filter
The built-in particle filter removes dust and
pollen from the incoming air and in the
recirculated air mode. Your BMW center
will replace this filter during the regularly
scheduled maintenance. A substantial
reduction in airflow indicates that the filter
needs to be replaced earlier.
To defrost windows and remove
condensation
1Turn the rotary control to
2Turn the rotary blower control for the air
supply completely to the right
3Turn the rotary temperature control
completely to the right
4To defrost the rear window, switch on
the rear window defroster
Page 58 of 106
Controlling the climate for pleasant driving
58
Tips for pleasant driving
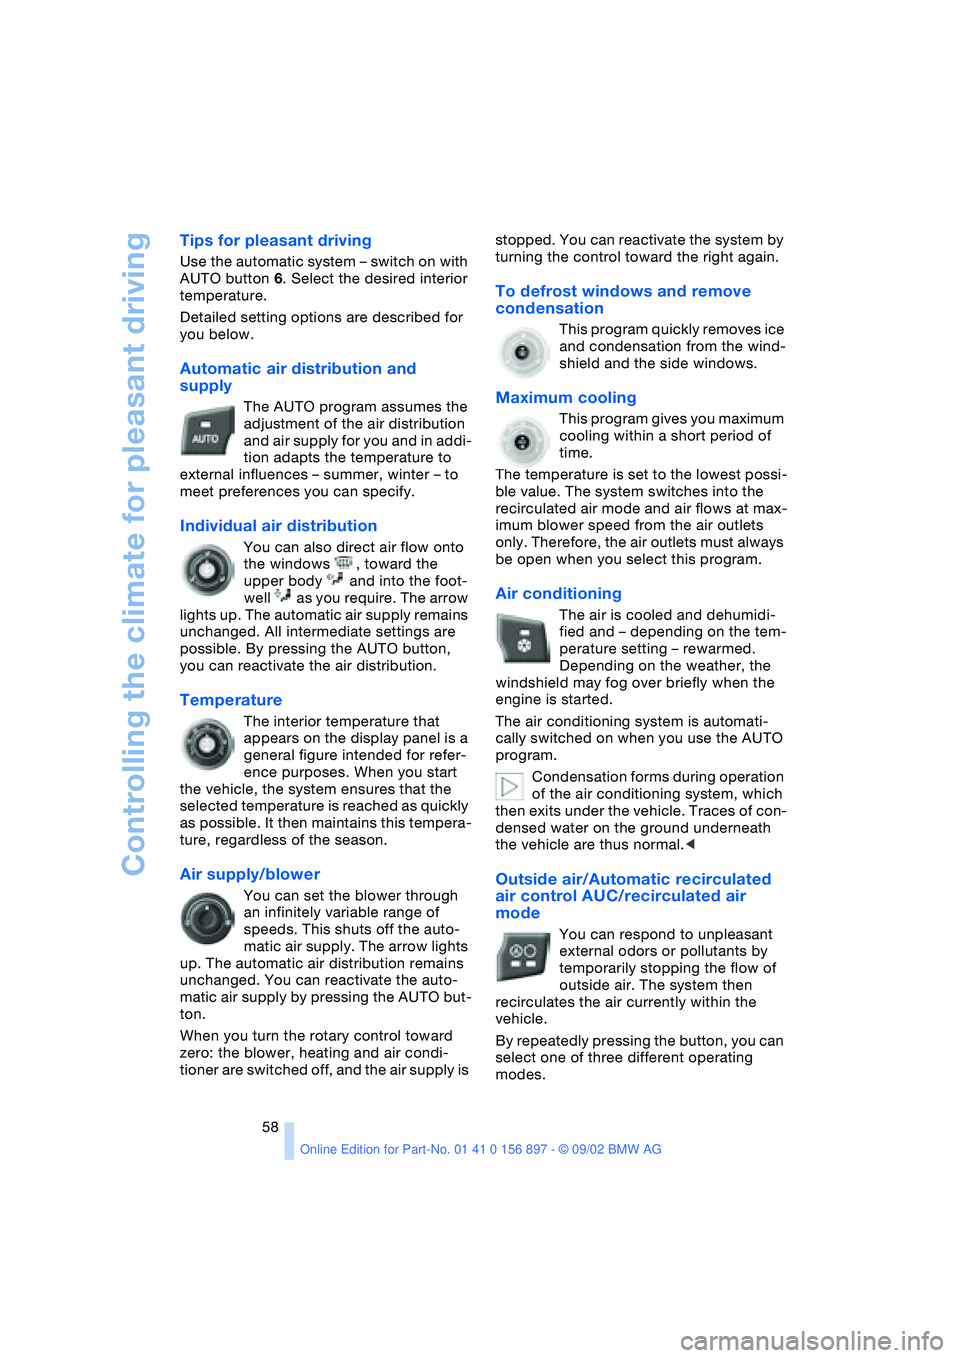
Use the automatic system – switch on with
AUTO button 6. Select the desired interior
temperature.
Detailed setting options are described for
you below.
Automatic air distribution and
supply
The AUTO program assumes the
adjustment of the air distribution
and air supply for you and in addi-
tion adapts the temperature to
external influences – summer, winter – to
meet preferences you can specify.
Individual air distribution
You can also direct air flow onto
the windows , toward the
upper body and into the foot-
well as you require. The arrow
lights up. The automatic air supply remains
unchanged. All intermediate settings are
possible. By pressing the AUTO button,
you can reactivate the air distribution.
Temperature
The interior temperature that
appears on the display panel is a
general figure intended for refer-
ence purposes. When you start
the vehicle, the system ensures that the
selected temperature is reached as quickly
as possible. It then maintains this tempera-
ture, regardless of the season.
Air supply/blower
You can set the blower through
an infinitely variable range of
speeds. This shuts off the auto-
matic air supply. The arrow lights
up. The automatic air distribution remains
unchanged. You can reactivate the auto-
matic air supply by pressing the AUTO but-
ton.
When you turn the rotary control toward
zero: the blower, heating and air condi-
tioner are switched off, and the air supply is stopped. You can reactivate the system by
turning the control toward the right again.
To defrost windows and remove
condensation
This program quickly removes ice
and condensation from the wind-
shield and the side windows.
Maximum cooling
This program gives you maximum
cooling within a short period of
time.
The temperature is set to the lowest possi-
ble value. The system switches into the
recirculated air mode and air flows at max-
imum blower speed from the air outlets
only. Therefore, the air outlets must always
be open when you select this program.
Air conditioning
The air is cooled and dehumidi-
fied and – depending on the tem-
perature setting – rewarmed.
Depending on the weather, the
windshield may fog over briefly when the
engine is started.
The air conditioning system is automati-
cally switched on when you use the AUTO
program.
Condensation forms during operation
of the air conditioning system, which
then exits under the vehicle. Traces of con-
densed water on the ground underneath
the vehicle are thus normal.<
Outside air/Automatic recirculated
air control AUC/recirculated air
mode
You can respond to unpleasant
external odors or pollutants by
temporarily stopping the flow of
outside air. The system then
recirculates the air currently within the
vehicle.
By repeatedly pressing the button, you can
select one of three different operating
modes.
Page 59 of 106
At a glance
Controls
Driving tips
Mobility
Reference
59
>Indicator lamps off: outside air flows
into the vehicle
>Left-hand indicator lamp on – AUC
mode: the system detects pollutants in
the outside air and responds by deacti-
vating the outside airflow as required.
The system then recirculates the air
currently within the vehicle. Depending
on air quality requirements, the system
automatically switches between out-
side air supply and recirculation of the
air already within the vehicle
>Right-hand indicator lamp on: the flow
of outside air is permanently blocked.
The system recirculates the air already
within the vehicle.
If the windows fog over in the recir-
culated air mode, switch this mode
off and increase the air supply as re-
quired.<
Rear window defroster
The indicator lamp lights up when
the rear window defroster is
active. The rear window defroster
switches off automatically.
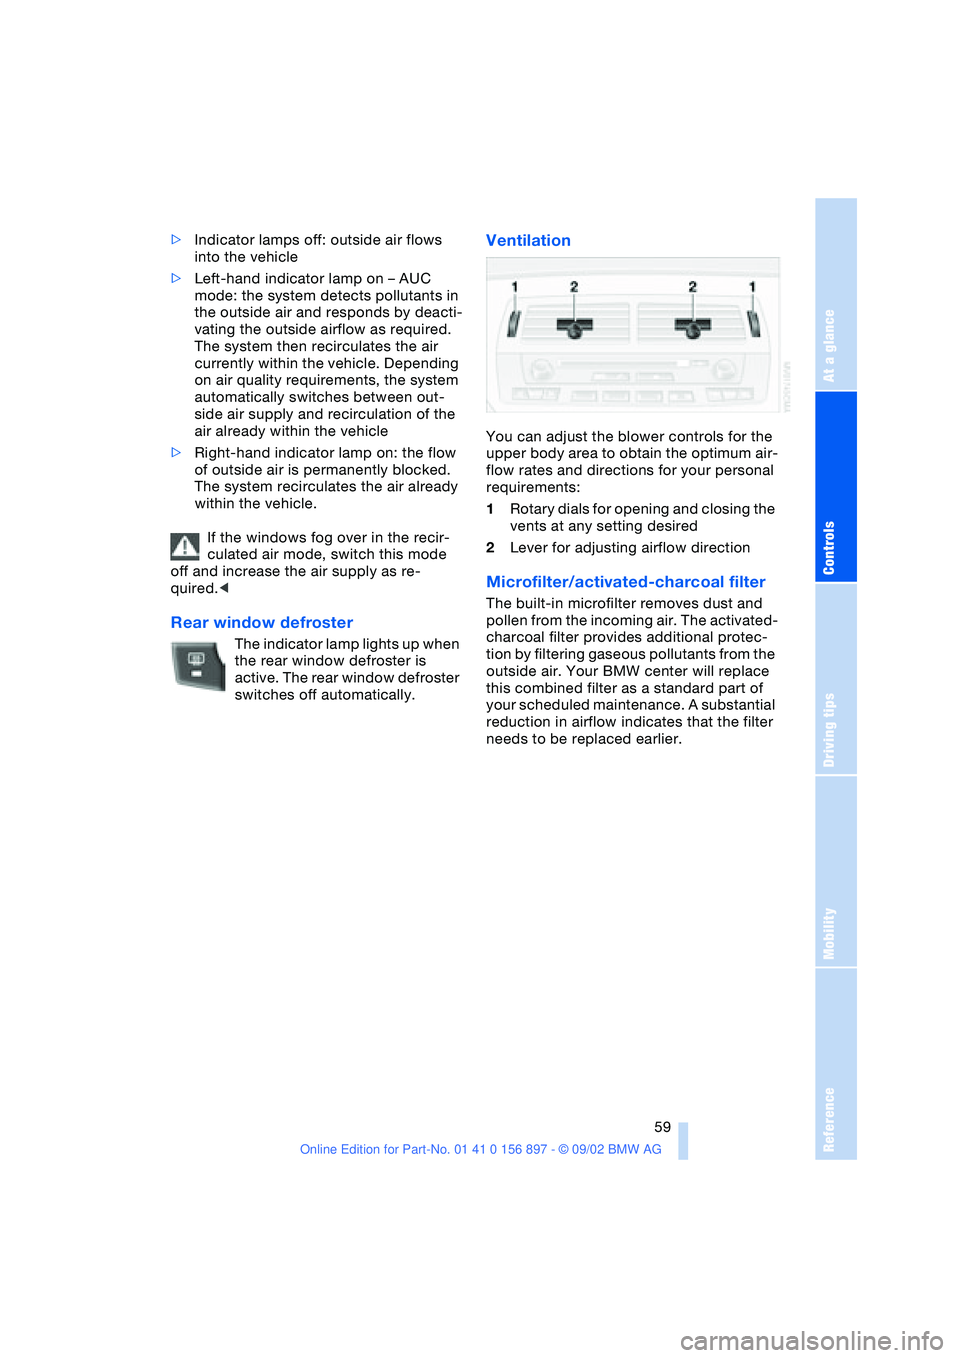
Ventilation
You can adjust the blower controls for the
upper body area to obtain the optimum air-
flow rates and directions for your personal
requirements:
1Rotary dials for opening and closing the
vents at any setting desired
2Lever for adjusting airflow direction
Microfilter/activated-charcoal filter
The built-in microfilter removes dust and
pollen from the incoming air. The activated-
charcoal filter provides additional protec-
tion by filtering gaseous pollutants from the
outside air. Your BMW center will replace
this combined filter as a standard part of
your scheduled maintenance. A substantial
reduction in airflow indicates that the filter
needs to be replaced earlier.
Page 86 of 106
Replacement procedures
86 tion using the fog lamps, provided traffic
laws in your area do not prohibit this.
Because of the extremely high volt-
ages involved, any work on the xenon
lighting system, including bulb-changing,
should be carried out by technically quali-
fied personnel only. Otherwise, there is a
risk of fatal injury.<
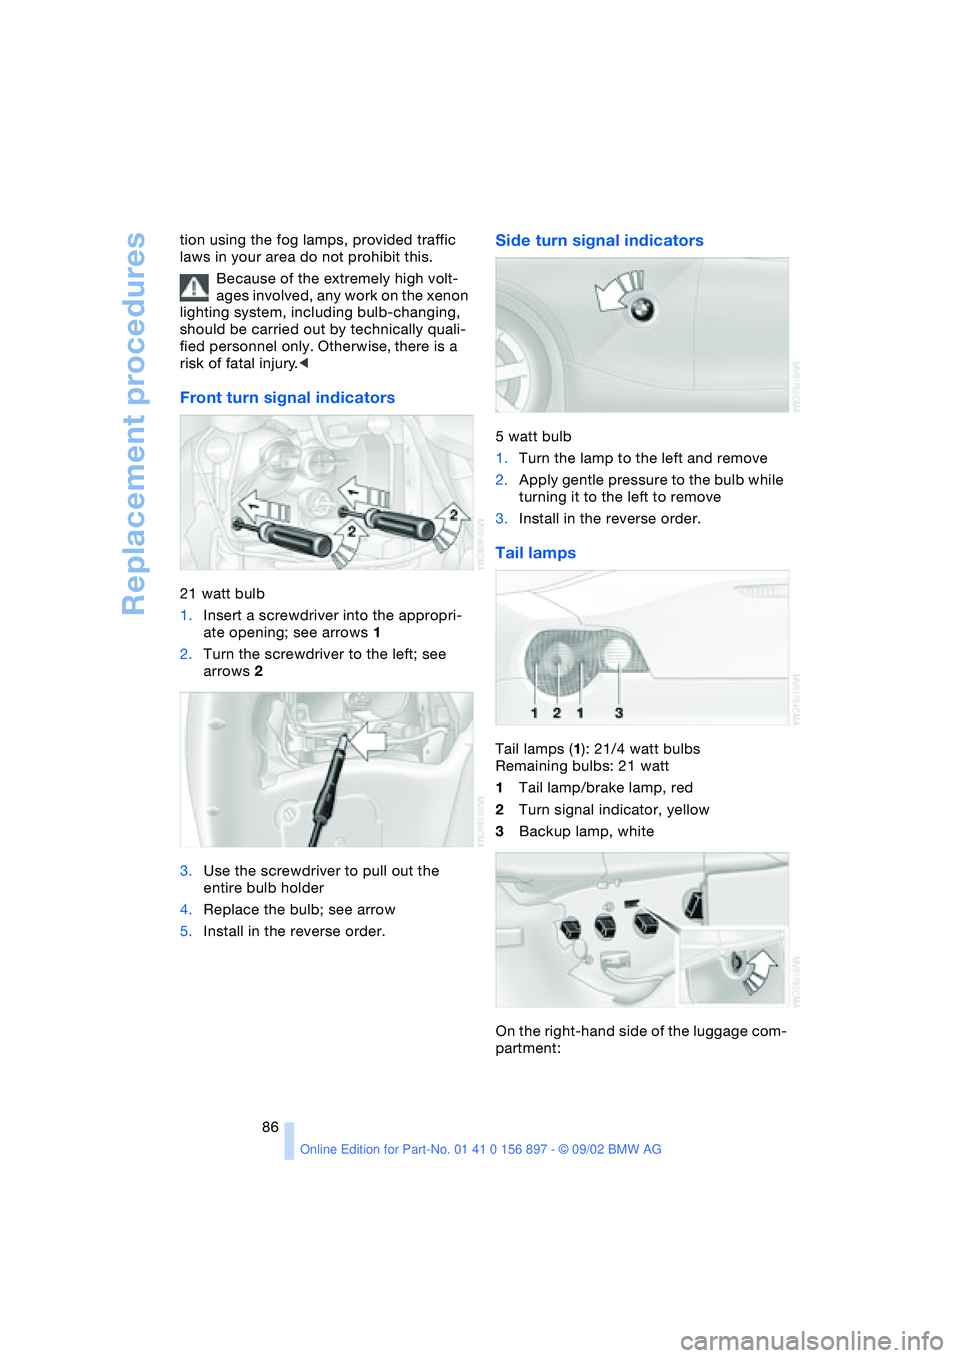
Front turn signal indicators
21 watt bulb
1.Insert a screwdriver into the appropri-
ate opening; see arrows 1
2.Turn the screwdriver to the left; see
arrows 2
3.Use the screwdriver to pull out the
entire bulb holder
4.Replace the bulb; see arrow
5.Install in the reverse order.
Side turn signal indicators
5 watt bulb
1.Turn the lamp to the left and remove
2.Apply gentle pressure to the bulb while
turning it to the left to remove
3.Install in the reverse order.
Tail lamps
Tail lamps (1): 21/4 watt bulbs
Remaining bulbs: 21 watt
1Tail lamp/brake lamp, red
2Turn signal indicator, yellow
3Backup lamp, white
On the right-hand side of the luggage com-
partment: