2003 BMW M3 CONVERTIBLE change wheel
[x] Cancel search: change wheelPage 72 of 166
72
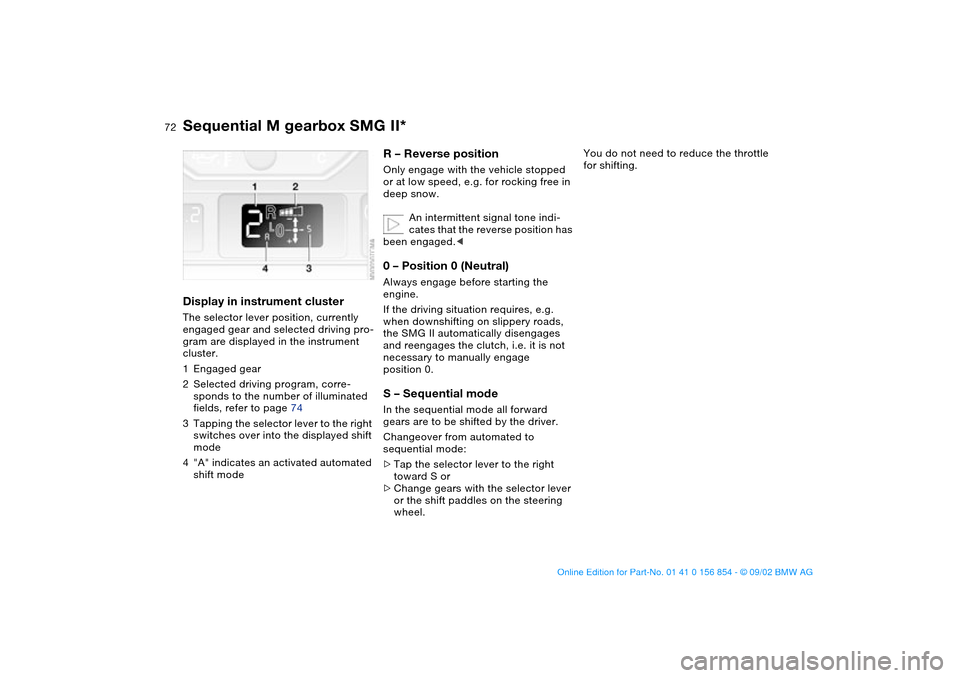
Display in instrument clusterThe selector lever position, currently
engaged gear and selected driving pro-
gram are displayed in the instrument
cluster.
1Engaged gear
2Selected driving program, corre-
sponds to the number of illuminated
fields, refer to page 74
3Tapping the selector lever to the right
switches over into the displayed shift
mode
4"A" indicates an activated automated
shift mode
R – Reverse positionOnly engage with the vehicle stopped
or at low speed, e.g. for rocking free in
deep snow.
An intermittent signal tone indi-
cates that the reverse position has
been engaged.<0 – Position 0 (Neutral)Always engage before starting the
engine.
If the driving situation requires, e.g.
when downshifting on slippery roads,
the SMG II automatically disengages
and reengages the clutch, i.e. it is not
necessary to manually engage
position 0.S – Sequential modeIn the sequential mode all forward
gears are to be shifted by the driver.
Changeover from automated to
sequential mode:
>Tap the selector lever to the right
toward S or
>Change gears with the selector lever
or the shift paddles on the steering
wheel.
You do not need to reduce the throttle
for shifting.
Sequential M gearbox SMG II*
handbook.book Page 72 Tuesday, July 30, 2002 9:28 AM
Page 73 of 166

73
Shifting gears with shift paddles on
steering wheel:
>To upshift, briefly pull the right pad-
dle +
>To downshift, briefly pull the left pad-
dle –.
Shift paddles with various widths
matched to the shape of your
hand are available from your BMW cen-
ter.<
Shifting gears with selector lever:
>To upshift, pull the selector lever
backward +
>To downshift, push the selector lever
forward toward –.
No automatic upshifting is carried out in
the sequential mode.
You accelerate from higher gears, e.g.
during passing, by manually downshift-
ing.
In the following situations the SMG II
helps you think in the sequential mode:
>Upshifts and downshifts are only exe-
cuted when the new gear will provide
a suitable combination of vehicle and
engine speed, i.e., downshifts that
would cause the engine to overrev
will not be executed
>During a stop the gearbox is auto-
matically downshifted into the first
gear so that, e.g. before a traffic light,
it is only necessary to accelerate to
continue driving
>When the speed is reduced, the
gearbox is automatically down-
shifted shortly before a gear-depen-
dent minimum speed is reached with-
out you taking any action.A – Automated modeEach time the engine is started, the
automated mode is activated as soon
as you move the selector lever into the
forward driving position.
In the automated mode all forward
gears are automatically shifted.Changeover from sequential to auto-
mated mode: tap the selector lever to
the right toward A. Watch the display in
the instrument cluster, refer to page 72.
For rapid acceleration, e.g. during
passing, depress the accelerator pedal
completely – kickdown. The gearbox
now downshifts in dependence on the
selected driving program.
Even in the automated mode, you can
help specify the shifting point: if a gear-
dependent minimum speed is
exceeded, you can upshift by slowly
reducing pressure on the accelerator
pedal. In the process, the respective
driving situation is detected by sensors
and taken into account.
Sequential M gearbox SMG II*
OverviewControlsMaintenanceRepairsDataIndex
handbook.book Page 73 Tuesday, July 30, 2002 9:28 AM
Page 75 of 166

75
Indicator lamp
The transmission indicator lamp
in the instrument cluster goes
out after the engine is started.
>If it does not go out, or if it lights up
during driving, a fault has occurred.
The available functions may be lim-
ited under certain circumstances.
Drive carefully and with the Dynamic
Stability Control (DSC) activated.
Have the system checked by the
nearest BMW center
>If the indicator lamp flashes while
driving, the system is overloaded.
Avoid high loads until the indicator
lamp goes out again permanently.
Shift lightsTo achieve the best possible vehicle
acceleration with a sporty driving style
in the sequential mode, shift lights in
the instrument cluster indicate the opti-
mum shifting point shortly before the
maximum engine speed is reached.
1. When the maximum engine speed is
approached, yellow indicator fields,
shift lights, in the tachometer light up
consecutively to indicate the
approaching upshift time
2. Shift at the latest when the last indi-
cator field lights up red.
Tire replacement, snow chainsFollowing a tire or wheel change and
after mounting or removing snow
chains, the slip recognition of the
SMG II must become familiar with the
changed condition.
Reinitialize the system afterwards:
1. Move the selector lever into
position 0 on a straight stretch of
road at a speed of over 20 mph /
30 km/h
2. Pull both shift paddles for approx.
two seconds.
If you do not carry out the initialization,
the system automatically learns the
changed condition gradually during
driving. This can become apparent due
to brief opening and closing of the
clutch.
Sequential M gearbox SMG II*
OverviewControlsMaintenanceRepairsDataIndex
handbook.book Page 75 Tuesday, July 30, 2002 9:28 AM
Page 111 of 166
111
Driving notes
Brakes: do not rest your foot on
the brake pedal while driving.
Even light but consistent pedal pres-
sure can lead to high temperatures,
brake wear and possibly even brake
failure.
Hydroplaning: when driving on wet or
slushy roads, reduce road speed. If you
do not, a wedge of water can form
between tires and road surface. This
phenomenon is referred to as hydro-
planing, and can lead to partial or com-
plete loss of traction, vehicle control
and braking effectiveness.
Driving through water: do not drive
through water on the road if it is deeper
than 1 ft/30 cm, and then only at walk-
ing speed. Otherwise, the vehicle's
engine, the electrical systems and the
transmission may be damaged.<
Antilock Brake System (ABS)The conceptThe Antilock Brake System (ABS) keeps
the wheels from locking during braking,
thereby enhancing active driving safety.Braking with ABSIf you are in a situation that requires full
braking, you will exploit the full benefits
of the ABS system if you apply maxi-
mum pedal pressure, panic stop. Since
the vehicle maintains steering respon-
siveness, you can avoid possible obsta-
cles with a minimum of steering effort,
despite the full brake application.
Pulsation at the brake pedal combines
with sounds from the hydraulic circuits
to indicate to the driver that ABS is in
its active mode.Cornering Brake Control (CBC)CBC is an advanced engineering
design of the ABS. When braking while
cornering at high speed or braking dur-
ing high lateral acceleration, or when
braking during a lane change, vehicle
stability is improved and steering
response is enhanced.
OverviewControlsMaintenanceRepairsDataIndex
handbook.book Page 111 Tuesday, July 30, 2002 9:28 AM
Page 117 of 166
117
Grades B and A represent higher levels
of performance on the laboratory test
wheel than the minimum required by
law.
The temperature grade for this tire
is established for a tire that is
properly inflated and not overloaded.
Excessive speed, under-inflation, or
excessive loading, either separately or
in combination, can cause heat buildup
and possible tire failure.
tread shoulder and maximum section
width. For example:
Treadwear 200 Traction AA
Temperature ATire ageThe date on which the tire was manu-
factured is indicated by the code on the
sidewall:
DOT ... 3502 indicates that the tire was
manufactured in week 35 of the year
2002.
BMW recommends the replacement of
all tires when the tires are no more than
6 years old, even if a tire life of 10 years
is possible.Following wheel/tire changesFollowing wheel and/or tire changes
you will need to reinitialize both the Flat
Tire Monitor and the sequential M gear-
box SMG II, refer to pages 75, 89.
Tire replacement
OverviewControlsMaintenanceRepairsDataIndex
handbook.book Page 117 Tuesday, July 30, 2002 9:28 AM
Page 119 of 166
119
Do not exceed specified
maximum speeds
Never exceed the maximum
speed for which the winter tires
are rated.
Unprofessional attempts by laymen to
service tires can lead to damage and
accidents.
Have this work performed by skilled
professionals only. Your BMW center
will be glad to assist you with both their
expertise and the proper equipment for
your vehicle.<
Tire condition, tire pressureAt tread depth below approx. 3/16 in /
4 mm, their performance under winter
driving conditions deteriorates notice-
ably. Worn tires should therefore be
replaced for safety considerations.
Comply with the specified tire inflation
pressures – and be sure to have the
wheel and tire assembly balanced
every time you change a tire or wheel.
Snow chains*Only certain snow chains have been
tested by BMW and determined and
approved as roadworthy. Consult your
BMW center for more information.
BMW recommends using only these
approved fine-link snow chains. Use
them in pairs on winter tires, but only on
both rear wheels.
Comply with all manufacturer's safety
precautions when mounting the chains.
Do not exceed a speed of 30 mph /
50 km/h with snow chains.
After mounting or removing snow
chains, always reinitialize the sequential
M gearbox SMG II, refer to page 89.
It is not possible to mount snow
chains on tires with 18- and 19-
inch wheels.
Deactivate the Flat Tire Monitor when
using snow chains. Malfunction warn-
ings and undetected losses in pressure
are a possibility when driving with snow
chains.
For additional information, refer to
page 88.<
Winter tires
OverviewControlsMaintenanceRepairsDataIndex
handbook.book Page 119 Tuesday, July 30, 2002 9:28 AM
Page 140 of 166
140
Preparing the M Mobility system
for useThe M Mobility system is located in the
luggage compartment under the floor
panel:
1. Lift the floor panel
2. Loosen the M Mobility system from
its storage location.
Before you use the M Mobility sys-
tem, read the warnings and dan-
ger notices on the device carefully.<
If possible, leave the foreign object in
the tire.
Pull off the sticker 5, refer to the second
column on the right, for the speed limit
and apply it to the steering wheel.
Please keep in mind that the fluids
bottle in the system's sealant con-
tainer has to be changed every 3 years
by your BMW center, if the unit has not
been used.<
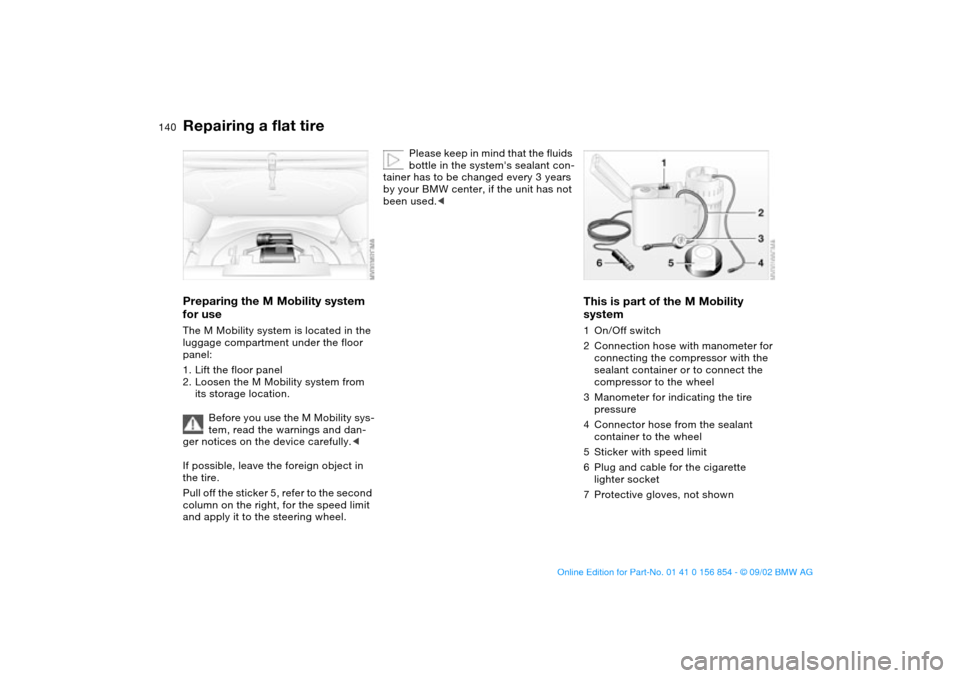
This is part of the M Mobility
system1On/Off switch
2Connection hose with manometer for
connecting the compressor with the
sealant container or to connect the
compressor to the wheel
3Manometer for indicating the tire
pressure
4Connector hose from the sealant
container to the wheel
5Sticker with speed limit
6Plug and cable for the cigarette
lighter socket
7Protective gloves, not shown
Repairing a flat tire
handbook.book Page 140 Tuesday, July 30, 2002 9:28 AM
Page 159 of 166

Everything from A to Z
159
LATCH child-restraint
mounting system 62
Leather care, refer to the
Caring for your vehicle
brochure
Length 151
License plate lamp
replacing bulb 139
Light switch 92
Lighter 102
Lighting, see lamps
LIGHTS ON warning 92
Load-securing devices 106
Lock, steering wheel 66
Low beams 92
bulb replacement 135
Luggage compartment
35, 37
capacity 152
floor panel 37
increase volume 37
Luggage compartment lid 35
emergency release 36
manual operation 35
opening from the inside 35
remote control 32
securing separately 35
Luggage compartment light-
ing 35
Luggage rack 107
Lumbar support 50M
M Engine dynamics
control 91
M Mobility system 139
M+S tires 118
Maintenance 82, 128
Malfunction displays 82
Manual operation
convertible top 44
Manual transmission 70
Master keys 30
with remote control 30
Memory 53, 65
Microfilter 100
Microphone 102
Mirror defrosting 55
Mirror memory 53
Mirrors 55
automatic curb monitor 54
inside rearview 56
outside 55
Mobility system 139
Modifications, technical 5
Mounting the roof rack 113
Multifunction switch 76
N
Navigation system, refer to
Owner's Manual for
Onboard Computer
Neckrest 50O
OBD interface socket 130
Odometer 80
Oil
additives 125
capacity 153
quality 125
viscosity 125
Oil change interval, see Ser-
vice and Warranty Infor-
mation Booklet for US
models / Warranty and
Service Guide Booklet for
Canadian models
Oil filter change 153
Oil level
checking 124
indicator lamp 19
warning lamp 18
Oil pressure
warning lamp 18
OIL SERVICE 82
Oil types 125
Onboard computer, refer to
the Owner's Manual for
Onboard Computer
Onboard tool kit 134
Opening and closing
from inside 34
via remote control 31
via the door lock 33
Operating elements 14Outlets, ventilation 96
Outside temperature dis-
play 84
P
Paintwork care, refer to the
Caring for your vehicle
brochure
Panic mode, trigger
alarm 32
Park Distance Control
(PDC) 86
Parking aid 86
Parking brake 69
Parking lamps 92
PDC Park Distance
Control 86
Pollen 100
Power output 150
Power seat 49
Pressure, tires 25, 115
R
Radiator 153
Radio navigation, refer to
Owner's Manual for
Radio 85
Radio, refer to the Owner's
Manual for Radio
Rain sensor 77
Range 85
OverviewControlsMaintenanceRepairsDataIndex
handbook.book Page 159 Tuesday, July 30, 2002 9:28 AM