2003 BMW 760LI SEDAN roof
[x] Cancel search: roofPage 45 of 229
At a glance
Controls
Driving tips
Communications
Navigation
Entertainment
Mobility
Reference
43
When you close the windows they will
slow down as they approach the end
of their travel; this is to allow the safety fea-
ture to respond more precisely to any
obstructions encountered in this critical
range.<
Safety switch
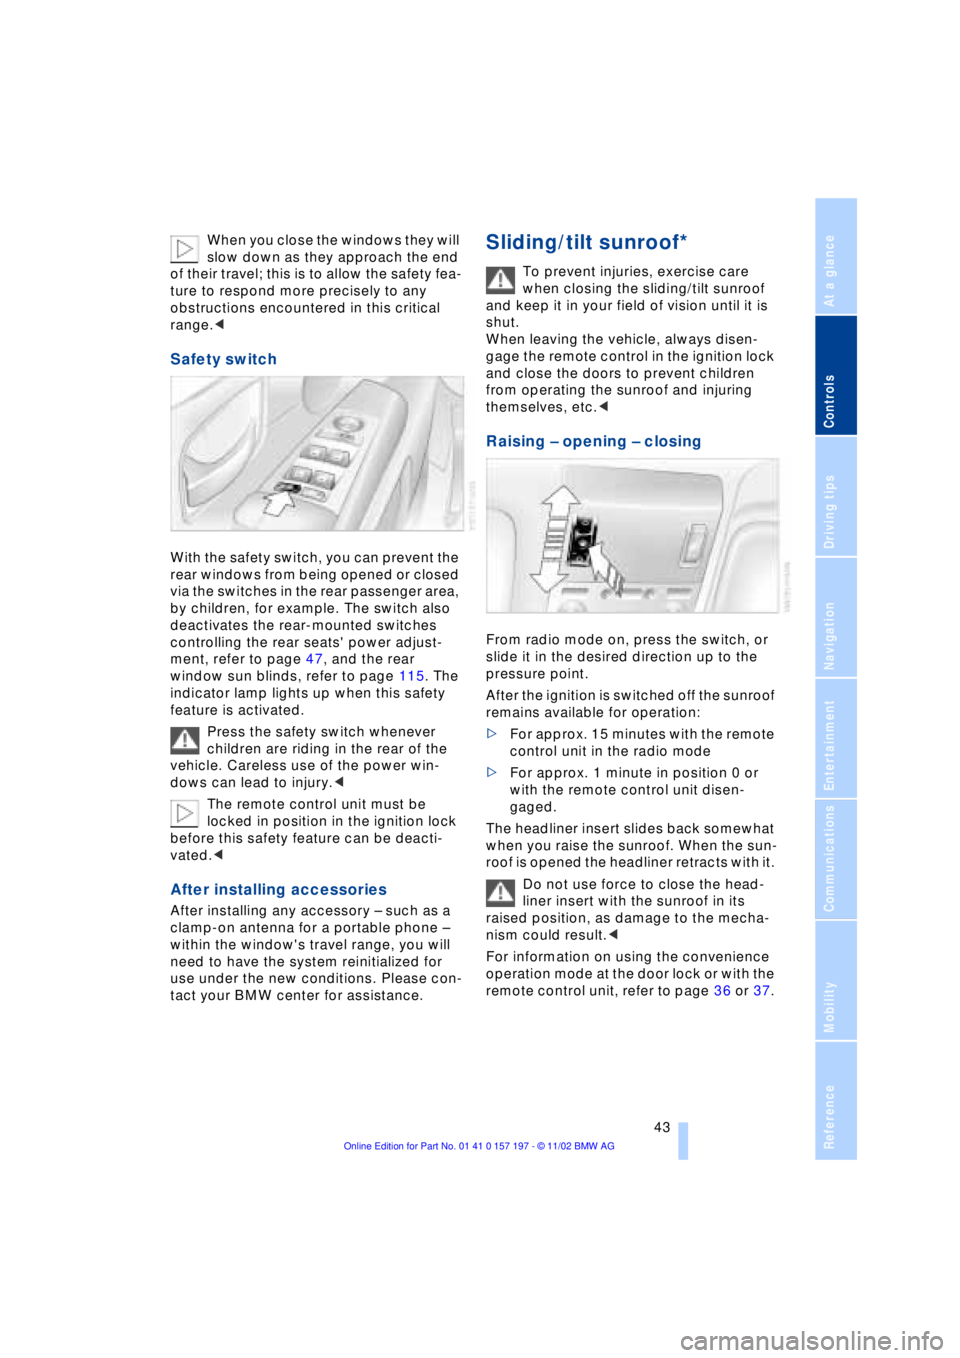
With the safety switch, you can prevent the
rear windows from being opened or closed
via the switches in the rear passenger area,
by children, for example. The switch also
deactivates the rear-mounted switches
controlling the rear seats' power adjust-
ment, refer to page 47, and the rear
window sun blinds, refer to page 115. The
indicator lamp lights up when this safety
feature is activated.
Press the safety switch whenever
children are riding in the rear of the
vehicle. Careless use of the power win-
dows can lead to injury.<
The remote control unit must be
locked in position in the ignition lock
before this safety feature can be deacti-
vated.<
After installing accessories
After installing any accessory Ð such as a
clamp-on antenna for a portable phone Ð
within the window's travel range, you will
need to have the system reinitialized for
use under the new conditions. Please con-
tact your BMW center for assistance.
Sliding/tilt sunroof*
To prevent injuries, exercise care
when closing the sliding/tilt sunroof
and keep it in your field of vision until it is
shut.
When leaving the vehicle, always disen-
gage the remote control in the ignition lock
and close the doors to prevent children
from operating the sunroof and injuring
themselves, etc.<
Raising Ð opening Ð closing
From radio mode on, press the switch, or
slide it in the desired direction up to the
pressure point.
After the ignition is switched off the sunroof
remains available for operation:
>For approx. 15 minutes with the remote
control unit in the radio mode
>For approx. 1 minute in position 0 or
with the remote control unit disen-
gaged.
The headliner insert slides back somewhat
when you raise the sunroof. When the sun-
roof is opened the headliner retracts with it.
Do not use force to close the head-
liner insert with the sunroof in its
raised position, as damage to the mecha-
nism could result.<
For information on using the convenience
operation mode at the door lock or with the
remote control unit, refer to page 36 or 37.
Page 46 of 229
Opening and closing
44
Automatic* opening and closing
Press the switch past the pressure point
and then release it.
In addition, the following response is also
automatic:
With the sunroof open, press the switch in
the Raise direction: the sunroof rises to its
tilt-up end position.
Press the switch again in any direction to
stop the sunroof.
The automatic opening feature in the
Raise direction can be deactivated.
Please contact your BMW center for assis-
tance.<
Safety feature
If the sliding/tilt sunroof encounters resis-
tance
>when it is closing from the raised posi-
tion
>when it is closing from a point roughly
past the middle of its travel,
the closing cycle is interrupted and the
sliding/tilt sunroof will open again slightly.
Despite this safety feature you should
always inspect the sunroof's travel
range prior to closing it, as the safety fea-
ture might fail to detect certain kinds of
obstructions, such as very thin objects, and
the sunroof would continue closing.
Pressing the switch beyond the pressure
point and holding it limits the response of
the safety feature. The sunroof only opens
a short distance.
If you again press the switch past the pres-
sure point and hold it in position within
about 1.5 seconds, the safety feature will
be deactivated.<
When you close the sliding/tilt sun-
roof it will slow down as it approaches
the end of its travel path; this is to allow the
safety feature to respond more precisely to
any obstructions encountered in this crit-
ical range.<
Following interruptions in electrical
power supply
Following interruptions in electrical power,
for instance, when the battery is discon-
nected, it is possible that the sliding/tilt
sunroof will extend to its tilt-up position,
but fail to respond to other commands.
Should this occur, please have the sunroof
reinitialized at your BMW center.
Malfunctions
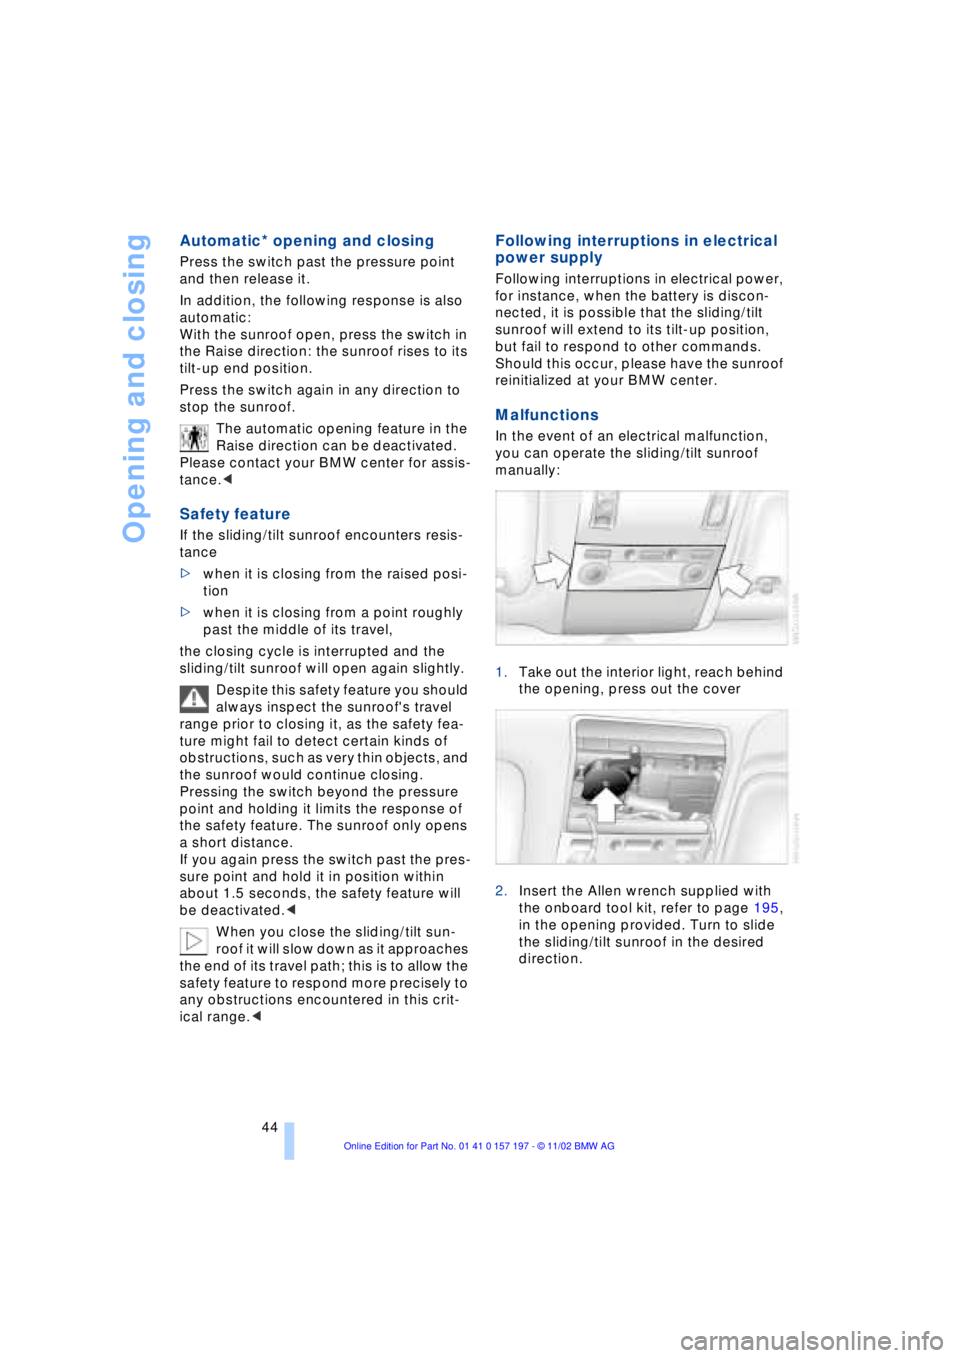
In the event of an electrical malfunction,
you can operate the sliding/tilt sunroof
manually:
1.Take out the interior light, reach behind
the opening, press out the cover
2.Insert the Allen wrench supplied with
the onboard tool kit, refer to page 195,
in the opening provided. Turn to slide
the sliding/tilt sunroof in the desired
direction.
Page 57 of 229
At a glance
Controls
Driving tips
Communications
Navigation
Entertainment
Mobility
Reference
55
Safety feature
1.Driver's door closed and ignition
switched either on or off
2.Press memory button 1 or 2 and main-
tain pressure until the adjustment pro-
cess has been completed.
If you press the
MEMORY button acciden-
tally:
Press the button again; the indicator lamp
goes out.
Do not call up a position from the
memory while the vehicle is moving.
There is a risk of accident from unexpected
movement of the seat or steering wheel.<
You can have your vehicle pro-
grammed to automatically dial in your
own individual adjustment settings for the
seat, mirrors and steering wheel whenever
you use your personal remote control unit
to unlock the vehicle.<
When using the Key Memory feature
always make sure that the footwell
behind the driver's seat is empty and unob-
structed. If you fail to do so, any persons or
objects behind the seat could be injured or
damaged by a rearward movement of the
seat.<
Passenger-side exterior mirror tilt
function
Automatic curb monitor
1.Select the driver's door mirror with the
switch
2.When you select the transmission posi-
tion R, the door mirror on the front pas-
senger side tilts downward slightly. This
allows the driver to see the area imme-
diately adjacent to the vehicle Ð such as
a curb Ð when parking, etc.
You can deactivate this automatic feature:
Slide the mirror selection switch to the pas-
senger's side position.
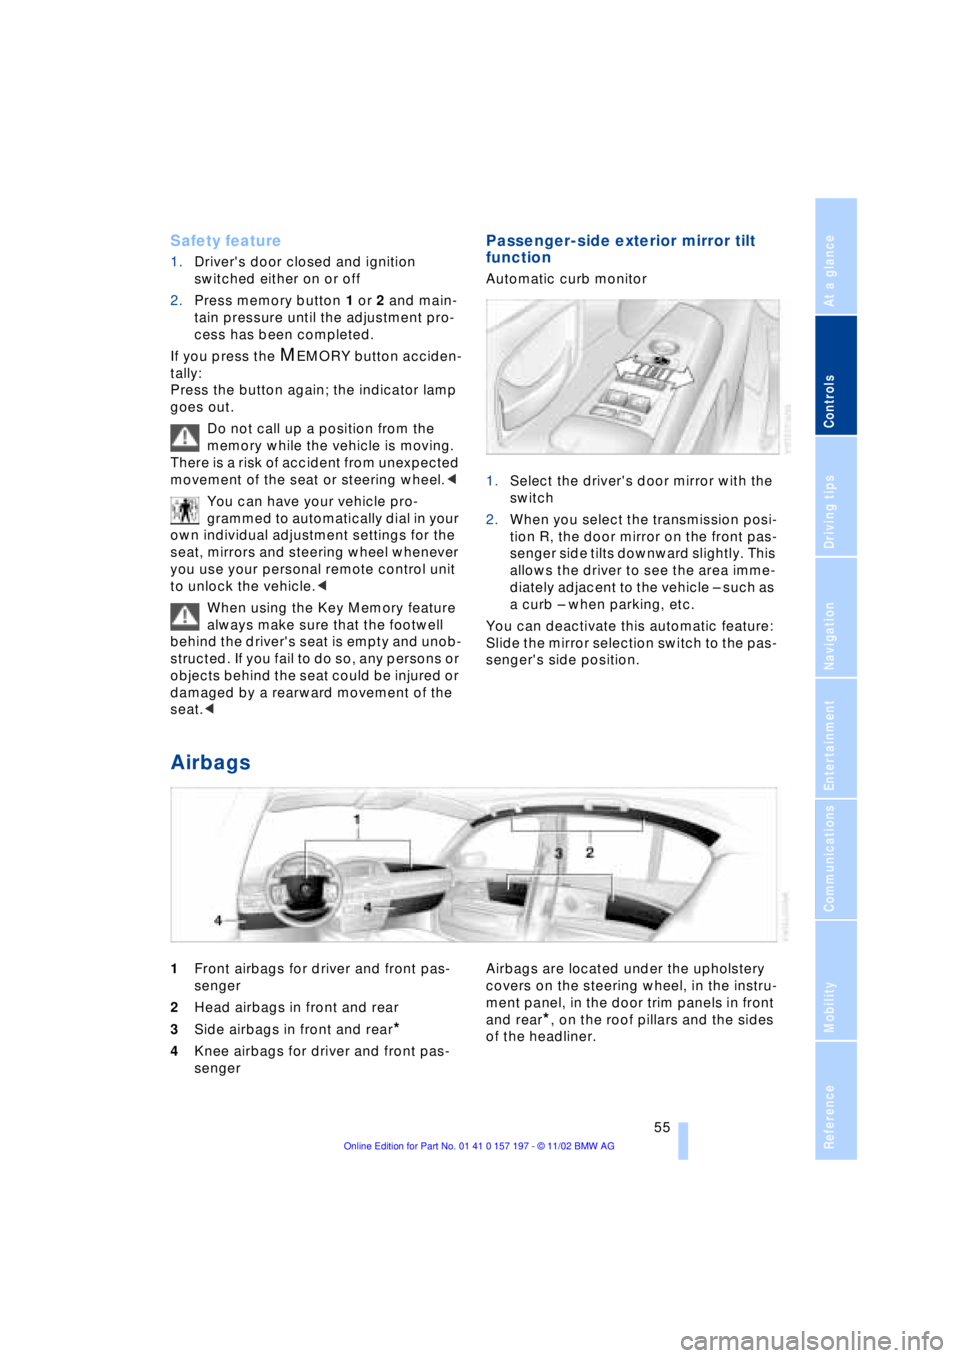
Airbags
1Front airbags for driver and front pas-
senger
2Head airbags in front and rear
3Side airbags in front and rear
*
4Knee airbags for driver and front pas-
senger Airbags are located under the upholstery
covers on the steering wheel, in the instru-
ment panel, in the door trim panels in front
and rear*, on the roof pillars and the sides
of the headliner.
Page 58 of 229
Adjustments
56
Protective effect
The front airbags help protect the front
passengers by responding to frontal
impacts in which safety belts alone cannot
provide adequate restraint. When needed,
the head and side airbags help provide
protection in the event of side impact. The
side airbags help restrain the side of the
occupant's upper torso, and the head air-
bags help support the head while also
helping provide protection against any
objects penetrating into the passenger
compartment. The knee airbags help pro-
tect the legs against impact against the
cockpit.
The side airbags in the rear pas-
senger area of your vehicle may
already have been deactivated either at the
time of manufacture or by a BMW center.
You may have them activated if you desire
to do so. Please contact your BMW center
for additional information.<
For information on the correct sitting posi-
tion, refer to page 45.
The airbags do not deploy in
response to minor accidents or rear
collisions, nor do they respond to certain
kinds of vehicle rollover.<
Even when all safety guidelines are
observed, there is a small residual risk that
passengers will sustain facial, hand or arm
injuries in isolated instances. The ignition
and inflation noise may provoke a mild Ð
usually temporary Ð hearing loss in
extremely sensitive individuals.
Important safety notes
Do not apply adhesive materials to
the cover panels of the airbags, cover
them or modify them in any other way.
Do not attempt to remove the airbag
restraint system from the vehicle. If you
note any indication of system malfunction,
if you desire to have an airbag deactivated,
or if the airbags are triggered in response
to an accident, you should always entrust
all inspection, repair and dismantling oper-
ations to your BMW center.
Never modify or tamper with either the wiring or the individual components in the
airbag system. This category includes the
upholstery in the center of the steering
wheel, on the instrument panel, the side
trim panels on the front or rear doors, and
the roof pillars along with the sides of the
headliner. Do not attempt to remove or dis-
mantle the steering wheel.
To ensure compliance with official safety
regulations, entrust disposal of airbag gen-
erators only to a BMW center.
Unprofessional attempts to service the
system could lead to failure in an emer-
gency or undesired airbag activation, either
of which could result in personal injury.
Do not touch the individual components
directly after the system has been trig-
gered, because there is a danger of
burns.<
At all times, occupants should sit
upright and be properly restrained Ð
infants and small children in appropriate
child-restraint systems; larger children and
adults using the safety belts. Never let an
occupant's head rest near or on a side
airbag because the inflating airbag could
cause a serious or fatal injury. Please note
that the word Airbag imprinted on the door
trim panel indicates the airbag's location.
Never install a rearward-facing child-
restraint system on the front passenger
seat. If you do so, the child could be
severely injured when the airbag is trig-
gered.
Children under 13 years of age and chil-
dren less than 5 ft (150 cm) tall should
always ride in the rear and the restraint sys-
tems should be secured with the vehicle's
safety belts.
Accident research shows that the safest
place for children in an automobile is in the
rear seat. However, a child sitting in the
rear seat and not properly restrained may
place his or her head on or near the airbag,
if so equipped.
For example, a child Ñ even though belted
Ñ may fall asleep with his or her head
against the side airbag. It may be difficult
for a driver to ensure that children in the
rear seat will remain properly positioned at
all times and do not place their heads on or
Page 129 of 229
At a glance
Controls
Driving tips
Communications
Navigation
Entertainment
Mobility
Reference
127
Roof-mounted luggage
rack*
Anchorage points
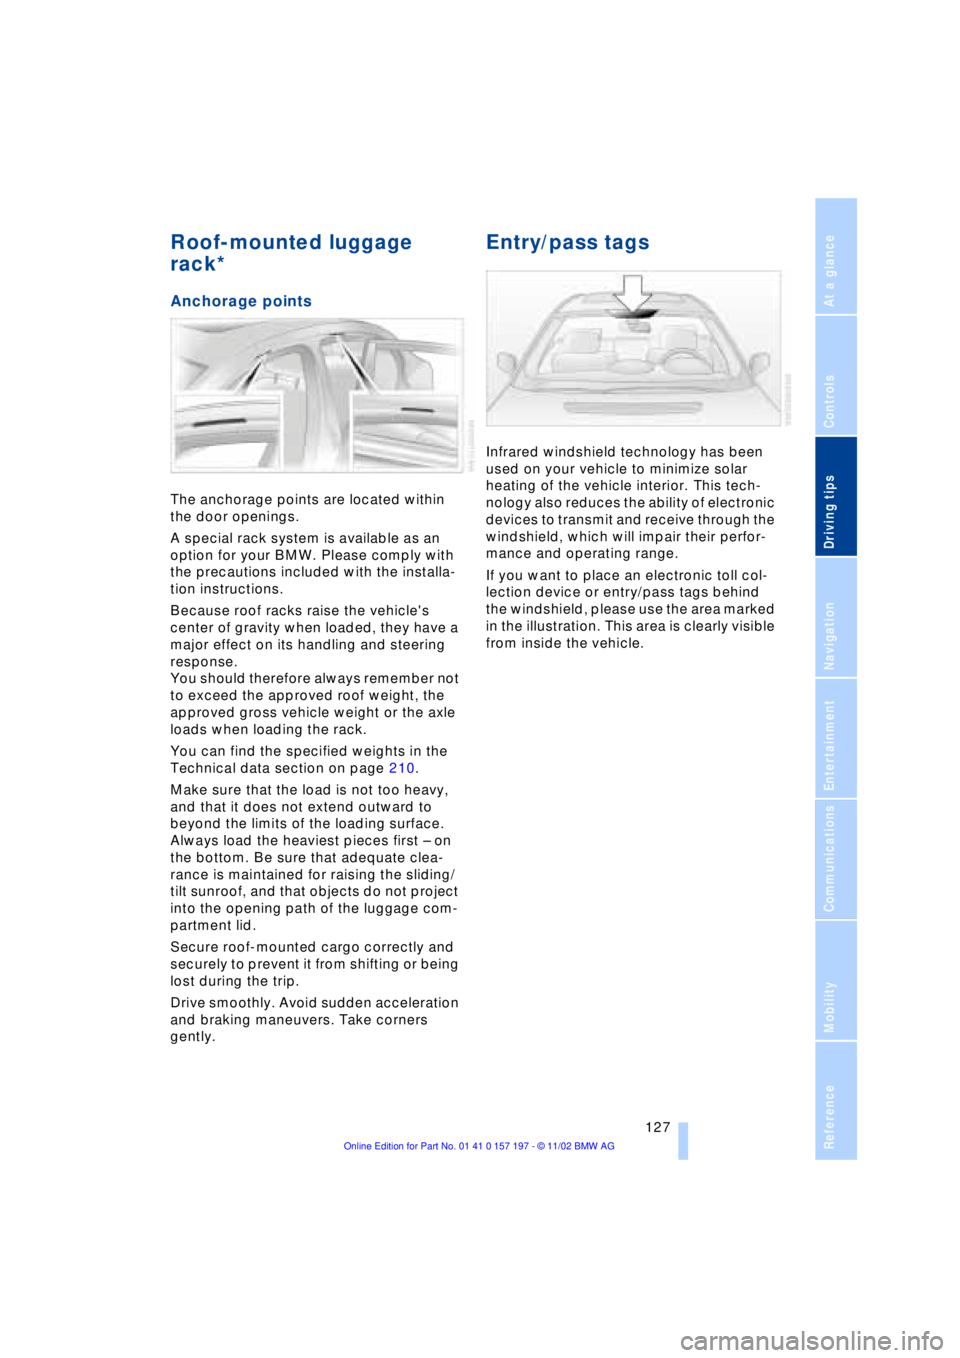
The anchorage points are located within
the door openings.
A special rack system is available as an
option for your BMW. Please comply with
the precautions included with the installa-
tion instructions.
Because roof racks raise the vehicle's
center of gravity when loaded, they have a
major effect on its handling and steering
response.
You should therefore always remember not
to exceed the approved roof weight, the
approved gross vehicle weight or the axle
loads when loading the rack.
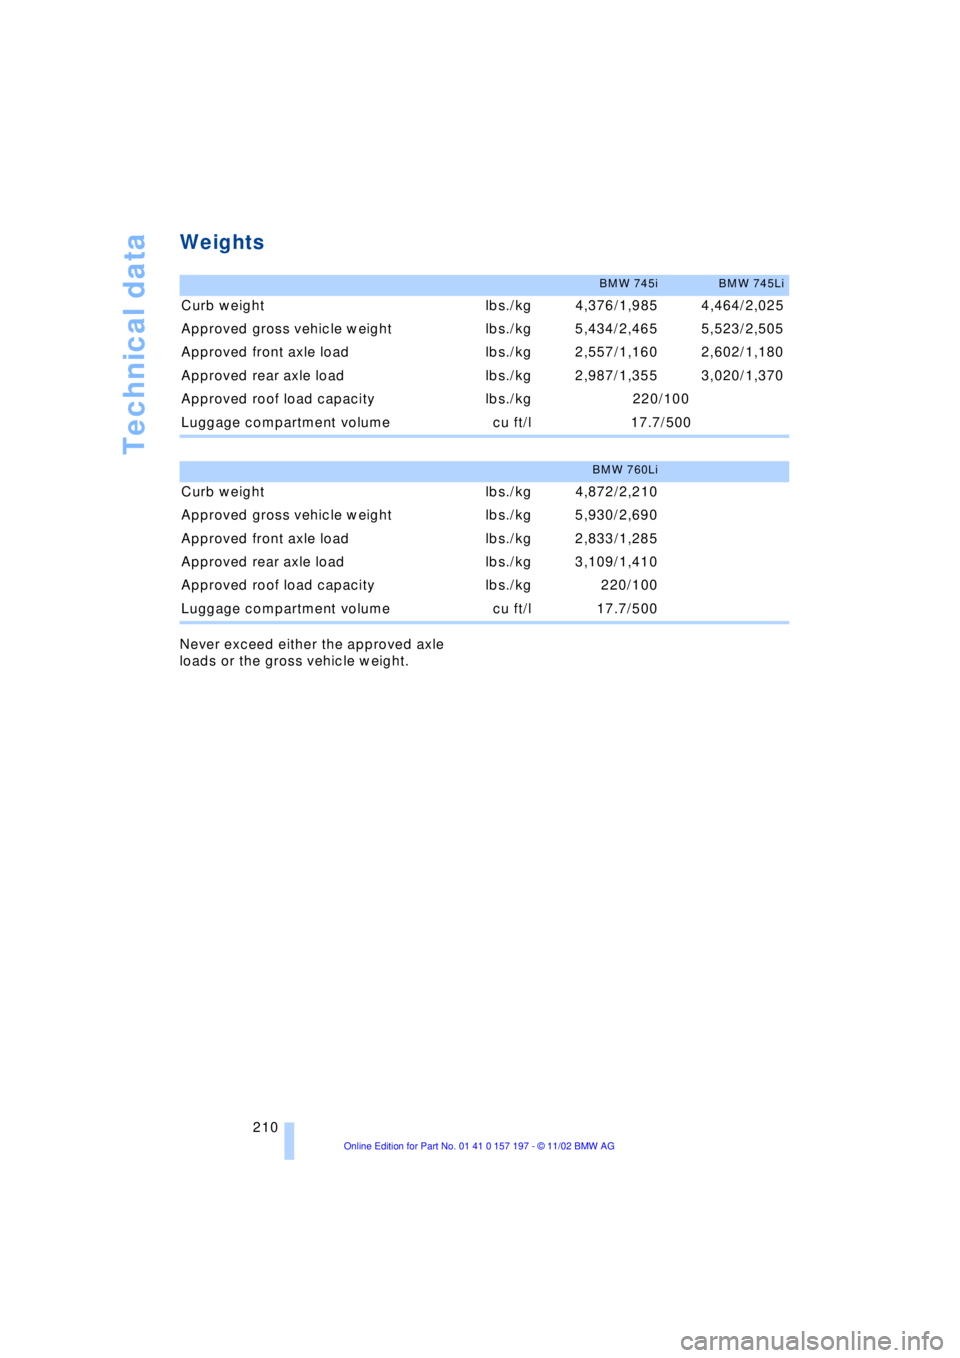
You can find the specified weights in the
Technical data section on page 210.
Make sure that the load is not too heavy,
and that it does not extend outward to
beyond the limits of the loading surface.
Always load the heaviest pieces first Ð on
the bottom. Be sure that adequate clea-
rance is maintained for raising the sliding/
tilt sunroof, and that objects do not project
into the opening path of the luggage com-
partment lid.
Secure roof-mounted cargo correctly and
securely to prevent it from shifting or being
lost during the trip.
Drive smoothly. Avoid sudden acceleration
and braking maneuvers. Take corners
gently.
Entry/pass tags
Infrared windshield technology has been
used on your vehicle to minimize solar
heating of the vehicle interior. This tech-
nology also reduces the ability of electronic
devices to transmit and receive through the
windshield, which will impair their perfor-
mance and operating range.
If you want to place an electronic toll col-
lection device or entry/pass tags behind
the windshield, please use the area marked
in the illustration. This area is clearly visible
from inside the vehicle.
Page 212 of 229
Technical data
210
Weights
Never exceed either the approved axle
loads or the gross vehicle weight.
BMW 745iBMW 745Li
Curb weight lbs./kg 4,376/1,985 4,464/2,025
Approved gross vehicle weight lbs./kg 5,434/2,465 5,523/2,505
Approved front axle load lbs./kg 2,557/1,160 2,602/1,180
Approved rear axle load lbs./kg 2,987/1,355 3,020/1,370
Approved roof load capacity lbs./kg 220/100
Luggage compartment volume cu ft/l 17.7/500
BMW 760Li
Curb weight lbs./kg 4,872/2,210
Approved gross vehicle weight lbs./kg 5,930/2,690
Approved front axle load lbs./kg 2,833/1,285
Approved rear axle load lbs./kg 3,109/1,410
Approved roof load capacity lbs./kg 220/100
Luggage compartment volume cu ft/l 17.7/500
Page 217 of 229
215
At a glance
Controls
Driving tips
Communications
Navigation
Entertainment
Mobility
Reference
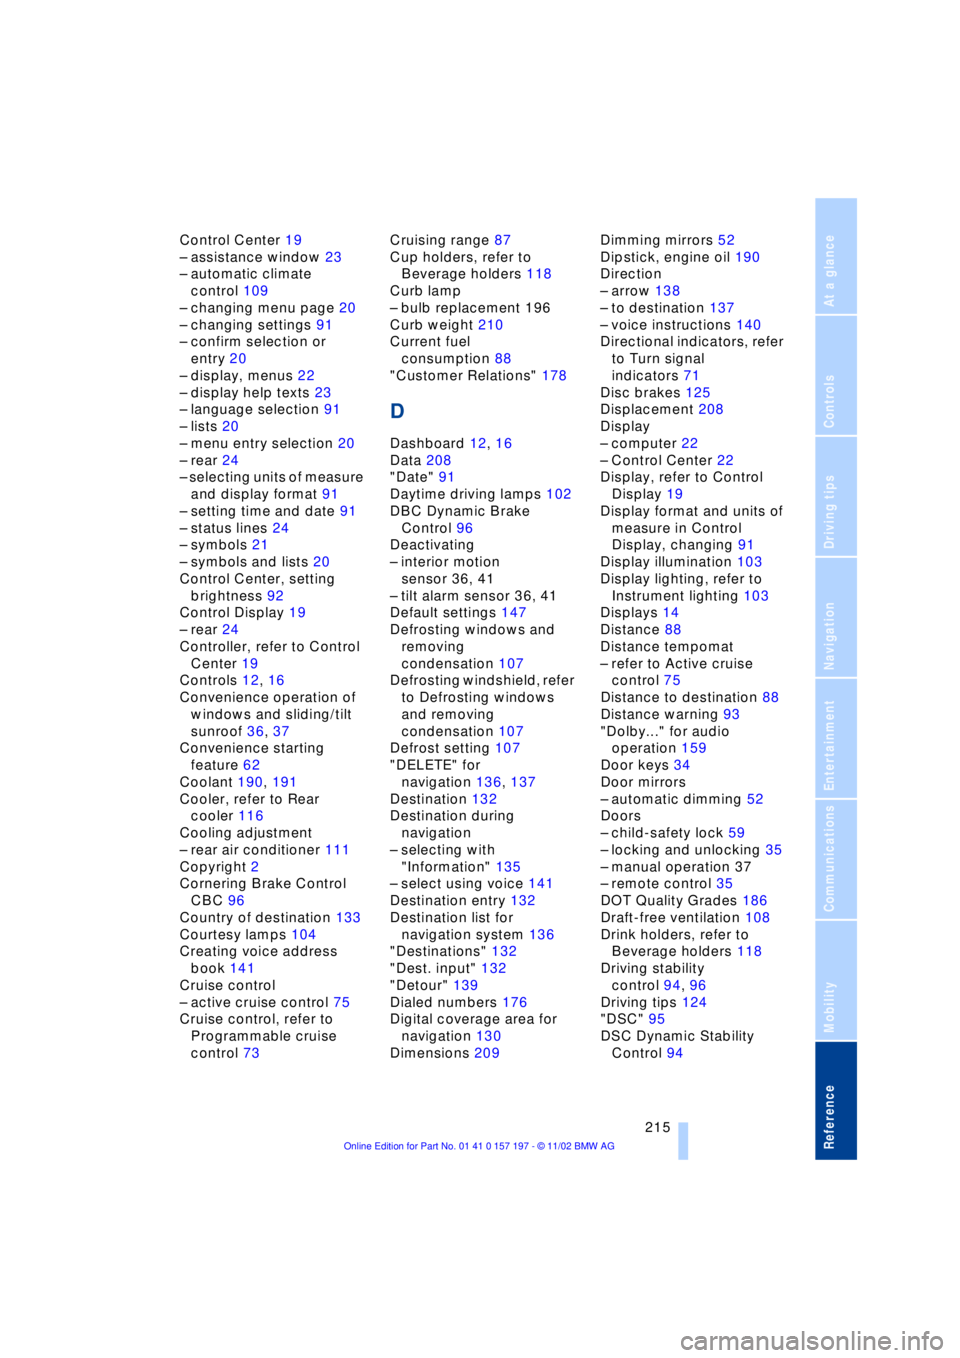
Control Center 19
Ð assistance window 23
Ð automatic climate
control 109
Ð changing menu page 20
Ð changing settings 91
Ð confirm selection or
entry 20
Ð display, menus 22
Ð display help texts 23
Ð language selection 91
Ð lists 20
Ð menu entry selection 20
Ð rear 24
Ð selecting units of measure
and display format 91
Ð setting time and date 91
Ð status lines 24
Ð symbols 21
Ð symbols and lists 20
Control Center, setting
brightness 92
Control Display 19
Ð rear 24
Controller, refer to Control
Center 19
Controls 12, 16
Convenience operation of
windows and sliding/tilt
sunroof 36, 37
Convenience starting
feature 62
Coolant 190, 191
Cooler, refer to Rear
cooler 116
Cooling adjustment
Ð rear air conditioner 111
Copyright 2
Cornering Brake Control
CBC 96
Country of destination 133
Courtesy lamps 104
Creating voice address
book 141
Cruise control
Ð active cruise control 75
Cruise control, refer to
Programmable cruise
control 73Cruising range 87
Cup holders, refer to
Beverage holders 118
Curb lamp
Ð bulb replacement 196
Curb weight 210
Current fuel
consumption 88
"Customer Relations" 178
D
Dashboard 12, 16
Data 208
"Date" 91
Daytime driving lamps 102
DBC Dynamic Brake
Control 96
Deactivating
Ð interior motion
sensor 36, 41
Ð tilt alarm sensor 36, 41
Default settings 147
Defrosting windows and
removing
condensation 107
Defrosting windshield, refer
to Defrosting windows
and removing
condensation 107
Defrost setting 107
"DELETE" for
navigation 136, 137
Destination 132
Destination during
navigation
Ð selecting with
"Information" 135
Ð select using voice 141
Destination entry 132
Destination list for
navigation system 136
"Destinations" 132
"Dest. input" 132
"Detour" 139
Dialed numbers 176
Digital coverage area for
navigation 130
Dimensions 209Dimming mirrors 52
Dipstick, engine oil 190
Direction
Ð arrow 138
Ð to destination 137
Ð voice instructions 140
Directional indicators, refer
to Turn signal
indicators 71
Disc brakes 125
Displacement 208
Display
Ð computer 22
Ð Control Center 22
Display, refer to Control
Display 19
Display format and units of
measure in Control
Display, changing 91
Display illumination 103
Display lighting, refer to
Instrument lighting 103
Displays 14
Distance 88
Distance tempomat
Ð refer to Active cruise
control 75
Distance to destination 88
Distance warning 93
"Dolby..." for audio
operation 159
Door keys 34
Door mirrors
Ð automatic dimming 52
Doors
Ð child-safety lock 59
Ð locking and unlocking 35
Ð manual operation 37
Ð remote control 35
DOT Quality Grades 186
Draft-free ventilation 108
Drink holders, refer to
Beverage holders 118
Driving stability
control 94, 96
Driving tips 124
"DSC" 95
DSC Dynamic Stability
Control 94
Page 218 of 229
Everything from A to Z
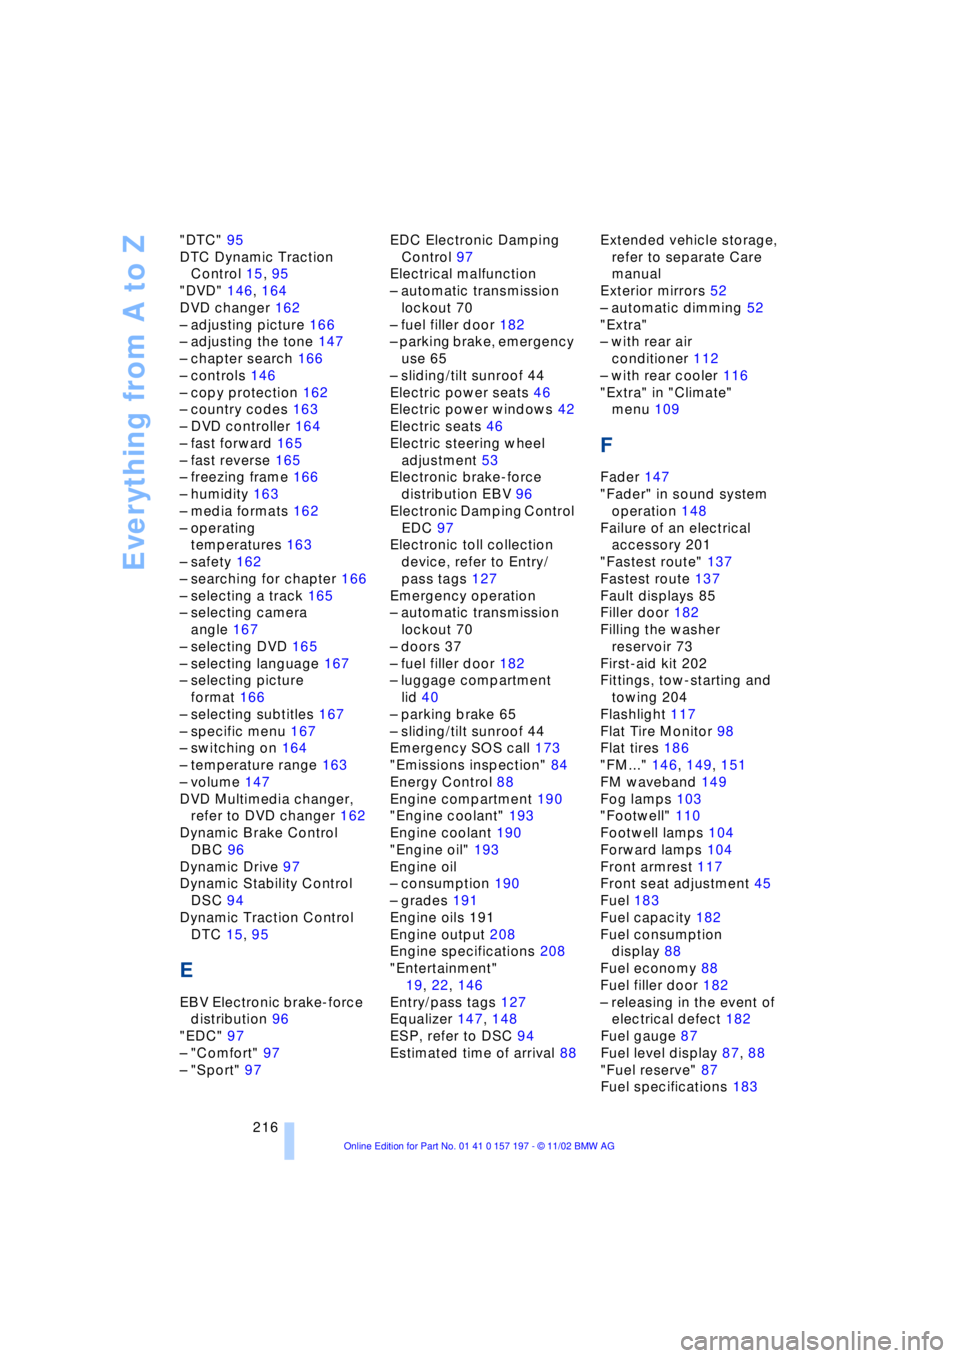
216 "DTC" 95
DTC Dynamic Traction
Control 15, 95
"DVD" 146, 164
DVD changer 162
Ð adjusting picture 166
Ð adjusting the tone 147
Ð chapter search 166
Ð controls 146
Ð copy protection 162
Ð country codes 163
Ð DVD controller 164
Ð fast forward 165
Ð fast reverse 165
Ð freezing frame 166
Ð humidity 163
Ð media formats 162
Ð operating
temperatures 163
Ð safety 162
Ð searching for chapter 166
Ð selecting a track 165
Ð selecting camera
angle 167
Ð selecting DVD 165
Ð selecting language 167
Ð selecting picture
format 166
Ð selecting subtitles 167
Ð specific menu 167
Ð switching on 164
Ð temperature range 163
Ð volume 147
DVD Multimedia changer,
refer to DVD changer 162
Dynamic Brake Control
DBC 96
Dynamic Drive 97
Dynamic Stability Control
DSC 94
Dynamic Traction Control
DTC 15, 95
E
EBV Electronic brake-force
distribution 96
"EDC" 97
Ð "Comfort" 97
Ð "Sport" 97EDC Electronic Damping
Control 97
Electrical malfunction
Ð automatic transmission
lockout 70
Ð fuel filler door 182
Ð parking brake, emergency
use 65
Ð sliding/tilt sunroof 44
Electric power seats 46
Electric power windows 42
Electric seats 46
Electric steering wheel
adjustment 53
Electronic brake-force
distribution EBV 96
Electronic Damping Control
EDC 97
Electronic toll collection
device, refer to Entry/
pass tags 127
Emergency operation
Ð automatic transmission
lockout 70
Ð doors 37
Ð fuel filler door 182
Ð luggage compartment
lid 40
Ð parking brake 65
Ð sliding/tilt sunroof 44
Emergency SOS call 173
"Emissions inspection" 84
Energy Control 88
Engine compartment 190
"Engine coolant" 193
Engine coolant 190
"Engine oil" 193
Engine oil
Ð consumption 190
Ð grades 191
Engine oils 191
Engine output 208
Engine specifications 208
"Entertainment"
19, 22, 146
Entry/pass tags 127
Equalizer 147, 148
ESP, refer to DSC 94
Estimated time of arrival 88Extended vehicle storage,
refer to separate Care
manual
Exterior mirrors 52
Ð automatic dimming 52
"Extra"
Ð with rear air
conditioner 112
Ð with rear cooler 116
"Extra" in "Climate"
menu 109
F
Fader 147
"Fader" in sound system
operation 148
Failure of an electrical
accessory 201
"Fastest route" 137
Fastest route 137
Fault displays 85
Filler door 182
Filling the washer
reservoir 73
First-aid kit 202
Fittings, tow-starting and
towing 204
Flashlight 117
Flat Tire Monitor 98
Flat tires 186
"FM..." 146, 149, 151
FM waveband 149
Fog lamps 103
"Footwell" 110
Footwell lamps 104
Forward lamps 104
Front armrest 117
Front seat adjustment 45
Fuel 183
Fuel capacity 182
Fuel consumption
display 88
Fuel economy 88
Fuel filler door 182
Ð releasing in the event of
electrical defect 182
Fuel gauge 87
Fuel level display 87, 88
"Fuel reserve" 87
Fuel specifications 183