2003 BMW 540I SEDAN wheel bolts
[x] Cancel search: wheel boltsPage 137 of 187
137n
OverviewControlsMaintenanceRepairsDataIndex
Tire replacement Wheel and tire combinationsUniform Tire Quality GradingQuality grades can be found where
applicable on the tire sidewall between
tread shoulder and maximum section
width. For example:
Treadwear 200 Traction AA
Temperature A
Do not use retreaded tires, since
driving safety may be impaired.
This is due to the possible variations in
casing structures and, in some cases,
to their extreme age, which can lead to
a decrease in their durability.< Tire ageThe date on which the tire was manu-
factured is indicated by the code on the
sidewall:
DOT ... 2601 indicates that the tire was
manufactured in Week 26 of the year
2001.
Although tires may have a theoretical
service life of up to 10 years, BMW
strongly recommends that you replace
all tires after an absolute maximum of
6 years.
The right choice
Never mount wheels and tires that
have not been specifically
approved by BMW for use on your par-
ticular model. Although other wheels
and tires may theoretically have the
same dimensions, variations in factors
such as manufacturing tolerances can
result in contact between tire and body-
work, ultimately leading to serious acci-
dents. If non-approved wheels and tires
are used, BMW cannot evaluate their
suitability, and therefore cannot be held
liable for driving safety.<
BMW has tested certain tires for each
tire size, rated them according to road
safety and approved them. Your BMW
center can inform you which tires have
been tested in this way. Observe pos-
sible national guidelines, e.g. regarding
entry into vehicle documents.
The correct wheel and tire combi-
nation affects different systems
such as ABS, ATC, ASC+T/DSC.
The function of these systems is
impaired if improper wheel and tire
combinations are used.
Always ensure that all of the tires
mounted on the vehicle are the same
series, from the same manufacturer and
with the same tread pattern. If you have
to mount the spare tire in response to a
flat tire, etc., you should remount a tire
of the correct specifications as soon as
possible.<
The use of rims and wheel bolts
that do not meet the specifica-
tions of the original factory-installed
equipment will affect the safe operation
of your vehicle and may cause an acci-
dent and personal injury.
Never mix tires of different design, such
as steel-belted radials with radial bias-
belted or bias-ply tires, etc. Mixing tire
types will adversely affect roadholding
and can lead to loss of vehicle con-
trol.< Storage Store tires in a cool, dry place, pro-
tecting them against light whenever
possible. Protect the tires against con-
tact with oil, grease and fuel.
Page 160 of 187
160n
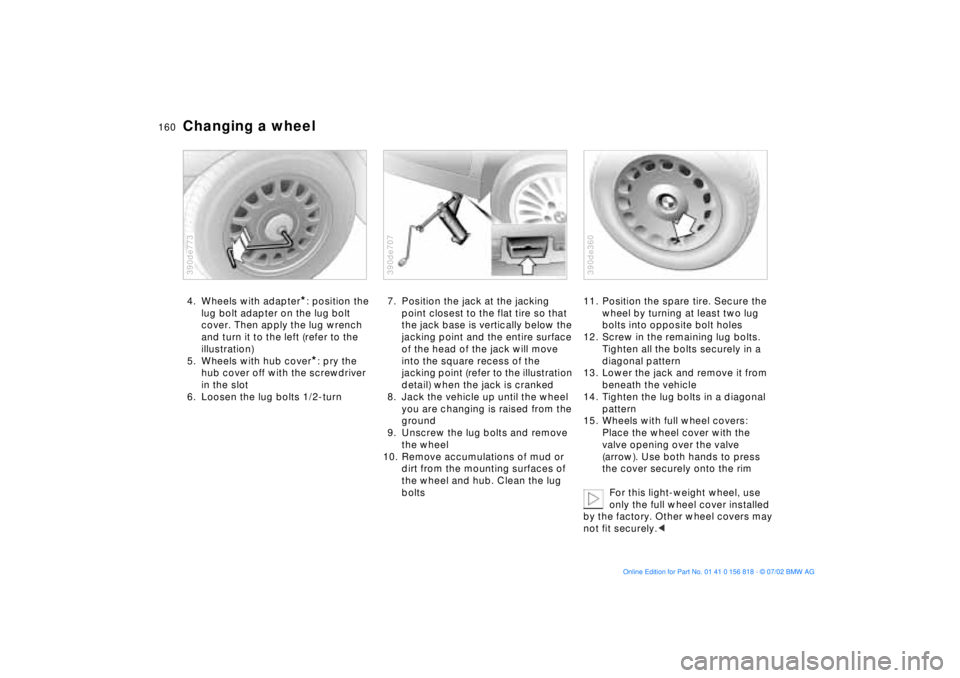
Changing a wheel4. Wheels with adapter
*: position the
lug bolt adapter on the lug bolt
cover. Then apply the lug wrench
and turn it to the left (refer to the
illustration)
5. Wheels with hub cover*: pry the
hub cover off with the screwdriver
in the slot
6. Loosen the lug bolts 1/2-turn
390de773
7. Position the jack at the jacking
point closest to the flat tire so that
the jack base is vertically below the
jacking point and the entire surface
of the head of the jack will move
into the square recess of the
jacking point (refer to the illustration
detail) when the jack is cranked
8. Jack the vehicle up until the wheel
you are changing is raised from the
ground
9. Unscrew the lug bolts and remove
the wheel
10. Remove accumulations of mud or
dirt from the mounting surfaces of
the wheel and hub. Clean the lug
bolts390de707
11. Position the spare tire. Secure the
wheel by turning at least two lug
bolts into opposite bolt holes
12. Screw in the remaining lug bolts.
Tighten all the bolts securely in a
diagonal pattern
13. Lower the jack and remove it from
beneath the vehicle
14. Tighten the lug bolts in a diagonal
pattern
15. Wheels with full wheel covers:
Place the wheel cover with the
valve opening over the valve
(arrow). Use both hands to press
the cover securely onto the rim
For this light-weight wheel, use
only the full wheel cover installed
by the factory. Other wheel covers may
not fit securely.< 390de360
Page 161 of 187

161n
OverviewControlsMaintenanceRepairsDataIndex
Changing a wheel16. Wheels with hub covers:
Position the hub cover and press it
on tightly
17. If equipped with lug bolt covers:
Align the arrow on the cover with
the line in the wheel and press the
cover into place
18. Check and correct the tire inflation
pressure at the earliest opportunity.
For vehicles with Tire Pressure
Monitor (RDC)
*:
After mounting the spare tire or cor-
recting the inflation pressure, reac-
tivate the system. Refer to
page 101.
The vehicle jack is designed for
changing wheels only. Do not
attempt to raise another vehicle model
with it or to raise any load of any kind.
To do so could cause accidents and
personal injury.
To ensure continued safety, have the
lug bolts checked with a calibrated
torque wrench [torque specification
72 lb-ft (100 Nm)] at the earliest
opportunity.<
When storing the wheel, take care to
ensure that you do not damage the
retaining pin in the spare tire recess.
If light-alloy wheels other than original
BMW light-alloy wheels have been
mounted, it may be necessary to use
different lug bolts for those wheels.
Replace the defective tire as soon as
possible and have the new wheel/tire
balanced.
Protect valve inserts against dirt using
screw-on valve stem caps. Dirty valve
stems frequently lead to slow pressure
loss.
Size 255/40 R17 94 W
* tires on
the rear axle:
In the event of a flat tire, it may be nec-
essary to mount the spare tire of dif-
ferent size at the rear. This tire is suit-
able for use in all load and speed
ranges. Nevertheless, you should
remount a tire of the correct size as
soon as possible.<
Page 181 of 187
Everything from A to Z
181n
OverviewControlsMaintenanceRepairsDataIndex
Instrument displays15
Instrument lighting104
Instruments15
Intensive cleaning141
Interior lamps105
Interior mirrors58
Interior motion sensor42
avoiding unintentional
alarms44
deactivate35
Interior rearview mirror57
automatic dimmer58
Interlock68 J
Jack159
Jump-starting164t K
Key Memory67
Key with remote control32
Keys32
Kickdown73, 76 L
Lamp switch103
Lamps and bulbs153t
Lashing eyes to secure the
load128
Length of vehicle171 Level control
system21, 101
License plate lamps
bulb replacement158t
Lighter120
LIGHTS ON warning103
LIMIT93
Load-securing devices128
Louvers106, 109
Low beams103
bulb replacement153t
Low-fuel warning lamp83
Lug bolts160
Lug wrench159t
Luggage
compartment38, 42, 125
capacity173
manual operation38t
Luggage compartment
lid38
electrical malfunction38
emergency release from
luggage compartment's
interior41
opening from the
outside39
opening separately38
remote control35
secure separately38
Luggage compartment's
interior, emergency
release41 Luggage net42
Luggage straps42
Lumbar support50
M
M+S tires138
Maintenance84, 146t
Malfunction displays85t
Manual operation
doors33
fuel filler door24
luggage compartment
lid38
sliding/tilt sunroof47
tailgate39
Manual transmission71
Manually controlled
recirculated-air112
Manually-adjusted seat49
Master key32
Maximum cooling112
Memory settings
for seat, mirror and
steering wheel54
related to individuals ("Key
Memory")67
related to the vehicle
("Vehicle Memory")67
Microfilter108, 114
MID (Multi-Information
Display)89 Mirrors57
adjusting57
automatic dimming
feature58
defrosting57
memory setting54
Modifications,
technical9, 147
Monitoring inflation
pressure, tires101
Moonroof47
Multifunction buttons,
steering wheel22
Multi-Information Display
(MID)89
N
Non-smoker's
equipment120 O
OBD interface socket148
Odometer16, 82
Oil additives142
Oil change interval, refer to
the Service and Warranty
Information Booklet (US
models) or to the Warranty
and Service Guide Booklet
(Canadian models)
Oil consumption142