Page 105 of 166
105
Ashtray, rear*To emptyPress on the edge of the raised cover to
open – see arrow: the ashtray moves up
and can be removed.
OverviewControlsMaintenanceRepairsDataIndex
Page 106 of 166
106Loading and transporting
Through-loading system*1. Pull the corresponding lever to
release – see arrow
2. The backrest moves forward slightly
when released. Reach into the gap
and fold it down.
When folding the backrest back
into its original position always
ensure that the detent engages
securely. A loose backrest might fail to
prevent cargo from entering the pas-
senger compartment during sudden
braking or evasive maneuvers, posing a
potential hazard to occupants.<
The fittings at the corners of the lug-
gage compartment provide you with a
convenient means of attaching luggage
nets* and flexible straps for securing
luggage.
Refer also to Cargo loading on
page 108.
Rear center 3-point safety belt*You can roll up the rear 3-point belt
before folding back the through-loading
system:
>Release the belt and insert its latch in
the recess provided for this purpose
in the rear tray – see arrow.
Page 107 of 166

107
Ski bag*The ski bag allows the safe and clean
transport of up to 4 pairs of standard
skis or up to two snowboards.
The length of the ski bag and the addi-
tional space provided in the luggage
compartment make it possible to carry
skis up to 6 ft 10 in / 2.10 m long.
Because of the tapered shape of the
bag, only two pairs of skis longer than
6 ft 10 in / 2.10 m can be carried.
LoadingVehicles without through-loading sys-
tem:
1. Fold the center armrest outward.
Loosen the trim from the upper
Velcro® fastener and place it on the
armrest
2. Press the button – see arrow 1, from
inside the passenger compartment:
this releases the cover panel in the
luggage compartment
3. Press the detent levers inward – see
arrows 2 – and fold the cover to the
front
4. Extend the ski bag between the front
seats. The zipper provides conve-
nient access to stored items. It may
be opened to allow the ski bag to dry
5. Use the magnetic retainers to attach
the cover panel to the upper surface
– metal surface below rear tray – of
the luggage compartment.
To store the ski bag, perform the above
steps in reverse sequence.
OverviewControlsMaintenanceRepairsDataIndex
Page 108 of 166

108
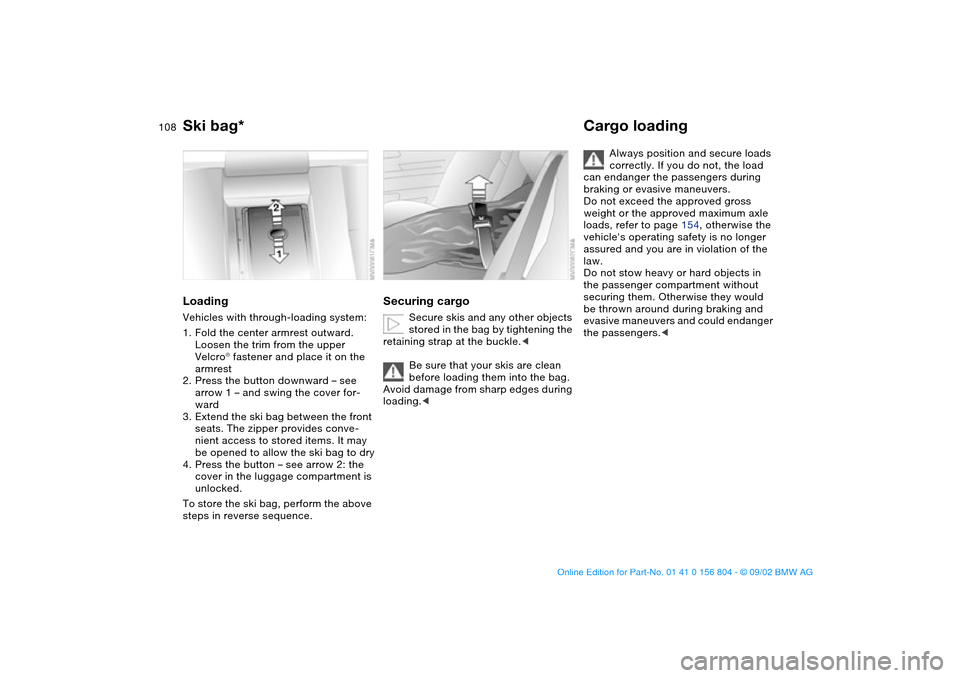
LoadingVehicles with through-loading system:
1. Fold the center armrest outward.
Loosen the trim from the upper
Velcro® fastener and place it on the
armrest
2. Press the button downward – see
arrow 1 – and swing the cover for-
ward
3. Extend the ski bag between the front
seats. The zipper provides conve-
nient access to stored items. It may
be opened to allow the ski bag to dry
4. Press the button – see arrow 2: the
cover in the luggage compartment is
unlocked.
To store the ski bag, perform the above
steps in reverse sequence.
Securing cargo
Secure skis and any other objects
stored in the bag by tightening the
retaining strap at the buckle.<
Be sure that your skis are clean
before loading them into the bag.
Avoid damage from sharp edges during
loading.<
Cargo loading
Always position and secure loads
correctly. If you do not, the load
can endanger the passengers during
braking or evasive maneuvers.
Do not exceed the approved gross
weight or the approved maximum axle
loads, refer to page 154, otherwise the
vehicle's operating safety is no longer
assured and you are in violation of the
law.
Do not stow heavy or hard objects in
the passenger compartment without
securing them. Otherwise they would
be thrown around during braking and
evasive maneuvers and could endanger
the passengers.<
Ski bag*
Page 109 of 166
109
Stowing cargo>Load heavy cargo as far forward as
possible – directly behind the back-
rests or the luggage compartment
partition – and as low as possible
>Cover sharp edges and corners
>Do not pile objects higher than the
top edge of the backrest
>For transporting very heavy loads
when the rear seat is not occupied,
secure the outer safety belts in the
opposite buckles, refer to the illustra-
tion.
Securing cargo>For small, light items, use the rubber-
lined, non-skid side of the floor mat
or secure using the luggage compart-
ment net* or elastic straps, refer to
page 37
>For large, heavy pieces, see your
BMW center for load-securing
devices*. Lashing fittings located in
the luggage compartment can be
used for fastening the load-securing
devices; see arrow.
Read and comply with the instructions
enclosed with the load-securing
devices.
Cargo loading
OverviewControlsMaintenanceRepairsDataIndex
Page 110 of 166

110
Roof-mounted luggage rack*A special roof-rack system is available
as an optional extra for your BMW.
Please observe the precautions
included with the installation instruc-
tions.AnchoragesAccess to the anchorages:
To fold up the cover – see arrow –
please use the tool provided with the
roof-rack system.Loading and driving notesRoof-mounted luggage racks raise the
center of gravity of the vehicle when
they are loaded. For this reason, they
exercise a major effect on the vehicle's
handling and steering response.
You should therefore always remember
not to exceed the approved roof load
capacity, the approved gross vehicle
weight or the axle loads when loading
the rack. These weights are listed under
Technical data on page 154.
Make sure that the load is not too
heavy, and attempt to distribute it
evenly. Always load the heaviest pieces
first so that they are at the bottom. Be
sure that adequate clearance is main-
tained for raising the sliding/tilt sunroof,
and that objects do not project into the
opening path of the luggage compart-
ment lid.
Secure the roof-mounted luggage cor-
rectly and securely to prevent it from
shifting or being lost during driving.
Drive smoothly and avoid sudden
acceleration and braking. Do not corner
at high speeds.
The roof-mounted luggage rack and the
roof load increase the aerodynamic
resistance: increased fuel consumption
and additional stress on the vehicle's
body are the result.
Page 111 of 166
111
OverviewControlsMaintenanceRepairsDataIndex
Page 112 of 166