2003 BMW 325Ci brake light
[x] Cancel search: brake lightPage 123 of 178
123
Driving notes
Brakes: do not drive with your foot
resting on the brake pedal. Even
light but consistent pedal pressure can
lead to high temperatures, brake wear
and possibly even brake failure.
Hydroplaning: when driving on wet or
slushy roads, reduce vehicle speed. If
you do not, a wedge of water may form
between the tires and the road surface.
This phenomenon can lead to partial or
complete loss of contact between the
tires and road surface, as well as loss of
vehicle control and braking ability.
Driving through water: do not drive
through water on the road if it is deeper
than 1 ft/30 cm, and then only at walk-
ing speed. Otherwise, the vehicle's
engine, the electrical systems and the
transmission may be damaged.
Clothes hooks, with hardtop: when
hanging clothing from the hooks, be
sure that they will not obstruct the
driver's vision. Do not hang heavy
objects on the hooks. If you do so, they
could cause personal injury during
braking or evasive maneuvers.<
Antilock Brake System (ABS)The conceptABS keeps the wheels from locking
during braking, thereby enhancing
active driving safety.Braking with ABSIf you are in a situation that requires full
braking, you will exploit the full benefits
of ABS system if you apply maximum
pedal pressure – panic stop.
Since the vehicle maintains steering
responsiveness, you can avoid possible
obstacles with a minimum of steering
effort, despite the full brake application.
Pulsation at the brake pedal combined
with sounds from the hydraulic circuits
indicates to the driver that ABS is in its
active mode.Dynamic Brake Control (DBC)DBC is included in the DSC, refer to
page 90. The system responds to sud-
den, high-intensity applications of force
to the brake pedal by automatically
braking the vehicle with maximum
boost to achieve the shortest possible
braking distances during panic stops.
This system also exploits the benefits of
ABS. Do not reduce the pressure exerted against the brake pedal until
the braking maneuver has been com-
pleted. DBC is deactivated when you
release the brake pedal.
Cornering Brake Control (CBC)CBC is an advanced engineering devel-
opment of ABS. When braking during
cornering with high lateral accelera-
tion, or when braking during a lane
change, vehicle stability is improved
and the steering response is enhanced.
OverviewControlsMaintenanceRepairsDataIndex
handbook.book Page 123 Wednesday, July 31, 2002 9:29 AM
Page 124 of 178
124
Brake systemBrake fluid levelIf the brake fluid level is too low and
brake pedal travel has become longer,
there may be a defect in one of the
brake system's hydraulic circuits.
Proceed to the nearest autho-
rized BMW center. It may be nec-
essary to apply higher levels of pres-
sure to the pedal when stopping and
braking distances may also be longer.
Please remember to adapt your driving
style accordingly.
and operating conditions in which brak-
ing is restricted to gentle, low-pressure
applications will all increase the ten-
dency for corrosion to form on the
rotors; this is often accompanied by a
simultaneous accumulation of contami-
nation on the brake pads. The pads
must exert a certain minimal level of
pressure against the rotors for the disc
brakes' inherent self-cleaning effect to
remain effective.
If the brake rotors are corroded, they
will tend to respond to braking with a
pulsating effect that even extended
brake applications will fail to cure.
When driving in heavy rain and on wet
roads it is useful to apply light pressure
to the brake pedal every few miles.
Monitor traffic conditions to ensure that
this maneuver does not pose a hazard
to you or to other road users. The heat
generated in this process helps dry the
pads and rotors to ensure that your
brake system will respond with undi-
minished efficiency when you need it.
When descending steep hills and
extended grades, downshift to a gear
that will allow you to continue safely
with only a minimal amount of braking.
By minimizing the loads placed on the
brake system, this strategy helps
ensure that optimal brake system
response will remain available at all
times. Use care to avoid exceeding the
approved engine-speed range, refer to
page 81.
Do not coast with the clutch
depressed or with the transmis-
sion or selector lever in Neutral. Do not
coast with the engine shut off. The
engine provides no braking effect when
the clutch is depressed and there is no
power-assist for braking or steering
when the engine is not running.
Never allow floor mats, carpets or any
other objects to protrude into the area
around the accelerator, clutch and
brake pedals and obstruct their move-
ment.
brake pads that BMW has
released for your particular vehicle
model. BMW cannot evaluate non-
approved brake pads to determine if
they are suitable for use, and therefore
cannot ensure the operating safety of
the vehicle if they are installed.<
handbook.book Page 124 Wednesday, July 31, 2002 9:29 AM
Page 149 of 178
149
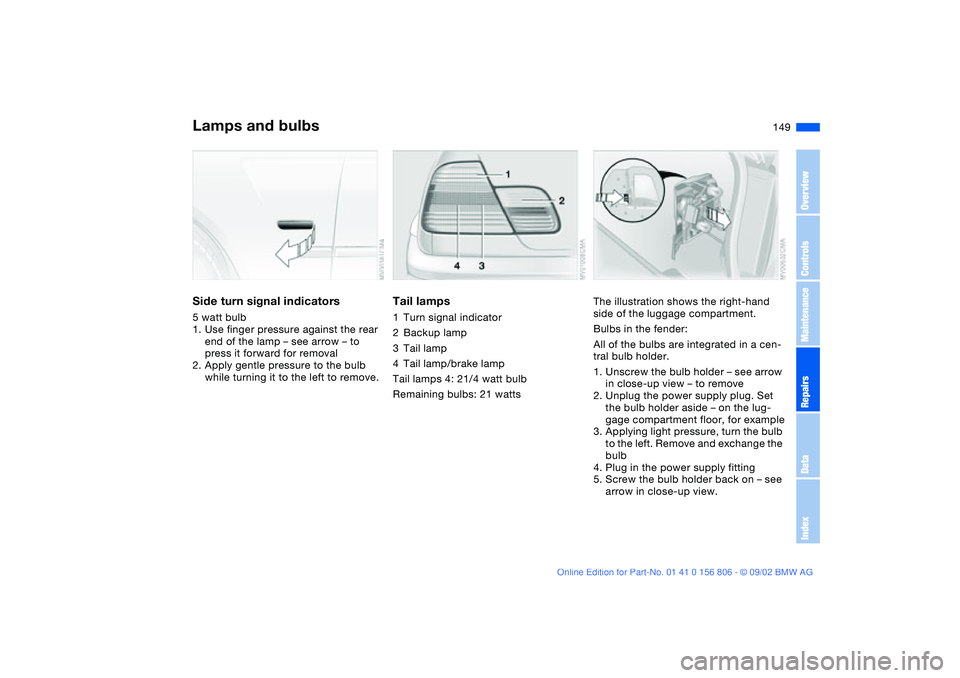
Side turn signal indicators5 watt bulb
1. Use finger pressure against the rear
end of the lamp – see arrow – to
press it forward for removal
2. Apply gentle pressure to the bulb
while turning it to the left to remove.
Tail lamps1Turn signal indicator
2Backup lamp
3Tail lamp
4Tail lamp/brake lamp
Tail lamps 4: 21/4 watt bulb
Remaining bulbs: 21 watts
The illustration shows the right-hand
side of the luggage compartment.
Bulbs in the fender:
All of the bulbs are integrated in a cen-
tral bulb holder.
1. Unscrew the bulb holder – see arrow
in close-up view – to remove
2. Unplug the power supply plug. Set
the bulb holder aside – on the lug-
gage compartment floor, for example
3. Applying light pressure, turn the bulb
to the left. Remove and exchange the
bulb
4. Plug in the power supply fitting
5. Screw the bulb holder back on – see
arrow in close-up view.
Lamps and bulbs
OverviewControlsMaintenanceRepairsDataIndex
handbook.book Page 149 Wednesday, July 31, 2002 9:29 AM
Page 150 of 178
150
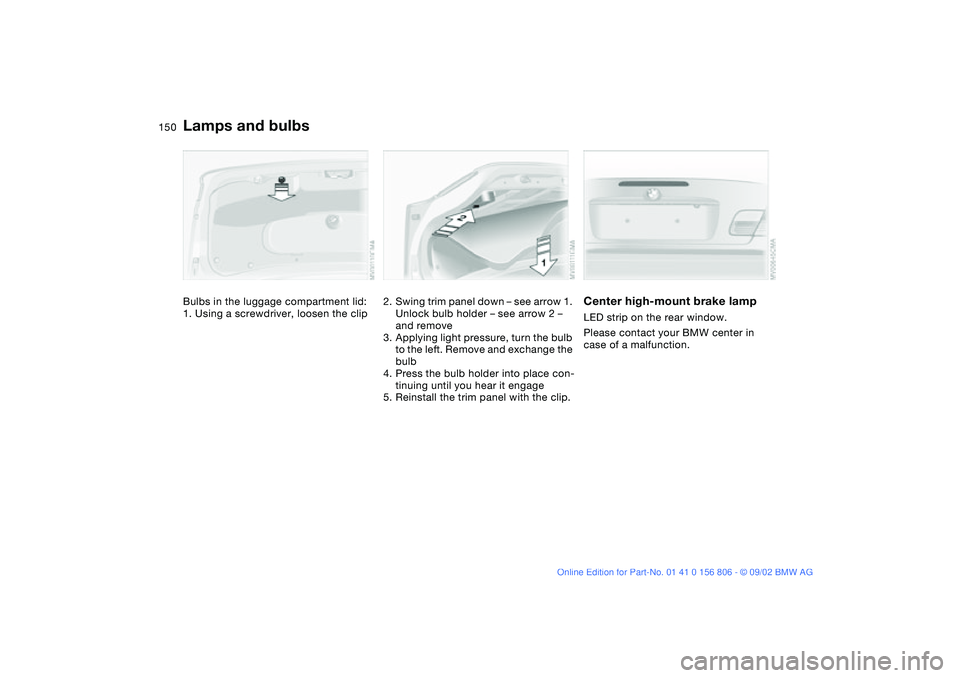
Bulbs in the luggage compartment lid:
1. Using a screwdriver, loosen the clip
2. Swing trim panel down – see arrow 1.
Unlock bulb holder – see arrow 2 –
and remove
3. Applying light pressure, turn the bulb
to the left. Remove and exchange the
bulb
4. Press the bulb holder into place con-
tinuing until you hear it engage
5. Reinstall the trim panel with the clip.
Center high-mount brake lampLED strip on the rear window.
Please contact your BMW center in
case of a malfunction.
Lamps and bulbs
handbook.book Page 150 Wednesday, July 31, 2002 9:29 AM
Page 155 of 178
155
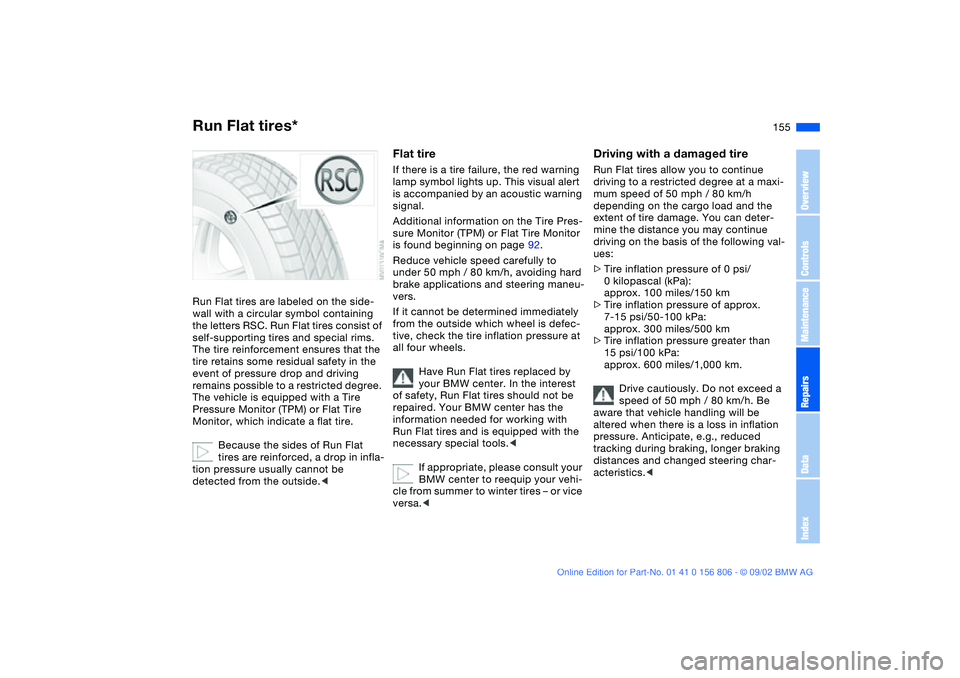
Run Flat tires*Run Flat tires are labeled on the side-
wall with a circular symbol containing
the letters RSC. Run Flat tires consist of
self-supporting tires and special rims.
The tire reinforcement ensures that the
tire retains some residual safety in the
event of pressure drop and driving
remains possible to a restricted degree.
The vehicle is equipped with a Tire
Pressure Monitor (TPM) or Flat Tire
Monitor, which indicate a flat tire.
Because the sides of Run Flat
tires are reinforced, a drop in infla-
tion pressure usually cannot be
detected from the outside.<
Flat tireIf there is a tire failure, the red warning
lamp symbol lights up. This visual alert
is accompanied by an acoustic warning
signal.
Additional information on the Tire Pres-
sure Monitor (TPM) or Flat Tire Monitor
is found beginning on page 92.
Reduce vehicle speed carefully to
under 50 mph / 80 km/h, avoiding hard
brake applications and steering maneu-
vers.
If it cannot be determined immediately
from the outside which wheel is defec-
tive, check the tire inflation pressure at
all four wheels.
Have Run Flat tires replaced by
your BMW center. In the interest
of safety, Run Flat tires should not be
repaired. Your BMW center has the
information needed for working with
Run Flat tires and is equipped with the
necessary special tools.<
If appropriate, please consult your
BMW center to reequip your vehi-
cle from summer to winter tires – or vice
versa.<
Driving with a damaged tireRun Flat tires allow you to continue
driving to a restricted degree at a maxi-
mum speed of 50 mph / 80 km/h
depending on the cargo load and the
extent of tire damage. You can deter-
mine the distance you may continue
driving on the basis of the following val-
ues:
>Tire inflation pressure of 0 psi/
0 kilopascal (kPa):
approx. 100 miles/150 km
>Tire inflation pressure of approx.
7-15 psi/50-100 kPa:
approx. 300 miles/500 km
>Tire inflation pressure greater than
15 psi/100 kPa:
approx. 600 miles/1,000 km.
Drive cautiously. Do not exceed a
speed of 50 mph / 80 km/h. Be
aware that vehicle handling will be
altered when there is a loss in inflation
pressure. Anticipate, e.g., reduced
tracking during braking, longer braking
distances and changed steering char-
acteristics.<
OverviewControlsMaintenanceRepairsDataIndex
handbook.book Page 155 Wednesday, July 31, 2002 9:29 AM
Page 169 of 178
Everything from A to Z
169
Car wash, refer to the Caring
for your vehicle brochure
Cargo loading 116
Cassette player operation,
refer to the Owner's Man-
ual for Radio
CBC Cornering Brake
Control 123
indicator lamp 19
CD player operation, refer to
the Owner's Manual for
Radio
Cellular phone 113
Center armrest 112
Center high-mount brake
lamp 150
Central locking system 30
button 34
Changing a wheel 151
Check Control 83
Check Filler Cap
indicator lamp 19
Checking coolant level 138
Checking oil level 136
Child seats 63
integrated 61
Child-restraint mounting
system (LATCH) 66
Child-restraint system 63
Cigarette lighter 113
Clean headlamps 79Cleaning position, convert-
ible top 45, 50
Cleaning windshield 79
Clock 84
setting 84
Cockpit 14
Code, refer to the Owner's
Manual for Radio
Coin box 113
Compartments 112
Compression ratio 162
Computer 85
Condensation
removing from windows
103, 106
Consumption
display 82
fuel 86
Convertible top
cleaning position 45, 50
closing in an
emergency 48
electrical fault 48
Convertible top activation
fully automatic top 46
manual top 41
Convertible top compart-
ment panel, folding
down 37
Coolant 134, 138, 165
indicator lamp 19
Cooling system 165Copyright 4
Cornering Brake Control
(CBC) 123
indicator lamp 19
Cruise control 79
indicator lamp 20
Cup holder, see Beverage
holder 113
Curb weight 164
Cushion height 163
D
Data
dimensions 163
engine 162
technical 162
weights 164
Daytime driving lamps 96
DBC Dynamic Brake
Control 123
warning lamp 19
Defrost position 103, 106
Defrosting rear window
102, 107
Defrosting windows
103, 106
Digital clock 84
Dimensions 163
Dipstick, engine oil 136
Disc brakes 124
Displacement 162
Display lighting 97Displays 16
Distance warning PDC 87
Door key 30
Door lock buttons 34
Doors
emergency operation 33
manual operation 33
remote control 31
unlocking and locking
31, 33
Driving notes
braking 123
disc brakes 124
general information 123
hydroplaning 123
DSC Dynamic Stability
Control 90
indicator lamp 19
DTC Dynamic Traction
Control 90
Dynamic Brake Control
(DBC) 123
warning lamps 19
Dynamic Stability Control
(DSC) 90
indicator lamp 19
Dynamic Traction Control
(DTC) 90
E
Electric power windows 40
OverviewControlsMaintenanceRepairsDataIndex
handbook.book Page 169 Wednesday, July 31, 2002 9:29 AM
Page 170 of 178
Everything from A to ZElectrical accessories, fail-
ure 156
Electrical malfunction
convertible top 48
doors 33
fuel filler door 24
Emergency operation
closing the convertible
top 48
doors 33
fuel filler door 24
Emergency release
luggage compartment
lid 36
Emissions, minimum, refer
to Energy control 81
Energy control 81
Engine
displacement 162
power output 162
starting 70
switching off 72
torque 162
Engine compartment 134
Engine coolant 165
adding 138
temperature gauge 82
Engine data 162
Engine electronics
warning lamp 19Engine oil
adding 134, 136
capacity 165
consumption 136
quality 137
viscosity 137
Engine oil level
check 134
indicator lamp 19
warning lamp 18
Engine oil pressure
warning lamp 18
Engine oil types 137
Engine speed 162
Entering the rear
rear entry aid 55
Environmentally-friendly
driving, refer to Energy
control 81
Exterior mirrors 59
Eyelet, towing 158
F
False alarm, avoiding 39
Fault displays 83
First-aid kit 23
Flashlight 109
Flat tire 127, 151
Flat Tire Monitor 93
indicator lamp 18, 19
Fog lamps 98
Follow me home lamps 96Footbrake 124
see Driving notes 123
Front fog lamps 98
indicator lamp 20
Front seat adjustment 52
Frost protection
radiator 138
Fuel 25
Fuel consumption 86
display 82
Fuel economy, refer to
Energy control 81
Fuel filler door 24
release following an elec-
trical malfunction 24
Fuel gauge 82
Fuel specifications 25
Fuel tank
capacity 165
display 82
gauge 82
Fuel-injection system 162
Fully automatic convertible
top 46
activation 46
opening, closing 47
Fuses 156
replacing 156
G
Garage-door opener 110Gasoline 25
gauge 82
Glove compartment 109
Grills 100, 104
Gross vehicle weight 164
H
Hands-free system 113
Hardtop 125
Hazard warning flashers 14
Hazard warning triangle 23
Head restraints 54
Headlamp flasher 97
Headlamp washer
reservoir 134
Headlamp washer system
136, 165
Headlamps 96
automatic control 96
Heated mirrors 59
Heated seats 58
Heavy loads 116
High beams 77, 97
indicator lamp 21
replacing bulb 147
Holder for beverages 113
Hood release 132
Horn 14
Hydraulic Brake assistant,
see DBC
Hydroplaning 123, 127
handbook.book Page 170 Wednesday, July 31, 2002 9:29 AM
Page 172 of 178

Everything from A to ZOil additives 137
Oil change intervals, refer to
the Service and Warranty
Information Booklet for US
models/Warranty and Ser-
vice Guide Booklet for
Canadian models
Oil consumption 136
Oil dipstick 136
Oil filter change 165
Oil level
checking 136
indicator lamp 19
warning lamp 18
Oil pressure
warning lamp 18
OIL SERVICE 83
Oil types 137
Onboard computer, refer to
the Owner's Manual for
Onboard Computer
Onboard tool kit 146
Opening and closing
from the inside 34
via the door lock 33
via the remote control 31
Operating elements 14
Outlets, ventilation 104
Outside temperature dis-
play 85P
Panic mode, trigger alarm
32
Park Distance Control
(PDC) 87
Parking aid 87
Parking brake 72
Parking lamps 96
replacing bulb 148
PDC Park Distance
Control 87
Pocket flashlight 109
Pollen 103, 108
Power output 162
Power seat 53
Pressure, tires 25, 92, 127
monitoring 92
R
Radiator 165
Radio, refer to the Owner's
Manual for Radio
Rain sensor 78
Range 86
Reading lamps
front 98
rear 98
Rear lamps 149
Rear window defroster
102, 107
Rearview mirror 59Recirculated-air mode
102, 107
Refueling 24
Remote control 31
Remote control keys 30
Replacement key 30, 31
Reporting safety defects 6
Reserve indicator lamp 82
Restraint system 63
Reverse 73
Rims 130
Rollover protection
system 67
indicator lamp 19
lowering 67
Roof load capacity 164
Roof-mounted luggage rack
118, 125
Run Flat tires 129, 155
S
Safe seating position 52
Safety belts 56
seat-integrated safety belt
system (SGS) 55
Seat
rear entry aid 55
Seat adjustment 52
lumbar support 53
thigh support 53
Seat heating 58
Seat memory 57Securing cargo 116
Securing child-restraint sys-
tem 65
Securing devices 117
Selector lever, automatic
transmission 74
Service and Warranty Infor-
mation Booklet 140
Service Engine Soon
warning lamp 19
Service interval display
83, 140
Setting
clock 84
Shiftlock 74
Side airbags 61
Side turn signal indicators
replacing bulb 149
Size 163
Ski bag 115
Snow chains 131
Socket 114
Spare key 30
Spare tire 151
Speedometer 16
Standing lamps 97
Starting problems 70
Starting the engine 70
Steering wheel lock 70
Steering wheel with multi-
function buttons 22
Steering wheel, adjusting 59
handbook.book Page 172 Wednesday, July 31, 2002 9:29 AM