2003 BMW 325Ci brake light
[x] Cancel search: brake lightPage 9 of 178

Contents
9
Passenger safety systems:
Airbags61
Transporting children safely63
Rollover protection system67
Vehicle Memory, Key
Memory69
Driving:
Ignition lock70
Starting the engine70
Switching off the engine72
Parking brake72
Manual transmission73
Automatic transmission with
Steptronic*74
Turn signal indicator/Headlamp
flasher77
Washer/wiper system/Rain
sensor*78
Cruise control*79
Everything under control:
Odometer81
Tachometer81
Energy control81
Fuel gauge82
Engine coolant temperature
gauge82
Service interval display83
Check Control83
Clock84
Computer85
Technology for safety and
driving convenience:
Park Distance Control (PDC)*87
Automatic Stability Control plus
Traction (ASC+T)*88
Dynamic Stability Control
(DSC)*90
Tire Pressure Monitor (TPM)*92
Flat Tire Monitor*93
Lamps:
Parking lamps/Low beams96
Instrument lighting97
High beams/Standing lamps97
Fog lamps*98
Interior lamps98
Controlling the climate for
pleasant driving:
Air conditioning100
Automatic climate control*104
Interior conveniences:
Glove compartment109
BMW Universal Transmitter*110
Storage compartments112
Cellular phone*113
Ashtray, front*113
Ashtray, rear*114
Loading and transporting:
Ski bag*115
Cargo loading116
Roof-mounted luggage rack for
the hardtop*118
Controls and features
handbook.book Page 9 Wednesday, July 31, 2002 9:29 AM
Page 18 of 178
18
Indicator and warning lamps
Technology that monitors itself
Indicator and warning lamps that are
identified by
●
are tested for proper
functioning whenever the ignition key is
turned. They each light up once for dif-
ferent periods of time.
If a fault should occur in one of these
systems, the corresponding lamp does
not go out after the engine is started, or
it lights up while the vehicle is moving.
You will see how to react in the follow-
ing section.
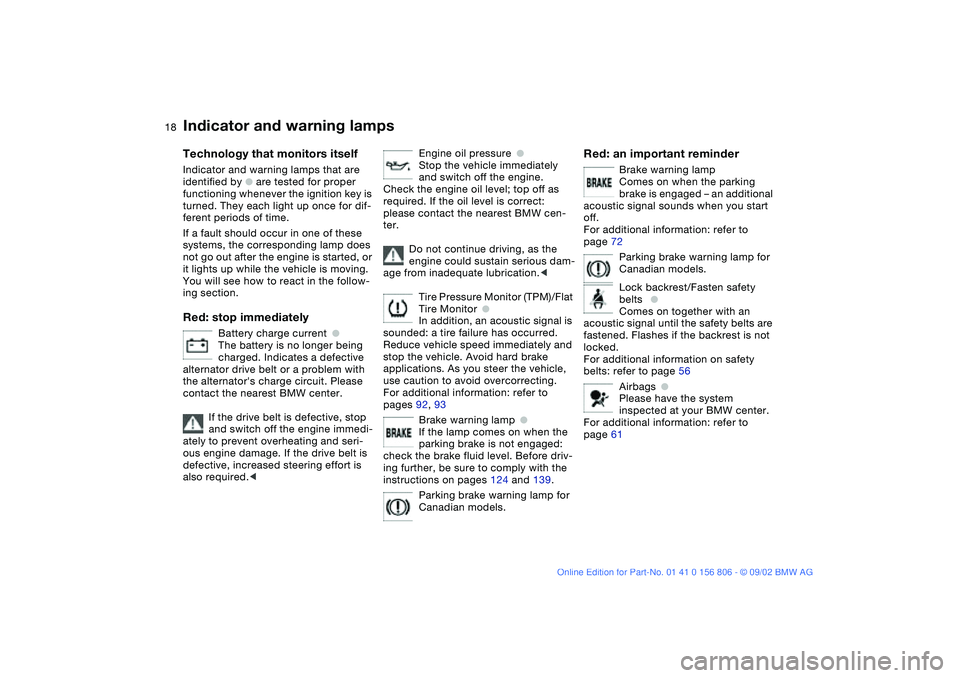
Red: stop immediately
Battery charge current
●
The battery is no longer being
charged. Indicates a defective
alternator drive belt or a problem with
the alternator's charge circuit. Please
contact the nearest BMW center.
If the drive belt is defective, stop
and switch off the engine immedi-
ately to prevent overheating and seri-
ous engine damage. If the drive belt is
defective, increased steering effort is
also required.
<
Engine oil pressure
●
Stop the vehicle immediately
and switch off the engine.
Check the engine oil level; top off as
required. If the oil level is correct:
please contact the nearest BMW cen-
ter.
Do not continue driving, as the
engine could sustain serious dam-
age from inadequate lubrication.
<
Tire Pressure Monitor (TPM)/Flat
Tire Monitor
●
In addition, an acoustic signal is
sounded: a tire failure has occurred.
Reduce vehicle speed immediately and
stop the vehicle. Avoid hard brake
applications. As you steer the vehicle,
use caution to avoid overcorrecting.
For additional information: refer to
pages 92, 93
Brake warning lamp
●
If the lamp comes on when the
parking brake is not engaged:
check the brake fluid level. Before driv-
ing further, be sure to comply with the
instructions on pages 124 and 139.
Parking brake warning lamp for
Canadian models.
Red: an important reminder
Brake warning lamp
Comes on when the parking
brake is engaged – an additional
acoustic signal sounds when you start
off.
For additional information: refer to
page 72
Parking brake warning lamp for
Canadian models.
Lock backrest/Fasten safety
belts
●
Comes on together with an
acoustic signal until the safety belts are
fastened. Flashes if the backrest is not
locked.
For additional information on safety
belts: refer to page 56
Airbags
●
Please have the system
inspected at your BMW center.
For additional information: refer to
page 61
handbook.book Page 18 Wednesday, July 31, 2002 9:29 AM
Page 70 of 178
70Driving
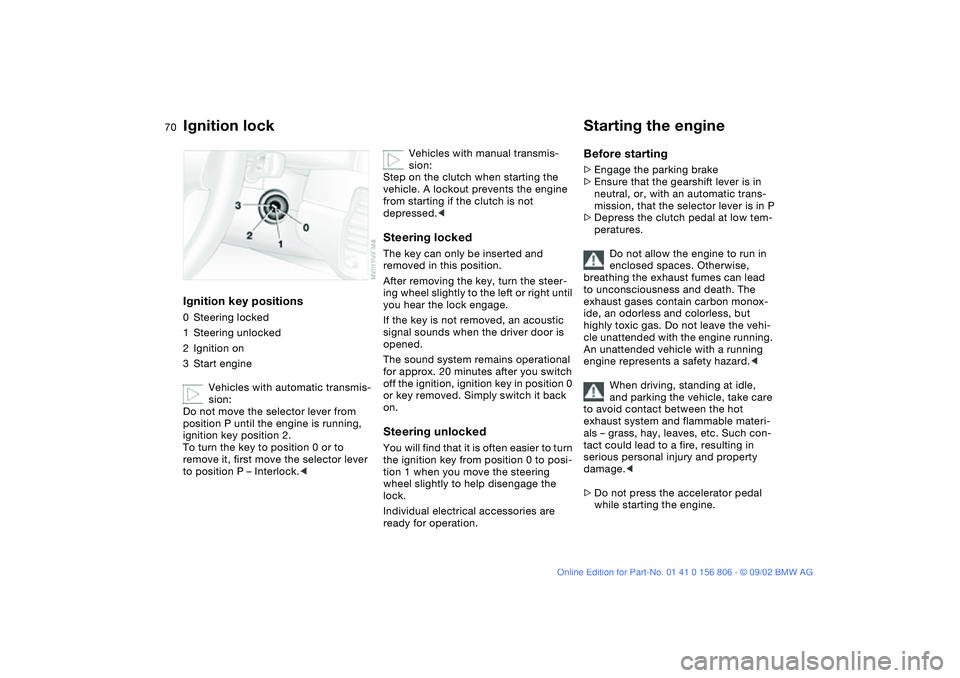
Ignition lockIgnition key positions0Steering locked
1Steering unlocked
2Ignition on
3Start engine
Vehicles with automatic transmis-
sion:
Do not move the selector lever from
position P until the engine is running,
ignition key position 2.
To turn the key to position 0 or to
remove it, first move the selector lever
to position P – Interlock.<
Vehicles with manual transmis-
sion:
Step on the clutch when starting the
vehicle. A lockout prevents the engine
from starting if the clutch is not
depressed.<
Steering lockedThe key can only be inserted and
removed in this position.
After removing the key, turn the steer-
ing wheel slightly to the left or right until
you hear the lock engage.
If the key is not removed, an acoustic
signal sounds when the driver door is
opened.
The sound system remains operational
for approx. 20 minutes after you switch
off the ignition, ignition key in position 0
or key removed. Simply switch it back
on.Steering unlockedYou will find that it is often easier to turn
the ignition key from position 0 to posi-
tion 1 when you move the steering
wheel slightly to help disengage the
lock.
Individual electrical accessories are
ready for operation.
Starting the engineBefore starting>Engage the parking brake
>Ensure that the gearshift lever is in
neutral, or, with an automatic trans-
mission, that the selector lever is in P
>Depress the clutch pedal at low tem-
peratures.
Do not allow the engine to run in
enclosed spaces. Otherwise,
breathing the exhaust fumes can lead
to unconsciousness and death. The
exhaust gases contain carbon monox-
ide, an odorless and colorless, but
highly toxic gas. Do not leave the vehi-
cle unattended with the engine running.
An unattended vehicle with a running
engine represents a safety hazard.<
When driving, standing at idle,
and parking the vehicle, take care
to avoid contact between the hot
exhaust system and flammable materi-
als – grass, hay, leaves, etc. Such con-
tact could lead to a fire, resulting in
serious personal injury and property
damage.<
>Do not press the accelerator pedal
while starting the engine.
handbook.book Page 70 Wednesday, July 31, 2002 9:29 AM
Page 72 of 178
72
Switching off the engineTurn the ignition key to position 1 or 0.
You should never remove the igni-
tion key when the vehicle is in
motion, as the steering lock could
engage.
When you leave the vehicle, always
remove the ignition key and engage the
steering lock.<
Vehicles with manual transmis-
sion:
Always engage the parking brake when
parking on slopes and inclined sur-
faces. Placing the lever in gear may not
provide adequate resistance to rolling.
Vehicles with automatic transmission:
place the selector lever in P.<
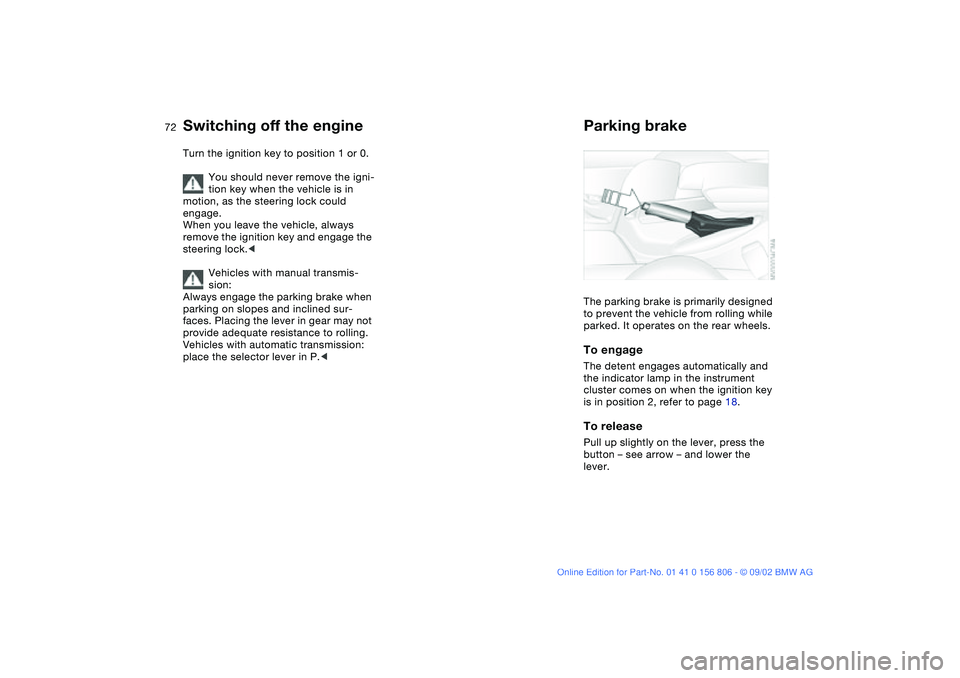
Parking brakeThe parking brake is primarily designed
to prevent the vehicle from rolling while
parked. It operates on the rear wheels.To engageThe detent engages automatically and
the indicator lamp in the instrument
cluster comes on when the ignition key
is in position 2, refer to page 18.To releasePull up slightly on the lever, press the
button – see arrow – and lower the
lever.
handbook.book Page 72 Wednesday, July 31, 2002 9:29 AM
Page 73 of 178
73
If exceptional circumstances
make it necessary to engage the
parking brake while the vehicle is in
motion, do not pull it with excessive
pressure. Keep your thumb pressed
against the release button while care-
fully pulling the lever up.
Excessive pressure can lead to over-
braking and loss of traction – fishtailing
– at the rear axle.
The brake lamps do not come on when
the parking brake is engaged.
Vehicles with manual transmission:
Always engage the parking brake when
parking on slopes and inclined sur-
faces. Placing the lever in gear may not
provide adequate resistance to rolling.
Vehicles with automatic transmission:
place the selector lever in P.<
To avoid corrosion and one-sided
braking, apply the parking brake
lightly from time to time when coasting
to a standstill – at a traffic signal, for
instance – provided that it is safe to do
so.<
Manual transmission
Do not hold the vehicle in place on
slopes by slipping or "riding" the
clutch. Use the parking brake instead.
Riding the clutch leads to severe and
premature clutch wear.<
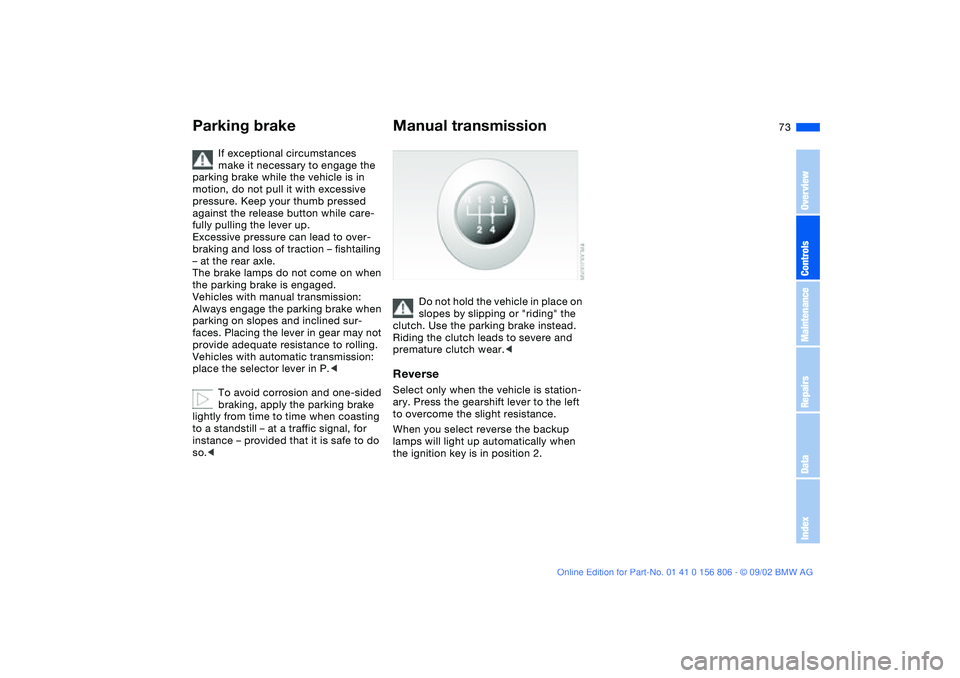
ReverseSelect only when the vehicle is station-
ary. Press the gearshift lever to the left
to overcome the slight resistance.
When you select reverse the backup
lamps will light up automatically when
the ignition key is in position 2.
Parking brake
OverviewControlsMaintenanceRepairsDataIndex
handbook.book Page 73 Wednesday, July 31, 2002 9:29 AM
Page 91 of 178
91
Under these special circumstances
traction is increased by deactivating the
control systems that enhance traction
under normal conditions.To switch DSC and ADB offHold the DSC button down for at least
3 seconds. The indicator lamp and the
yellow brake warning lamps light up
and remain on continuously.
The systems for enhancing stability and
traction are deactivated, and there is no
active braking intervention or torque
control.
To maintain vehicle stability,
always drive with the DSC acti-
vated whenever possible.
DTC is deactivated.
The laws of physics cannot be
repealed even with DSC. An
appropriate driving style always
remains the responsibility of the driver.
We therefore urge you to avoid using
the additional safety margin of the sys-
tem as an excuse for taking risks.
Whenever the DTC is activated, the
DSC is switched off and performs minor
stabilizing intervention.
Do not make any modifications to the
DSC system. Allow only authorized
technicians to perform service proce-
dures on the DSC.<
Dynamic Stability Control (DSC)*
OverviewControlsMaintenanceRepairsDataIndex
handbook.book Page 91 Wednesday, July 31, 2002 9:29 AM
Page 95 of 178
95
Flat tire
The red warning lamp in the
instrument cluster lights up to
warn of pressure loss and tire
failure. This visual alert is accompanied
by an acoustic warning signal. Reduce
your speed immediately, and steer and
brake gently as you bring the vehicle to
a stop.
To reset the warning lamp: after replac-
ing the damaged tire you will need to
reset the red warning lamp manually:
maintain pressure on the Flat Tire Moni-
tor button until the warning lamp goes
out. Then reinitialize the system.
The Flat Tire Monitor cannot pro-
vide you with advance warning of
sudden and severe tire damage caused
by external factors.
The system also does not detect the
gradual and minor loss of pressure that
all tires display over extended periods
of time.<
Check tire inflation pressures on a
regular basis, correcting them as
necessary, refer to page 25.
The system may respond to operation
on slippery or snow-covered road sur-
faces with false warnings or delays in
detecting actual pressure loss.
Performance-oriented driving, slip at
the drive wheels and high rates of lat-
eral acceleration can also increase the
time that the Flat Tire Monitor requires
to detect a flat.<
System malfunctionsThe yellow indicator lamp in the instru-
ment cluster lights up and remains on
until the problem is corrected.
Please refer the problem to your BMW
center.
Flat Tire Monitor*
OverviewControlsMaintenanceRepairsDataIndex
handbook.book Page 95 Wednesday, July 31, 2002 9:29 AM
Page 122 of 178
122Special operating instructions
Break-in proceduresTo ensure that your vehicle continues to
provide maximum economy throughout
an extended service life, we request
that you devote careful attention to the
following instructions.Engine and differentialThe first 1,250 miles/2,000 km:
Attempt to constantly vary both vehicle
and engine speeds during these initial
miles while remembering to avoid
engine speeds in excess of 4,500 rpm
and/or vehicle speeds of over
100 mph / 160 km/h:
Always obey all official speed limits.
Refrain from using full throttle and avoid
pressing the accelerator beyond the
kickdown point.
You can then proceed to increase both
engine and vehicle speeds once the ini-
tial 1,250 miles/2,000 km have elapsed.
Please remember to observe the same
break-in procedures if either the engine
or the differential should have to be
replaced later in the course of the vehi-
cle's service life.
TiresOwing to technical factors associated
with their manufacture, tires do not
achieve their full traction potential until
an initial break-in period has elapsed.
We thus ask you to drive with extra care
during the first 200 miles/300 km.
Always obey all official speed limits.
When the vehicle is operated on
wet or slushy roads, a wedge of
water may form between the tire and
the road surface. This phenomenon is
referred to as hydroplaning, and can
lead to partial or complete loss of trac-
tion, vehicle control and braking effec-
tiveness. Reduce your speed on wet
roads.
achieve the optimal pad-surface and
wear patterns required for trouble-free
operation and an extended service life
later on.
To break in the separate parking brake
drums, apply the parking brake lightly
when coasting to a standstill – at a traf-
fic signal, for instance; use caution to
avoid posing a danger to other road
users.
You can prevent corrosion in the drums
by periodically repeating this proce-
dure.
The brake lamps do not come on
when the parking brake is set.
Vacuum for the brake system servo unit
on your BMW is available only when the
engine is running. When you move the
vehicle with the engine off – when tow-
ing, for example – substantially higher
levels of pedal force will be required to
brake the vehicle.
optimum efficiency. Remember to
engage the clutch carefully during this
initial period.
handbook.book Page 122 Wednesday, July 31, 2002 9:29 AM