Page 57 of 120

PERIODIC MAINTENANCE AND MINOR REPAIR
6-4
6
EAU04522
NOTE:_ �
Air filter
This model’s air filter is equipped with a disposable oil-coated paper element, which must not be cleaned with com-
pressed air to avoid damaging it.
The air filter element needs to be replaced more frequently when riding in unusually wet or dusty areas.
�
Hydraulic brake service
Regularly check and, if necessary, correct the brake fluid level.
Every two years replace the internal components of the brake master cylinders and calipers, and change the brake
fluid.
Replace the brake hoses every four years and if cracked or damaged.
_24
*Cooling systemCheck coolant level and vehicle for coolant leakage.√√√√ √
Change. Every 3 years
25*Front and rear brake
switchesCheck operation.√√√√√ √
26 Moving parts and cablesLubricate.√√√√ √
27*Throttle grip housing
and cableCheck operation and free play.
Adjust the throttle cable free play if necessary.
Lubricate the throttle grip housing and cable.√√√√ √
28*Air induction systemCheck the air cut-off valve, reed valve, and hose for
damage.
Replace any damaged parts if necessary.√√√√ √
29*Muffler and exhaust pipeCheck the screw clamp for looseness.√√√√√
30*Lights, signals and
switchesCheck operation.
Adjust headlight beam.√√√√√ √ NO. ITEM CHECK OR MAINTENANCE JOBODOMETER READING (×1,000 km)
ANNUAL
CHECK
1 10203040
U5PWE0.book Page 4 Friday, December 7, 2001 5:14 PM
Page 58 of 120
PERIODIC MAINTENANCE AND MINOR REPAIR
6-5
6
EAU01139
Removing and installing
cowlings and panels The cowlings and panels shown above
need to be removed to perform some
of the maintenance jobs described in
this chapter. Refer to this section each
time a cowling or panel needs to be re-
moved and installed.
EAU04544
Cowling A
To remove the cowling1. Remove the quick fasteners at the
front of the cowling.
1. Panel A
2. Cowling A
3. Cowling B
1. Panel B
2. Cowling B
1. Quick fastener (× 4)
U5PWE0.book Page 5 Friday, December 7, 2001 5:14 PM
Page 59 of 120
PERIODIC MAINTENANCE AND MINOR REPAIR
6-6
6 2. Remove the bolts and screw, and
then loosen the quick fastener
screws 1/4 turn counterclockwise.
3. Slide the cowling backward at the
area shown.4. Disconnect the turn signal light
lead coupler.
5. Remove the screws, and then take
the cowling off.
To install the cowling
1. Install the screws.
2. Connect the turn signal light lead
coupler.
3. Place the cowling in the original
position.
4. Install the screw and the bolts,
tighten the quick fastener screws,
and then install the quick fasteners.
NOTE:_ To install the quick fastener, push the
center pin out so that it will protrude
from the fastener head, insert the fas-
tener into the cowling, and then push
the protruding pin in until it is flush with
the fastener head. _
1. Quick fastener screw (× 6)
2. Screw
3. Bolt (× 2)
1. Turn signal light lead coupler
2. Screw (× 2)
1. Quick fastenerAfter removal
Before installation
U5PWE0.book Page 6 Friday, December 7, 2001 5:14 PM
Page 60 of 120
PERIODIC MAINTENANCE AND MINOR REPAIR
6-7
6
EAU04555
Cowling B
To remove the cowlingRemove the bolts, loosen the quick fas-
tener screws 1/4 turn counterclock-
wise, and then take the cowling off.To install the cowling
Place the cowling in the original posi-
tion, and then tighten the quick fastener
screws and install the bolts.
EAU04531
Panels A and B
To remove one of the panelsLoosen the quick fastener screws 1/4
turn counterclockwise, remove the
screw, and then take the panel off.
To install the panelPlace the panel in the original position,
tighten the quick fastener screws, and
then install the screw.
1. Quick fastener screw (× 4)
2. Cowling B
3. Bolt Right side
1. Bolt
2. Quick fastener screw (× 3)
3. Cowling BLeft side
1. Quick fastener screw (× 2)
2. Screw
U5PWE0.book Page 7 Friday, December 7, 2001 5:14 PM
Page 61 of 120

PERIODIC MAINTENANCE AND MINOR REPAIR
6-8
6
EAU01880
Checking the spark plugs The spark plugs are important engine
components, which should be checked
periodically, preferably by a Yamaha
dealer. Since heat and deposits will
cause any spark plug to slowly erode,
they should be removed and checked
in accordance with the periodic mainte-
nance and lubrication chart. In addition,
the condition of the spark plugs can re-
veal the condition of the engine.
The porcelain insulator around the cen-
ter electrode of each spark plug should
be a medium-to-light tan (the ideal col-
or when the motorcycle is ridden nor-
mally), and all spark plugs installed in
the engine should have the same color.
If any spark plug shows a distinctly dif-
ferent color, the engine could be defec-
tive. Do not attempt to diagnose such
problems yourself. Instead, have a
Yamaha dealer check the motorcycle.
If a spark plug shows signs of electrode
erosion and excessive carbon or other
deposits, it should be replaced.Before installing a spark plug, the spark
plug gap should be measured with a
wire thickness gauge and, if necessary,
adjusted to specification. Specified spark plug:
CR9E
IA 9 (NGK) or
IU27D (DENSO)
a. Spark plug gapSpark plug gap:
0.8–0.9 mm
U5PWE0.book Page 8 Friday, December 7, 2001 5:14 PM
Page 62 of 120

PERIODIC MAINTENANCE AND MINOR REPAIR
6-9
6Clean the surface of the spark plug
gasket and its mating surface, and then
wipe off any grime from the spark plug
threads.
NOTE:_ If a torque wrench is not available when
installing a spark plug, a good estimate
of the correct torque is 1/4–1/2 turn
past finger tight. However, the spark
plug should be tightened to the speci-
fied torque as soon as possible. _
EAU04279
Engine oil and oil filter
cartridge The engine oil level should be checked
before each ride. In addition, the oil
must be changed and the oil filter car-
tridge replaced at the intervals speci-
fied in the periodic maintenance and
lubrication chart.
To check the engine oil level
1. Place the motorcycle on a level
surface and hold it in an upright
position.NOTE:_ Make sure that the motorcycle is posi-
tioned straight up when checking the oil
level. A slight tilt to the side can result in
a false reading. _
2. Start the engine, warm it up for
several minutes, and then turn it off.
3. Wait a few minutes until the oil set-
tles, and then check the oil level
through the check window located
at the bottom-right side of the
crankcase.NOTE:_ The engine oil should be between the
minimum and maximum level marks. _4. If the engine oil is below the mini-
mum level mark, add sufficient oil
of the recommended type to raise
it to the correct level. Tightening torque:
Spark plug:
12.5 Nm (1.25 m·kgf)1. Engine oil level check window
2. Maximum level mark
3. Minimum level mark
4. Engine oil filler cap
U5PWE0.book Page 9 Friday, December 7, 2001 5:14 PM
Page 63 of 120
PERIODIC MAINTENANCE AND MINOR REPAIR
6-10
6 To change the engine oil (with or
without oil filter cartridge replace-
ment)
1. Remove cowling B. (See page 6-7
for cowling removal and installa-
tion procedures.)
2. Start the engine, warm it up for
several minutes, and then turn it
off.
3. Place an oil pan under the engine
to collect the used oil.4. Remove the engine oil filler cap
and drain bolt to drain the oil from
the crankcase.
NOTE:_ Skip steps 5–7 if the oil filter cartridge is
not being replaced. _
5. Remove the oil filter cartridge with
an oil filter wrench.NOTE:_ An oil filter wrench is available at a
Yamaha dealer. _
1. Engine oil drain bolt
1. Oil filter wrench
2. Oil filter cartridge
U5PWE0.book Page 10 Friday, December 7, 2001 5:14 PM
Page 64 of 120

PERIODIC MAINTENANCE AND MINOR REPAIR
6-11
66. Apply a thin coat of engine oil to
the O-ring of the new oil filter car-
tridge.
NOTE:_ Make sure that the O-ring is properly
seated. _
7. Install the new oil filter cartridge,
and then tighten it to the specified
torque with a torque wrench.
8. Install the engine oil drain bolt, and
then tighten it to the specified
torque.9. Add the specified amount of the
recommended engine oil, and then
install and tighten the oil filler cap.
ECA00105
CAUTION:_ �
In order to prevent clutch slip-
page (since the engine oil also
lubricates the clutch), do not
mix any chemical additives with
the oil or use oils of grade “CD”
or higher. In addition, do not
use oils labeled “ENERGY
CONSERVING II” or higher.
�
Make sure that no foreign mate-
rial enters the crankcase.
_
1. O-ring
1. Torque wrench
Tightening torque:
Oil filter cartridge:
17 Nm (1.7 m·kgf)
Tightening torque:
Engine oil drain bolt:
43 Nm (4.3 m·kgf)
Recommended engine oil:
See page 8-1.
Oil quantity:
Without oil filter cartridge
replacement:
2.9 L
With oil filter cartridge
replacement:
3.1 L
Total amount (dry engine):
3.8 L
U5PWE0.book Page 11 Friday, December 7, 2001 5:14 PM
 1
1 2
2 3
3 4
4 5
5 6
6 7
7 8
8 9
9 10
10 11
11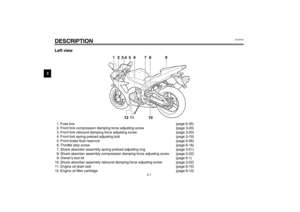 12
12 13
13 14
14 15
15 16
16 17
17 18
18 19
19 20
20 21
21 22
22 23
23 24
24 25
25 26
26 27
27 28
28 29
29 30
30 31
31 32
32 33
33 34
34 35
35 36
36 37
37 38
38 39
39 40
40 41
41 42
42 43
43 44
44 45
45 46
46 47
47 48
48 49
49 50
50 51
51 52
52 53
53 54
54 55
55 56
56 57
57 58
58 59
59 60
60 61
61 62
62 63
63 64
64 65
65 66
66 67
67 68
68 69
69 70
70 71
71 72
72 73
73 74
74 75
75 76
76 77
77 78
78 79
79 80
80 81
81 82
82 83
83 84
84 85
85 86
86 87
87 88
88 89
89 90
90 91
91 92
92 93
93 94
94 95
95 96
96 97
97 98
98 99
99 100
100 101
101 102
102 103
103 104
104 105
105 106
106 107
107 108
108 109
109 110
110 111
111 112
112 113
113 114
114 115
115 116
116 117
117 118
118 119
119


1. Remove cowling B. (See page 6-7
for cowling removal and installa-
tion pro")