Page 73 of 111
 by turning it counterclockwise.
· Remove the connector (2).
· Loosen the")
To remove a defective bulb:
· Switch off the ignition.
· Open the hood.
· Remove the plastic cover over the bulb (1) by turning it counterclockwise.
· Remove the connector (2).
· Loosen the retaining spring (3) by first moving it to the right and then moving it down, out of the way.
· Pull out the defective bulb. Note the position of the guide lug on the base of the bulb (4).
To install a new bulb:
· Insert the new bulb, without touching the glass, with the guide lug upward (1). The bulb will only seat properly in
this position.
· Move the retaining spring up and push it slightly to the left until it seats properly (2).
· Press the connector into place on the bulb (3).
· Reinstall the plastic cover and turn it clockwise until it is correctly in place (4). "TOP" must be upward.
NOTE: If the vertical aim of your headlights needs to be adjusted for any reason (e.g., towing a trailer for extended
periods), this should be done by an authorized Volvo retailer.
pg. 101 Replacing bulbs
Front parking lights
· Switch off the ignition.
· Remove the plastic cover over it the high beam bulb by turning it counterclockwise.
· Pull out the bulb and its socket. Replace the bulb.
· Press the bulb and its socket back into place.
ProCarManuals.com
Page 74 of 111
· Switch on the ignition to test the bulb.
· Reinstall the plastic cover and turn it clockwise until it is correctly in place. "TOP" must be upward) see illustration
on previous page).
Front direction indicators
· Switch off the ignition.
· Open the hood.
· Press down the retaining catch with a screwdriver and pull out the lamp housing.
· Press the retaining spring downward and pull the connector out of the lamp housing.
· Turn the bulb holder counterclockwise and remove it.
· Remove the defective bulb from the holder by first pressing it in slightly and then turning it counterclockwise.
· Install a new bulb in the holder and reinsert
the bulb and holder in the lamp housing.
· Press the connector onto the bulb holder.
· Switch on the ignition to test the bulb.
· Press the lamp housing back into place on the fender. Be sure it seats properly.
pg. 102 Replacing bulbs
ProCarManuals.com
Page 75 of 111

All tail light bulbs are accessed from inside the trunk.
· Switch off the ignit")
Tail lights
1. Brake light
2. Back-up light
3. Direction indicator
4/5. Tail lights
6. Fog light (left side only)
All tail light bulbs are accessed from inside the trunk.
· Switch off the ignition and open the trunk.
· Fold the covering panel inward to access the bulbs. When replacing right tail light bulbs, access is made easier if you
pull out the cargo net in the trunk completely before folding down the panel.
The bulbs are located in upper and a lower holders. . Each holder has a retaining catch.
To replace a bulb in the upper holder:
· Disconnect the wiring from the bulb holder.
· Press the retaining catch upward to release the lower part of the holder.
· Press the retaining catch downward to release the upper part of the holder.
· Replace the defective bulb.
· Press the bulb holder back into place.
· Reconnect the wiring.
· Fold up and close the covering panel.
To replace a bulb in the lower holder:
· Disconnect the wiring from the bulb holder.
· Press the retaining catch toward the outside of the car to release the holder.
· Replace the defective bulb.
· Press the bulb holder back into place.
· Reconnect the wiring.
· Fold up and close the covering panel.
pg. 103 Replacing bulbs
ProCarManuals.com
Page 76 of 111
Front fog lights (option)
CAUTION:
Avoid touching the glass on the bulb with your fingers.
· Switch off the ignition.
· Turn the bulb holder slightly counterclockwise to release it.
· Replace the bulb. The shape of the foot of the bulb corresponds to the shape of the bulb holder.
· Reinstall the bulb holder by turning it slightly clockwise. "TOP" on the holder should be upward.
Vanity mirror lights
· Carefully insert a screwdriver and pry out the lens.
· Pry out the bulb and replace it.
· Carefully press the lower edge of lens onto the four tabs and press the upper edge of the lens into place.
ProCarManuals.com
Page 77 of 111

Side direction indicator
· Open the front door halfway.
· From the inside of the fender, push the lamp housing out.
· Turn the bulb holder 1/4 turn counterclockwise and pull it out from the lens.
· Remove the defective bulb by pulling it straight out.
· Insert a new bulb.
· Reinsert the bulb holder in the lens and press the entire lamp housing back into place on the fender.
pg. 104 Replacing bulbs
License plate lights
· Switch off the ignition.
· Loosen the screws with a torx screwdriver.
· Carefully pull out the lamp housing.
· Turn the bulb holder counterclockwise and pull it out.
· Pull out the defective bulb and insert a new one.
· Reinsert the bulb holder into the housing and turn it clockwise.
· Reinstall the housing and screw it in place.
Door step courtesy lights
The door step courtesy lights are located under the dash on the driver's and passenger's sides. To replace a bulb:
· Carefully insert a screwdriver and pry out the lens.
· Replace the defective bulb.
· Reinstall the lens.
ProCarManuals.com
Page 78 of 111
Rear door step lights
· Carefully insert a screwdriver and pry out the lens.
· Disconnect the wiring from the lamp housing.
· Remove the lens from the lamp housing by pressing the two side catches out.
· Pull out the defective bulb and replace it.
· Reinstall the lamp housing in the reverse order.
Contents | Top of Page
ProCarManuals.com
Page 79 of 111

2 0 0 2
VOLVO S80
Chapter 9 - Specifications
pg. 123 Specifications
Label information124
Dimensions and weights125
Engine/transmission specifications126
Oil/fluid specifications and volumes127
Fuel system, Distributor ignition system, Suspension128
Electrical system129
Volvo On Call130
pg. 124 Label information
1 Vehicle Emission Control Information
Your Volvo is designed to meet all applicable emission standards, as evidenced by the certification label on the
underside of the hood. For further information regarding these regulations, please consult your Volvo retailer.
2 Vacuum hose routing
(underside of hood)
3 Loads and Tire Pressures
(on inside of fuel filler door)
4 Model plate
Vehicle Identification Number (VIN). Codes for color and upholstery, etc. The plate is located in the engine
compartment, on the inside of the left front fender.
5 Vehicle Identification Number (VIN) *
The VIN plate is located on the top left surface of the dashboard. The VIN is also stamped on the right hand door
pillar.
6 Federal Motor Vehicle Safety Standards (FMVSS) specifications (USA) and Ministry of Transport (CMVSS)
ProCarManuals.com
Page 80 of 111
standards (Canada)
Your Volvo is designed to meet all applicable safety standards, as evidenced by the certification label on the facing
side of the driver's door. For further information regarding these regulations, please consult your Volvo retailer.
7 Child safety latch label
* The Vehicle Identification Number (VIN) should always be quoted in all correspondence concerning your vehicle
with the retailer and when ordering parts.
All specifications are subject to change without prior notice.
pg. 125 Dimensions and weights
Dimensions
Length 189.8 in. (482 cm)
Width 72 in. (183 cm)
Height 57.1 in. (145 cm)
Wheelbase 109.8 in. (279 cm)
Track, front 62.2 in. (158 cm)
Track, rear 61.4 in. (156 cm)
Turning circle (between curbs) 35.8 - 39 ft. (10.9 - 12 m)
Cargo capacity - trunk 14.2
cu. ft. (0.4 m3)
Weights USACanada
Gross vehicle weight (GVW)
6 cyl. 4608 lbs2090 kg
6 cyl. turbo 4670 lbs2120 kg
Capacity weight *
ProCarManuals.com
 1
1 2
2 3
3 4
4 5
5 6
6 7
7 8
8 9
9 10
10 11
11 12
12 13
13 14
14 15
15 16
16 17
17 18
18 19
19 20
20 21
21 22
22 23
23 24
24 25
25 26
26 27
27 28
28 29
29 30
30 31
31 32
32 33
33 34
34 35
35 36
36 37
37 38
38 39
39 40
40 41
41 42
42 43
43 44
44 45
45 46
46 47
47 48
48 49
49 50
50 51
51 52
52 53
53 54
54 55
55 56
56 57
57 58
58 59
59 60
60 61
61 62
62 63
63 64
64 65
65 66
66 67
67 68
68 69
69 70
70 71
71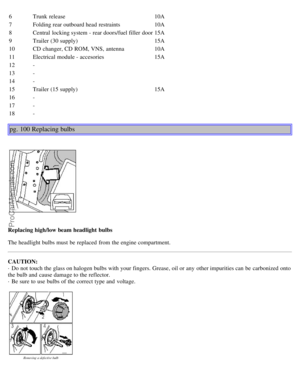 72
72 73
73 74
74 75
75 76
76 77
77 78
78 79
79 80
80 81
81 82
82 83
83 84
84 85
85 86
86 87
87 88
88 89
89 90
90 91
91 92
92 93
93 94
94 95
95 96
96 97
97 98
98 99
99 100
100 101
101 102
102 103
103 104
104 105
105 106
106 107
107 108
108 109
109 110
110 see illustration
on previous page).
Front d")

CAUTION:
Avoid touching the glass on the bulb with your fingers.
· Switch off the ignition.
· Turn the bulb holder slightly counterclockwise to release it.
· Replace")


Your Volvo is designed to meet all applicable safety standards, as evidenced by the certification label on the facing
side of the drivers door. For further information regarding")