2002 VOLVO S60 key
[x] Cancel search: keyPage 22 of 106

Low beam headlights will automatically come on if the ignition key is in position II. Front and rear parking lights and
license plate lights will also be on. Volvo recommends the use of daytime running lights. If, however, you would
prefer to have these lights turned off (USA only), please consult your Volvo retailer. Please note that the use of
daytime running lights is mandatory in Canada.
Parking lights on. The parking lights should be switched off when you leave the car to help avoid battery
drain.
Headlights, parking lights, license plate lights and instrument panel illumination are on if the ignition key is in
position II.
If the headlight switch is in this position, all lights will go out when the ignition is switched off.
The headlight switch must be in this position before the high beams will function.
Switch from high to low beams and vice versa by pulling the turn signal switch lever on the left side of steering
column toward you.
B - Instrument lighting
Move the thumb wheel up to increase brightness or down to decrease brightness. There is also an instrument panel
illumination sensor (see illustration on page 56
) which automatically adjusts the level of illumination.
The symbols have maximum illumination in daylight (only the background lighting can be adjusted). At night, both the
symbol light and background lighting can be adjusted.
C - Unlocking the fuel filler door
Press this button when the car is at a standstill to unlock the fuel filler door. Please note that the fuel filler door will
remain unlocked until the car is driven again at a speed of over approximately 5 mph (8 km/h). An audible click will
be heard when the fuel filler door relocks.
D - Front fog lights *
The front fog lights will function only in combination with the low beam headlights.
An LED in the switch indicates when the front fog lights are on.
E - Rear fog light*
The rear fog light is considerably brighter than the normal tail lights and should be used only when conditions such as
fog, rain, snow, smoke or dust reduce visibility for other vehicles to less than 500 ft (150 meters).
An LED in the switch indicates when the rear fog light is on.
The rear fog light will only function in combination with the high/low beam headlights. By design, there is one rear fog
light only, located in the driver's side tail light cluster.
* Standard on T5/accessory on the other models.
These lights will be automatically switched off the next time the car is started.
Contents | Top of Page
ProCarManuals.com
Page 34 of 106

18. Automatic presetting of radio stations
19. Display
pg. 67 Audio systems HU-413/ HU-613/ HU-803
Switch on/off
Press the knob to switch on or turn off the radio.
Volume control
Turn the knob clockwise to increase volume. Volume control is electronic and does not have an end stop. If you have
a key pad in the steering wheel, increase or decrease the volume with the + or - buttons.
Band selector
Turn "SOURCE" knob to select FM or AM. The station and band are displayed. You can also select cassette deck,
CD, or the optional CD changer if connected, with this knob. Active sound control (ASC) The ASC (Active Sound
Control) automatically adapts volume to vehicle speed.
Press the ASC button (HU-613) for several seconds to switch this function ON or OFF. This function is included in
the Advanced User Mode on the HU -803 equipped with this feature.
"ASC ON" or "ASC OFF" will be shown in the display for several seconds.
Bass
Adjust the bass by pressing the button to extend the control and turning it to the left (less bass) or to the right (more
bass). A "detent" indicates "equalized" bass. Press the button back in when you have made the adjustment.
Treble
Adjust the treble by pressing the button to extend the control, pulling it out as far as possible, and then turning it to the
left (less treble) or to the right (more treble). A "detent" indicates "equalized" treble. Press the button back in when you
have made the adjustment.
ProCarManuals.com
Page 36 of 106

Press the left or right-hand side of the button to seek lower or higher frequencies. The radio seeks the next
audible station and sets it. Press the button again to continue seek.
Steering wheel keypad
If you have a keypad in the steering wheel, press the right or left arrow to select preset stations.
Scan function
Press the SCAN button (HU-613) or the SOURCE knob (HU-803) to start the station scan function. When a station is
found, scanning stops for several seconds, after which scanning will continue.
Press the SCAN button or SOURCE knob when a station has been found if you would like to listen to that station and
to discontinue the scan function.
pg. 70 Audio systems HU-413/ HU-613/ HU-803
Automatic station preset
This function seeks and stores up to 10 strong AM or FM stations in a separate memory. This function is especially
useful in areas where you are not familiar with the radio stations.
1. Press in the "AUTO" button. A number of strong signal stations (max. 10) from the currently selected waveband are
now stored automatically in the memory. An "A" and "AUTO" is displayed. If there is no station with sufficient signal
strength "NO STATION" is displayed.
2. Turn "1- 20/ DISC" knob if you wish to change to another of the auto-stored stations.
Another auto-stored station is selected with each turn.
Programming stations
1. Tune in the desired frequency.
2. Press the "1-20/ DISC" knob. Select a number by turning forwards or backwards. Press again to store the selected
frequency and station.
Preset
To choose a pre-set station, turn "1-20/ DISC" knob to the stored number. The currently selected station is displayed.
Radio Data System (RDS, also referred to as RBDS) - HU-803 only
This feature, which may not work in your area, functions only with FM broadcasts. The HU -803 radio in your car is
equipped with an advanced system allowing information from broadcasters to be transmitted visually, as text, together
with the audio signal. This information is then decoded by the radio and made available for several new and unique
ProCarManuals.com
Page 41 of 106

pg. 103 Front seats
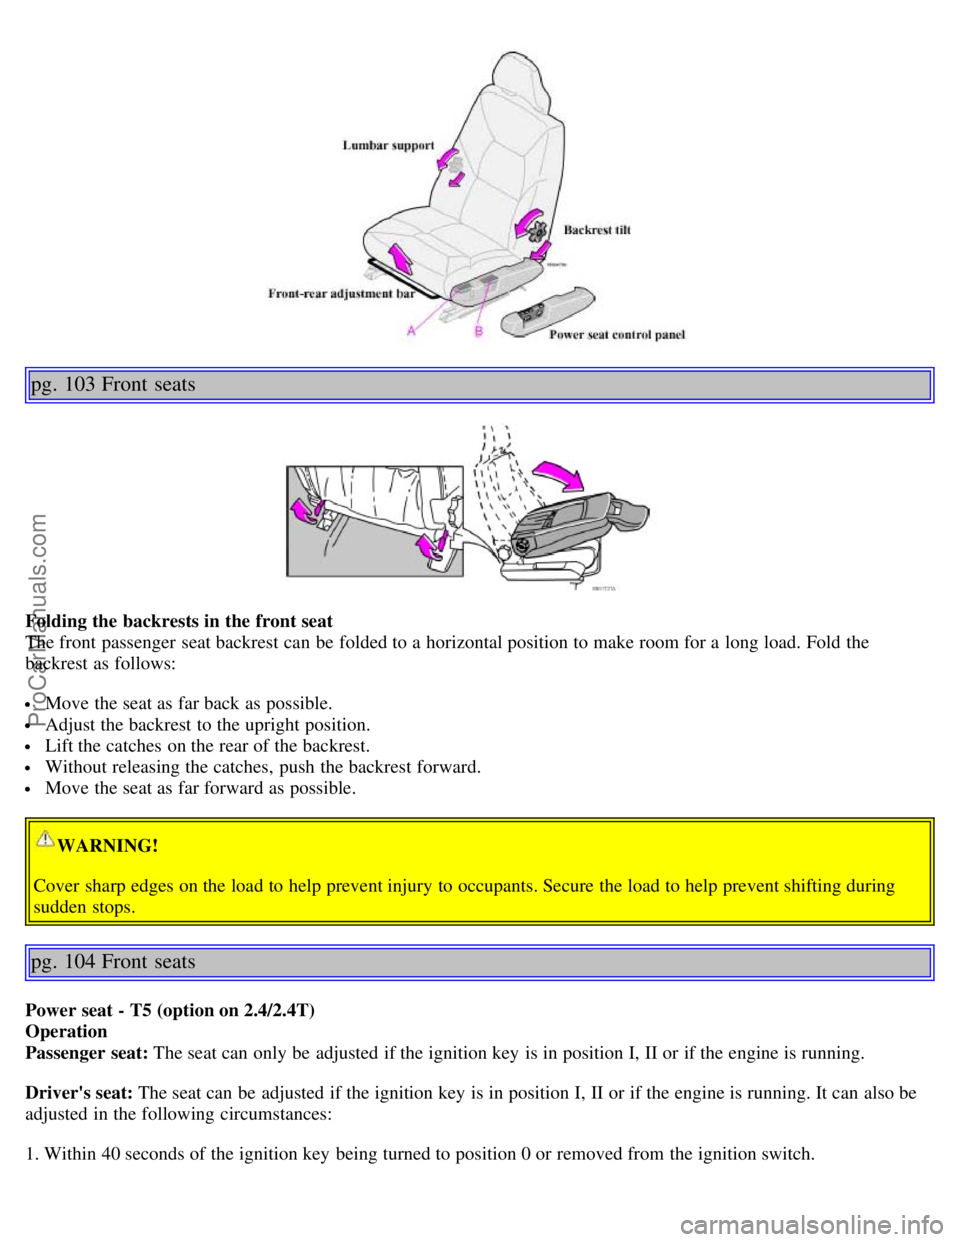
Folding the backrests in the front seat
The front passenger seat backrest can be folded to a horizontal position to make room for a long load. Fold the
backrest as follows:
Move the seat as far back as possible.
Adjust the backrest to the upright position.
Lift the catches on the rear of the backrest.
Without releasing the catches, push the backrest forward.
Move the seat as far forward as possible.
WARNING!
Cover sharp edges on the load to help prevent injury to occupants. Secure the load to help prevent shifting during
sudden stops.
pg. 104 Front seats
Power seat - T5 (option on 2.4/2.4T)
Operation
Passenger seat: The seat can only be adjusted if the ignition key is in position I, II or if the engine is running.
Driver's seat: The seat can be adjusted if the ignition key is in position I, II or if the engine is running. It can also be
adjusted in the following circumstances:
1. Within 40 seconds of the ignition key being turned to position 0 or removed from the ignition switch.
ProCarManuals.com
Page 42 of 106

2. After you have unlocked the driver's door with the key or remote control, the driver's seat can be adjusted during a
10 minute period if the door remains open. If the door is closed, the seat can be adjusted for 40 seconds. The ignition
key can be in position 0 or not yet inserted in the ignition switch.
Remote keyless entry system and driver's seat
The remote control transmitter also controls the electrically operated driver's seat in the following way:
Adjust the seat to your preferences.
When you leave your car, lock it using the remote control.
The next time you unlock the driver's door with the same remote control (the one you used to lock the doors with) and
open the driver's door, the driver's seat will automatically move to the position in which you left it.
The seat will move to this position even if someone else had adjusted them since you last drove the car.
NOTE! This feature will work in the same way with all of the remote control transmitters (up to 3) that you use with
your car.
This feature will not function if you lock your car with the key. This feature will not function if you lock you car with
the key.
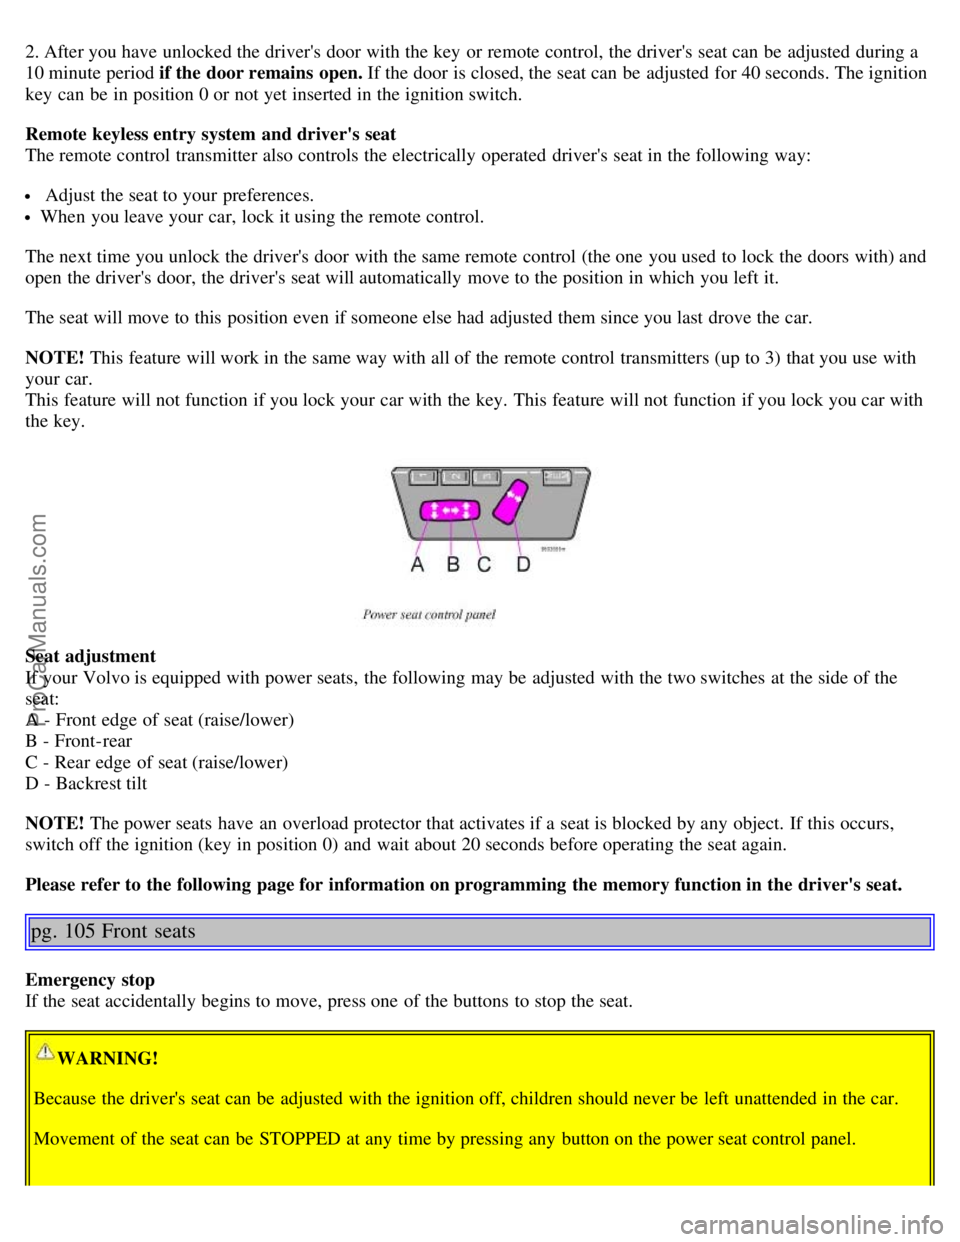
Seat adjustment
If your Volvo is equipped with power seats, the following may be adjusted with the two switches at the side of the
seat:
A - Front edge of seat (raise/lower)
B - Front-rear
C - Rear edge of seat (raise/lower)
D - Backrest tilt
NOTE! The power seats have an overload protector that activates if a seat is blocked by any object. If this occurs,
switch off the ignition (key in position 0) and wait about 20 seconds before operating the seat again.
Please refer to the following page for information on programming the memory function in the driver's seat.
pg. 105 Front seats
Emergency stop
If the seat accidentally begins to move, press one of the buttons to stop the seat.
WARNING!
Because the driver's seat can be adjusted with the ignition off, children should never be left unattended in the car.
Movement of the seat can be STOPPED at any time by pressing any button on the power seat control panel.
ProCarManuals.com
Page 43 of 106

Do not adjust the seat while driving. The seat should be adjusted so that the brake pedal can be depressed fully. In
addition, position the seat as far rearward as comfort and control allow.
The seat rails on the floor must not be obstructed in any way when the seat is in motion.
pg. 106 Front seats
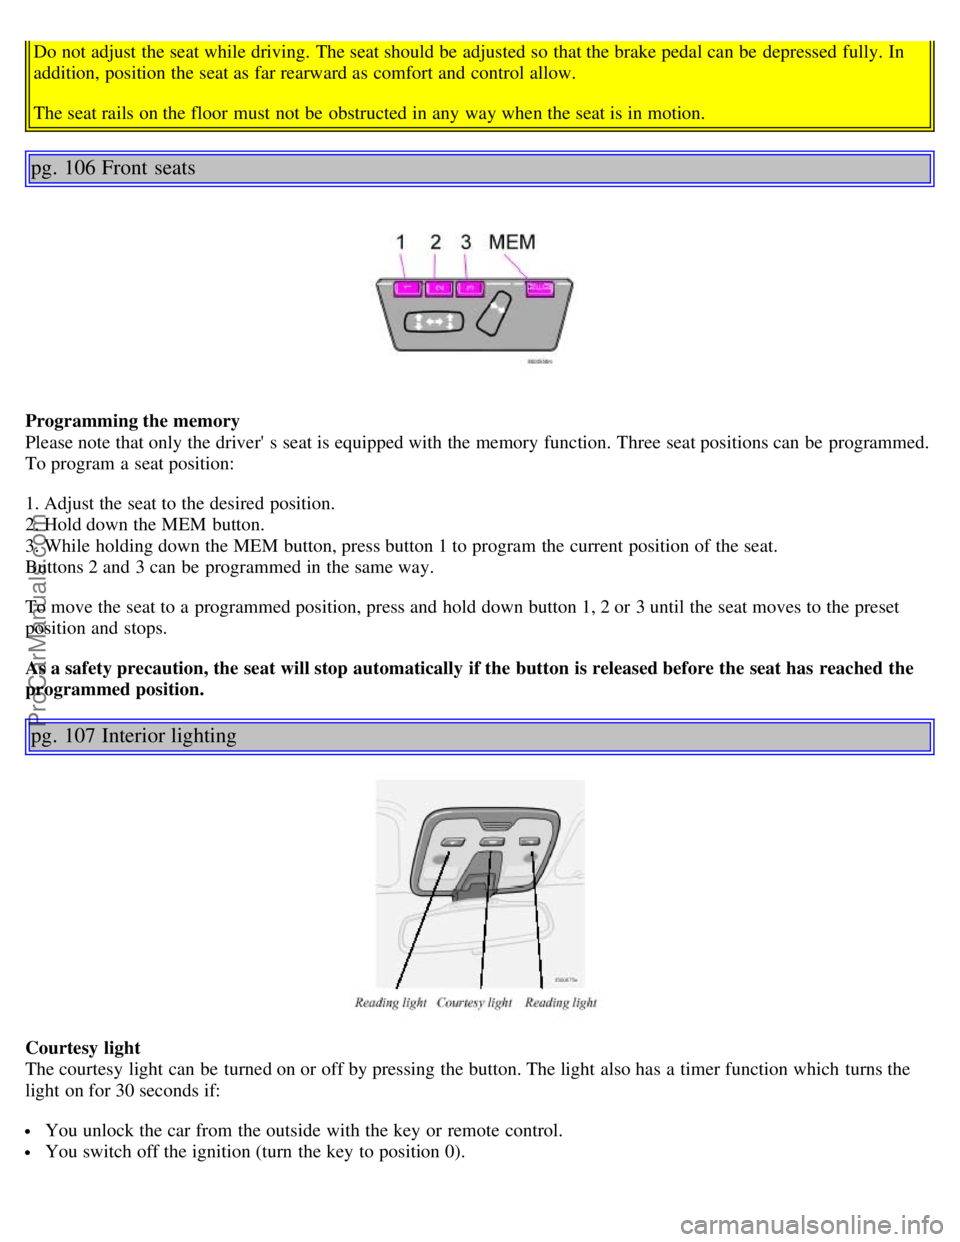
Programming the memory
Please note that only the driver' s seat is equipped with the memory function. Three seat positions can be programmed.
To program a seat position:
1. Adjust the seat to the desired position.
2. Hold down the MEM button.
3. While holding down the MEM button, press button 1 to program the current position of the seat.
Buttons 2 and 3 can be programmed in the same way.
To move the seat to a programmed position, press and hold down button 1, 2 or 3 until the seat moves to the preset
position and stops.
As a safety precaution, the seat will stop automatically if the button is released before the seat has reached the
programmed position.
pg. 107 Interior lighting
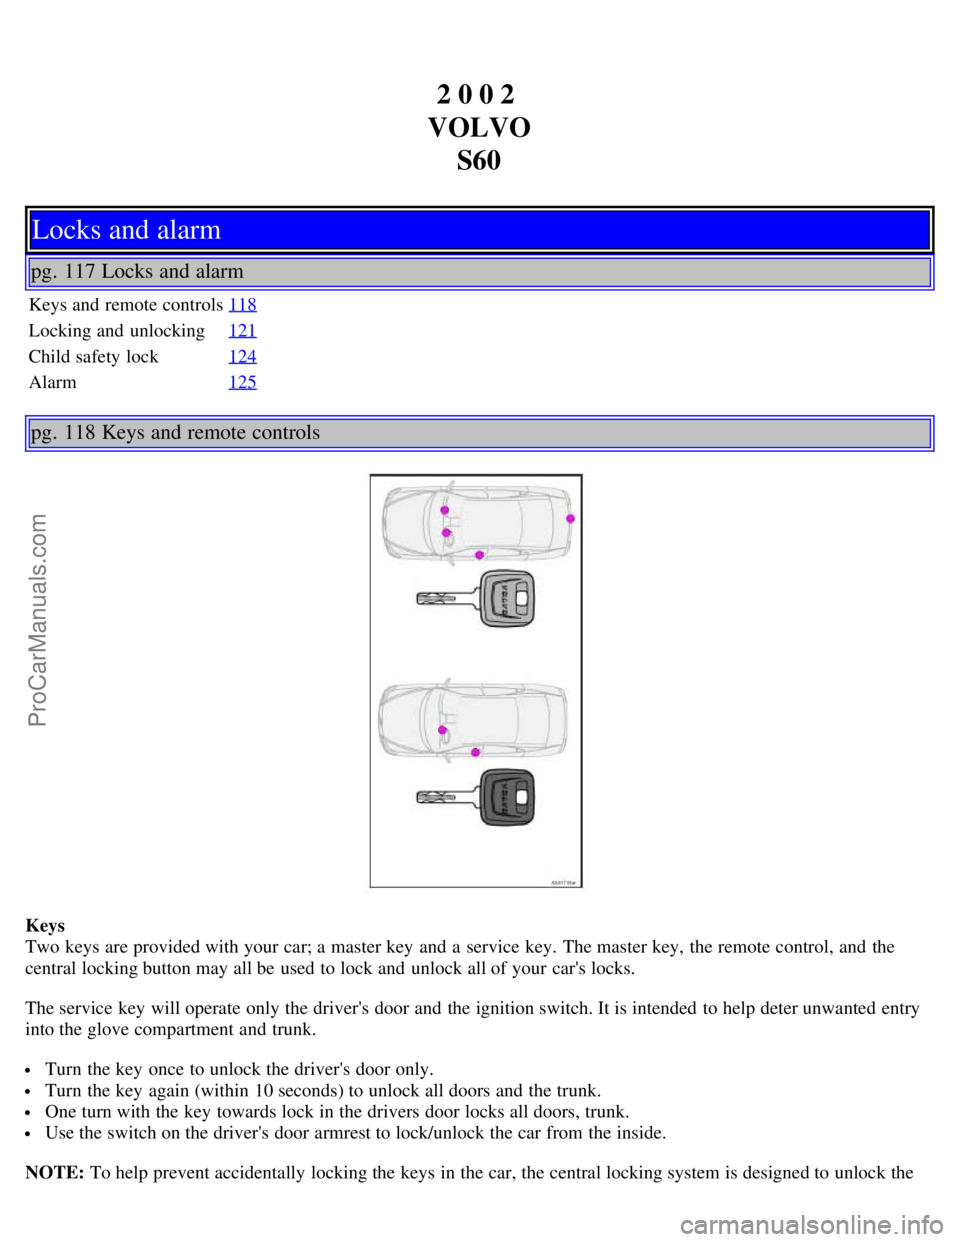
Courtesy light
The courtesy light can be turned on or off by pressing the button. The light also has a timer function which turns the
light on for 30 seconds if:
You unlock the car from the outside with the key or remote control.
You switch off the ignition (turn the key to position 0).
ProCarManuals.com
Page 44 of 106

The courtesy light stays on for 10 minutes if one of the doors is left open after the car is unlocked. The courtesy light
switches off if:
The engine is started.
The car is locked from the outside with the key or remote control.
The courtesy light can be switched off or on in all situations by briefly pressing the button. When you switch the light
on, it remains lit for 10 minutes.
You can disconnect the automatic function by pressing the courtesy light button for more than 3 seconds. Briefly
pressing the courtesy light button again automatically reconnects the function.
The courtesy light timer periods can be changed. Contact your Volvo retailer.
Reading lights - front/rear
The reading lights can be switched on or off by pressing the respective buttons. These lights switch off automatically
after 10 minutes if the engine is not running. If the engine is running, the lights stay on indefinitely. The lights can be
switched off at any time by pressing the button.
pg. 108 Floor mats
Vanity mirror
The light comes on when you open the cover.
Floor mats (option)
Volvo offers floor mats specially manufactured for your car. They must be properly placed and secured in the mat
clips.
ProCarManuals.com
Page 46 of 106

2 0 0 2
VOLVO S60
Locks and alarm
pg. 117 Locks and alarm
Keys and remote controls 118
Locking and unlocking121
Child safety lock124
Alarm125
pg. 118 Keys and remote controls
Keys
Two keys are provided with your car; a master key and a service key. The master key, the remote control, and the
central locking button may all be used to lock and unlock all of your car's locks.
The service key will operate only the driver's door and the ignition switch. It is intended to help deter unwanted entry
into the glove compartment and trunk.
Turn the key once to unlock the driver's door only.
Turn the key again (within 10 seconds) to unlock all doors and the trunk.
One turn with the key towards lock in the drivers door locks all doors, trunk.
Use the switch on the driver's door armrest to lock/unlock the car from the inside.
NOTE: To help prevent accidentally locking the keys in the car, the central locking system is designed to unlock the
ProCarManuals.com