Page 36 of 1690
320VZ±01
G24211
To Master Cylinder Front
G24212
To Master Cylinder Rear
To Front Wheel RH
To Rear Wheel LH
To Rear Wheel RH
To Front Wheel LH
G24213
32±54
± BRAKEBRAKE ACTUATOR ASSY (W/O VSC)
AVENSIS REPAIR MANUAL (RM1018E)
REPLACEMENT
1. DRAIN BRAKE FLUID
NOTICE:
Wash the brake fluid off immediately if it adheres to any painted surfaces.
2. REMOVE FRONT WHEEL RH
3. REMOVE FRONT FENDER LINER RH
4. REMOVE BRAKE ACTUATOR WITH BRACKET
(a) Release the latch of the brake actuator connector to dis-
connect the connector.
(b) Using SST, disconnect the brake tubes from the brake ac-
tuator.
SST 09023±00100
(c) Use tags or make a memo to identify the place to recon-
nect.
(d) Remove the nut, 2 bolts and brake actuator with bracket.
Page 37 of 1690
G24213
To Master Cylinder Front
G24212
To Master Cylinder Rear
To Front Wheel RH
To Rear Wheel LH
To Rear Wheel RH
To Front Wheel LH
±
BRAKE BRAKE ACTUATOR ASSY(W/O VSC)
32±55
AVENSIS REPAIR MANUAL (RM1018E)
5.REMOVE BRAKE ACTUATOR ASSY
(a)Remove the 2 nuts and brake actuator from the brake acutuator bracket.
6.REMOVE SKID CONTROL ECU
(a)Disconnect the connector from the skid control ECU.
(b)Using a torx driver (T20), remove the 4 screws and the skid control EC\
U from the brake actuator.
7.INSTALL SKID CONTROL ECU
(a)Install the skid control ECU and 4 screws with a torx driver (T20).
(b)Connect the connector to the skid control ECU.
8.INSTALL BRAKE ACTUATOR ASSY
(a)Install the brake actuator with the 2 nuts to the brake actuator bracket\
.
Torque: 7.0 N �m ( 71 kgf �cm, 62 in. �lbf)
9.INSTALL BRAKE ACTUATOR WITH BRACKET
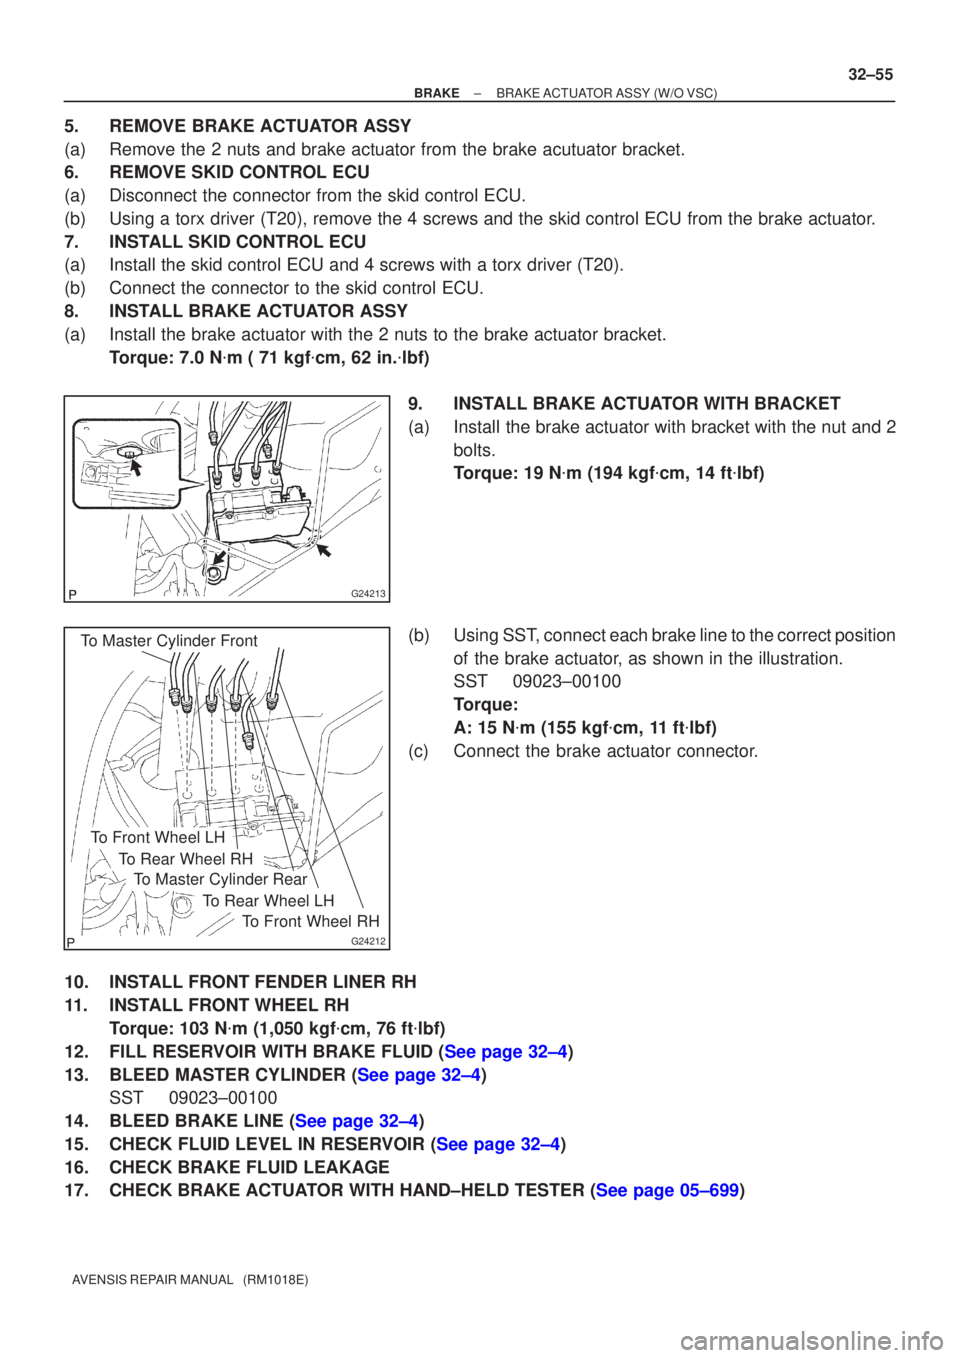
(a)Install the brake actuator with bracket with the nut and 2 bolts.
Torque: 19 N �m (194 kgf �cm, 14 ft �lbf)
(b)Using SST, connect each brake line to the correct position of the brake actuator, as shown in the illustration.
SST09023±00100
Torque:
A: 15 N �m (155 kgf �cm, 11 ft �lbf)
(c)Connect the brake actuator connector.
10.INSTALL FRONT FENDER LINER RH
11.INSTALL FRONT WHEEL RH Torque: 103 N �m (1,050 kgf �cm, 76 ft �lbf)
12.FILL RESERVOIR WITH BRAKE FLUID (See page 32±4)
13.BLEED MASTER CYLINDER (See page 32±4) SST 09023±00100
14.BLEED BRAKE LINE (See page 32±4)
15.CHECK FLUID LEVEL IN RESERVOIR (See page 32±4)
16. CHECK BRAKE FLUID LEAKAGE
17.CHECK BRAKE ACTUATOR WITH HAND±HELD TESTER (See page 05±699)
Page 38 of 1690
3201G±07
BR2238
GOOD NO GOOD
2nd3rd
1st
BR2237
G24221
Ventilation No Ventilation
± BRAKEBRAKE BOOSTER ASSY (LHD)
32±17
AVENSIS REPAIR MANUAL (RM1018E)
BRAKE BOOSTER ASSY (LHD)
ON±VEHICLE INSPECTION
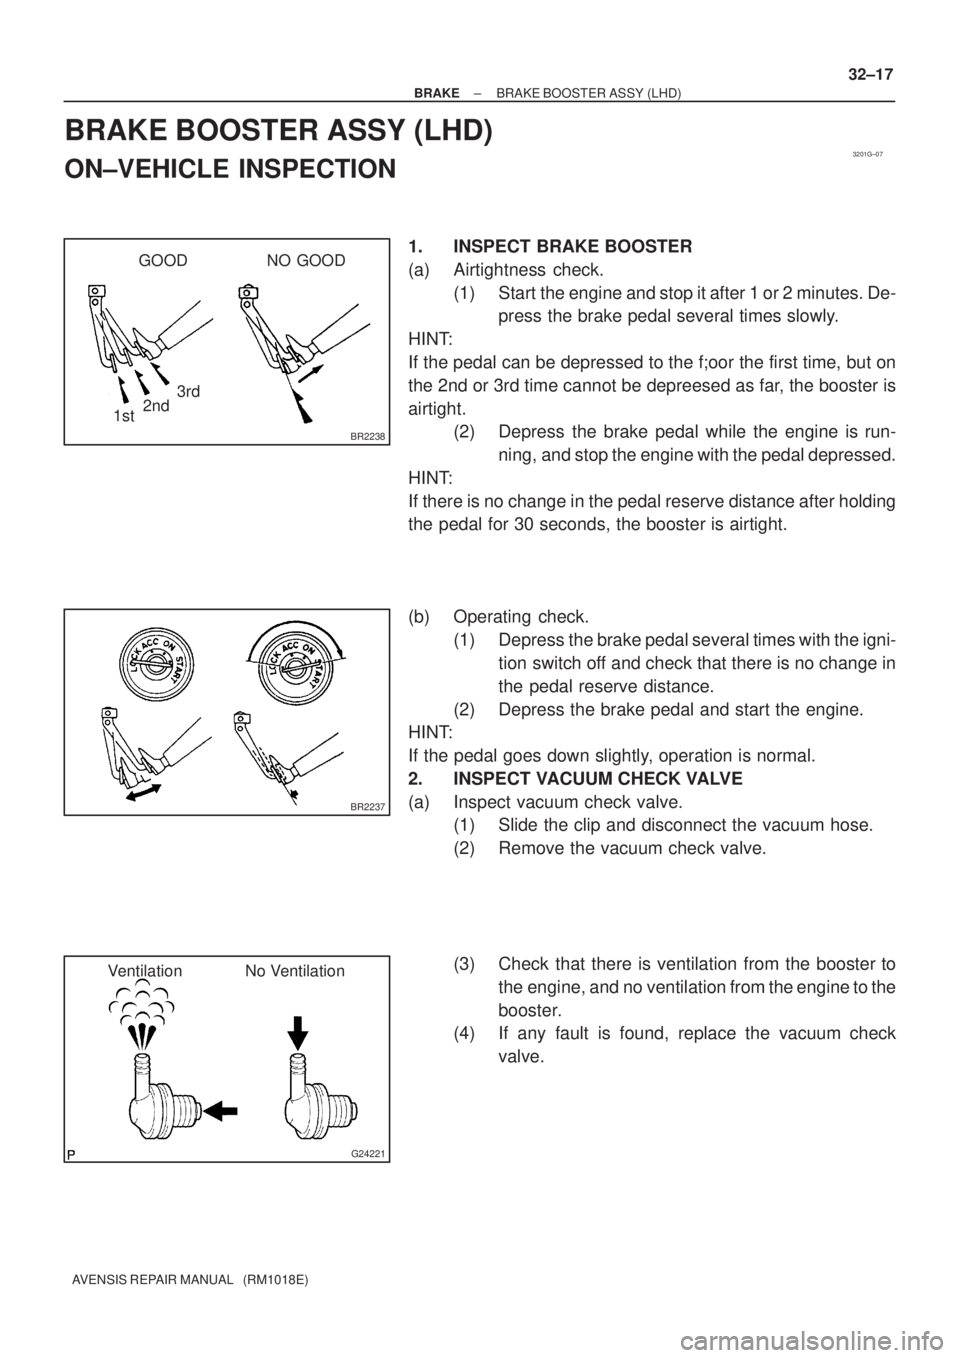
1. INSPECT BRAKE BOOSTER
(a) Airtightness check.
(1) Start the engine and stop it after 1 or 2 minutes. De-
press the brake pedal several times slowly.
HINT:
If the pedal can be depressed to the f;oor the first time, but on
the 2nd or 3rd time cannot be depreesed as far, the booster is
airtight.
(2) Depress the brake pedal while the engine is run-
ning, and stop the engine with the pedal depressed.
HINT:
If there is no change in the pedal reserve distance after holding
the pedal for 30 seconds, the booster is airtight.
(b) Operating check.
(1) Depress the brake pedal several times with the igni-
tion switch off and check that there is no change in
the pedal reserve distance.
(2) Depress the brake pedal and start the engine.
HINT:
If the pedal goes down slightly, operation is normal.
2. INSPECT VACUUM CHECK VALVE
(a) Inspect vacuum check valve.
(1) Slide the clip and disconnect the vacuum hose.
(2) Remove the vacuum check valve.
(3) Check that there is ventilation from the booster to
the engine, and no ventilation from the engine to the
booster.
(4) If any fault is found, replace the vacuum check
valve.
Page 40 of 1690
320W7±01
F40019
F42620
±
BRAKE BRAKE BOOSTER ASSY (LHD)
32±19
AVENSIS REPAIR MANUAL (RM1018E)
REPLACEMENT
NOTICE:
Do not adjust the brake booster push rod.
1. DRAIN BRAKE FLUID
NOTICE:
Wash the brake fluid off immediately if it adheres to any painted surface\
.
2. REMOVE AIR CLEANER ASSEMBLY WITH HOSE
3. SEPARATE ENGINE ROOM RELAY BLOCK
4. REMOVE CHARCOAL CANISTER ASSY (GASOLINE ENGINE TYPE)
5.REMOVE FUEL FILTER ASSY (DIESEL ENGINE TYPE) (See page 11±82)
6.REMOVE BRAKE MASTER CYLINDER SUB±ASSY (See page 32±13)
(a) w/o VSC:
SST 09023±00100
(b) w/ VSC: SST 09023±38400
7.REMOVE HEATER ASSY (W/ COLD AREA) (See page 55±100)
8. REMOVE FRONT WHEEL LH
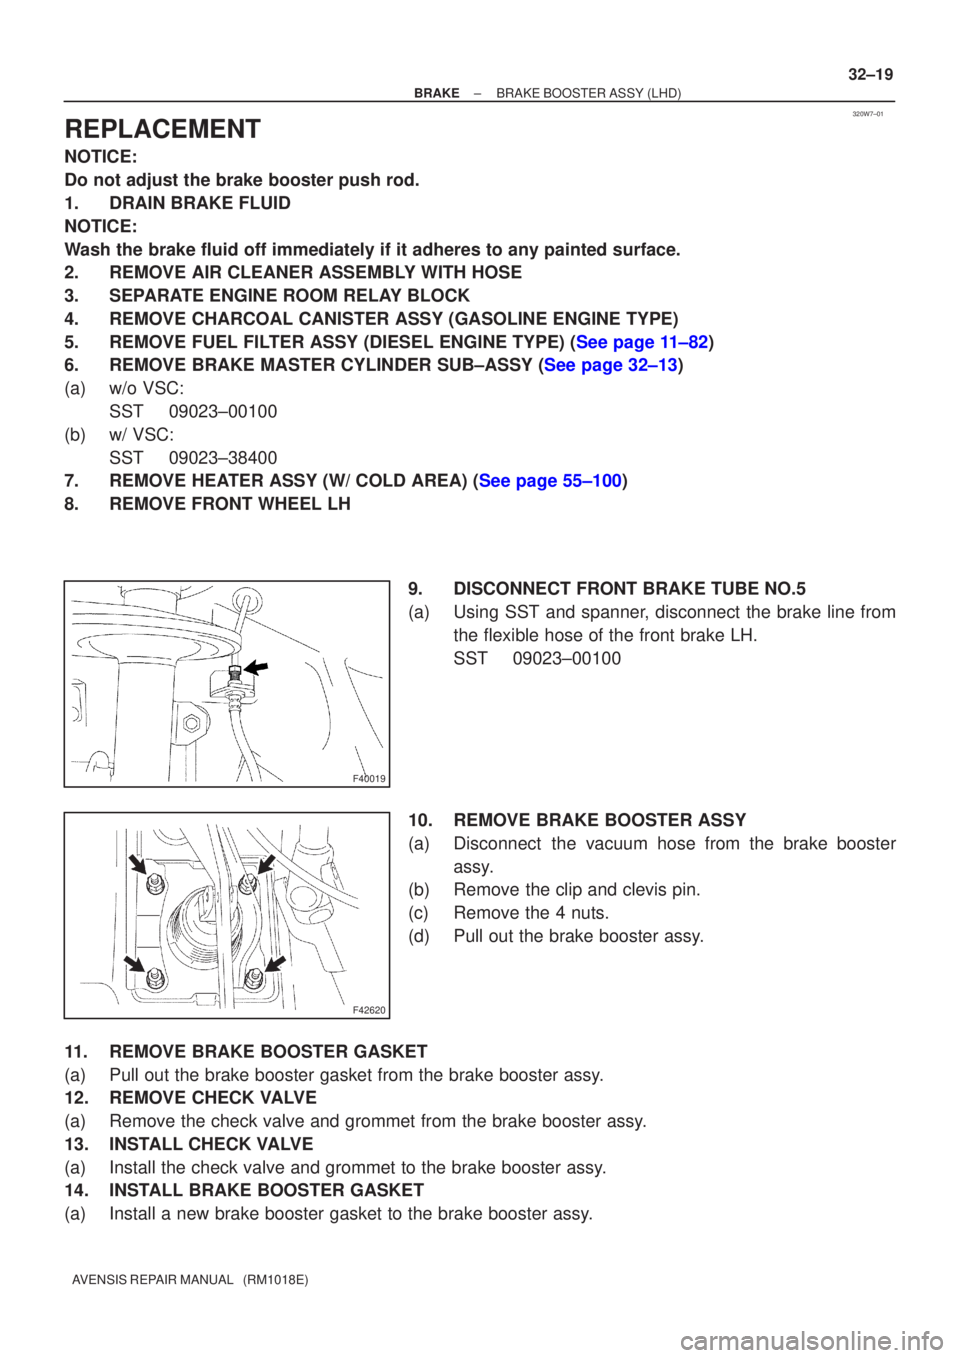
9. DISCONNECT FRONT BRAKE TUBE NO.5
(a) Using SST and spanner, disconnect the brake line fromthe flexible hose of the front brake LH.
SST 09023±00100
10. REMOVE BRAKE BOOSTER ASSY
(a) Disconnect the vacuum hose from the brake booster assy.
(b) Remove the clip and clevis pin.
(c) Remove the 4 nuts.
(d) Pull out the brake booster assy.
11. REMOVE BRAKE BOOSTER GASKET
(a) Pull out the brake booster gasket from the brake booster assy.
12. REMOVE CHECK VALVE
(a) Remove the check valve and grommet from the brake booster assy.
13. INSTALL CHECK VALVE
(a) Install the check valve and grommet to the brake booster assy.
14. INSTALL BRAKE BOOSTER GASKET
(a) Install a new brake booster gasket to the brake booster assy.
Page 42 of 1690
320GN±02
BR2238
GOOD NO GOOD
2nd3rd
1st
BR2237
G24221
Ventilation No Ventilation
± BRAKEBRAKE BOOSTER ASSY (RHD)
32±21
AVENSIS REPAIR MANUAL (RM1018E)
BRAKE BOOSTER ASSY (RHD)
ON±VEHICLE INSPECTION
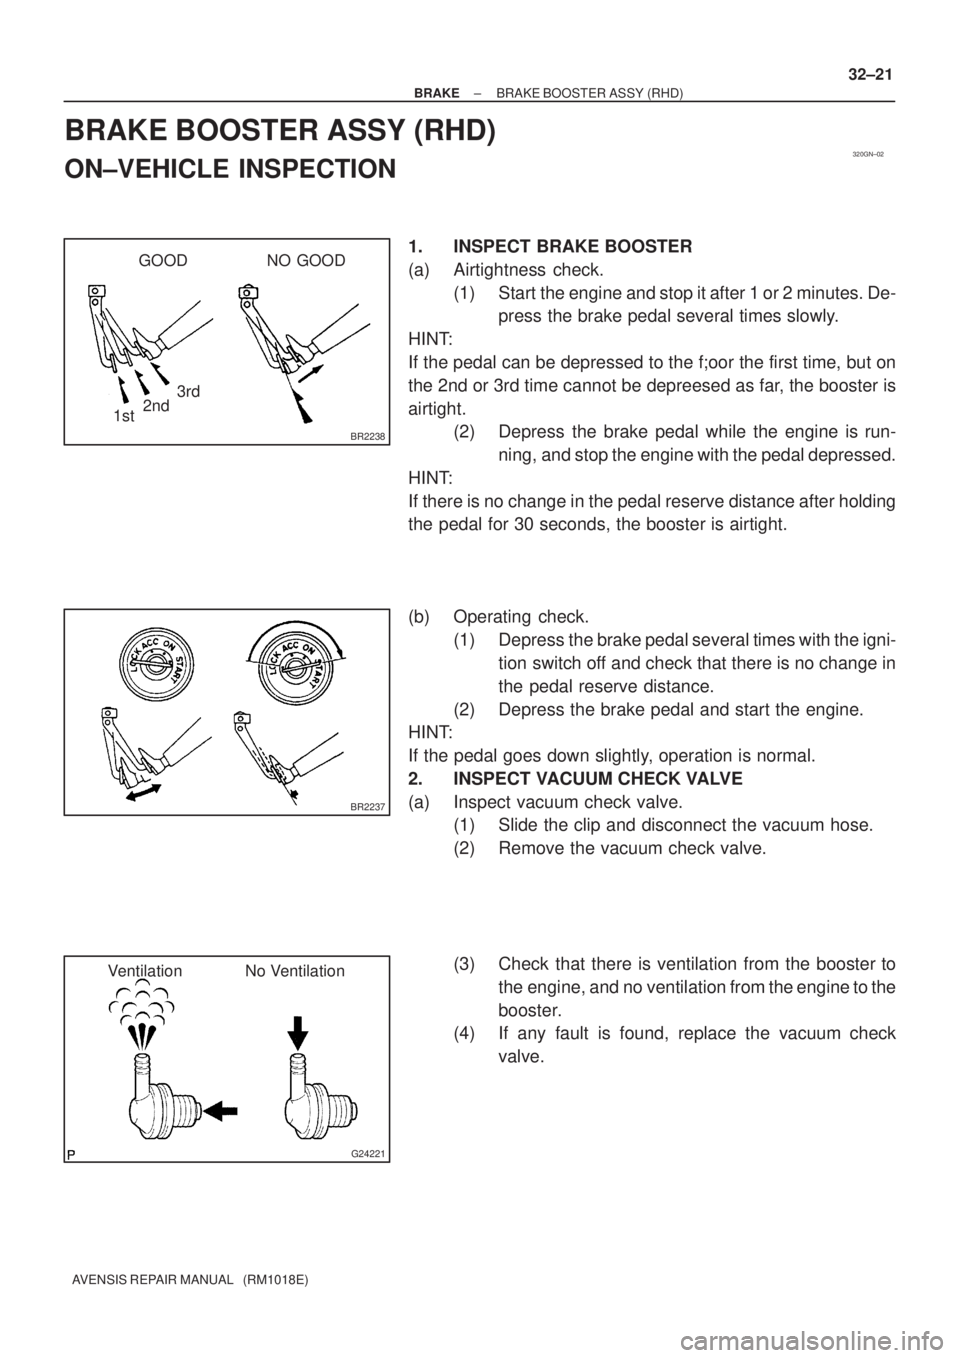
1. INSPECT BRAKE BOOSTER
(a) Airtightness check.
(1) Start the engine and stop it after 1 or 2 minutes. De-
press the brake pedal several times slowly.
HINT:
If the pedal can be depressed to the f;oor the first time, but on
the 2nd or 3rd time cannot be depreesed as far, the booster is
airtight.
(2) Depress the brake pedal while the engine is run-
ning, and stop the engine with the pedal depressed.
HINT:
If there is no change in the pedal reserve distance after holding
the pedal for 30 seconds, the booster is airtight.
(b) Operating check.
(1) Depress the brake pedal several times with the igni-
tion switch off and check that there is no change in
the pedal reserve distance.
(2) Depress the brake pedal and start the engine.
HINT:
If the pedal goes down slightly, operation is normal.
2. INSPECT VACUUM CHECK VALVE
(a) Inspect vacuum check valve.
(1) Slide the clip and disconnect the vacuum hose.
(2) Remove the vacuum check valve.
(3) Check that there is ventilation from the booster to
the engine, and no ventilation from the engine to the
booster.
(4) If any fault is found, replace the vacuum check
valve.
Page 46 of 1690
320W4±01
G24211
F42291
±
BRAKE BRAKE BOOSTER ASSY (RHD)
32±25
AVENSIS REPAIR MANUAL (RM1018E)
REPLACEMENT
NOTICE:
Do not adjust the brake booster push rod.
1. DRAIN BRAKE FLUID
NOTICE:
Wash the brake fluid off immediately if it adheres to any painted surface\
.
2.REMOVE BRAKE MASTER CYLINDER SUB±ASSY (See page 32±13)
(a) w/o VSC:
SST 09023±00100
(b) w/ VSC: SST 09023±38400
3.REMOVE CLUTCH MASTER CYLINDER ASSY (M/T TRANSAXLE) (See page 42±13) SST 09023±00100
4. REMOVE ENGINE ASSEMBLY WITH TRANSAXLE (1AZ±FSE ENGINE TYPE) (See page 14±204)
5. REMOVE ENGINE COVER NO.1
6.REMOVE IGNITION COIL ASSY (GASOLINE ENGINE TYPE) (See page 14±81)
7.REMOVE CYLINDER HEAD COVER SUB±ASSY (GASOLINE ENGINE TYPE) (See page 14±81)
8.REMOVE TIMING BELT NO.2 COVER (DIESEL ENGINE TYPE) (See page 14±307)
9.REMOVE CYLINDER HEAD COVER SUB±ASSY (DIESEL ENGINE TYPE) (See page 14±318)
10.REMOVE INJECTOR ASSY (DIESEL ENGINE TYPE) (See page 14±318)
11. REMOVE FRONT WHEEL RH
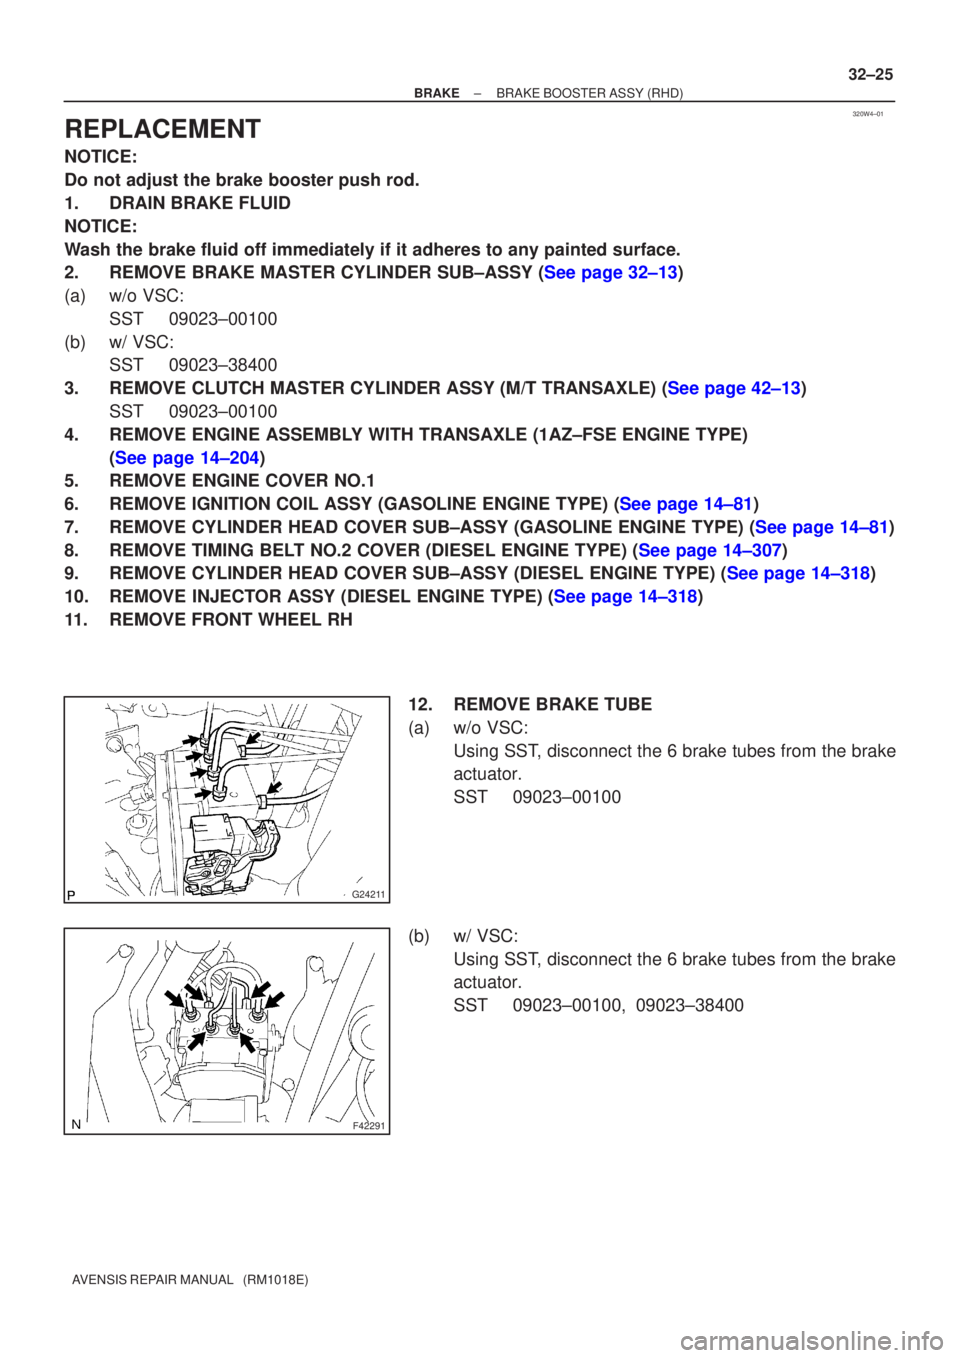
12. REMOVE BRAKE TUBE
(a) w/o VSC:Using SST, disconnect the 6 brake tubes from the brake
actuator.
SST 09023±00100
(b) w/ VSC: Using SST, disconnect the 6 brake tubes from the brake
actuator.
SST 09023±00100, 09023±38400
Page 47 of 1690
F45057
w/o VSC:
w/ VSC:
To Master
Cylinder Rear
To
Master
Cylinder
Front
To Rear Wheel
RH
To Front Wheel LH
To Front Wheel RH
To Rear Wheel
LH
A
To
Master
Cylinder
FrontTo Master
Cylinder
Rear
To Rear
Wheel RH
To Front Wheel LHTo Front Wheel RH
To Rear
Wheel LH
AA
AA
BB
C80802
C80806
32±26
± BRAKEBRAKE BOOSTER ASSY (RHD)
AVENSIS REPAIR MANUAL (RM1018E)
(c) Use tags or make a memo to identify the place to recon-
nect.
(d) Using SST and a spanner, disconnect the brake tube from
the flexible hose of the front brake RH.
SST 09023±00100
(e) Remove the 2 bolts and disconnect the 2 brake tube
clamps.
Page 48 of 1690
F45361
F45362
F45367
F45363Vacuum tank
C81275
± BRAKEBRAKE BOOSTER ASSY (RHD)
32±27
AVENSIS REPAIR MANUAL (RM1018E)
(f) Using SST, disconnect the 3 brake tubes from the ways.
SST 09023±00100
(g) Disconnect the brake tube from the clamp and remove
the brake tubes.
(h) Disconnect the 3 brake tubes from the clamp and remove
the brake tubes.
13. REMOVE BRAKE BOOSTER ASSY
(a) Gasoline engine type:
Remove the 2 bolts and separate the vacuum pipe from
the body.
(b) Diesel engine type:
Remove the 2 bolts and remove the vacuum tank from the
body.
(c) Disconnect the vacuum hose from the brake booster
assy.
(d) Remove the engine under cover.
(e) Remove the 2 nuts from the engine mounting bracket RH.
(f) Remove the bolt from the rear engine mounting bracket.
(g) Remove the bolt and nut from the front engine mounting
bracket.