Page 278 of 427
5-15
CAUTION:
You can be burned if you spill coolant on hot
engine parts. Coolant contains ethylene glycol
and it will burn if the engine parts are hot
enough. Don't spill coolant on a hot engine.
When the coolant in the coolant recovery tank is at the
FULL COLD mark, start your vehicle.
If the overheat warning continues, there's one more
thing you can try. You can add the proper coolant
mixture directly to the radiator, but be sure the cooling
system is cool before you do it.
CAUTION:
Steam and scalding liquids from a hot cooling
system can blow out and burn you badly. They
are under pressure, and if you turn the radiator
pressure cap
-- even a little -- they can come out
at high speed.
CAUTION: (Continued)
CAUTION: (Continued)
Never turn the cap when the cooling system,
including the radiator pressure cap, is hot. Wait
for the cooling system and radiator pressure cap
to cool if you ever have to turn the pressure cap.
Page 279 of 427
5-16 How to Add Coolant to the Radiator
1. You can remove the radiator pressure cap when
the cooling system, including the radiator pressure
cap and upper radiator hose, is no longer hot. Turn
the pressure cap slowly counterclockwise until it
first stops. (Don't press down while turning the
pressure cap.)
If you hear a hiss, wait for that to stop. A hiss means
there is still some pressure left.
2. Then keep turning the pressure cap, but now push
down as you turn it. Remove the pressure cap.
3. Remove the 3800 Series II V6 engine cover shield to
access the bleed valve.
Page 280 of 427
5-17
A. Clean the area around the engine oil fill tube and
cap before removing. Twist the oil fill tube, with
cap attached, counterclockwise and remove it.
B. If you have the supercharged engine, remove the
nut in the center of the cover shield.
C. Lift the engine cover shield at the front, slide the
catch tab out of the engine bracket and remove
the cover shield.
D. Put the oil fill tube, with cap attached, in the valve
cover oil fill hole until you're ready to replace the
cover shield.
There is one
bleed valve. It is
located on the
thermostat housing.
4. After the engine cools, open the coolant air
bleed valve.
Page 281 of 427
5-18
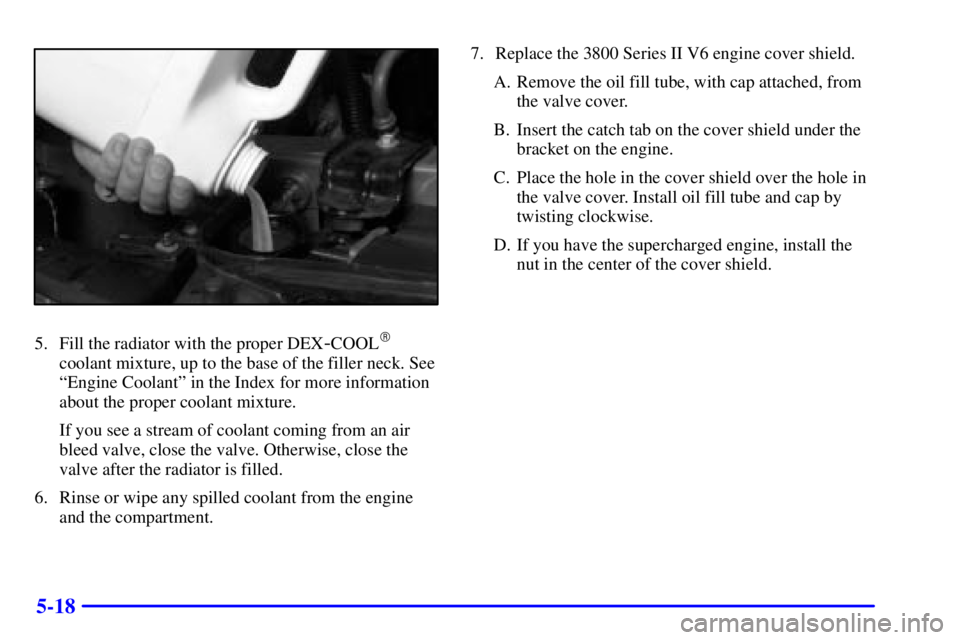
5. Fill the radiator with the proper DEX-COOL�
coolant mixture, up to the base of the filler neck. See
ªEngine Coolantº in the Index for more information
about the proper coolant mixture.
If you see a stream of coolant coming from an air
bleed valve, close the valve. Otherwise, close the
valve after the radiator is filled.
6. Rinse or wipe any spilled coolant from the engine
and the compartment.7. Replace the 3800 Series II V6 engine cover shield.
A. Remove the oil fill tube, with cap attached, from
the valve cover.
B. Insert the catch tab on the cover shield under the
bracket on the engine.
C. Place the hole in the cover shield over the hole in
the valve cover. Install oil fill tube and cap by
twisting clockwise.
D. If you have the supercharged engine, install the
nut in the center of the cover shield.
Page 282 of 427
5-19
8. Then fill the coolant recovery tank to the FULL
COLD mark.
9. Put the cap back on the coolant recovery tank, but
leave the radiator pressure cap off.10. Start the engine and let it run until you can feel the
upper radiator hose getting hot. Watch out for the
engine cooling fans.
11. By this time, the coolant level inside the radiator
filler neck may be lower. If the level is lower, add
more of the proper DEX
-COOL� coolant mixture
through the filler neck until the level reaches the
base of the filler neck.
Page 284 of 427
5-21
Changing a Flat Tire
If a tire goes flat, avoid further tire and wheel damage
by driving slowly to a level place. Turn on your hazard
warning flashers.
CAUTION:
Changing a tire can cause an injury. The vehicle
can slip off the jack and roll over you or other
people. You and they could be badly injured.
Find a level place to change your tire. To help
prevent the vehicle from moving:
1. Set the parking brake firmly.
2. Put the shift lever in PARK (P).
3. Turn off the engine.
To be even more certain the vehicle won't move,
you can put blocks at the front and rear of the
tire farthest away from the one being changed.
That would be the tire on the other side of the
vehicle, at the opposite end.
The following steps will tell you how to use the jack and
change a tire.
Page 295 of 427

5-32
If You're Stuck: In Sand, Mud,
Ice or Snow
In order to free your vehicle when it is stuck, you will
need to spin the wheels, but you don't want to spin
your wheels too fast. The method known as ªrockingº
can help you get out when you're stuck, but you must
use caution.
CAUTION:
If you let your tires spin at high speed, they can
explode, and you or others could be injured.
And, the transaxle or other parts of the vehicle
can overheat. That could cause an engine
compartment fire or other damage. When you're
stuck, spin the wheels as little as possible. Don't
spin the wheels above 35 mph (55 km/h) as shown
on the speedometer.
NOTICE:
Spinning your wheels can destroy parts of your
vehicle as well as the tires. If you spin the wheels
too fast while shifting your transaxle back and
forth, you can destroy your transaxle.
For information about using tire chains on your vehicle,
see ªTire Chainsº in the Index.
Rocking Your Vehicle To Get It Out
First, turn your steering wheel left and right. That will
clear the area around your front wheels. If your vehicle
has traction control, you should turn the system off. See
ªTraction Control Systemº in the Index. Then shift back
and forth between REVERSE (R) and a forward gear,
spinning the wheels as little as possible. Release the
accelerator pedal while you shift, and press lightly on
the accelerator pedal when the transaxle is in gear. By
slowly spinning your wheels in the forward and reverse
directions, you will cause a rocking motion that may
free your vehicle. If that doesn't get you out after a few
tries, you may need to be towed out. If you do need to
be towed out, see ªTowing Your Vehicleº in the Index.
Page 296 of 427

6-
6-1
Section 6 Service and Appearance Care
Here you will find information about the care of your vehicle. This section begins with service and fuel information,
and then it shows how to check important fluid and lubricant levels. There is also technical information about your
vehicle, and a part devoted to its appearance care.
6
-2 Service
6
-3 Fuel
6
-5 Fuels in Foreign Countries
6
-6 Filling Your Tank
6
-9 Filling a Portable Fuel Container
6
-9 Checking Things Under the Hood
6
-12 Engine Oil
6
-17 Engine Air Cleaner/Filter
6
-19 Passenger Compartment Air Filter
(If Equipped)
6
-20 Supercharger Oil
6
-21 Automatic Transaxle Fluid
6
-25 Engine Coolant
6
-28 Radiator Pressure Cap
6
-28 Power Steering Fluid
6
-29 Windshield Washer Fluid
6
-31 Brakes6
-34 Battery
6
-36 Bulb Replacement
6
-45 Windshield Wiper Blade Replacement
6
-46 Tires
6
-57 Appearance Care
6
-58 Cleaning the Inside of Your Vehicle
6
-60 Care of Safety Belts
6
-61 Cleaning the Outside of Your Vehicle
6
-63 Sheet Metal Damage
6
-65 GM Vehicle Care/Appearance Materials
6
-66 Vehicle Identification Number (VIN)
6
-67 Electrical System
6
-71 Removing the Rear Seat Cushion
6
-77 Replacement Bulbs
6
-77 Capacities and Specifications
6
-78 Normal Maintenance Replacement Parts