Page 108 of 166

Rear screen wiper (estate)
Turn ring Ato the first notch,
for intermittent wiping. Rear screen wash (estate)
Turn ring Abeyond the first
notch; the windscreen wash then the windscreen wiperoperate for a fixed period.
WINDSCREEN WIPER STALK Front windscreen wipers2 . Rapid wipe (heavy rain)
1 . Normal wipe (moderate rain).
AUTO Automatic wipe
0 . Off.
∀Single wipe (press downwards).
Operation In position 1or 2, when the vehicle
stops, the windscreen wiper changes to a lower wiping speed, thenresumes its initial speed when thevehicle starts again. When the ignition has been switched off for more than a
minute with the stalk in the AUTOposition, it is necesary to reacti-vate this function. To do this, move
the stalk to any position, then move itback to the AUTOposition. Automatic windscreen wiper In the
AUTO position, the wipers
operate automatically and adjust
their speed to the intensity of the rainfall. Operating check Switching on Activation of the function is accom- panied by the message 'Automatic
windscreen wiper actuated' on the
multi–function display. In the event of malfunction in the
AUTO position, the windscreen wiper
will operate in downgrade mode.
Contact a PEUGEOT dealer to have the system checked.
YOUR 406 IN DETAIL
126
Do not mask the rain detector located on thewindscreen behind the
interior mirror.
If you take the vehicle to an auto-matic car wash, switch off the igni-tion or check that the windscreenwiper stalk is not in the automaticposition.
In Winter, it is advisable to wait for complete de-icing of the wind-screen before switching on theautomatic wipe.
Windscreen and headlamp wash Pull the windscreen wiper stalk towards you. The windscreen wash then the wind- screen wipers operate for a fixed
period. The windscreen wash andheadlamp wash operate simultane-ously for a few seconds, only if the
dipped beam or main beam head-lamps are on.
Page 112 of 166
EXTERIOR MIRRORS Electric rear view mirrors
Turn knob 6to the right or to the left
to select the corresponding mirror.Move knob 6in all four directions to
adjust.When parked, the mirrors can be
folded back manually. Fold-back electric mirrors With the ignition on, turn knob 6to
position A.
The outside of the mirror on the driver's side is con-vex (area at edge definedby dotted line) in order toeliminate the 'blind spot'.
Objects observed in the driver'sand passenger's mirrors are in
reality closer than they appear. This must be taken into account
to judge correctly the distance ofvehicles approaching from behind.
YOUR 406 IN DETAIL
142
Page 113 of 166

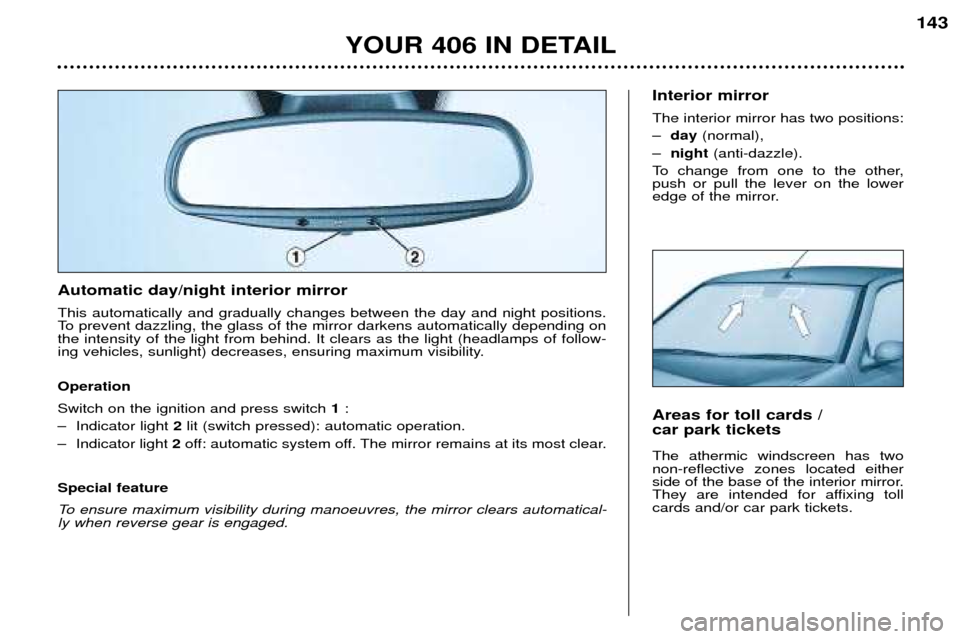
Automatic day/night interior mirror This automatically and gradually changes between the day and night positions.
To prevent dazzling, the glass of the mirror darkens automatically depending onthe intensity of the light from behind. It clears as the light (headlamps of follow-
ing vehicles, sunlight) decreases, ensuring maximum visibility. Operation Switch on the ignition and press switch 1:
– Indicator light 2lit (switch pressed): automatic operation.
– Indicator light 2off: automatic system off. The mirror remains at its most clear.
Special feature
To ensure maximum visibility during manoeuvres, the mirror clears automatical- ly when reverse gear is engaged.
YOUR 406 IN DETAIL
143
Areas for toll cards / car park tickets
The athermic windscreen has two non-reflective zones located either
side of the base of the interior mirror.
They are intended for affixing tollcards and/or car park tickets.
Interior mirror The interior mirror has two positions: – day (normal),
– night (anti-dazzle).
To change from one to the other, push or pull the lever on the lower
edge of the mirror.
Page 115 of 166
Sun visor with illuminated courtesy light With the ignition on, the mirror is automatically lit up when the flap isopened.COURTESY LIGHTSOff. On when one of the doors is opened. Permanently on when the ignition key is in the accessories position or the ignition is on.
1 - Front courtesy light.
2 - Rear courtesy light.
3 - Front map-reading lights. With the key in the accessories position or the ignition on, operate the rele- vant switch.
YOUR 406 IN DETAIL
145
Page 144 of 166
CHANGING A FUSE The fuse boxes are under the fascia and in the engine compartment. Fascia fuse box
Turn the three screws a quarter turn with a coin.Pull at Aand tilt the cover to access
the fuses. Removing and changing a fuse Before changing a fuse you must find out the cause of the fault and have it put
right. The fuse numbers are indicated on the fuse box. Use the special pliers
Aattached to the box.
Always change a faulty fuse for one of the same rating.
Correct Incorrect Pliers A
Remove the fascia panel lower trim to access the built-in systems interface.
Fuse no. Rating Functions A 20 A Locking/Unlocking.
B 10 A Rear fog lamps.
C 40 A Demisting of mirrors.
D 15 A Rear screen wiper.
E 30 A Electric windows.
F 15 A Supply to: Instrument panel,
Display, Audio equipment,Satellite navigation system, Air conditioning.
MAINTENANCE OF YOUR 406
43
Page 148 of 166
Fuse N° RatingFunctions
19 10 ARear fog lamps.
20 10ARear right and front left side light.
21 10ARear left and front right side light.
22 10 A Glove box lighting –Map reading light –Courtesy mirror light -Front and rear courtesy lights -
Lighting for electric windows pad and Electrochrome rear view mirror.
23 20 ALighter.
24 –Not used.
25 20 AAudio equipment.
26 –Not used.
27 5 ARear window relay.
28 15 AHeated seats.
R5AReplacement fuse.
R2 10 A Replacement fuse.
R3 30AReplacement fuse.
R4 20 AReplacement fuse.
R5 15A Replacement fuse.
MAINTENANCE OF YOUR 406
45