Page 4 of 128
STEERING WHEEL
STALKS LIGHTING
Front and rear lights (ring A)Lights off. Side lights on.
Dipped/ main beam headlampson. Automatic switching on of lights*
Front fog lamps * and rear foglamp
Turn the ring towards the front to switch on and towards the rear to
switch off. The on/off status isshown by the indicator light onthe instrument panel. Vehicles fitted with a rear foglamp (ring B)
Rear fog lamp.
Vehicles fitted with front foglamps and a rear fog lamp(ring C) Front fog lamps (first rota-tion of the ring forwards).
Front fog lampsand rear fog lamp(second rotation ofthe ring
forwards)
* According to specification WINDSCREEN WIPERS Front
2 Rapid wipe (heavy rain)
1 Normal wipe (moderately heavy rain)
AUTO Automatic wipe*
0 Stop
� Single wipe
Wash-wipe: pull the stalktowards you. Rear
Stop Intermittent W ash-
wipe wipe
Automatic wipe*In the AUTO position,
the system automatically adjusts the wiper timingto the intensity of therainfall.
7274
YOUR 307 AT A GLANCE5
Page 24 of 128

1 -Rev counter.
2 - Seat belt not fastened warning light.
3 - Engine autodiagnostics warning light.
4 - Handbrake and low brake fluidlevel warning light.
5 - Left-hand direction indicator.
6 - Coolant temperature indicator. 7 -
Battery charge warning light.
8 - Central (STOP) warning light.
9 - Engine oil pressure warning light.
10 - Low fuel level warning light.
11 - Right-hand direction indicator.
12 - Fuel gauge.
13 - ABS warning light. 14 -
Air bag warning light.
15 - Passenger air bag disarmingindicator light.
16 - Speedometer.
17 - Service indicator, oil level and
total distance recorder.
18 - Trip recorder zero reset.
19 - Rear fog lamp indicator light.
20 - (ESP/ASR) warning light*
21 - Front fog lamps indicator light*.
22 - Diesel engine preheating light.
23 -Main beam headlamps indicator light.
24 - Low coolant level warninglight*.
25 - Dipped beam headlampsindicator light.
26 - Water in diesel filter warninglight*.
27 - Lighting rheostat.
* According to specification.
INSTRUMENTS AND CONTROLS
28
INSTRUMENT PANEL DIALS: PETROL / DIESEL
Page 25 of 128

INSTRUMENTS AND CONTROLS29
1 -
Rev counter.
2 - Seat belt not fastened warning light.
3 -
Engine autodiagnostics warning light.
4 - Handbrake and low brake fluid level warning light.
5 - Left-hand direction indicator.
6 - Coolant temperature indicator. 7 -
Battery charge warning light.
8 - Central (STOP) warning light.
9 - Engine oil pressure warning light.
10 - Low fuel level warning light.
11 - Right-hand direction indicator.
12 - Fuel gauge.
13 - ABS warning light. 14 -
Air bag warning light.
15 - Passenger air bag disarming indicator light.
16 - Speedometer.
17 - Service indicator, oil level and
total distance recorder.
18 - Trip recorder zero reset.
19 - Rear fog lamp indicator light.
20 - (ESP/ASR) warning light*
21 - Front fog lamps indicator light*.
22 -
Main beam headlamps indicator light.
23 - Low coolant level warninglight*.
24 - Dipped beam headlampsindicator light.
25 - Lighting rheostat.
26 - Sport programme.
27 - Snow programme.
28 - Gear lever position indicator.
* According to specification
INSTRUMENT PANEL DIALS: AUTOMATIC GEARBOX
Page 75 of 128

Dipped/Main beam change Pull the stalk towards you. Note:with the ignition off, if the dri-
ver's door is opened, a buzzer sounds if you have left your lights on. Front fog lamps* and rear fog lamp Rotate the ring forwards to switch on
and backwards to switch off. The statusis confirmed by the light on the instru-ment panel.
Vehicles fitted with a rear fog lamp (ring B)
Rear fog lamp
This operates with the dipped/main beam headlamps.
Vehicles fitted with front fog lamps and a rear fog lamp (ring C)* Front fog lamps (first rota- tion of the ring forwards)
These operate with the side lightsand the dipped beam lamps.
THE LIGHTS STALK Front and rear lights Selection is by turning ring
A.
Lights off Side lights on Dipped/Main beam headlamps Automatic switching on of lights* Front and rear foglamps (2nd rotation ofthe ring forwards). These operate with the
side lights and the dipped/main beam headlamps. Note: to switch off the rear fog lamp
and the front fog lamps, turn the ring backwards twice in succession.
Direction indicators (flashers) Left : downwards.
Right : upwards.
YOUR 307 IN DETAIL
72
In good or rainy weather, both day and night, therear fog lamp is dazzlingand is prohibited. Do not forget to switch
the fog lamp off when it is no lon- ger needed.
* According tospecification
Page 76 of 128

AUTOMATIC SWITCHING ON OF LIGHTS* Side lights and dipped beam head- lamps switch on automatically if the
light is poor, or during operation of
the windscreen wipers. They switch
off as soon as the light becomesbright enough or the windscreenwipers stop. Note :In foggy weather the bright-
ness sensor can detect sufficient
light. As a consequence, the lights
wil not come on automatically. This function is active when the
vehicle is supplied to the customer.
To disarm or activate the function: � Start with the key in the accesso- ries position (1st notch),
� Press the end of the stalk formore than two seconds.
Note: after the ignition is switched
off and depending on the brightness,the lights remain on for 45 secondsor until the vehicle is locked. Do not cover the brightness sen- sor located in the centre of thefascia. It is used for automaticswitching on of the lights. Operating check
Triggering of the sensorAcivation of this function is accom- panied by an audible signal"Automatic lighting''
on the multi-
function display. The light also comes on as soon as the driver changes the stalk positionto 0. Disarming Disarming of the function is accom- panied by an audible signal Note: the function is temporarily
disarmed when the driver uses the manual lighting controls. If the brightness sensor does not function correctly , the system acti-
vates the function (the lights comeon). The driver is alerted by an audible signal, accompanied by the messa-ge "Automatic switching on of
lights faulty" .
Contact a PEUGEOT dealer to havethe system checked.
*According to specification
YOUR 307 IN DETAIL 73
Page 109 of 128

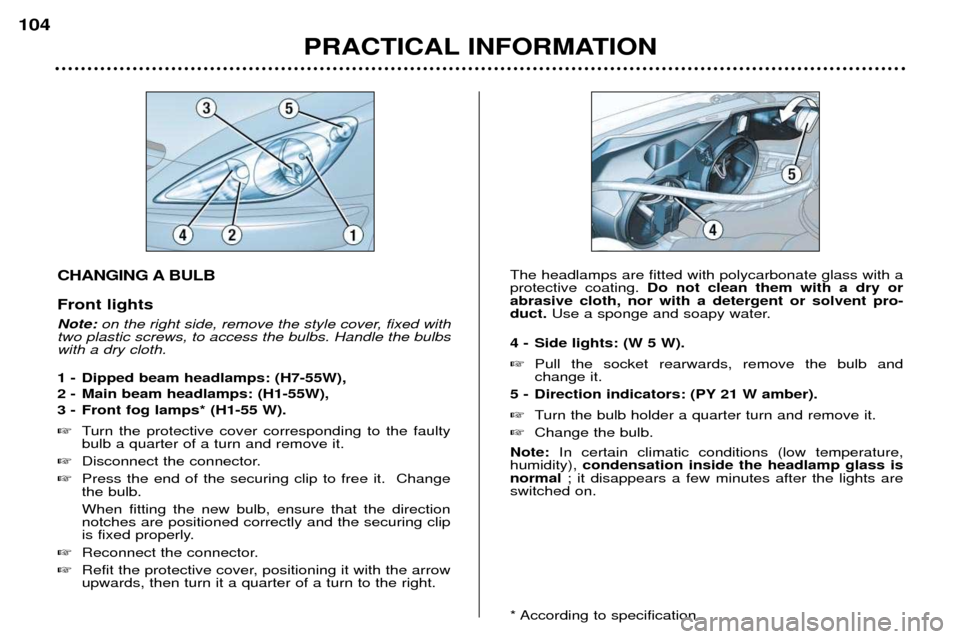
CHANGING A BULB Front lights Note: on the right side, remove the style cover, fixed with
two plastic screws, to access the bulbs. Handle the bulbs with a dry cloth.
1 - Dipped beam headlamps: (H7-55W),
2 - Main beam headlamps: (H1-55W),
3 - Front fog lamps* (H1-55 W). � Turn the protective cover corresponding to the faulty bulb a quarter of a turn and remove it.
� Disconnect the connector.
� Press the end of the securing clip to free it. Changethe bulb. When fitting the new bulb, ensure that the direction notches are positioned correctly and the securing clip
is fixed properly.
� Reconnect the connector.
� Refit the protective cover, positioning it with the arrowupwards, then turn it a quarter of a turn to the right. The headlamps are fitted with polycarbonate glass with aprotective coating.
Do not clean them with a dry or
abrasive cloth, nor with a detergent or solvent pro-duct. Use a sponge and soapy water.
4 - Side lights: (W 5 W). � Pull the socket rearwards, remove the bulb and change it.
5 - Direction indicators: (PY 21 W amber). � Turn the bulb holder a quarter turn and remove it.
� Change the bulb.
Note: In certain climatic conditions (low temperature,
humidity), condensation inside the headlamp glass is
normal ; it disappears a few minutes after the lights are
switched on.
* According to specification
PRACTICAL INFORMATION
104
Page 110 of 128

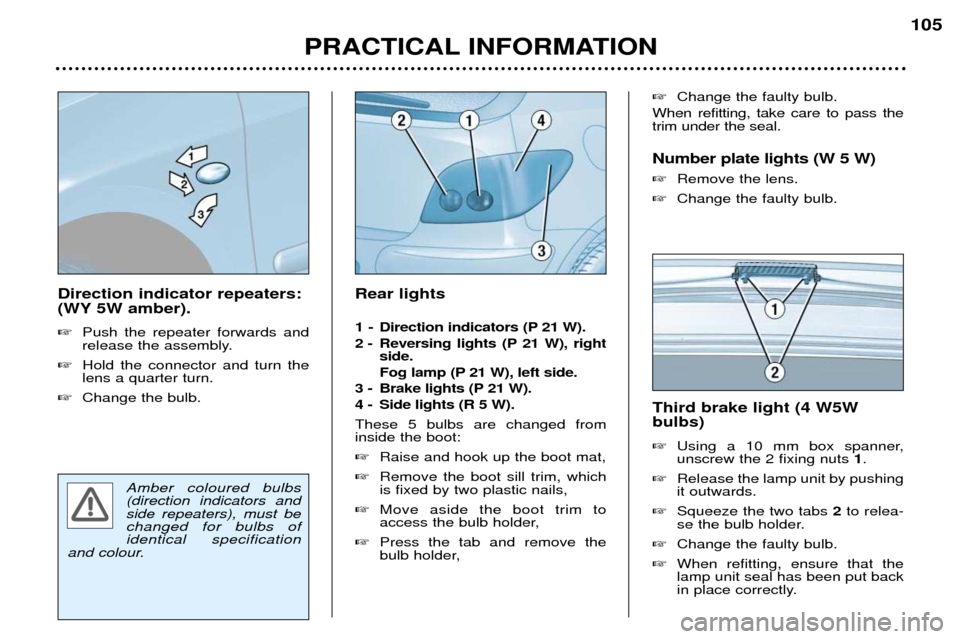
Direction indicator repeaters:
(WY 5W amber). �Push the repeater forwards and
release the assembly.
� Hold the connector and turn thelens a quarter turn.
� Change the bulb. Rear lights
1 - Direction indicators (P 21 W).
2 - Reversing lights (P 21 W), right
side.
Fog lamp (P 21 W), left side.
3 - Brake lights (P 21 W).
4 - Side lights (R 5 W). These 5 bulbs are changed from inside the boot: � Raise and hook up the boot mat,
� Remove the boot sill trim, which is fixed by two plastic nails,
� Move aside the boot trim to
access the bulb holder,
� Press the tab and remove the
bulb holder, Third brake light (4 W5W bulbs) �
Using a 10 mm box spanner, unscrew the 2 fixing nuts 1.
� Release the lamp unit by pushingit outwards.
� Squeeze the two tabs 2to relea-
se the bulb holder.
� Change the faulty bulb.
� When refitting, ensure that thelamp unit seal has been put back
in place correctly.
�
Change the faulty bulb.
When refitting, take care to pass thetrim under the seal. Number plate lights (W 5 W) � Remove the lens.
� Change the faulty bulb.
PRACTICAL INFORMATION 105
Amber coloured bulbs (direction indicators andside repeaters), must bechanged for bulbs ofidentical specification
and colour.
Page 111 of 128

Direction indicator repeaters:
(WY 5W amber). �Push the repeater forwards and
release the assembly.
� Hold the connector and turn thelens a quarter turn.
� Change the bulb. Rear lights
1 - Direction indicators (P 21 W).
2 - Reversing lights (P 21 W), right
side.
Fog lamp (P 21 W), left side.
3 - Brake lights (P 21 W).
4 - Side lights (R 5 W). These 5 bulbs are changed from inside the boot: � Raise and hook up the boot mat,
� Remove the boot sill trim, which is fixed by two plastic nails,
� Move aside the boot trim to
access the bulb holder,
� Press the tab and remove the
bulb holder, Third brake light (4 W5W bulbs) �
Using a 10 mm box spanner, unscrew the 2 fixing nuts 1.
� Release the lamp unit by pushingit outwards.
� Squeeze the two tabs 2to relea-
se the bulb holder.
� Change the faulty bulb.
� When refitting, ensure that thelamp unit seal has been put back
in place correctly.
�
Change the faulty bulb.
When refitting, take care to pass thetrim under the seal. Number plate lights (W 5 W) � Remove the lens.
� Change the faulty bulb.
PRACTICAL INFORMATION 105
Amber coloured bulbs (direction indicators andside repeaters), must bechanged for bulbs ofidentical specification
and colour.