2002 NISSAN XTERRA automatic transmission
[x] Cancel search: automatic transmissionPage 147 of 263
COAST/SET, or CANCEL switch (located
on the steering wheel). To properly use
the cruise control system, use the follow-
ing procedures.
WARNING
Do not use the cruise control when
driving under the following conditions.
cWhen it is not possible to keep the
vehicle at a set speed.
cIn heavy traffic or in traffic that var-
ies in speed.
cOn winding or hilly roads.
c
On slippery roads (rain, snow, ice, etc.).
cIn very windy areas.
Doing so could cause a loss of vehicle
control and result in an accident.
CAUTION
On manual transmission models, do
not shift into N (Neutral) without de-
pressing the clutch pedal when the
cruise control is set. Should this occur,
depress the clutch pedal and turn the
main switch off immediately. Failure to
do so may cause engine damage.
CRUISE CONTROL OPERA-
TIONS
The cruise control allows driving at a speed
between 25 to 90 MPH (40 to 144 km/h)
without keeping your foot on the accelerator
pedal.
To turn on the cruise control,push the
main switch. The CRUISE indicator light in
the instrument panel comes on.
To set cruising speed,accelerate the ve-
hicle to the desired speed, push the
COAST/SET switch and release it. The SET
light in the instrument cluster comes on.
Take your foot off the accelerator pedal.
Your vehicle maintains the set speed.
cTo pass another vehicle,depress the
accelerator pedal. When you release the
pedal, the vehicle returns to the previ-
ously set speed.
c
The vehicle may not maintain the set speed
when going up or down steep hills. If this
happens, drive without the cruise control.
To cancel the preset speed,use one of the
following three methods:
a) Push the CANCEL button; the SET light
in the instrument cluster goes out.b) Tap the brake pedal; the SET light goes
out.
c) Turn the main switch off. Both the
CRUISE indicator on the main switch and
SET light in the instrument cluster go out.
The cruise control is automatically can-
celled and the SET light in the instrument
panel goes out if:
cyou depress the brake or clutch pedal
while pushing the RES/ACCEL or
COAST/SET switch.
cthe vehicle slows down more than 8 MPH
(13 km/h) below the set speed.
cyou depress the clutch pedal (manual
transmission), or move the shift selector
lever to N (Neutral) (automatic transmis-
sion).
To reset at a faster cruising speed,use
one of the following three methods.
a) Depress the accelerator pedal. When the
vehicle attains the desired speed, push
and release the COAST/SET switch.
b) Push and hold the RES/ACCEL switch.
When the vehicle attains the speed you
desire, release the switch.
5-16Starting and driving
ZX
Page 149 of 263
OKeep your engine tuned up.
OFollow the recommended periodic main-
tenance schedule.
OKeep the tires inflated to the correct
pressure. Low tire pressure increases
tire wear and wastes fuel.
OKeep the front wheels in correct align-
ment. Improper alignment increases tire
wear and lowers fuel economy.
OAir conditioner operation lowers fuel
economy. Use the air conditioner only
when necessary.
OWhen cruising at highway speeds, it is
more economical to use the air condi-
tioner and leave the windows closed to
reduce drag.
O
Use 4H or 4L position only when neces-
sary. Four-wheel drive operation lowers
fuel economy.
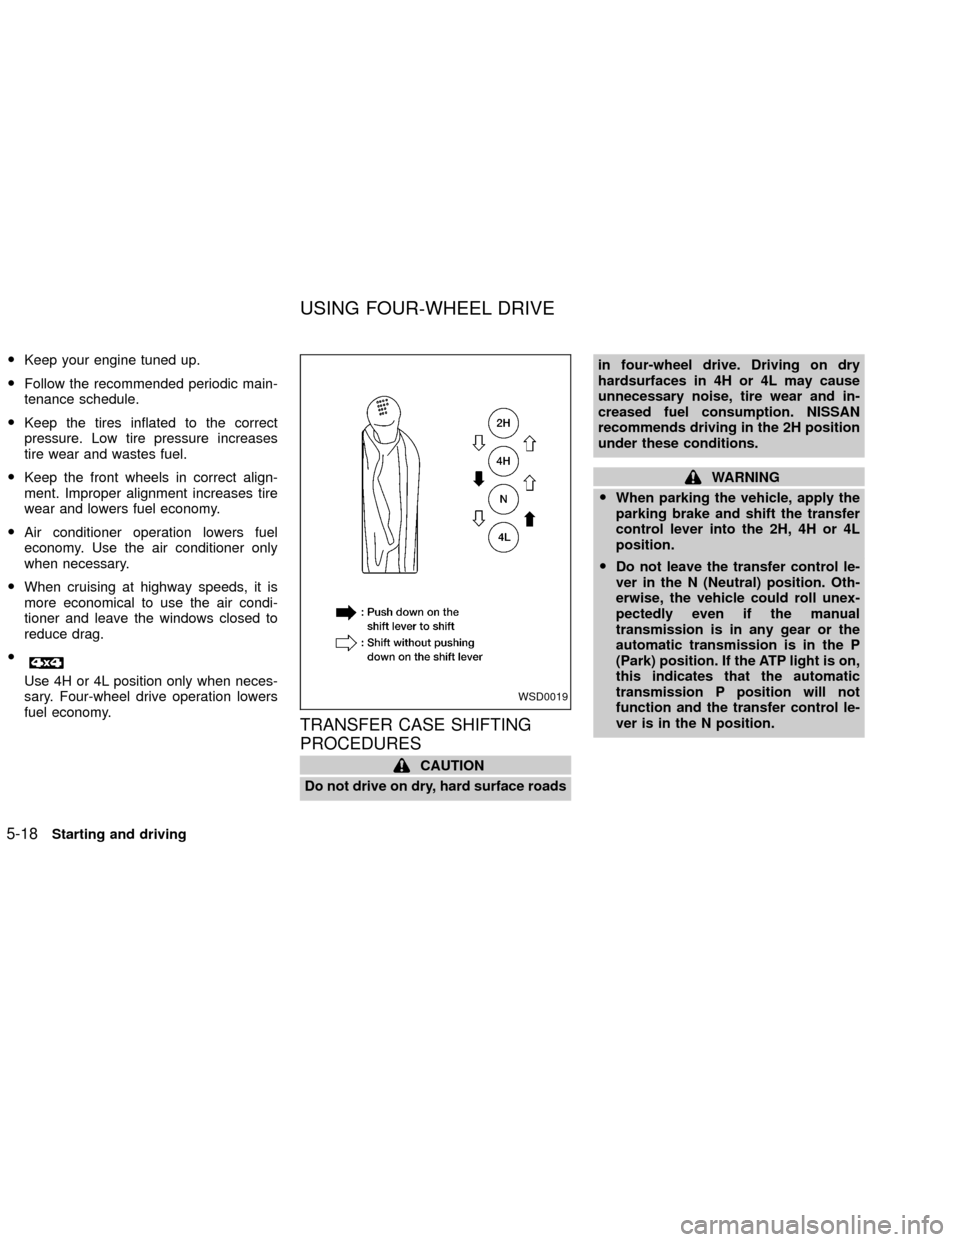
TRANSFER CASE SHIFTING
PROCEDURES
CAUTION
Do not drive on dry, hard surface roadsin four-wheel drive. Driving on dry
hardsurfaces in 4H or 4L may cause
unnecessary noise, tire wear and in-
creased fuel consumption. NISSAN
recommends driving in the 2H position
under these conditions.
WARNING
OWhen parking the vehicle, apply the
parking brake and shift the transfer
control lever into the 2H, 4H or 4L
position.
ODo not leave the transfer control le-
ver in the N (Neutral) position. Oth-
erwise, the vehicle could roll unex-
pectedly even if the manual
transmission is in any gear or the
automatic transmission is in the P
(Park) position. If the ATP light is on,
this indicates that the automatic
transmission P position will not
function and the transfer control le-
ver is in the N position.
WSD0019
USING FOUR-WHEEL DRIVE
5-18Starting and driving
ZX
Page 155 of 263
WARNING
ODo not park the vehicle over flam-
mable materials such as dry grass,
waste paper or rags. They may ignite
and cause a fire.
O
The transfer control lever
must be in the 2H, 4H or 4L position
and the parking brake set to prevent
the vehicle from rolling.
ONever place the transfer control le-
ver in the N (Neutral) position. Oth-
erwise, the vehicle could roll unex-pectedly even if the manual trans-
mission is in gear or the automatic
transmission is in the P (Park) posi-
tion. This could result in serious in-
jury or property damage.
OSafe parking procedures require that
both the parking brake be set and
the transmission placed into P (Park)
for automatic transmission models
or in an appropriate gear for manual
transmission models. Failure to do
so could cause the vehicle to move
unexpectedly or roll away and resultin an accident. Make sure the shift
lever has been pushed as far forward
as it can go and cannot be moved
without depressing the foot brake
pedal.
ONever leave the engine running while
the vehicle is left unattended.
O
Do not leave children unattended in-
side the vehicle. They could unknow-
ingly activate switches or controls.
Unattended children could become
involved in serious accidents.
OIf the ATP lamp is ON, this indicates
that the automatic transmission P
(park) position will not function and
the transfer control lever is in the N
(neutral) position. Failure to engage
the transfer control lever in the 2H,
4H or 4L position could result in the
vehicle moving unexpectedly, result-
ing in serious personal injury or
property damage.
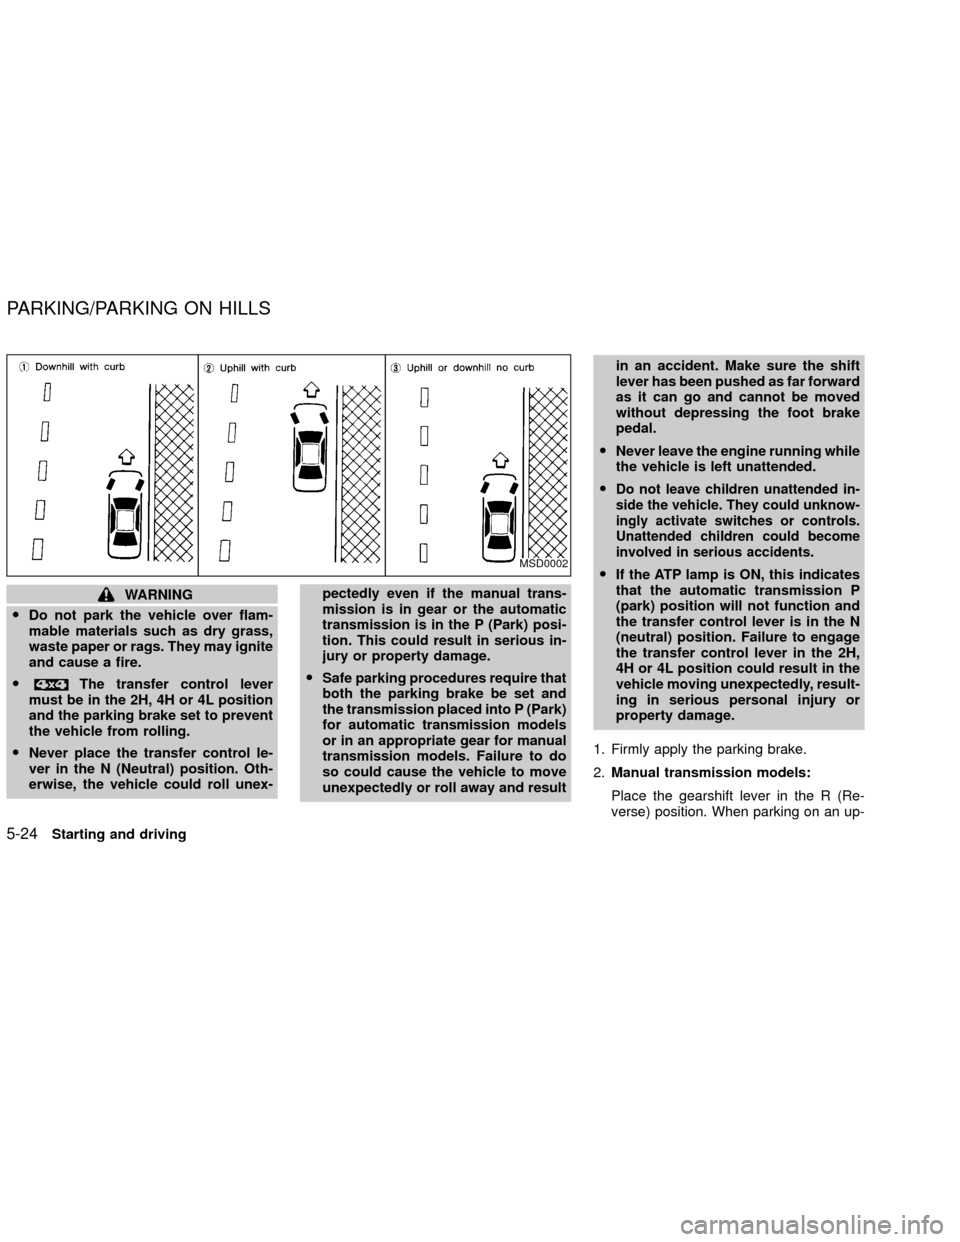
1. Firmly apply the parking brake.
2.Manual transmission models:
Place the gearshift lever in the R (Re-
verse) position. When parking on an up-MSD0002
PARKING/PARKING ON HILLS
5-24Starting and driving
ZX
Page 156 of 263
hill grade, place the gearshift lever in the
1st position.
Automatic transmission models:
Move the gearshift lever to the P (Park)
position.
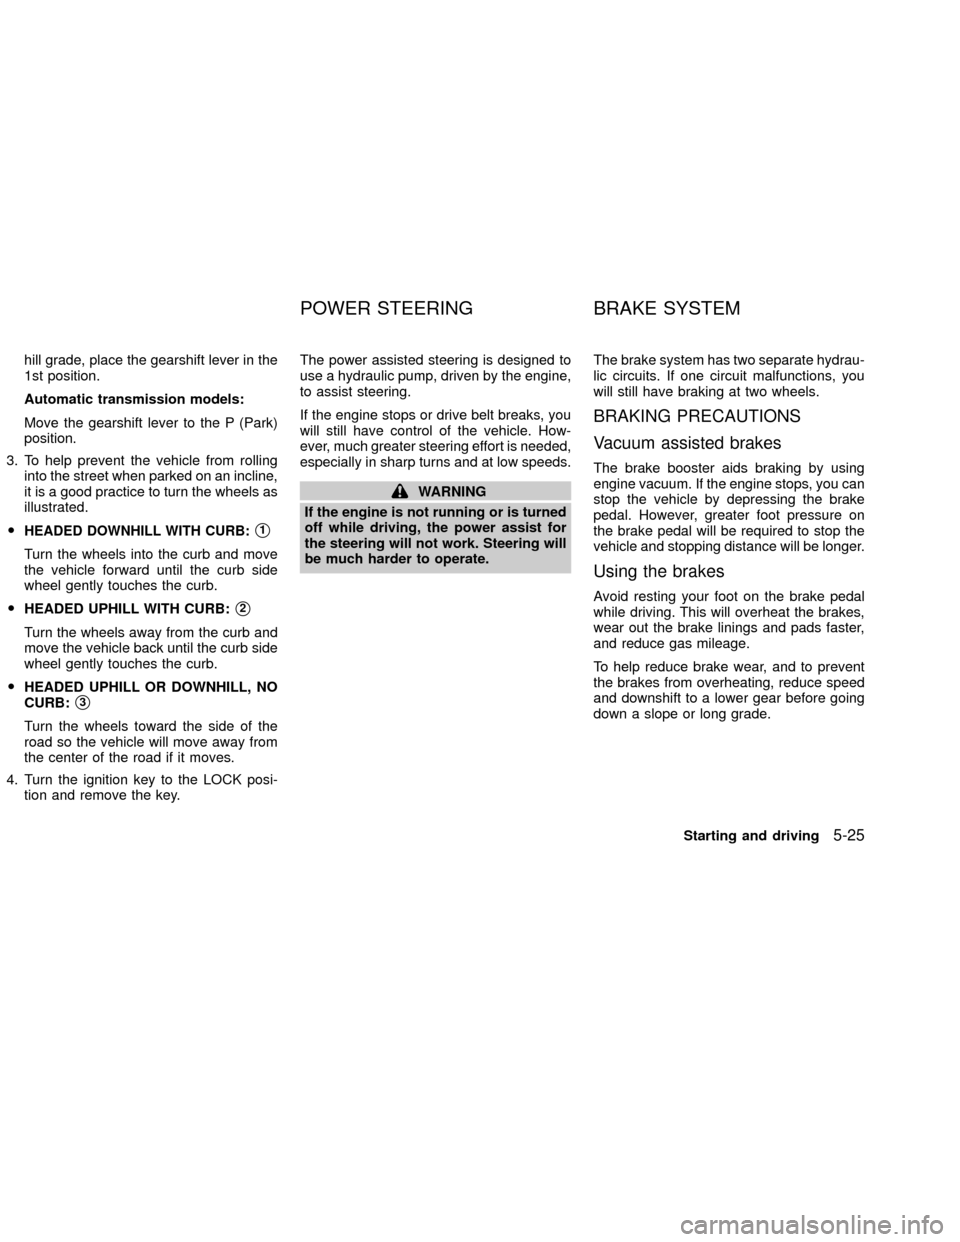
3. To help prevent the vehicle from rolling
into the street when parked on an incline,
it is a good practice to turn the wheels as
illustrated.
O
HEADED DOWNHILL WITH CURB:s1
Turn the wheels into the curb and move
the vehicle forward until the curb side
wheel gently touches the curb.
OHEADED UPHILL WITH CURB:
s2
Turn the wheels away from the curb and
move the vehicle back until the curb side
wheel gently touches the curb.
OHEADED UPHILL OR DOWNHILL, NO
CURB:
s3
Turn the wheels toward the side of the
road so the vehicle will move away from
the center of the road if it moves.
4. Turn the ignition key to the LOCK posi-
tion and remove the key.The power assisted steering is designed to
use a hydraulic pump, driven by the engine,
to assist steering.
If the engine stops or drive belt breaks, you
will still have control of the vehicle. How-
ever, much greater steering effort is needed,
especially in sharp turns and at low speeds.
WARNING
If the engine is not running or is turned
off while driving, the power assist for
the steering will not work. Steering will
be much harder to operate.The brake system has two separate hydrau-
lic circuits. If one circuit malfunctions, you
will still have braking at two wheels.
BRAKING PRECAUTIONS
Vacuum assisted brakes
The brake booster aids braking by using
engine vacuum. If the engine stops, you can
stop the vehicle by depressing the brake
pedal. However, greater foot pressure on
the brake pedal will be required to stop the
vehicle and stopping distance will be longer.
Using the brakes
Avoid resting your foot on the brake pedal
while driving. This will overheat the brakes,
wear out the brake linings and pads faster,
and reduce gas mileage.
To help reduce brake wear, and to prevent
the brakes from overheating, reduce speed
and downshift to a lower gear before going
down a slope or long grade.
POWER STEERING BRAKE SYSTEM
Starting and driving5-25
ZX
Page 163 of 263
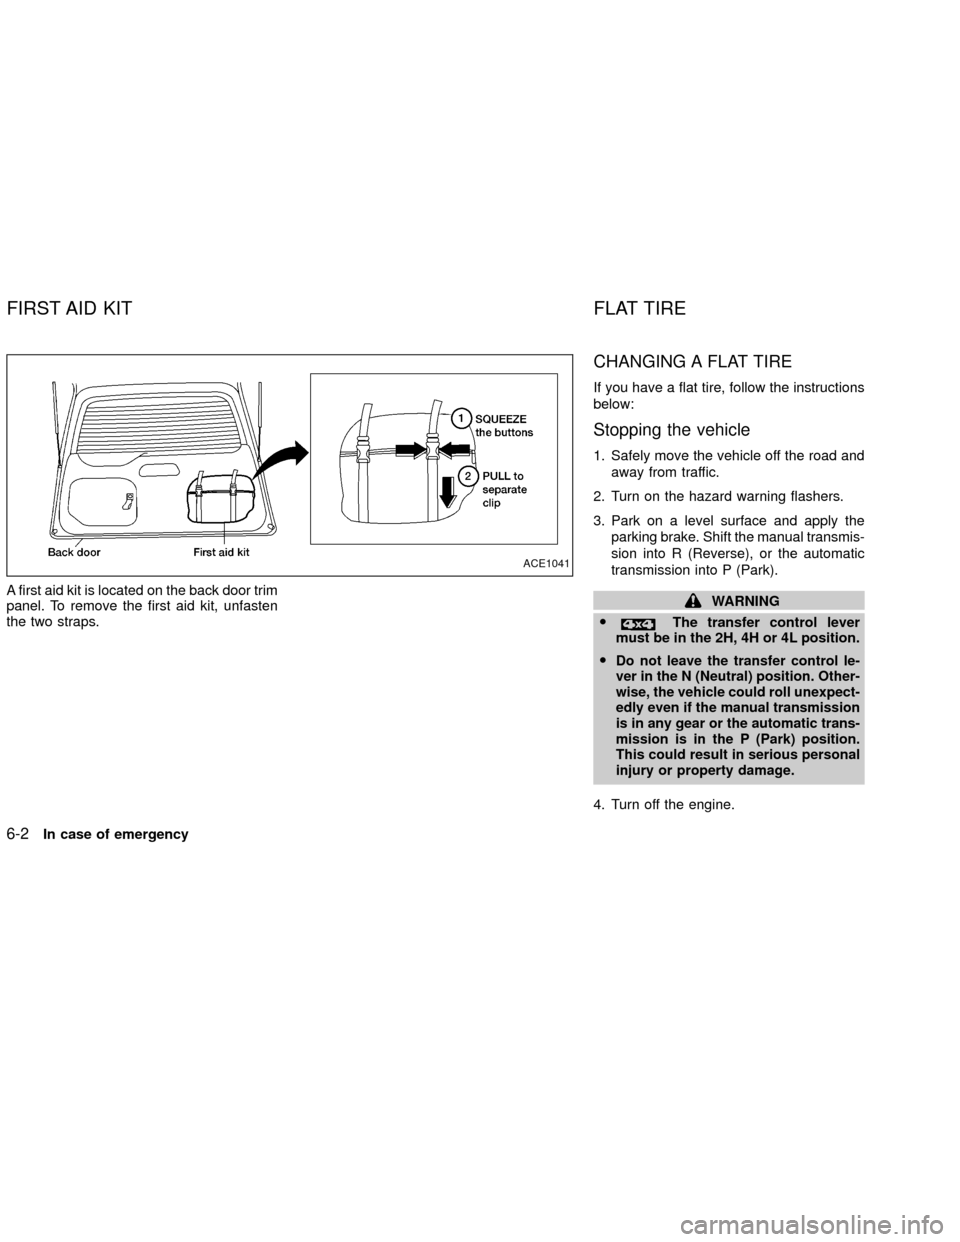
A first aid kit is located on the back door trim
panel. To remove the first aid kit, unfasten
the two straps.
CHANGING A FLAT TIRE
If you have a flat tire, follow the instructions
below:
Stopping the vehicle
1. Safely move the vehicle off the road and
away from traffic.
2. Turn on the hazard warning flashers.
3. Park on a level surface and apply the
parking brake. Shift the manual transmis-
sion into R (Reverse), or the automatic
transmission into P (Park).
WARNING
O
The transfer control lever
must be in the 2H, 4H or 4L position.
O
Do not leave the transfer control le-
ver in the N (Neutral) position. Other-
wise, the vehicle could roll unexpect-
edly even if the manual transmission
is in any gear or the automatic trans-
mission is in the P (Park) position.
This could result in serious personal
injury or property damage.
4. Turn off the engine.
ACE1041
FIRST AID KIT FLAT TIRE
6-2In case of emergency
ZX
Page 164 of 263
5. Raise the hood to warn other traffic and
to signal professional road assistance
personnel that you require assistance.
6. Have all passengers get out of the ve-
hicle and stand in a safe place away from
traffic and clear of the vehicle.
WARNING
OMake sure the parking brake is se-
curely applied and the manual trans-
mission is shifted into R (Reverse),
or the automatic transmission into P
(Park).
ONever change tires when the vehicle
is on a slope, ice or slippery areas.
This is hazardous.
ONever change tires if oncoming traf-
fic is close to your vehicle. Wait for
professional road assistance.
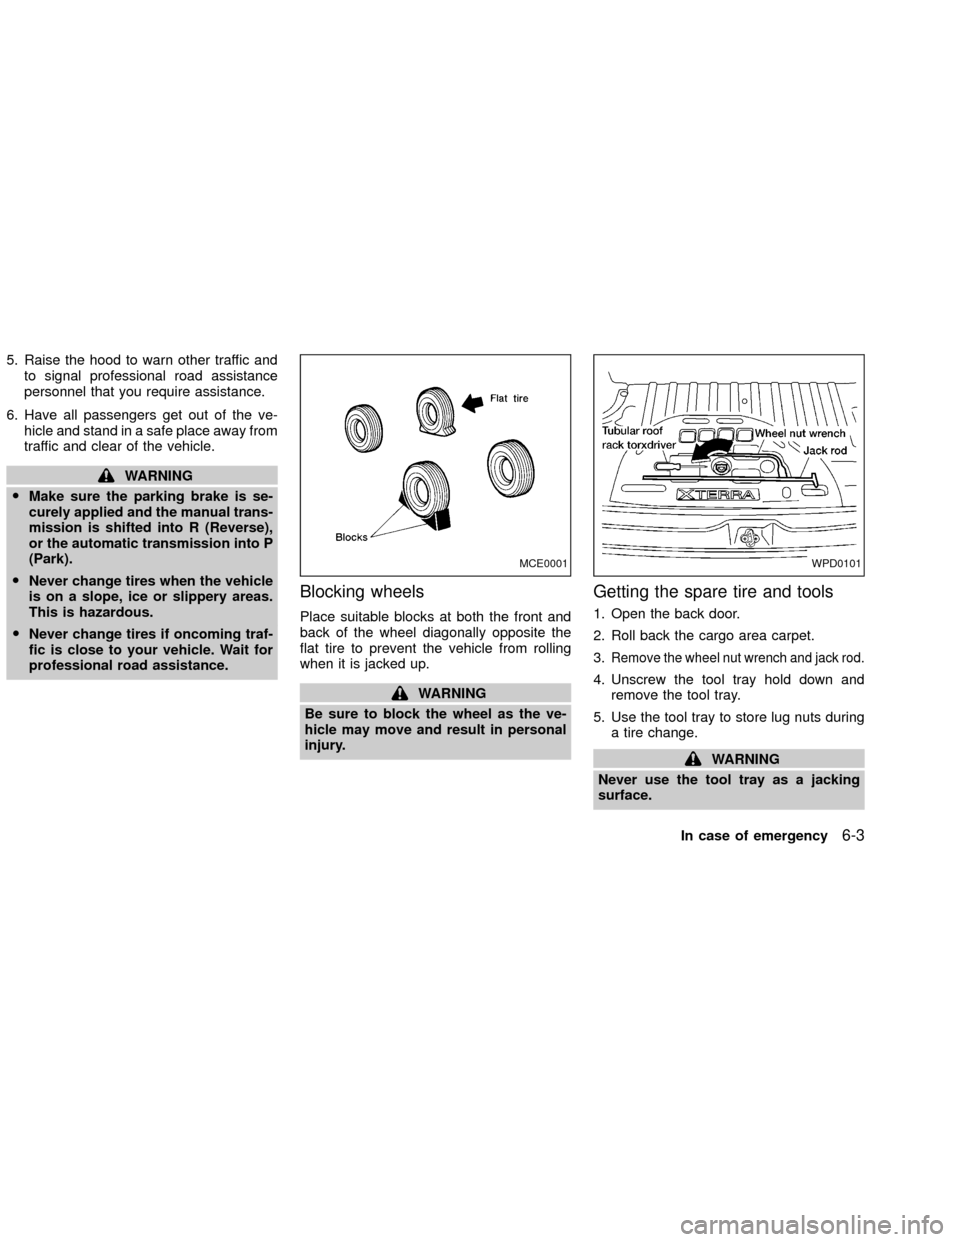
Blocking wheels
Place suitable blocks at both the front and
back of the wheel diagonally opposite the
flat tire to prevent the vehicle from rolling
when it is jacked up.
WARNING
Be sure to block the wheel as the ve-
hicle may move and result in personal
injury.
Getting the spare tire and tools
1. Open the back door.
2. Roll back the cargo area carpet.
3.
Remove the wheel nut wrench and jack rod.
4. Unscrew the tool tray hold down and
remove the tool tray.
5. Use the tool tray to store lug nuts during
a tire change.
WARNING
Never use the tool tray as a jacking
surface.
MCE0001WPD0101
In case of emergency6-3
ZX
Page 171 of 263
CAUTION
OAutomatic transmission models can-
not be push or tow started. This may
cause transmission or other vehicle
damage.
ONever try to start the vehicle by tow-
ing it. When the engine starts, the
forward surge could cause the ve-
hicle to collide with the tow vehicle.If your vehicle is overheating (indicated by
an extremely high temperature gauge read-
ing), or if you feel a lack of engine power, or
detect abnormal noise, etc., take the follow-
ing steps:
WARNING
ODo not continue to drive if your ve-
hicle overheats. Doing so could
cause a vehicle fire.
OTo avoid the danger of being
scalded, never remove the radiator
cap while the engine is still hot.
When the radiator cap is removed,
pressurized hot water will spurt out,
possibly causing serious injury.
ODo not open the hood if steam is
coming out.
1. Move the vehicle safely off the road,
apply the parking brake and move the
gearshift lever to N (Neutral), or the au-
tomatic transmission into P (Park).
Do not stop the engine.
2. Turn off the air conditioner (if so
equipped). Open all of the windows,
move the heater or air conditioner tem-perature control to maximum hot and fan
control to high speed.
3. If engine overheating is caused by climb-
ing a long hill on a hot day, run the engine
at a fast idle (approximately 1,500 r/min)
until the temperature gauge indicator re-
turns to normal.
4. Get out of the vehicle. Look and listen for
steam or coolant escaping from the ra-
diator before opening the hood. Wait until
no steam or coolant can be seen before
proceeding.
5. Open the hood.
WARNING
If steam or water is coming from the
engine, stand clear to prevent getting
burned.
6. Visually check drive belts for damage or
looseness. Also check if the cooling fan is
running. The radiator hoses and radiator
should not leak water. If coolant is leak-
ing, or the water pump belt is missing or
loose, or the cooling fan does not run,
stop the engine.
PUSH STARTING IF YOUR VEHICLE
OVERHEATS
6-10In case of emergency
ZX
Page 173 of 263
TOWING RECOMMENDED BY
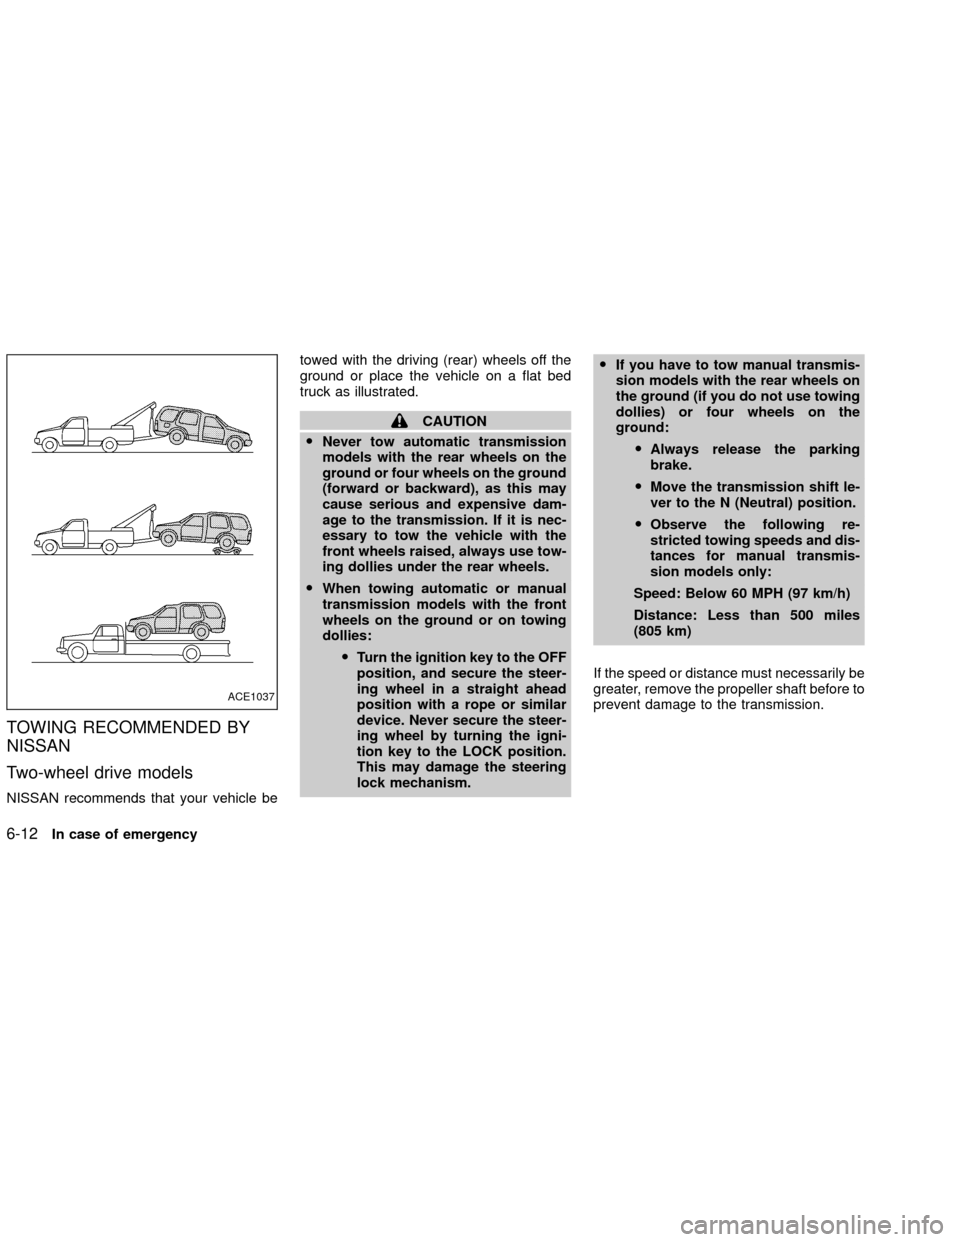
NISSAN
Two-wheel drive models
NISSAN recommends that your vehicle betowed with the driving (rear) wheels off the
ground or place the vehicle on a flat bed
truck as illustrated.
CAUTION
ONever tow automatic transmission
models with the rear wheels on the
ground or four wheels on the ground
(forward or backward), as this may
cause serious and expensive dam-
age to the transmission. If it is nec-
essary to tow the vehicle with the
front wheels raised, always use tow-
ing dollies under the rear wheels.
OWhen towing automatic or manual
transmission models with the front
wheels on the ground or on towing
dollies:
OTurn the ignition key to the OFF
position, and secure the steer-
ing wheel in a straight ahead
position with a rope or similar
device. Never secure the steer-
ing wheel by turning the igni-
tion key to the LOCK position.
This may damage the steering
lock mechanism.OIf you have to tow manual transmis-
sion models with the rear wheels on
the ground (if you do not use towing
dollies) or four wheels on the
ground:
OAlways release the parking
brake.
OMove the transmission shift le-
ver to the N (Neutral) position.
OObserve the following re-
stricted towing speeds and dis-
tances for manual transmis-
sion models only:
Speed: Below 60 MPH (97 km/h)
Distance: Less than 500 miles
(805 km)
If the speed or distance must necessarily be
greater, remove the propeller shaft before to
prevent damage to the transmission.
ACE1037
6-12In case of emergency
ZX