Page 64 of 263

OThe SECURITY light blinks at a steady
1/2 second on - 1/2 second off rate (a
door, or the hood is open and the key is
not in the ACC or ON position). When the
ignition key is turned to the ACC or ON
position, the SECURITY light turns off.
Vehicle security system operation
The vehicle security system emits the fol-
lowing alarm:
OThe headlights blink and the horn sounds
intermittently. In addition, the starter mo-
tor does not operate.
OThe alarm automatically turns off after 50
seconds. However, the alarm reactivates
if the vehicle is tampered with again. The
alarm can be shut off by unlocking a door
with the key or by pressing the UNLOCK
buttonon the keyfob.
The alarm is activated by:
Oopening a door without using the key
(even if the door is unlocked by releasing
the inside lock knob).
Oopening the hood.
How to stop the alarm
The alarm stops only by unlocking a door with
the key or by pressing the UNLOCK button
on the keyfob.The alarm does not stop if the
ignition switch is turned to ACC or ON posi-
tion.
Silencing the horn beep feature
If desired, the horn beep feature can be
deactivated using the keyfob.
To deactivate:Press and hold the LOCK
and UNLOCK buttonsfor at least two
seconds.
The hazard lights will quickly flash three
times to confirm that the horn beep feature
has been deactivated.
To activate:Press and hold the LOCK and
UNLOCK buttonsfor at least two seconds
once more.
LIC0116
Instruments and controls2-17
ZX
Page 118 of 263

Adjusting tone quality and speaker bal-
ance
Press the AUDIO button to enter the audio
adjust mode:
Bass!Mid!Treb!Fade!Bal
Press the TUNE/FF-REV (
or)or
SEEK/TRACK (
or) to adjust to the
desired levels. The display will return to the
regular radio display after 7 seconds, or you
may press the AUDIO button again to return
to the regular radio display.
Clock operation
Pressing the CLOCK button displays the
clock with the radio on or off. Press the
CLOCK button again to turn off the clock
display.
Clock set
1. Press and hold the CLOCK button until it
beeps (>2 seconds).
2. The hours will start flashing. Press
TUNE/FF-REV (
or)or
SEEK/TRACK (or) to adjust the
hours.
3. Press the CLOCK button to switch to the
minute adjustment.4. Press TUNE/FF-REV (
or)or
SEEK/TRACK (or) to adjust the
minutes.
5. Press the CLOCK button again to exit the
clock set mode.
The display will return to the regular clock
display after 7 seconds, or you may press
the CLOCK button again to return to the
regular clock display.
FM-AM radio operation
FM-AM band select
Push the AM or the FM button to change
from AM to FM reception.
The FM stereo indicator, ST, illuminates
during FM stereo reception. When the ste-
reo broadcast signal is weak, the radio
automatically changes from stereo to mon-
aural reception.
Station signal strength, distance from radio
transmitter, buildings, bridges, mountains,
and other external influences affect radio
reception. Intermittent changes in reception
quality normally are caused by these exter-
nal influences.Using a cellular phone in or near the
vehicle may influence radio reception
quality.
TUNE/FF-REV
WARNING
The radio should not be tuned while
driving so full attention may be given to
vehicle operation.
Use the
orbuttons for manual tun-
ing. To move quickly through the channels,
hold the tuning buttons down.
SEEK tuning
Push SEEK/TRACK (or). SEEK tuning
begins from low to high frequencies or high
to low frequencies, depending on which but-
ton is pressed, and stops at the next broad-
casting station. If using the up button, once
the highest broadcasting station is reached,
the radio continues in the SEEK mode at the
lowest broadcasting station. If using the
down button, once the lowest broadcasting
station is reached, the radio continues in the
Heater, air conditioner and audio systems4-19
ZX
Page 141 of 263

The shift lever cannot be moved out of P
(Park) and into any of the other gear
positions if the ignition key is turned to
LOCK or if the key is removed.
The shift lever can be moved if the igni-
tion switch is in the ACC or OFF position
without depressing the foot brake pedal.
This allows the vehicle to be moved if the
battery is discharged.
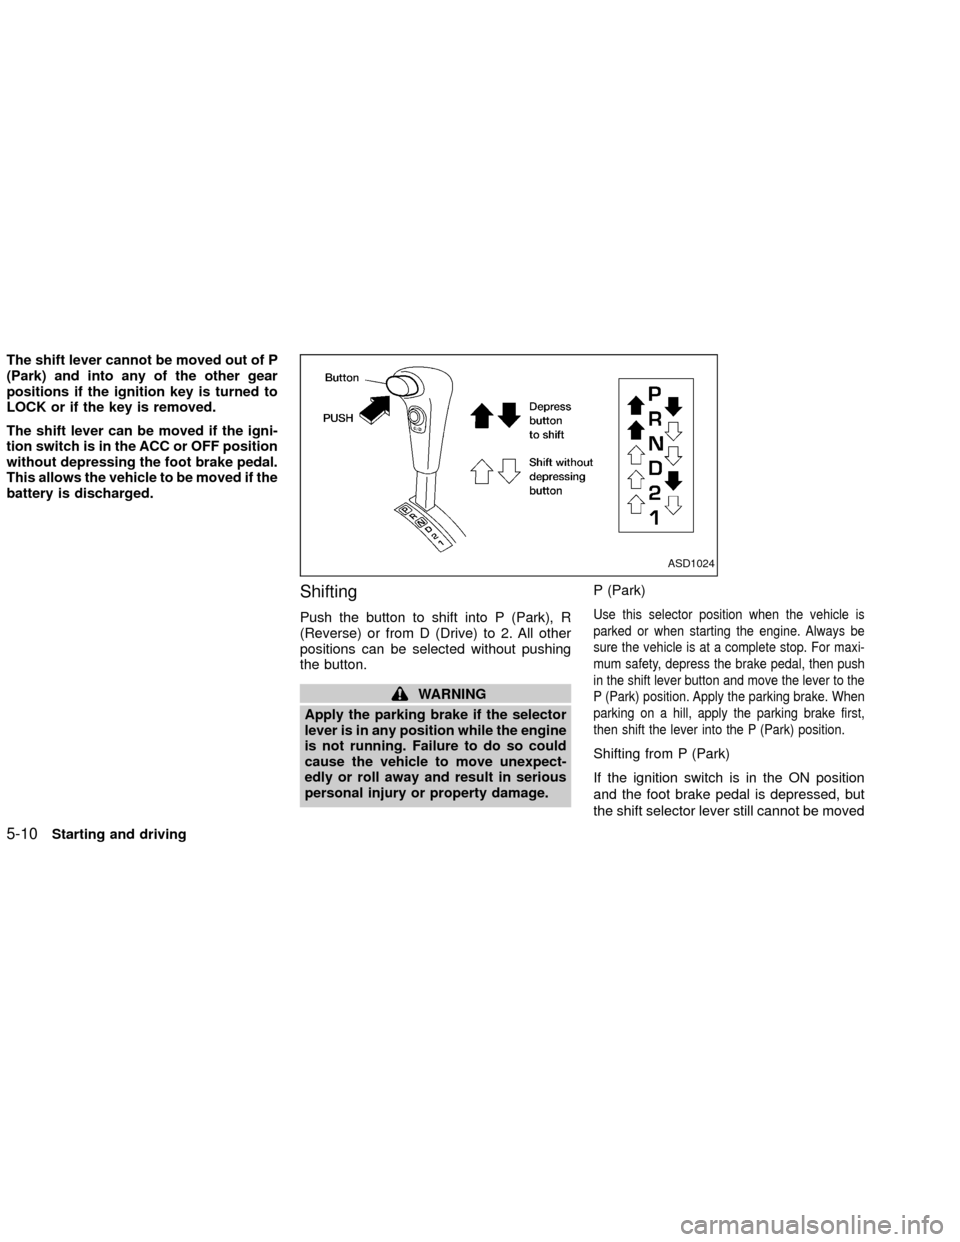
Shifting
Push the button to shift into P (Park), R
(Reverse) or from D (Drive) to 2. All other
positions can be selected without pushing
the button.
WARNING
Apply the parking brake if the selector
lever is in any position while the engine
is not running. Failure to do so could
cause the vehicle to move unexpect-
edly or roll away and result in serious
personal injury or property damage.P (Park)
Use this selector position when the vehicle is
parked or when starting the engine. Always be
sure the vehicle is at a complete stop. For maxi-
mum safety, depress the brake pedal, then push
in the shift lever button and move the lever to the
P (Park) position. Apply the parking brake. When
parking on a hill, apply the parking brake first,
then shift the lever into the P (Park) position.
Shifting from P (Park)
If the ignition switch is in the ON position
and the foot brake pedal is depressed, but
the shift selector lever still cannot be moved
ASD1024
5-10Starting and driving
ZX
Page 142 of 263

out of P (Park), follow these instructions.
1. Turn the ignition key to the LOCK posi-
tion.
2. Apply the parking brake.
3. Reinsert the key and turn it to the ACC
position.
4. Depress the foot brake pedal and move
the shift selector lever to N (Neutral).
5. Start the engine.
These instructions for starting the vehicle in
N (Neutral) should only be used until service
can be obtained at an authorized NISSAN
dealership.
R (Reverse):
Use this position to back up. Always be sure
the vehicle is at a complete stop before
shifting into the R (Reverse) position. For
maximum safety, check to ensure the area
behind the vehicle is clear. With the brake
pedal depressed, push in the shift selector
lever button and move the shift selector
lever to the R (Reverse) position.N (Neutral)
Neither forward nor reverse gear is en-
gaged. The engine can be started in this
position. You may shift to N (Neutral) and
restart a stalled engine while the vehicle is
moving.
D (Drive)
Use this position for all normal forward
driving.
2 (Second gear)
Use this position for hill climbing or engine
braking on downhill grades.
Do not shift into the 2 position at speeds
above 68 MPH (110 km/h). Do not exceed
68 MPH (110 km/h) in the 2 position.
1 (Low gear)
Use this position when climbing steep hills
slowly or slow driving through deep snow,
sand or mud, or for maximum engine brak-
ing on steep downhill grades.
Do not shift into the 1 position at speeds
above 34 MPH (55 km/h). Do not exceed 34
MPH (55 km/h) in the 1 position.
WSD0017
Starting and driving5-11
ZX