2002 NISSAN TERRANO ignition
[x] Cancel search: ignitionPage 1665 of 1767
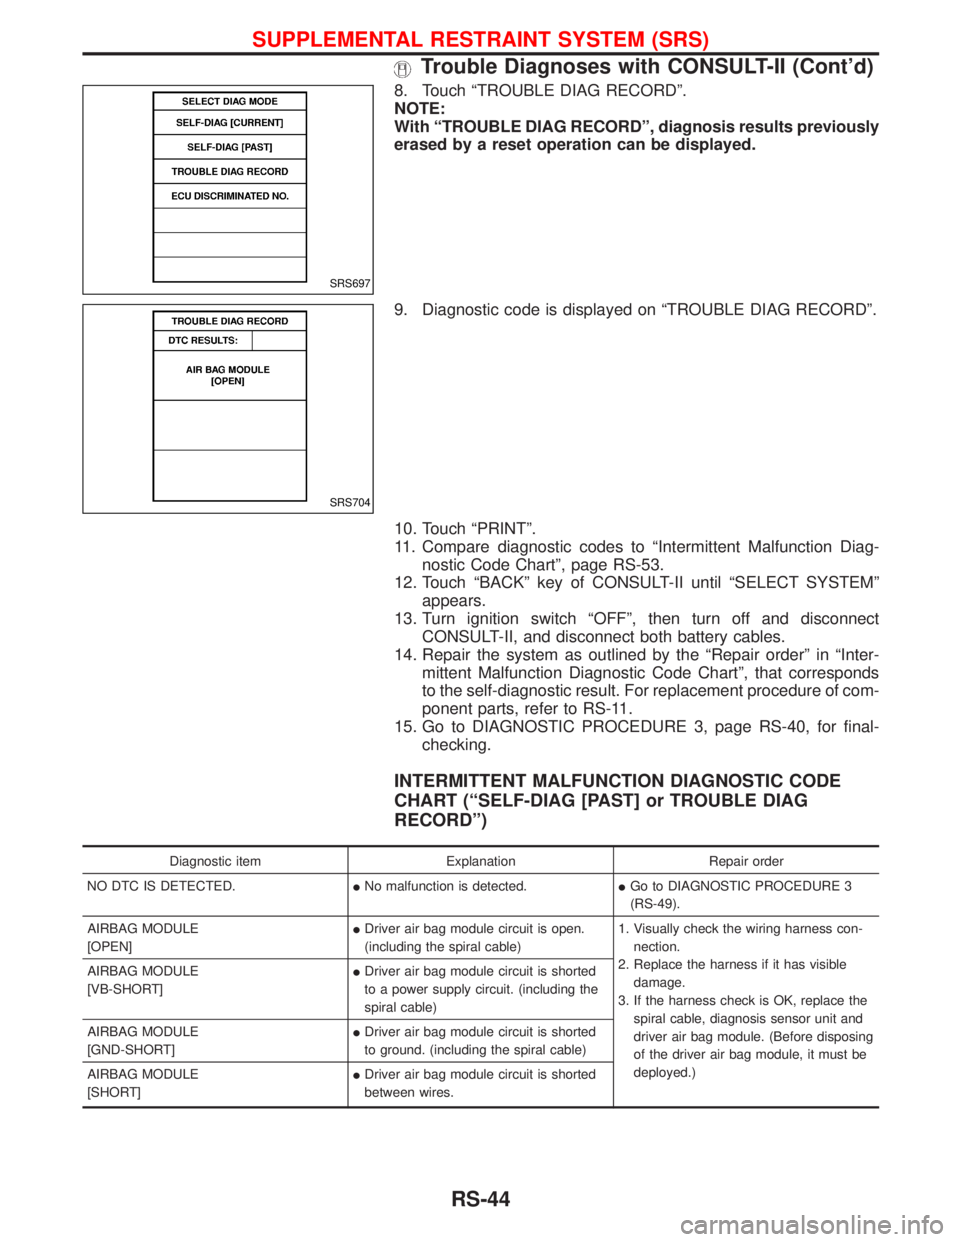
8. Touch ªTROUBLE DIAG RECORDº.
NOTE:
With ªTROUBLE DIAG RECORDº, diagnosis results previously
erased by a reset operation can be displayed.
9. Diagnostic code is displayed on ªTROUBLE DIAG RECORDº.
10. Touch ªPRINTº.
11. Compare diagnostic codes to ªIntermittent Malfunction Diag-
nostic Code Chartº, page RS-53.
12. Touch ªBACKº key of CONSULT-II until ªSELECT SYSTEMº
appears.
13. Turn ignition switch ªOFFº, then turn off and disconnect
CONSULT-II, and disconnect both battery cables.
14. Repair the system as outlined by the ªRepair orderº in ªInter-
mittent Malfunction Diagnostic Code Chartº, that corresponds
to the self-diagnostic result. For replacement procedure of com-
ponent parts, refer to RS-11.
15. Go to DIAGNOSTIC PROCEDURE 3, page RS-40, for final-
checking.
INTERMITTENT MALFUNCTION DIAGNOSTIC CODE
CHART (ªSELF-DIAG [PAST] or TROUBLE DIAG
RECORDº)
Diagnostic item Explanation Repair order
NO DTC IS DETECTED.INo malfunction is detected.IGo to DIAGNOSTIC PROCEDURE 3
(RS-49).
AIRBAG MODULE
[OPEN]IDriver air bag module circuit is open.
(including the spiral cable)1. Visually check the wiring harness con-
nection.
2. Replace the harness if it has visible
damage.
3. If the harness check is OK, replace the
spiral cable, diagnosis sensor unit and
driver air bag module. (Before disposing
of the driver air bag module, it must be
deployed.) AIRBAG MODULE
[VB-SHORT]IDriver air bag module circuit is shorted
to a power supply circuit. (including the
spiral cable)
AIRBAG MODULE
[GND-SHORT]IDriver air bag module circuit is shorted
to ground. (including the spiral cable)
AIRBAG MODULE
[SHORT]IDriver air bag module circuit is shorted
between wires.
SRS697
SRS704
SUPPLEMENTAL RESTRAINT SYSTEM (SRS)
Trouble Diagnoses with CONSULT-II (Cont'd)
RS-44
Page 1667 of 1767
![NISSAN TERRANO 2002 Service Repair Manual Diagnostic item Explanation Repair order
PRE-TEN FRONT RH
[OPEN/VB-SHORT]IThe circuit for front RH seat belt pre-
tensioner is open or shorted to a power
supply circuit.1. Visually check the wiring ha NISSAN TERRANO 2002 Service Repair Manual Diagnostic item Explanation Repair order
PRE-TEN FRONT RH
[OPEN/VB-SHORT]IThe circuit for front RH seat belt pre-
tensioner is open or shorted to a power
supply circuit.1. Visually check the wiring ha](/manual-img/5/57393/w960_57393-1666.png)
Diagnostic item Explanation Repair order
PRE-TEN FRONT RH
[OPEN/VB-SHORT]IThe circuit for front RH seat belt pre-
tensioner is open or shorted to a power
supply circuit.1. Visually check the wiring harness con-
nections.
2. Replace the harness if it has visible
damage.
3. If the harness check is OK, replace the
diagnosis sensor unit and front RH seat
belt. (Before disposing of the front RH
seat belt pre-tensioner, if must be
deployed.) PRE-TEN FRONT RH
[GND-SHORT]IThe circuit for front RH seat belt pre-
tensioner is shorted to ground.
CONTROL UNITIDiagnosis sensor unit is malfunctioning. 1. Visually check the wiring harness con-
nection.
2. Replace the harness if it has visible
damage.
3. If the harness check is OK, replace the
diagnosis sensor unit.
* Follow the procedures in numerical order when repairing malfunctioning parts, then make the final system check.
Trouble Diagnoses without CONSULT-II
DIAGNOSTIC PROCEDURE 6
Inspecting SRS malfunctioning parts by using ªAIR BAGº
warning lamp Ð Diagnosis mode
NOTE:
SRS will not enter Diagnosis mode if no malfunction is
detected in User mode.
1. Turn ignition switch ªONº.
2. After ªAIR BAGº warning lamp lights for 7 seconds, turn ignition
switch ªOFFº within 1 second.
3. Wait more than 3 seconds.
4. Repeat steps 1 to 3 three times.
5. Turn ignition switch ªONº.
SRS is now in Diagnosis mode.
6. ªAIR BAGº warning lamp operates in Diagnosis mode as fol-
lows:
NOTE:
If SRS does not enter Diagnosis mode even though malfunc-
tion is detected in User mode, check the battery voltage.
If the battery voltage is less than 9V, charge the battery. Then
go to DIAGNOSTIC PROCEDURE 7, page RS-51.
If the battery voltage is OK, replace the diagnosis sensor unit.
SRS800
SUPPLEMENTAL RESTRAINT SYSTEM (SRS)
Trouble Diagnoses with CONSULT-II (Cont'd)
RS-46
Page 1668 of 1767
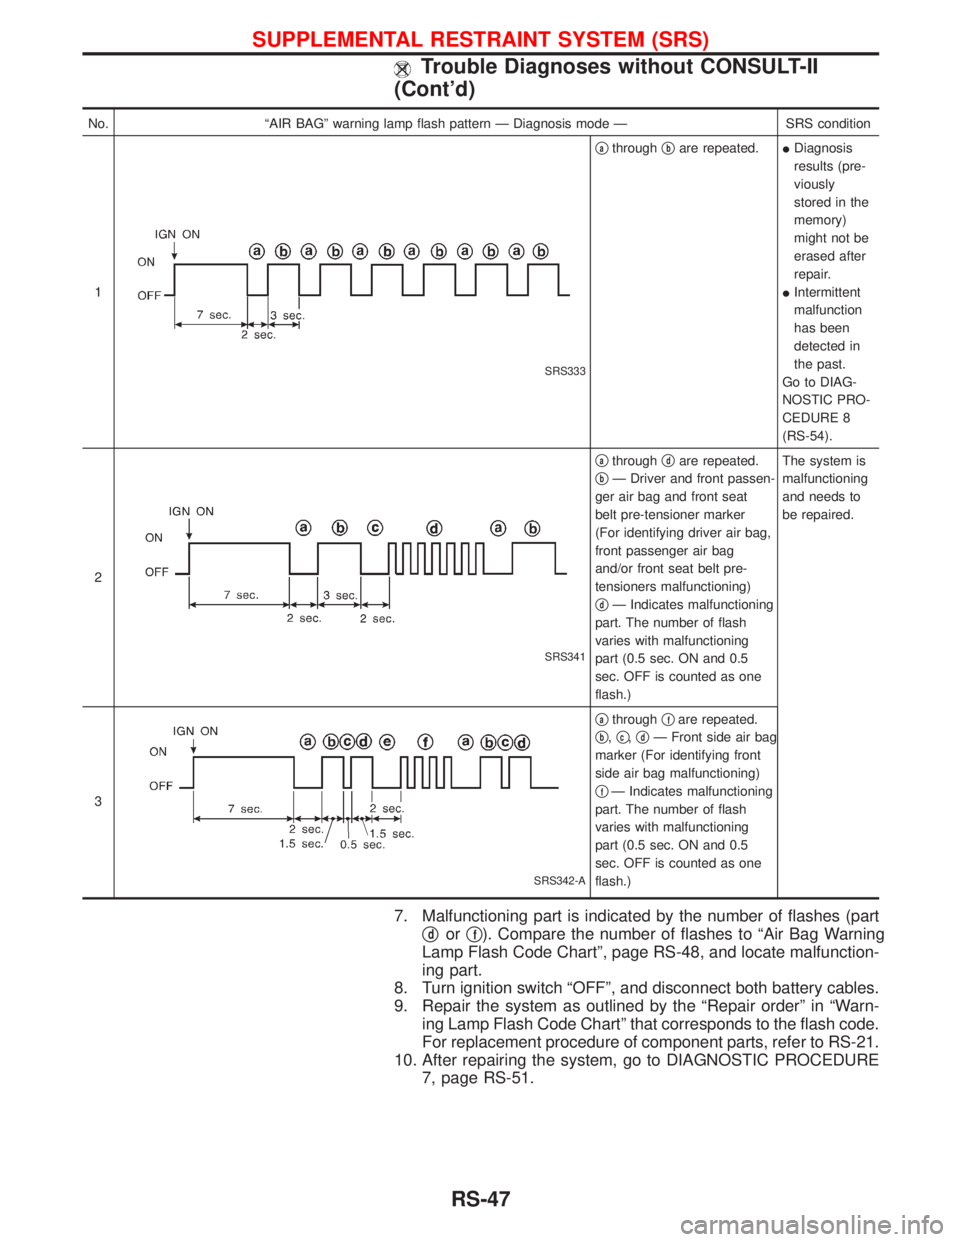
No. ªAIR BAGº warning lamp flash pattern Ð Diagnosis mode Ð SRS condition
1
SRS333
qathroughqbare repeated.IDiagnosis
results (pre-
viously
stored in the
memory)
might not be
erased after
repair.
IIntermittent
malfunction
has been
detected in
the past.
Go to DIAG-
NOSTIC PRO-
CEDURE 8
(RS-54).
2
SRS341
qathroughqdare repeated.
q
bÐ Driver and front passen-
ger air bag and front seat
belt pre-tensioner marker
(For identifying driver air bag,
front passenger air bag
and/or front seat belt pre-
tensioners malfunctioning)
q
dÐ Indicates malfunctioning
part. The number of flash
varies with malfunctioning
part (0.5 sec. ON and 0.5
sec. OFF is counted as one
flash.)The system is
malfunctioning
and needs to
be repaired.
3
SRS342-A
qathroughqfare repeated.
q
b,qc,qdÐ Front side air bag
marker (For identifying front
side air bag malfunctioning)
q
fÐ Indicates malfunctioning
part. The number of flash
varies with malfunctioning
part (0.5 sec. ON and 0.5
sec. OFF is counted as one
flash.)
7. Malfunctioning part is indicated by the number of flashes (part
q
dorqf). Compare the number of flashes to ªAir Bag Warning
Lamp Flash Code Chartº, page RS-48, and locate malfunction-
ing part.
8. Turn ignition switch ªOFFº, and disconnect both battery cables.
9. Repair the system as outlined by the ªRepair orderº in ªWarn-
ing Lamp Flash Code Chartº that corresponds to the flash code.
For replacement procedure of component parts, refer to RS-21.
10. After repairing the system, go to DIAGNOSTIC PROCEDURE
7, page RS-51.
SUPPLEMENTAL RESTRAINT SYSTEM (SRS)
Trouble Diagnoses without CONSULT-II
(Cont'd)
RS-47
Page 1672 of 1767
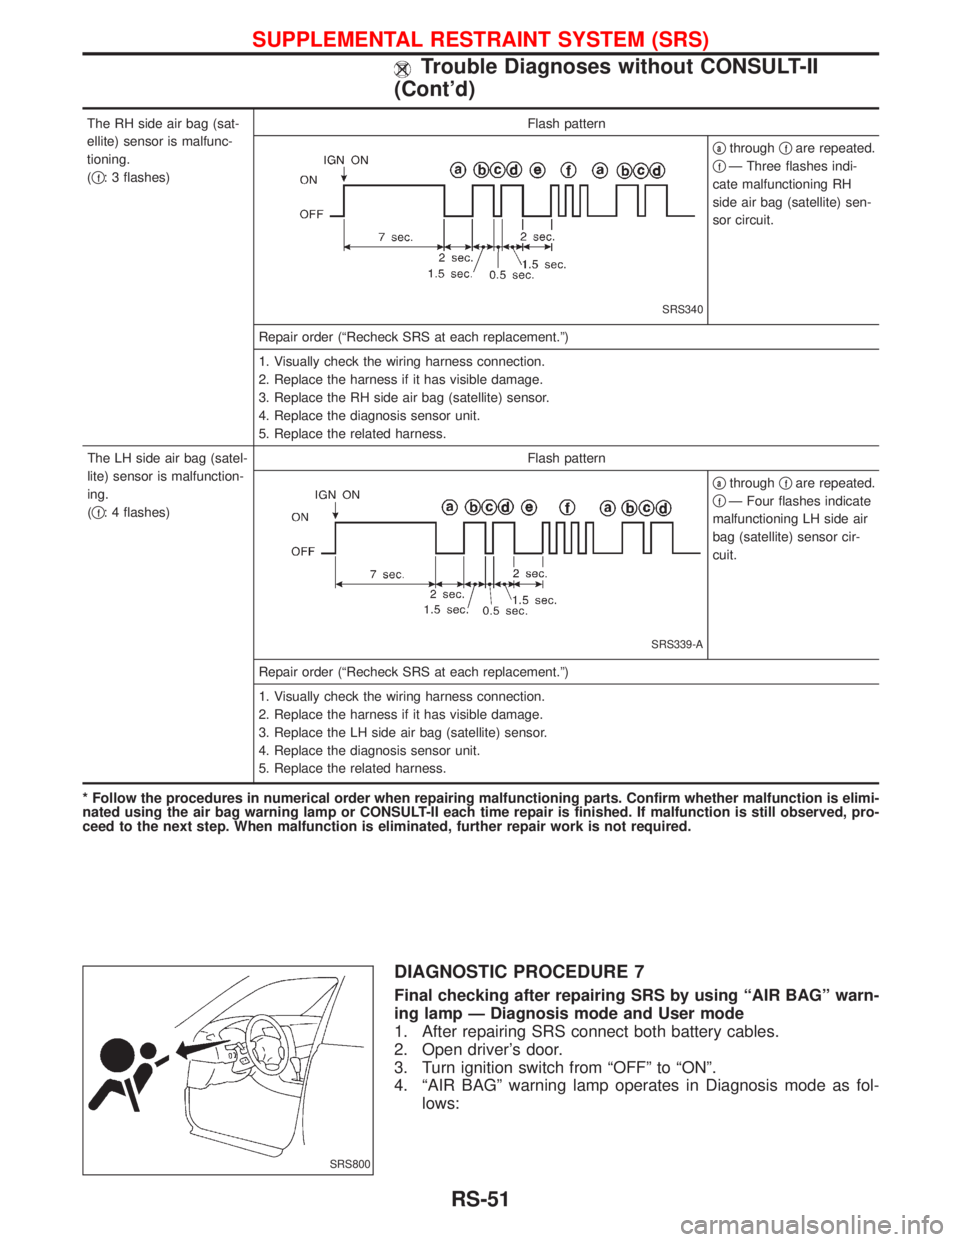
The RH side air bag (sat-
ellite) sensor is malfunc-
tioning.
(q
f: 3 flashes)Flash pattern
SRS340
qathroughqfare repeated.
q
fÐ Three flashes indi-
cate malfunctioning RH
side air bag (satellite) sen-
sor circuit.
Repair order (ªRecheck SRS at each replacement.º)
1. Visually check the wiring harness connection.
2. Replace the harness if it has visible damage.
3. Replace the RH side air bag (satellite) sensor.
4. Replace the diagnosis sensor unit.
5. Replace the related harness.
The LH side air bag (satel-
lite) sensor is malfunction-
ing.
(q
f: 4 flashes)Flash pattern
SRS339-A
qathroughqfare repeated.
q
fÐ Four flashes indicate
malfunctioning LH side air
bag (satellite) sensor cir-
cuit.
Repair order (ªRecheck SRS at each replacement.º)
1. Visually check the wiring harness connection.
2. Replace the harness if it has visible damage.
3. Replace the LH side air bag (satellite) sensor.
4. Replace the diagnosis sensor unit.
5. Replace the related harness.
* Follow the procedures in numerical order when repairing malfunctioning parts. Confirm whether malfunction is elimi-
nated using the air bag warning lamp or CONSULT-II each time repair is finished. If malfunction is still observed, pro-
ceed to the next step. When malfunction is eliminated, further repair work is not required.
DIAGNOSTIC PROCEDURE 7
Final checking after repairing SRS by using ªAIR BAGº warn-
ing lamp Ð Diagnosis mode and User mode
1. After repairing SRS connect both battery cables.
2. Open driver's door.
3. Turn ignition switch from ªOFFº to ªONº.
4. ªAIR BAGº warning lamp operates in Diagnosis mode as fol-
lows:
SRS800
SUPPLEMENTAL RESTRAINT SYSTEM (SRS)
Trouble Diagnoses without CONSULT-II
(Cont'd)
RS-51
Page 1673 of 1767
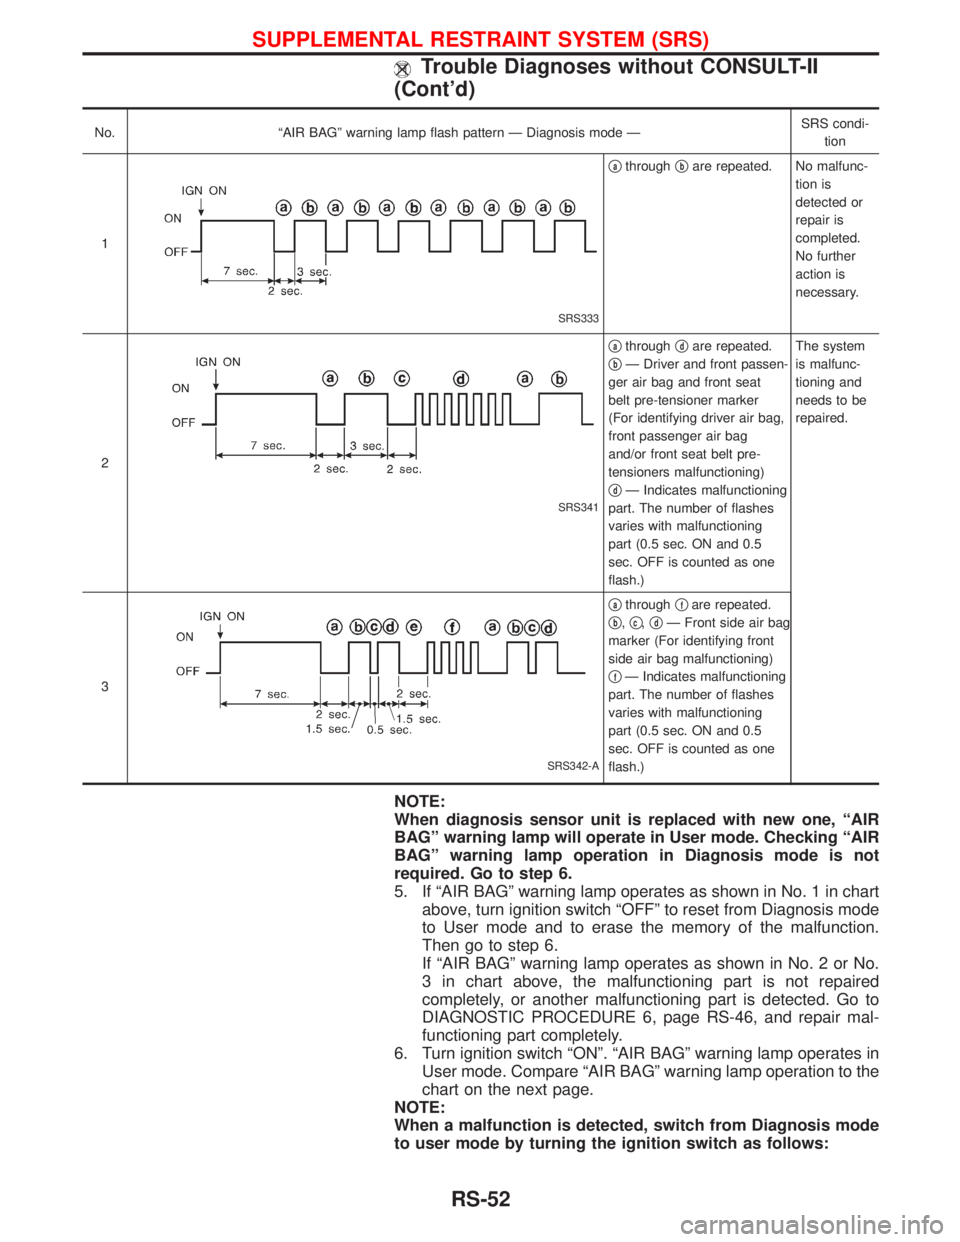
No. ªAIR BAGº warning lamp flash pattern Ð Diagnosis mode ÐSRS condi-
tion
1
SRS333
qathroughqbare repeated. No malfunc-
tion is
detected or
repair is
completed.
No further
action is
necessary.
2
SRS341
qathroughqdare repeated.
q
bÐ Driver and front passen-
ger air bag and front seat
belt pre-tensioner marker
(For identifying driver air bag,
front passenger air bag
and/or front seat belt pre-
tensioners malfunctioning)
q
dÐ Indicates malfunctioning
part. The number of flashes
varies with malfunctioning
part (0.5 sec. ON and 0.5
sec. OFF is counted as one
flash.)The system
is malfunc-
tioning and
needs to be
repaired.
3
SRS342-A
qathroughqfare repeated.
q
b,qc,qdÐ Front side air bag
marker (For identifying front
side air bag malfunctioning)
q
fÐ Indicates malfunctioning
part. The number of flashes
varies with malfunctioning
part (0.5 sec. ON and 0.5
sec. OFF is counted as one
flash.)
NOTE:
When diagnosis sensor unit is replaced with new one, ªAIR
BAGº warning lamp will operate in User mode. Checking ªAIR
BAGº warning lamp operation in Diagnosis mode is not
required. Go to step 6.
5. If ªAIR BAGº warning lamp operates as shown in No. 1 in chart
above, turn ignition switch ªOFFº to reset from Diagnosis mode
to User mode and to erase the memory of the malfunction.
Then go to step 6.
If ªAIR BAGº warning lamp operates as shown in No. 2 or No.
3 in chart above, the malfunctioning part is not repaired
completely, or another malfunctioning part is detected. Go to
DIAGNOSTIC PROCEDURE 6, page RS-46, and repair mal-
functioning part completely.
6. Turn ignition switch ªONº. ªAIR BAGº warning lamp operates in
User mode. Compare ªAIR BAGº warning lamp operation to the
chart on the next page.
NOTE:
When a malfunction is detected, switch from Diagnosis mode
to user mode by turning the ignition switch as follows:
SUPPLEMENTAL RESTRAINT SYSTEM (SRS)
Trouble Diagnoses without CONSULT-II
(Cont'd)
RS-52
Page 1674 of 1767
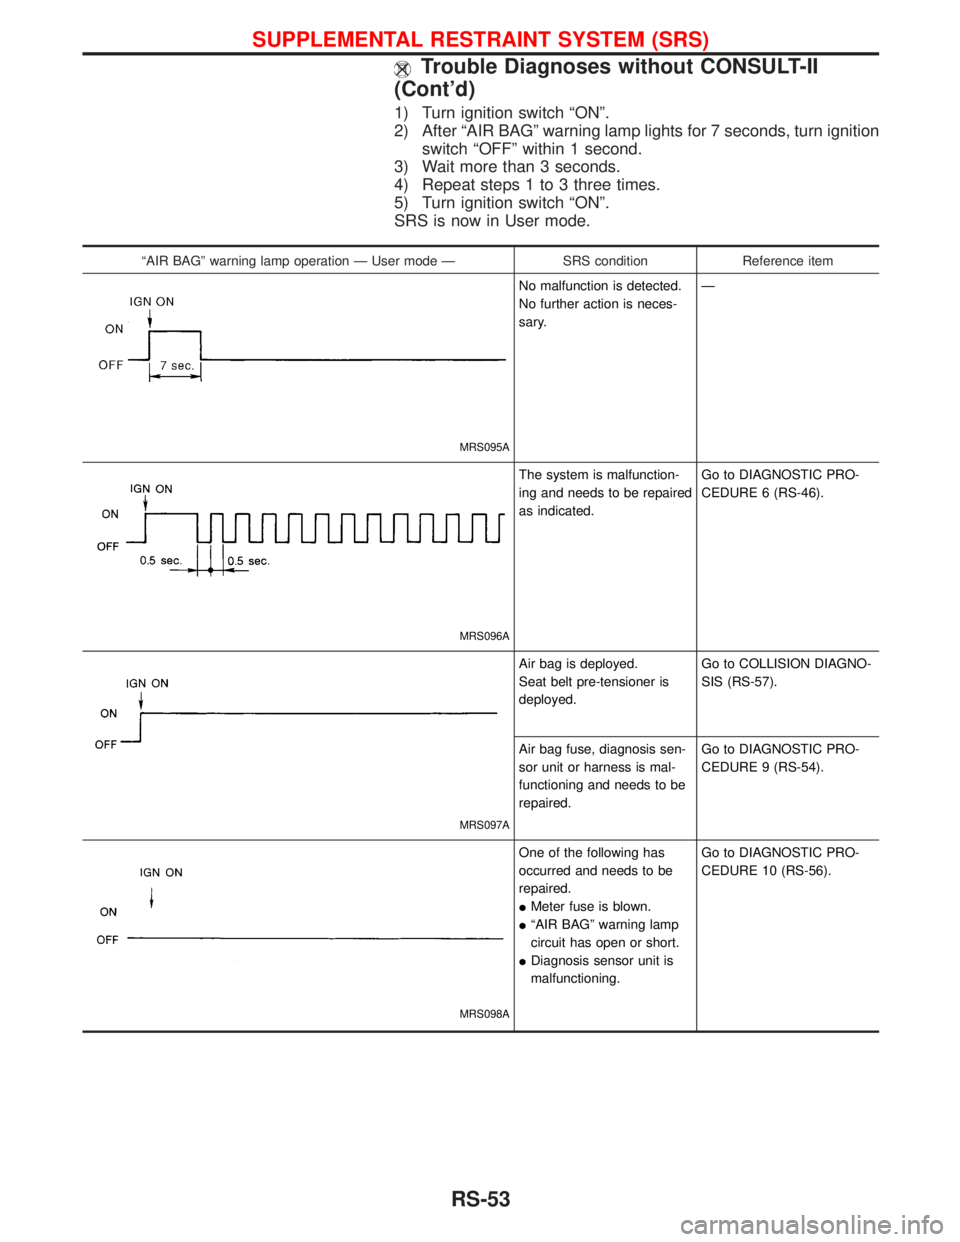
1) Turn ignition switch ªONº.
2) After ªAIR BAGº warning lamp lights for 7 seconds, turn ignition
switch ªOFFº within 1 second.
3) Wait more than 3 seconds.
4) Repeat steps 1 to 3 three times.
5) Turn ignition switch ªONº.
SRS is now in User mode.
ªAIR BAGº warning lamp operation Ð User mode Ð SRS condition Reference item
MRS095A
No malfunction is detected.
No further action is neces-
sary.Ð
MRS096A
The system is malfunction-
ing and needs to be repaired
as indicated.Go to DIAGNOSTIC PRO-
CEDURE 6 (RS-46).
MRS097A
Air bag is deployed.
Seat belt pre-tensioner is
deployed.Go to COLLISION DIAGNO-
SIS (RS-57).
Air bag fuse, diagnosis sen-
sor unit or harness is mal-
functioning and needs to be
repaired.Go to DIAGNOSTIC PRO-
CEDURE 9 (RS-54).
MRS098A
One of the following has
occurred and needs to be
repaired.
IMeter fuse is blown.
IªAIR BAGº warning lamp
circuit has open or short.
IDiagnosis sensor unit is
malfunctioning.Go to DIAGNOSTIC PRO-
CEDURE 10 (RS-56).
SUPPLEMENTAL RESTRAINT SYSTEM (SRS)
Trouble Diagnoses without CONSULT-II
(Cont'd)
RS-53
Page 1675 of 1767
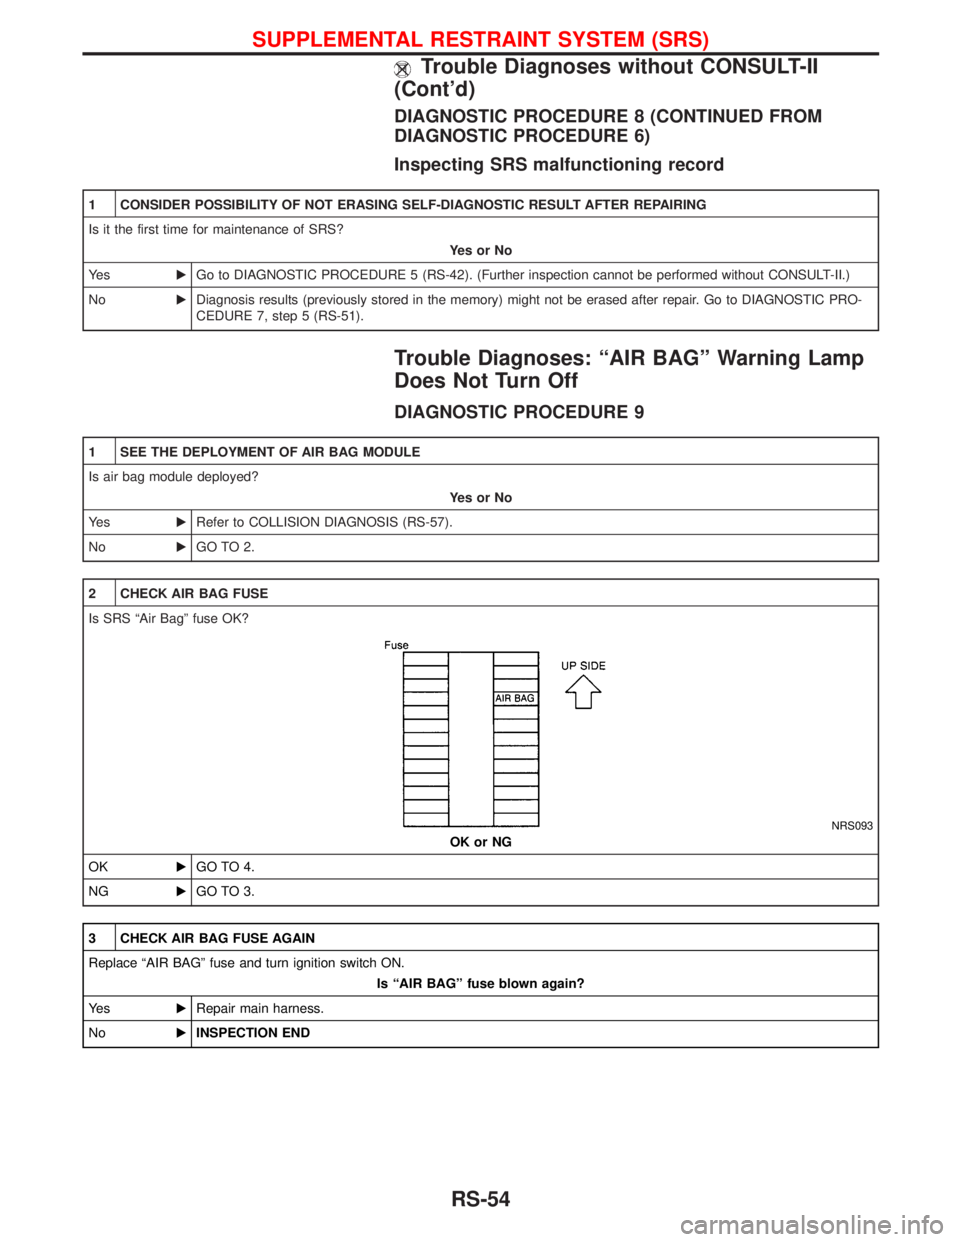
DIAGNOSTIC PROCEDURE 8 (CONTINUED FROM
DIAGNOSTIC PROCEDURE 6)
Inspecting SRS malfunctioning record
1 CONSIDER POSSIBILITY OF NOT ERASING SELF-DIAGNOSTIC RESULT AFTER REPAIRING
Is it the first time for maintenance of SRS?
YesorNo
Ye sEGo to DIAGNOSTIC PROCEDURE 5 (RS-42). (Further inspection cannot be performed without CONSULT-II.)
NoEDiagnosis results (previously stored in the memory) might not be erased after repair. Go to DIAGNOSTIC PRO-
CEDURE 7, step 5 (RS-51).
Trouble Diagnoses: ªAIR BAGº Warning Lamp
Does Not Turn Off
DIAGNOSTIC PROCEDURE 9
1 SEE THE DEPLOYMENT OF AIR BAG MODULE
Is air bag module deployed?
YesorNo
Ye sERefer to COLLISION DIAGNOSIS (RS-57).
NoEGO TO 2.
2 CHECK AIR BAG FUSE
Is SRS ªAir Bagº fuse OK?
NRS093
OK or NG
OKEGO TO 4.
NGEGO TO 3.
3 CHECK AIR BAG FUSE AGAIN
Replace ªAIR BAGº fuse and turn ignition switch ON.
Is ªAIR BAGº fuse blown again?
Ye sERepair main harness.
NoEINSPECTION END
SUPPLEMENTAL RESTRAINT SYSTEM (SRS)
Trouble Diagnoses without CONSULT-II
(Cont'd)
RS-54
Page 1677 of 1767
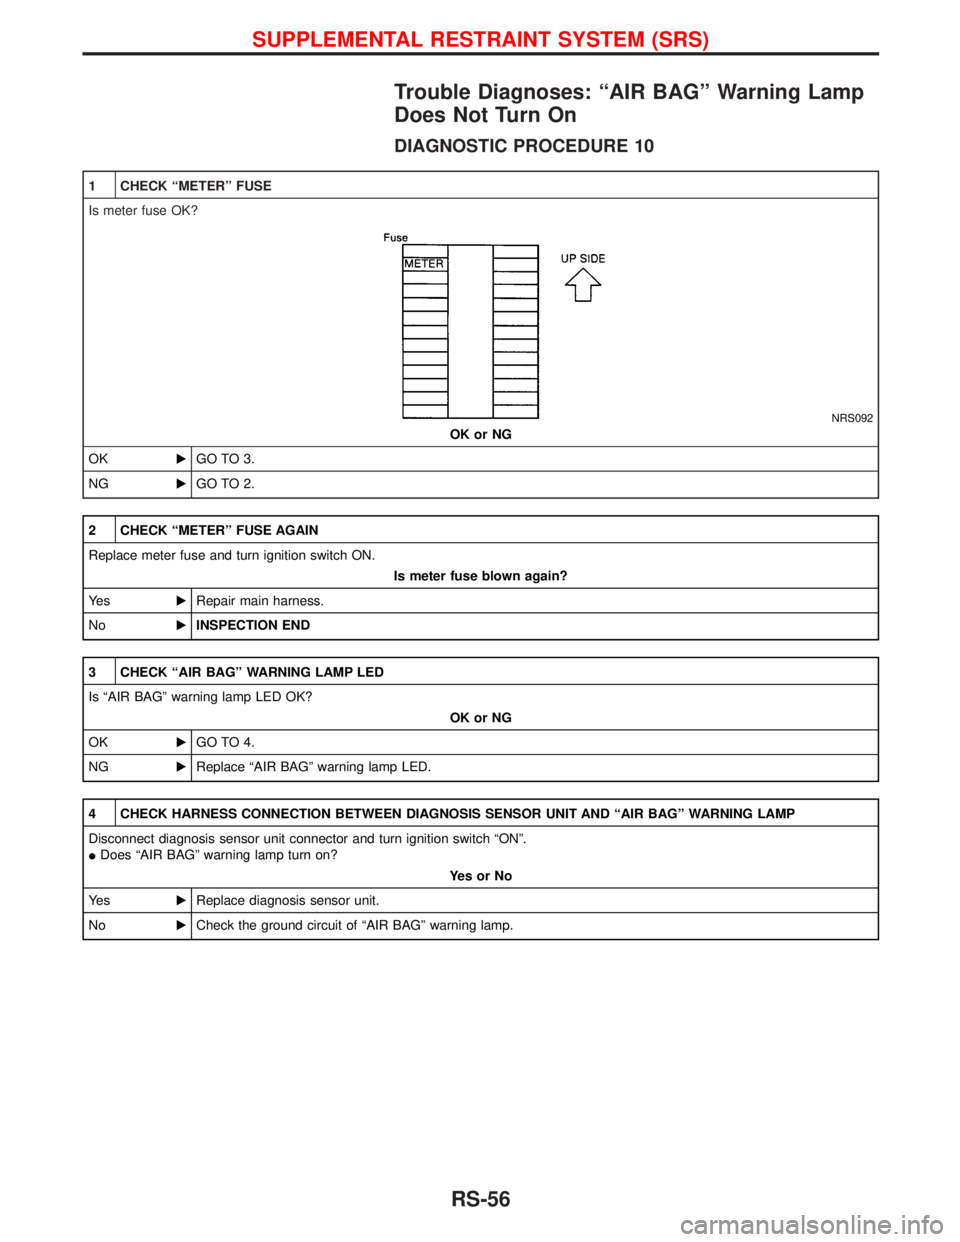
Trouble Diagnoses: ªAIR BAGº Warning Lamp
Does Not Turn On
DIAGNOSTIC PROCEDURE 10
1 CHECK ªMETERº FUSE
Is meter fuse OK?
NRS092
OK or NG
OKEGO TO 3.
NGEGO TO 2.
2 CHECK ªMETERº FUSE AGAIN
Replace meter fuse and turn ignition switch ON.
Is meter fuse blown again?
Ye sERepair main harness.
NoEINSPECTION END
3 CHECK ªAIR BAGº WARNING LAMP LED
Is ªAIR BAGº warning lamp LED OK?
OK or NG
OKEGO TO 4.
NGEReplace ªAIR BAGº warning lamp LED.
4 CHECK HARNESS CONNECTION BETWEEN DIAGNOSIS SENSOR UNIT AND ªAIR BAGº WARNING LAMP
Disconnect diagnosis sensor unit connector and turn ignition switch ªONº.
IDoes ªAIR BAGº warning lamp turn on?
YesorNo
Ye sEReplace diagnosis sensor unit.
NoECheck the ground circuit of ªAIR BAGº warning lamp.
SUPPLEMENTAL RESTRAINT SYSTEM (SRS)
RS-56