Page 640 of 1767
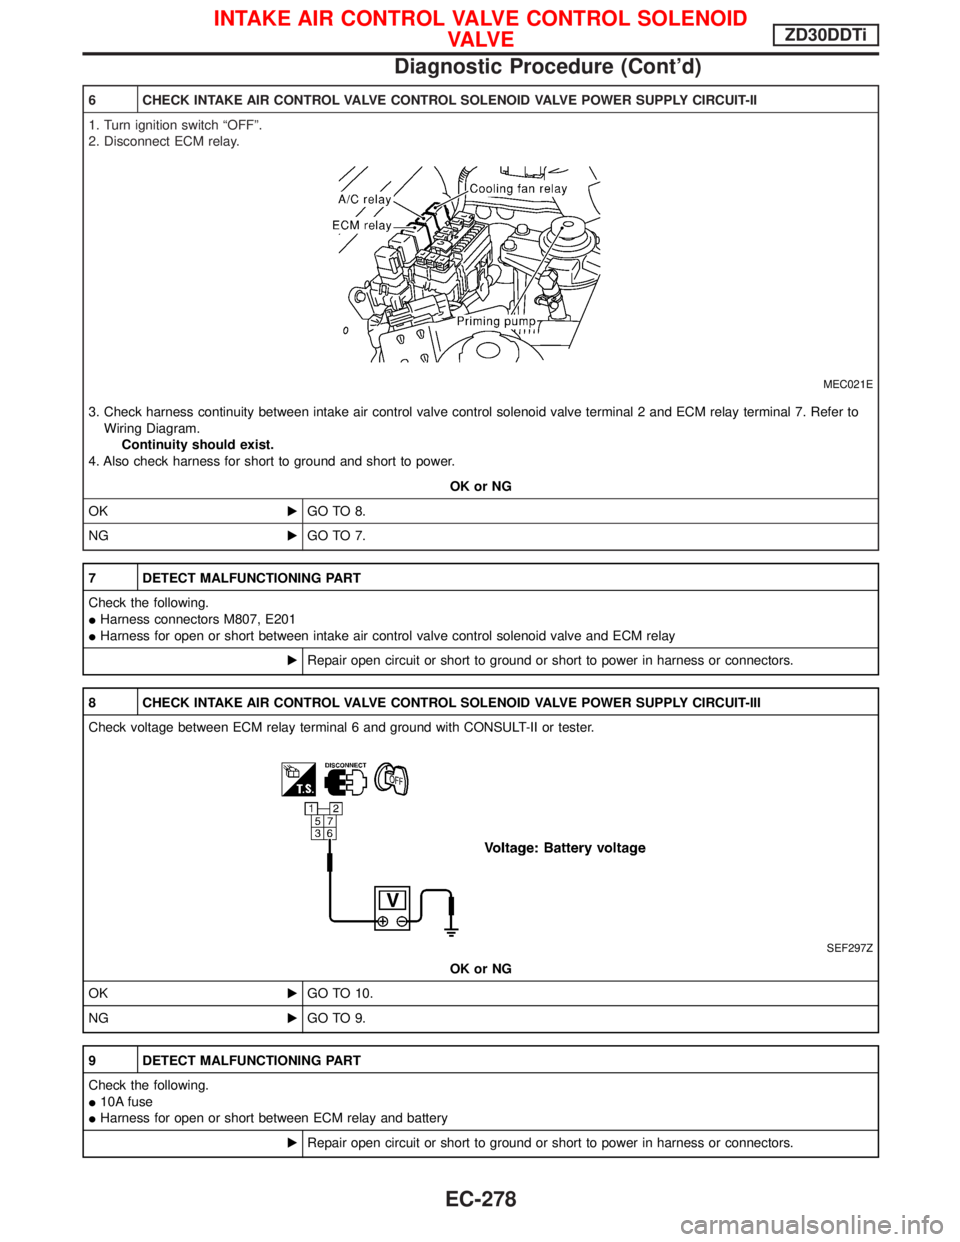
6 CHECK INTAKE AIR CONTROL VALVE CONTROL SOLENOID VALVE POWER SUPPLY CIRCUIT-II
1. Turn ignition switch ªOFFº.
2. Disconnect ECM relay.
MEC021E
3. Check harness continuity between intake air control valve control solenoid valve terminal 2 and ECM relay terminal 7. Refer to
Wiring Diagram.
Continuity should exist.
4. Also check harness for short to ground and short to power.
OK or NG
OKEGO TO 8.
NGEGO TO 7.
7 DETECT MALFUNCTIONING PART
Check the following.
IHarness connectors M807, E201
IHarness for open or short between intake air control valve control solenoid valve and ECM relay
ERepair open circuit or short to ground or short to power in harness or connectors.
8 CHECK INTAKE AIR CONTROL VALVE CONTROL SOLENOID VALVE POWER SUPPLY CIRCUIT-III
Check voltage between ECM relay terminal 6 and ground with CONSULT-II or tester.
SEF297Z
OK or NG
OKEGO TO 10.
NGEGO TO 9.
9 DETECT MALFUNCTIONING PART
Check the following.
I10A fuse
IHarness for open or short between ECM relay and battery
ERepair open circuit or short to ground or short to power in harness or connectors.
INTAKE AIR CONTROL VALVE CONTROL SOLENOID
VA LV EZD30DDTi
Diagnostic Procedure (Cont'd)
EC-278
Page 649 of 1767
7 DETECT MALFUNCTIONING PART
Check the following.
IHarness connectors M842, F135 (RHD models)
IFuse block (J/B) connector F48 (LHD models), M756 (RHD models)
I10A fuse
IHarness for open or short between variable nozzle turbocharger control solenoid valve and fuse
ERepair open circuit or short to ground or short to power in harness or connectors.
8 CHECK VARIABLE NOZZLE TURBOCHARGER CONTROL SOLENOID VALVE OUTPUT SIGNAL CIRCUIT FOR
OPEN OR SHORT
1. Turn ignition switch ªOFFº.
2. Disconnect ECM harness connector.
3. Check harness continuity between ECM terminal 101 and variable nozzle turbocharger control solenoid valve terminal 1. Refer
to Wiring Diagram.
Continuity should exist.
4. Also check harness for short to ground and short to power.
OK or NG
OKEGO TO 10.
NGEGO TO 9.
9 DETECT MALFUNCTIONING PART
Check the following.
IHarness connectors F135, M842 (RHD models)
IHarness for open or short between variable nozzle turbocharger control solenoid valve and ECM
ERepair open circuit or short to ground or short to power in harness or connectors.
VARIABLE NOZZLE TURBOCHARGER CONTROL
SOLENOID VALVEZD30DDTi
Diagnostic Procedure (Cont'd)
EC-287
Page 676 of 1767
Inspection (No.2-4nozzle)
Thoroughly clean all disassembled parts with fresh kerosene or
solvent.
IIf nozzle needle is damaged or fused, replace nozzle assem-
bly with a new one.
IIf end of nozzle needle is seized or excessively discolored,
replace nozzle assembly.
ICheck nozzle body and distance piece for proper contact. If
excessively worn or damaged, replace nozzle assembly or dis-
tance piece.
ICheck nozzle spring for excessive wear or damage. If exces-
sively worn or damaged, replace it with a new spring.
ICheck distance piece and nozzle holder for proper contact. If
excessively worn or damaged, replace nozzle holder assembly.
Cleaning (No.2-4nozzle)
a. Do not touch the nozzle mating surface with your fingers.
b. To wash the nozzles, use a wooden stick and brass brush
with clean diesel fuel.
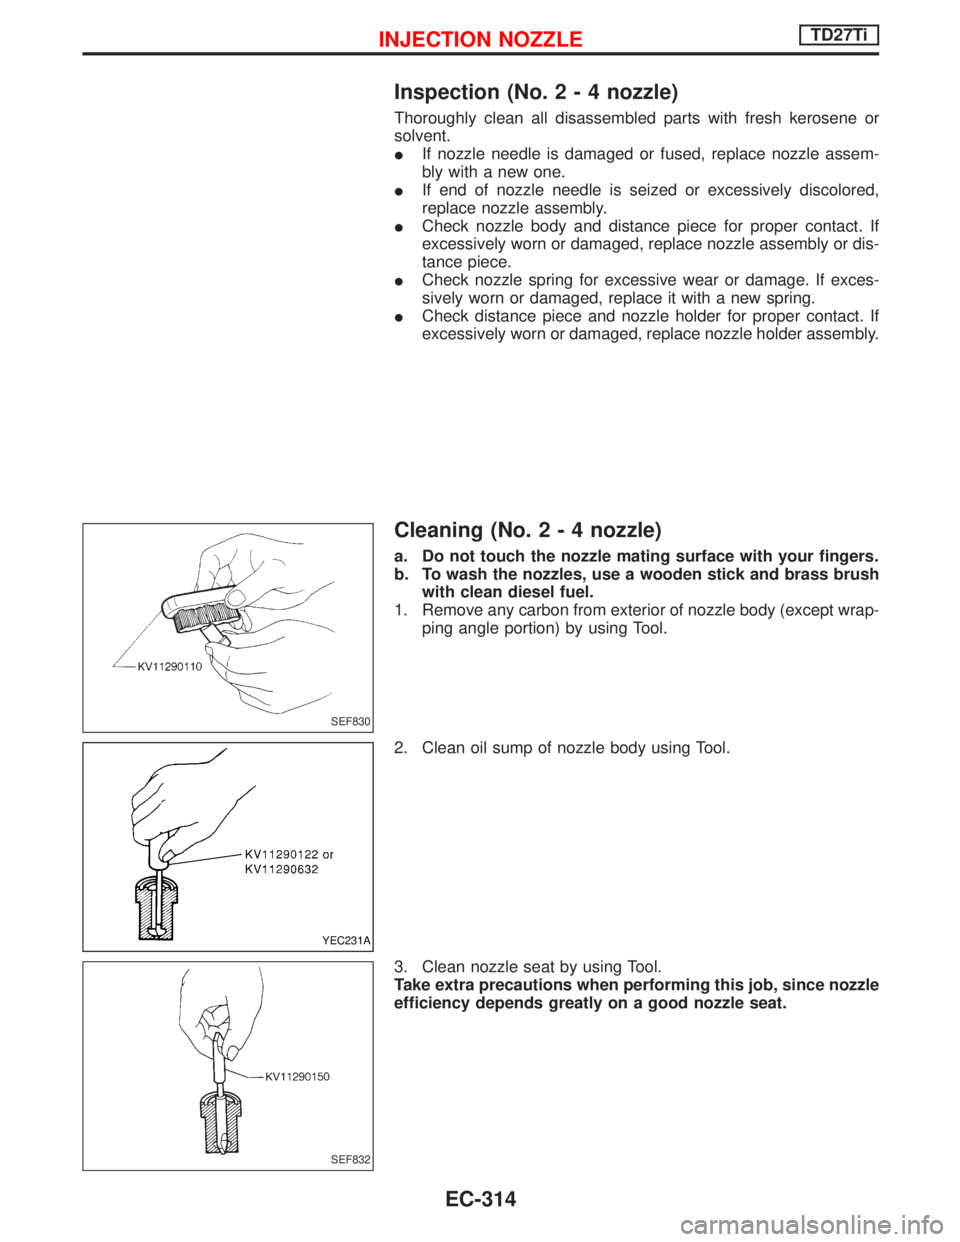
1. Remove any carbon from exterior of nozzle body (except wrap-
ping angle portion) by using Tool.
2. Clean oil sump of nozzle body using Tool.
3. Clean nozzle seat by using Tool.
Take extra precautions when performing this job, since nozzle
efficiency depends greatly on a good nozzle seat.
SEF830
YEC231A
SEF832
INJECTION NOZZLETD27Ti
EC-314
Page 689 of 1767
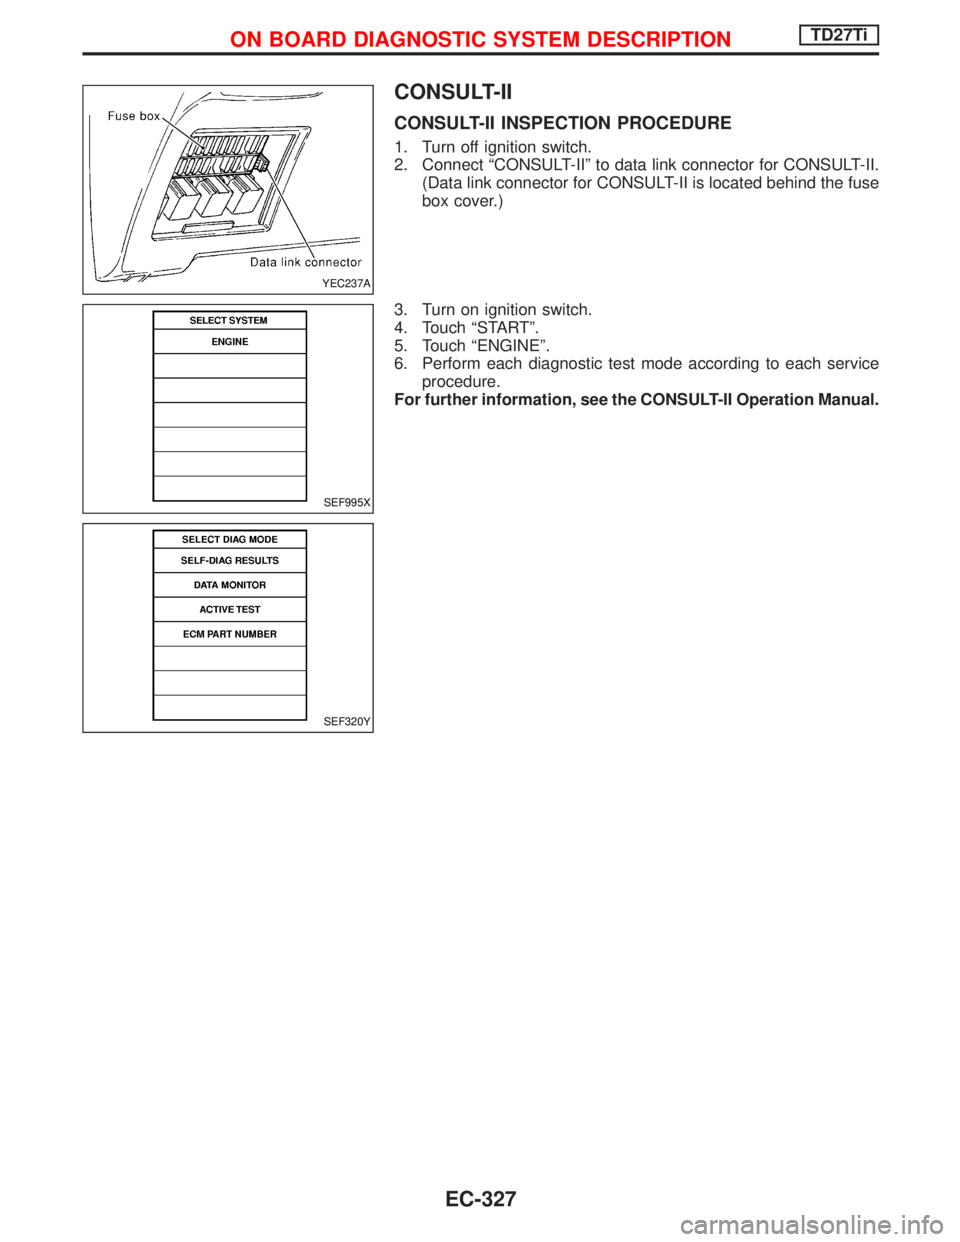
CONSULT-II
CONSULT-II INSPECTION PROCEDURE
1. Turn off ignition switch.
2. Connect ªCONSULT-IIº to data link connector for CONSULT-II.
(Data link connector for CONSULT-II is located behind the fuse
box cover.)
3. Turn on ignition switch.
4. Touch ªSTARTº.
5. Touch ªENGINEº.
6. Perform each diagnostic test mode according to each service
procedure.
For further information, see the CONSULT-II Operation Manual.
YEC237A
SEF995X
SEF320Y
ON BOARD DIAGNOSTIC SYSTEM DESCRIPTIONTD27Ti
EC-327
Page 715 of 1767
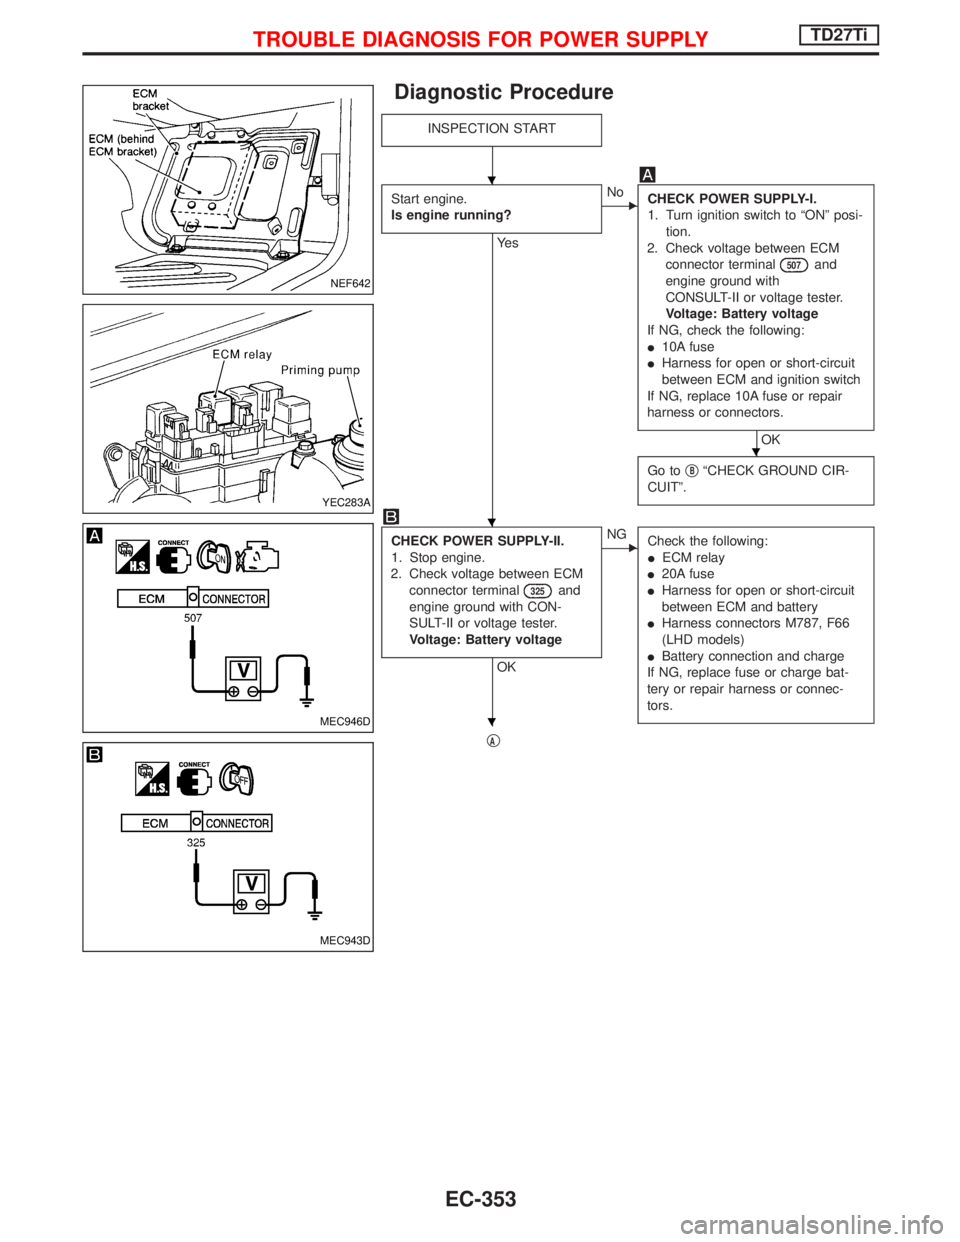
Diagnostic Procedure
INSPECTION START
Start engine.
Is engine running?
Ye s
ENo
CHECK POWER SUPPLY-I.
1. Turn ignition switch to ªONº posi-
tion.
2. Check voltage between ECM
connector terminal
507and
engine ground with
CONSULT-II or voltage tester.
Voltage: Battery voltage
If NG, check the following:
I10A fuse
IHarness for open or short-circuit
between ECM and ignition switch
If NG, replace 10A fuse or repair
harness or connectors.
OK
Go toq
BªCHECK GROUND CIR-
CUITº.
CHECK POWER SUPPLY-II.
1. Stop engine.
2. Check voltage between ECM
connector terminal
325and
engine ground with CON-
SULT-II or voltage tester.
Voltage: Battery voltage
OK
ENG
Check the following:
IECM relay
I20A fuse
IHarness for open or short-circuit
between ECM and battery
IHarness connectors M787, F66
(LHD models)
IBattery connection and charge
If NG, replace fuse or charge bat-
tery or repair harness or connec-
tors.
qA
NEF642
YEC283A
MEC946D
MEC943D
H
H
H
H
TROUBLE DIAGNOSIS FOR POWER SUPPLYTD27Ti
EC-353
Page 716 of 1767

qA
CHECK POWER SUPPLY-III.
1. Turn ignition switch to ªONº position
and then to ªLOCKº position.
2. Check voltage between ECM connector
terminals
107,108,109and engine
ground with CONSULT-II or tester.
Voltage:
After turning ignition switch to
ªLOCKº position, battery voltage
will exist for a few seconds, then
drop to approximately 0V.
NG
EOK
Go toqBªCHECK
GROUND CIRCUITº.
Case-1: Battery voltage does
not exist.
Case-2: Battery voltage exists
for more than a few
seconds.
Case-1
Case-2
EGo toªCHECK ECM
RELAYº.
CHECK HARNESS CONTINUITY
BETWEEN ECM RELAY AND ECM.
1. Disconnect ECM harness connector.
2. Disconnect ECM relay harness connec-
tor.
3. Check harness continuity between
ECM connector terminals
325and
ECM relay connector terminalq
2, and
ECM connector terminals
107,108,
109and ECM relay connector termi-
nalq
5. Refer to wiring diagram.
Continuity should exist.
If OK, check harness for short-circuit.
OK
ENG
Check the following:
IHarness connectors
M787,F66(LHD mod-
els)
IHarness for open or
short-circuit between
ECM relay connector
and ECM connector.
If NG, repair harness or
connectors.
CHECK VOLTAGE BETWEEN ECCS
RELAY AND ENGINE GROUND.
Check voltage between ECM relay con-
nector terminalsq
1,q3and engine ground
with CONSULT-II or tester.
Voltage: Battery voltage
OK
ENG
Check the following:
I20A fuse
IFuse box and battery
connections
IHarness for open or
short-circuit between
ECM relay and battery
If NG, replace fuse or
repair harness or connec-
tors.
CHECK ECM RELAY.
1. Remove ECM relay.
2. Apply 12V direct current between relay
terminalsq
1andq2.
3. Check continuity between relay termi-
nalsq
3andq5.
12V (q
1-q2) applied:
Continuity exists.
No voltage applied:
No continuity
OK
ENG
Replace ECM relay.
qB
MEC944D
MEC945D
NEF350
H
H
H
H
H
TROUBLE DIAGNOSIS FOR POWER SUPPLYTD27Ti
Diagnostic Procedure (Cont'd)
EC-354
Page 721 of 1767
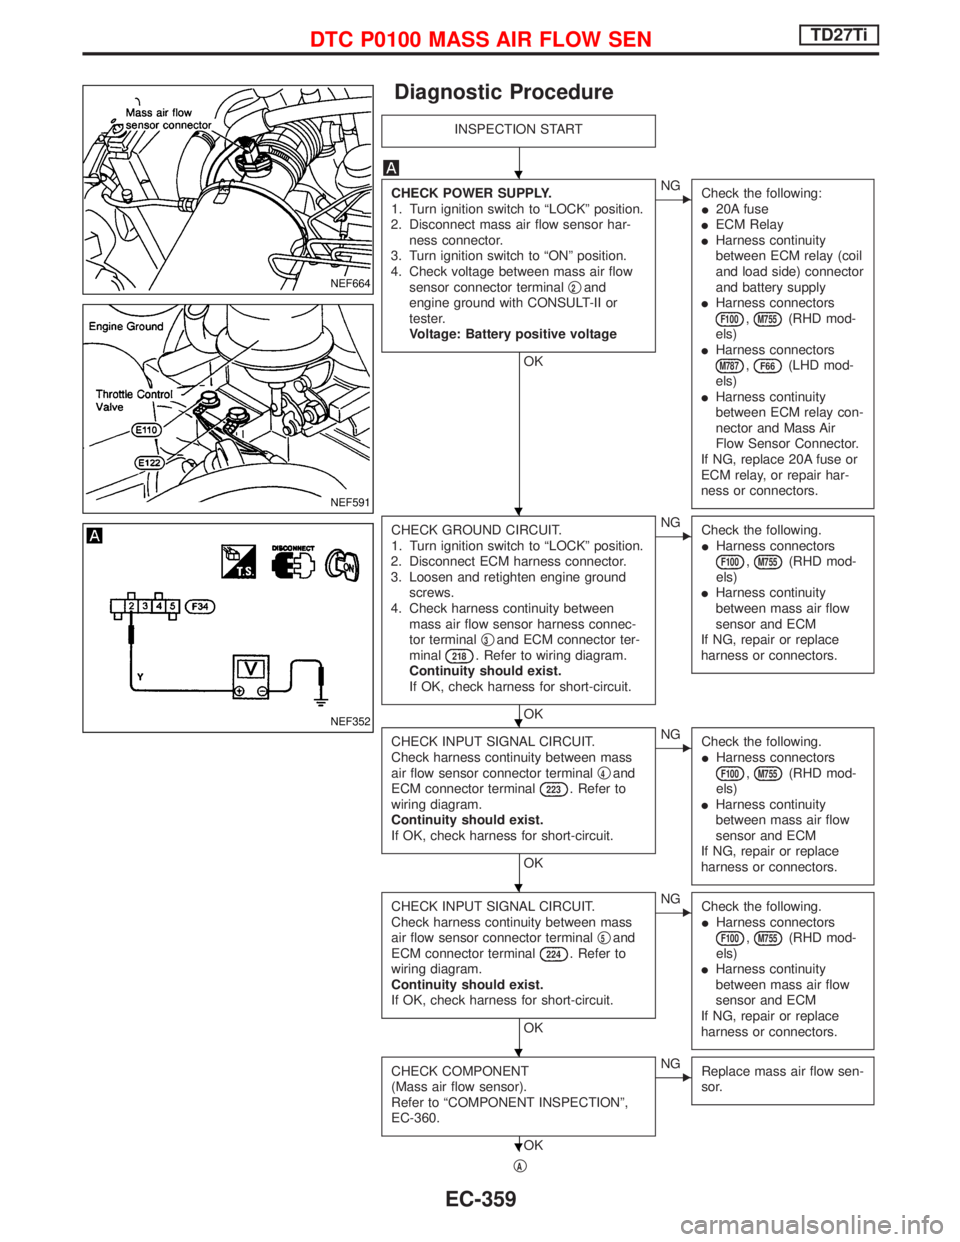
Diagnostic Procedure
INSPECTION START
CHECK POWER SUPPLY.
1. Turn ignition switch to ªLOCKº position.
2. Disconnect mass air flow sensor har-
ness connector.
3. Turn ignition switch to ªONº position.
4. Check voltage between mass air flow
sensor connector terminalq
2and
engine ground with CONSULT-II or
tester.
Voltage: Battery positive voltage
OK
ENG
Check the following:
I20A fuse
IECM Relay
IHarness continuity
between ECM relay (coil
and load side) connector
and battery supply
IHarness connectors
F100,M755(RHD mod-
els)
IHarness connectors
M787,F66(LHD mod-
els)
IHarness continuity
between ECM relay con-
nector and Mass Air
Flow Sensor Connector.
If NG, replace 20A fuse or
ECM relay, or repair har-
ness or connectors.
CHECK GROUND CIRCUIT.
1. Turn ignition switch to ªLOCKº position.
2. Disconnect ECM harness connector.
3. Loosen and retighten engine ground
screws.
4. Check harness continuity between
mass air flow sensor harness connec-
tor terminalq
3and ECM connector ter-
minal218. Refer to wiring diagram.
Continuity should exist.
If OK, check harness for short-circuit.
OK
ENG
Check the following.
IHarness connectors
F100,M755(RHD mod-
els)
IHarness continuity
between mass air flow
sensor and ECM
If NG, repair or replace
harness or connectors.
CHECK INPUT SIGNAL CIRCUIT.
Check harness continuity between mass
air flow sensor connector terminalq
4and
ECM connector terminal223. Refer to
wiring diagram.
Continuity should exist.
If OK, check harness for short-circuit.
OK
ENG
Check the following.
IHarness connectors
F100,M755(RHD mod-
els)
IHarness continuity
between mass air flow
sensor and ECM
If NG, repair or replace
harness or connectors.
CHECK INPUT SIGNAL CIRCUIT.
Check harness continuity between mass
air flow sensor connector terminalq
5and
ECM connector terminal224. Refer to
wiring diagram.
Continuity should exist.
If OK, check harness for short-circuit.
OK
ENG
Check the following.
IHarness connectors
F100,M755(RHD mod-
els)
IHarness continuity
between mass air flow
sensor and ECM
If NG, repair or replace
harness or connectors.
CHECK COMPONENT
(Mass air flow sensor).
Refer to ªCOMPONENT INSPECTIONº,
EC-360.
OK
ENG
Replace mass air flow sen-
sor.
qA
NEF664
NEF591
NEF352
H
H
H
H
H
H
DTC P0100 MASS AIR FLOW SENTD27Ti
EC-359
Page 732 of 1767

qA
CHECK INPUT SIGNAL CIRCUIT.
1. Turn ignition switch to ªLOCKº position.
2. Disconnect accelerator work unit har-
ness connector and ECM harness con-
nector.
3. Check harness continuity between
accelerator work unit terminalq
3and
ECM terminal
435. Refer to wiring
diagram.
Continuity should exist.
Check harness for short-circuit.
OK
ENG
Check the following:
I10A fuse in fuse box
I75A fusible link in fusible
link box
IHarness continuity
between ECM relay and
battery positive supply
IHarness for open or
short-circuit between
ECM relay and accelera-
tor position switch.
If NG, repair harness or
connectors.
CHECK GROUND CIRCUIT.
1. Turn ignition switch to ªLOCKº position.
2. Disconnect ECM harness connector.
3. Check harness continuity between
accelerator work unit connector termi-
nalq
1and ECM connector terminal
426. Refer to wiring diagram.
Continuity should exist.
If OK; check harness for short-circuit.
If OK, re-connect harness connectors.
OK
ENG
Repair harness or connec-
tors.
CHECK COMPONENT.
(Accelerator position switch.)
Refer to ªCOMPONENT INSPECTIONº on
page EC-371.
OK
ENG
Replace accelerator pedal.
Disconnect and reconnect harness con-
nectors in the circuits. Then retest.
Trouble is not fixed
Check ECM pin terminals for damage and
check the connection of ECM harness
connector. Reconnect ECM harness con-
nector and retest.
INSPECTION END
SEF628S
H
H
H
H
H
H
DTC P0120 ACCEL POS SENSORTD27Ti
Diagnostic Procedure (Cont'd)
EC-370