2002 NISSAN SENTRA ECO mode
[x] Cancel search: ECO modePage 2 of 235
You will see various symbols in this manual.
They are used in the following ways:
WARNING
This is used to indicate the presence of
a hazard that could cause death or
serious personal injury. To avoid or
reduce the risk, the procedures must
be followed precisely.
CAUTION
This is used to indicate the presence of
a hazard that could cause minor or
moderate personal injury or damage to
your vehicle. To avoid or reduce the
risk, the procedures must be followed
carefully.If you see this symbol, it means ``Do not do
this'' or ``Do not let this happen.''
CALIFORNIA PROPOSITION 65
WARNING
WARNING
Engine Exhaust, some of its constitu-
ents, and certain vehicle components
contain or emit chemicals known to
State of California to cause cancer and
birth defects or other reproductive
harm.
2002 NISSAN NORTH AMERICA, INC.
GARDENA, CALIFORNIA
All rights reserved. No part of this Owner's
Manual may be reproduced or stored in a
retrieval system, or transmitted in any form, or
by any means, electronic, mechanical, photo-
copying, recording or otherwise, without the
prior written permission of Nissan North
America, Inc., Gardena, California.
The inside pages of this manual contain
a minimum of 50% recycled fibers,
including 10% post-consumer fibers.
APD1005
IMPORTANT INFORMATION
ABOUT THIS MANUAL
ZX
Page 33 of 235
WARNING
cImproper use of a child restraint can
result in increased injuries for both
the infant or child and other occu-
pants in the vehicle.
cFollow all of the child restraint manu-
facturer's instructions for installa-
tion and use. When purchasing a
child restraint, be sure to select one
which will fit your child and vehicle.
It may not be possible to properly
install some types of child restraints
in your vehicle.
cIf the child restraint is not anchored
properly, the risk of a child being
injured in a collision or a sudden
stop greatly increases.
cAdjustable seatbacks should be po-
sitioned to fit the child restraint, but
as upright as possible.
c
After attaching the child restraint,
test it before you place the child in it.
Tilt it from side to side. Try to tug it
forward and check to see if the belt
holds the restraint in place. If the
restraint is not secure, tighten thebelt as necessary, or put the re-
straint in another seat and test it
again.
cFor a front-facing child restraint, if
the seat position where it is installed
has a three-point type lap/shoulder
belt, check to make sure the shoulder
belt does not go in front of the child's
face or neck. If it does, put the shoul-
der belt behind the child restraint. If
you must install a front-facing child
restraint in the front seat, see ``Instal-
lation on front passenger seat'' later
in this section for details.
cWhen your child restraint is not in
use, keep it secured with a seat belt
to prevent it from being thrown
around in case of a sudden stop or
accident.
CAUTION
Remember that a child restraint left in a
closed vehicle can become very hot.
Check the seating surface and buckles
before placing your child in the child
restraint.
INSTALLATION ON REAR SEAT
CENTER OR OUTBOARD POSI-
TIONS
WARNING
cThe three-point belt in your vehicle
is equipped with a locking mode re-
tractor which must be used when
installing a child restraint.
cFailure to use the retractor's locking
mode will result in the child restraint
not being properly secured. The re-
straint could tip over or otherwise be
unsecured and cause injury to the
child in a sudden stop or collision.
1-26Seats, restraints and supplemental air bag systems
ZX
Page 42 of 235
INSTALLATION ON FRONT PAS-
SENGER SEAT
WARNING
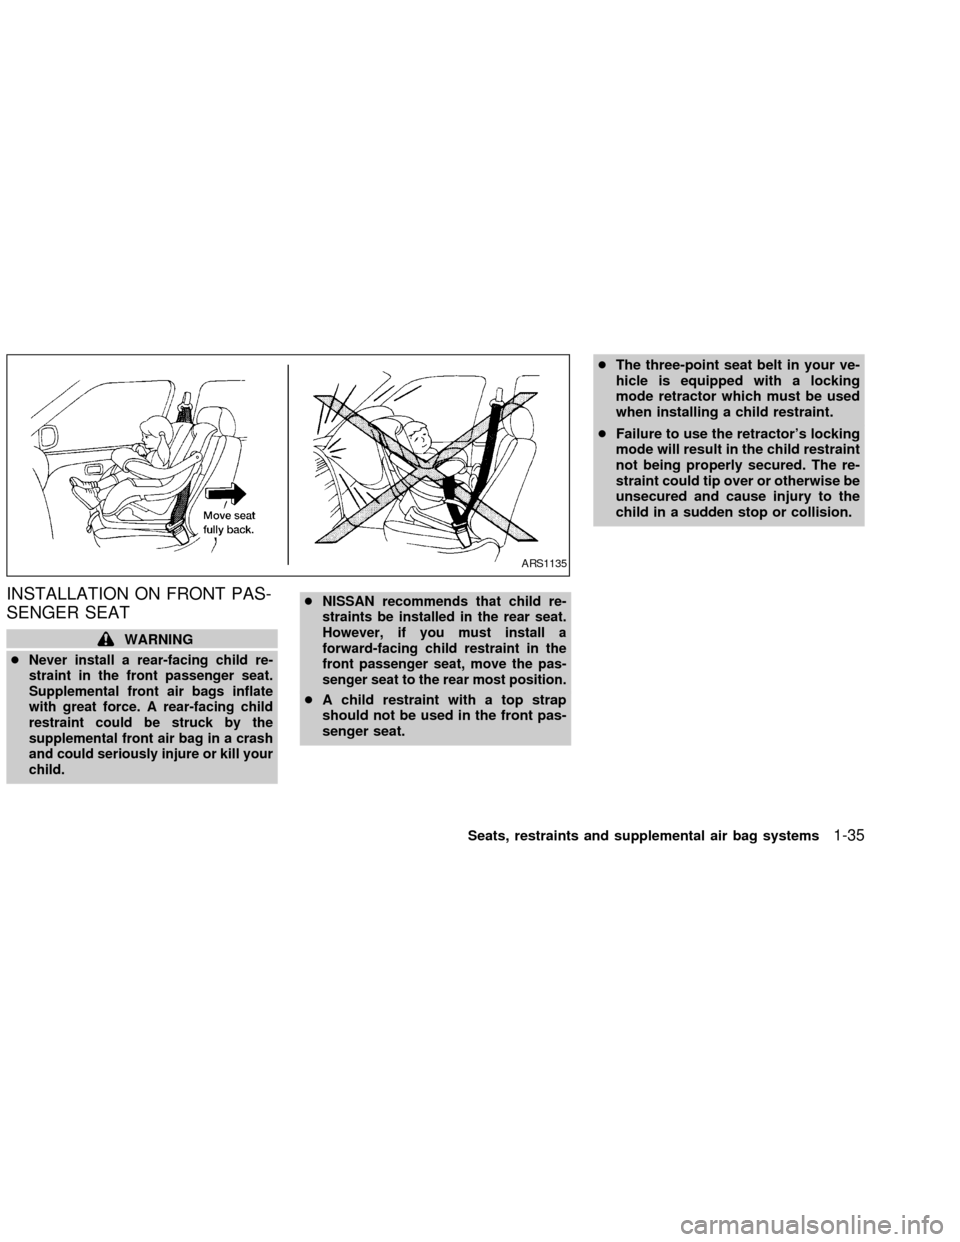
c
Never install a rear-facing child re-
straint in the front passenger seat.
Supplemental front air bags inflate
with great force. A rear-facing child
restraint could be struck by the
supplemental front air bag in a crash
and could seriously injure or kill your
child.cNISSAN recommends that child re-
straints be installed in the rear seat.
However, if you must install a
forward-facing child restraint in the
front passenger seat, move the pas-
senger seat to the rear most position.
cA child restraint with a top strap
should not be used in the front pas-
senger seat.cThe three-point seat belt in your ve-
hicle is equipped with a locking
mode retractor which must be used
when installing a child restraint.
cFailure to use the retractor's locking
mode will result in the child restraint
not being properly secured. The re-
straint could tip over or otherwise be
unsecured and cause injury to the
child in a sudden stop or collision.
ARS1135
Seats, restraints and supplemental air bag systems1-35
ZX
Page 94 of 235
WARNING
cThe air conditioner cooling function
operates only when the engine is
running.
cDo not leave children, impaired
adults, or pets alone in your vehicle.
On hot, sunny days, temperatures in
a closed vehicle could quickly be-
come high enough to cause severe
or possibly fatal injuries to people or
animals.
cDo not use the recirculation mode
for long periods as it may cause the
interior air to become stale and the
windows to fog up.
cPositioning of the heater and air con-
ditioner controls should not be done
while driving so full attention may be
given to vehicle operation.
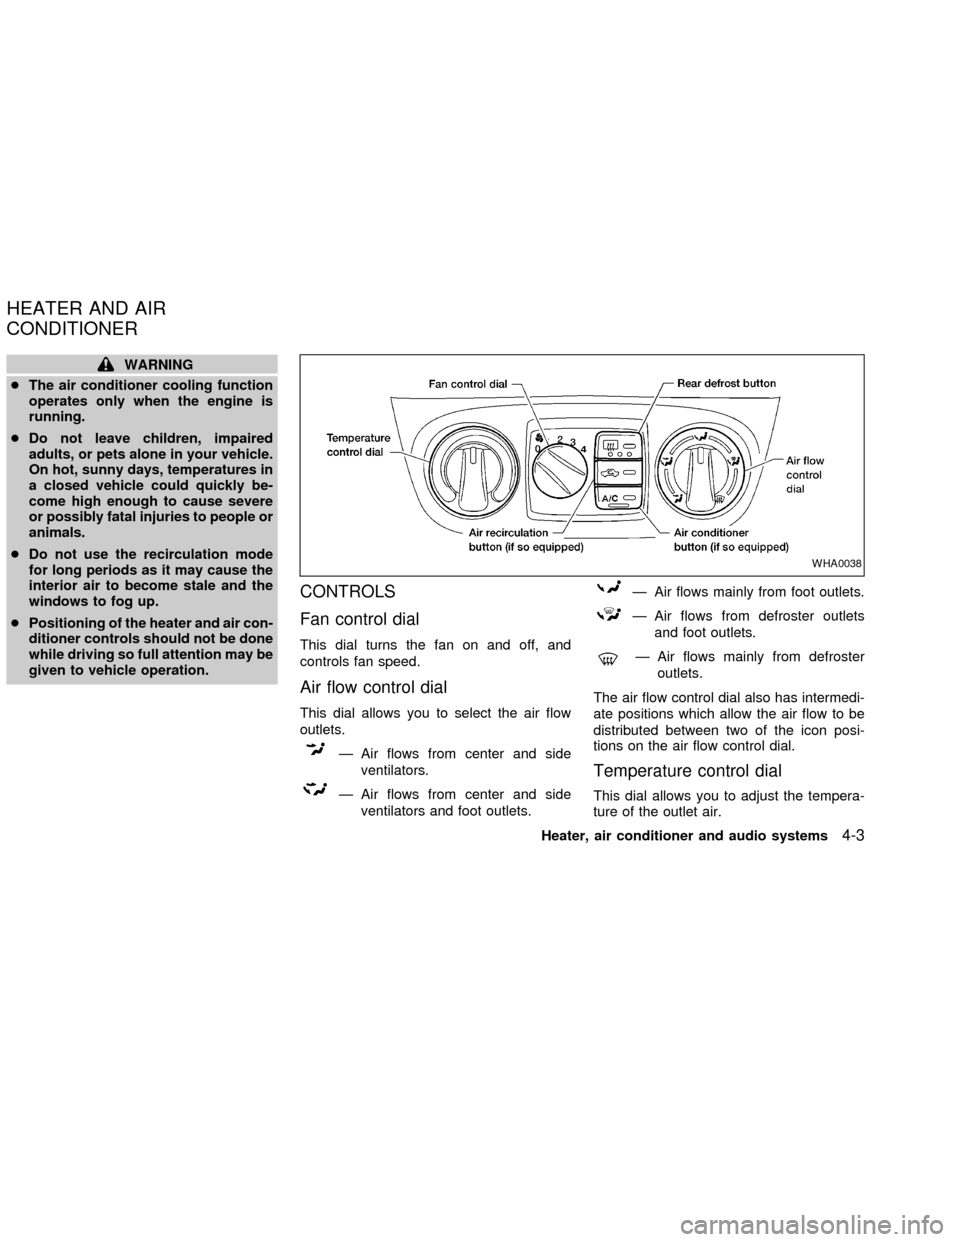
CONTROLS
Fan control dial
This dial turns the fan on and off, and
controls fan speed.
Air flow control dial
This dial allows you to select the air flow
outlets.
Ð Air flows from center and side
ventilators.
Ð Air flows from center and side
ventilators and foot outlets.
Ð Air flows mainly from foot outlets.
Ð Air flows from defroster outlets
and foot outlets.
Ð Air flows mainly from defroster
outlets.
The air flow control dial also has intermedi-
ate positions which allow the air flow to be
distributed between two of the icon posi-
tions on the air flow control dial.
Temperature control dial
This dial allows you to adjust the tempera-
ture of the outlet air.
WHA0038
HEATER AND AIR
CONDITIONER
Heater, air conditioner and audio systems4-3
ZX
Page 105 of 235
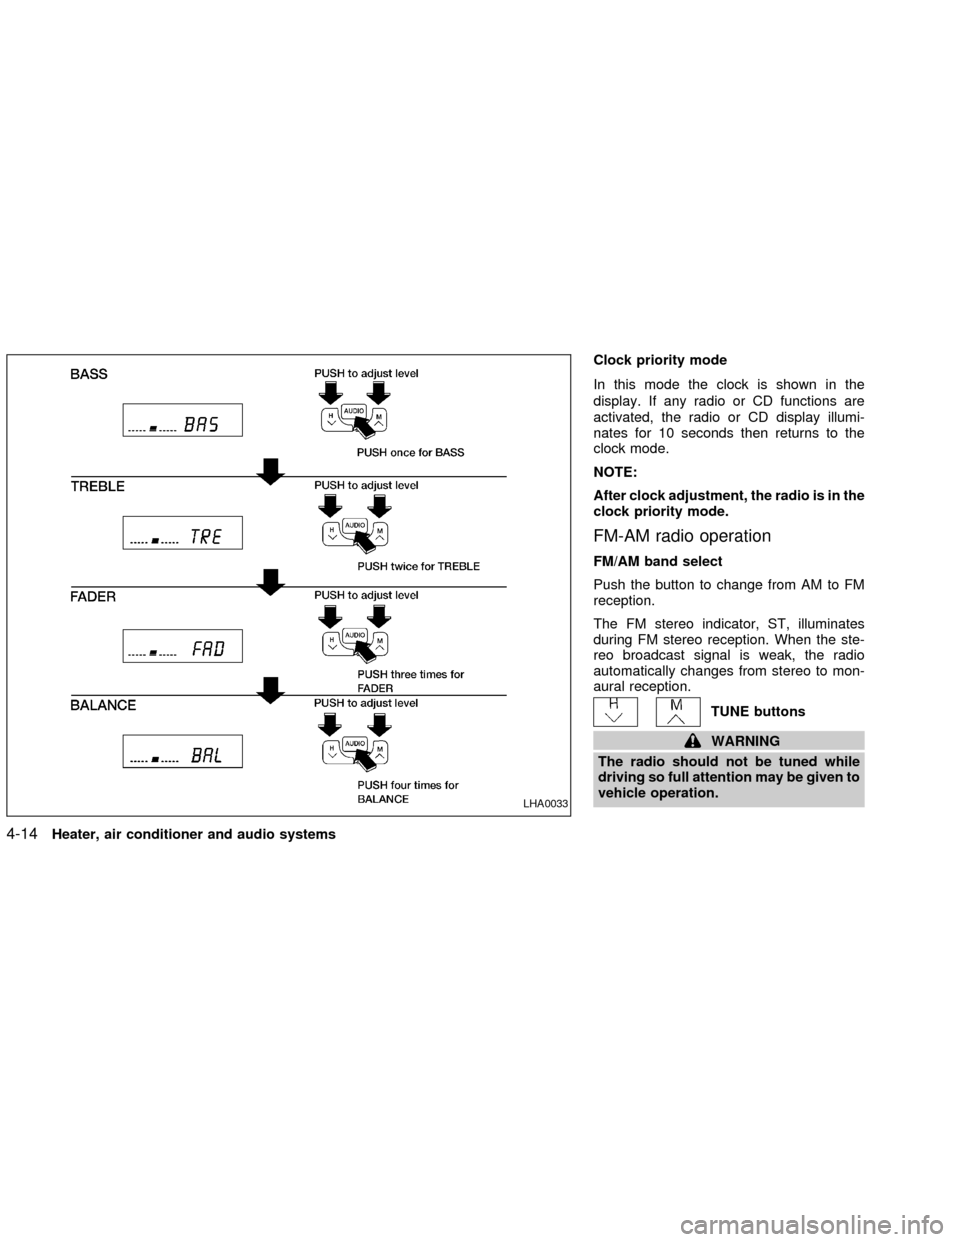
Clock priority mode
In this mode the clock is shown in the
display. If any radio or CD functions are
activated, the radio or CD display illumi-
nates for 10 seconds then returns to the
clock mode.
NOTE:
After clock adjustment, the radio is in the
clock priority mode.
FM-AM radio operation
FM/AM band select
Push the button to change from AM to FM
reception.
The FM stereo indicator, ST, illuminates
during FM stereo reception. When the ste-
reo broadcast signal is weak, the radio
automatically changes from stereo to mon-
aural reception.
TUNE buttons
WARNING
The radio should not be tuned while
driving so full attention may be given to
vehicle operation.
LHA0033
4-14Heater, air conditioner and audio systems
ZX
Page 106 of 235
Use theandbuttons for manual
tuning. To move quickly through the chan-
nels, hold either of the tune buttons down
for more than 0.5 seconds.
SEEK/SCAN button
SEEK tuning
Push the SEEK/SCAN tuning button
for less than 1.5 seconds. SEEK tuning
begins from high to low frequencies or low
to high frequencies, depending on which
button is pressed, and stops at the next
broadcasting station. Once the highest
broadcasting station is reached, the radio
continues in the SEEK mode at the lowest
broadcasting station.
SCAN tuning
Push the SEEK/SCAN tuning button
for more than 1.5 seconds. SCAN illu-
minates in the display. SCAN tuning begins
from high to low frequencies or low to high
frequencies, depending on which button is
pressed. SCAN tuning stops at each broad-
casting station for five seconds. Pushing the
button again during this five second period
stops SCAN tuning and the radio remains
tuned to that station.Station memory operations
Six stations can be set for the AM band.
Twelve stations can be set for the FM band
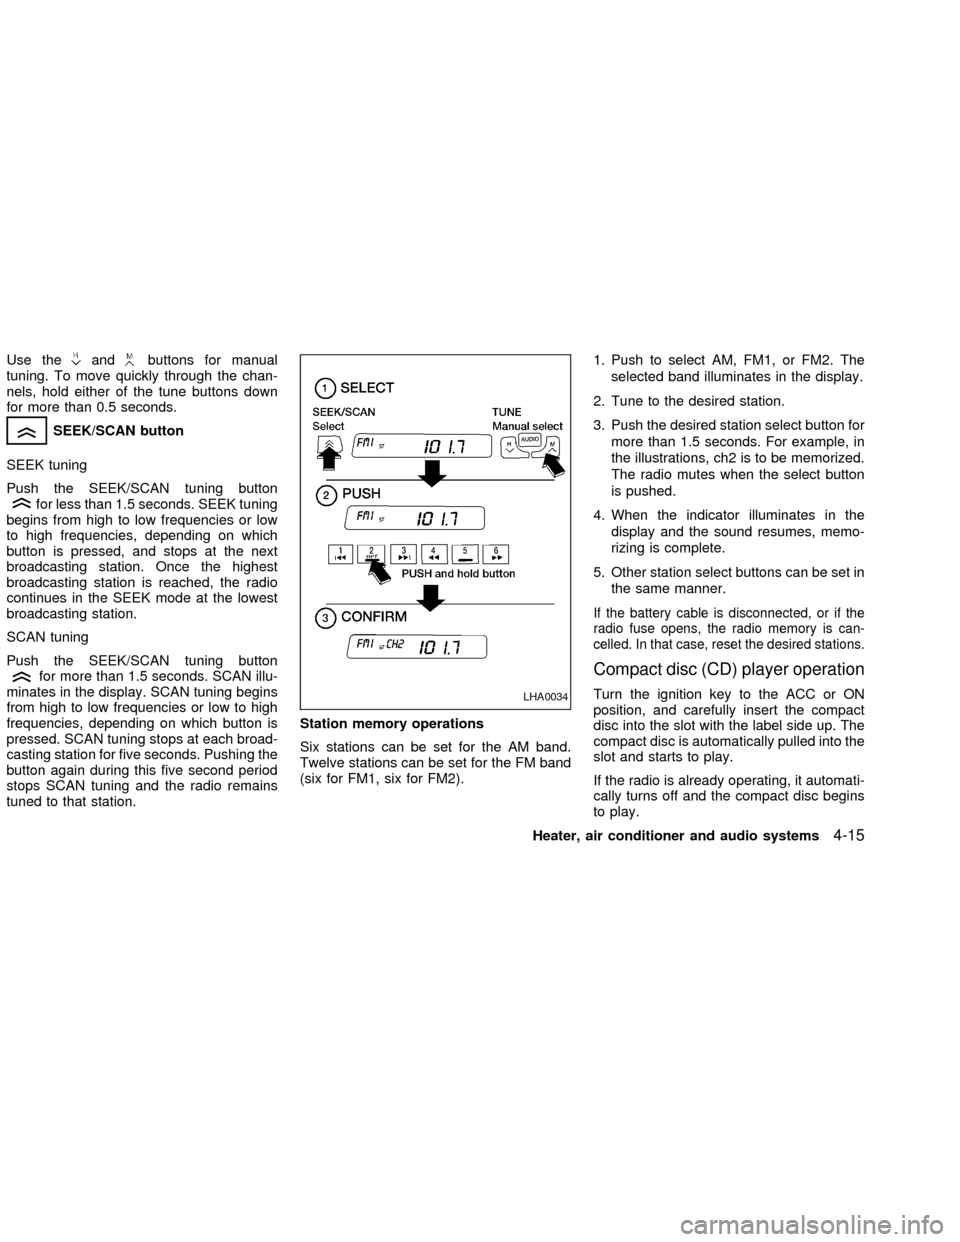
(six for FM1, six for FM2).1. Push to select AM, FM1, or FM2. The
selected band illuminates in the display.
2. Tune to the desired station.
3. Push the desired station select button for
more than 1.5 seconds. For example, in
the illustrations, ch2 is to be memorized.
The radio mutes when the select button
is pushed.
4. When the indicator illuminates in the
display and the sound resumes, memo-
rizing is complete.
5. Other station select buttons can be set in
the same manner.
If the battery cable is disconnected, or if the
radio fuse opens, the radio memory is can-
celled. In that case, reset the desired stations.
Compact disc (CD) player operation
Turn the ignition key to the ACC or ON
position, and carefully insert the compact
disc into the slot with the label side up. The
compact disc is automatically pulled into the
slot and starts to play.
If the radio is already operating, it automati-
cally turns off and the compact disc begins
to play.LHA0034
Heater, air conditioner and audio systems4-15
ZX
Page 108 of 235
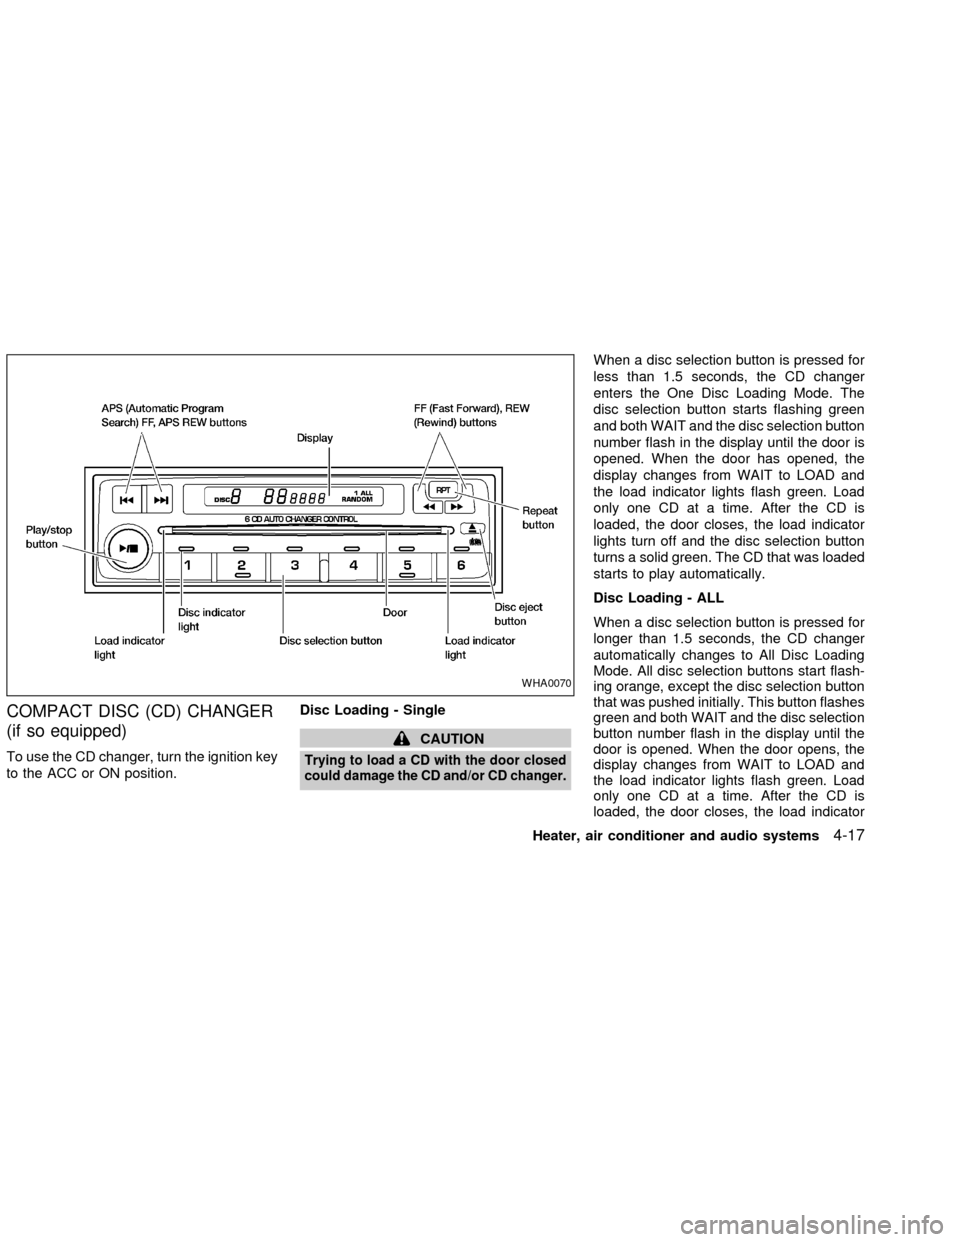
COMPACT DISC (CD) CHANGER
(if so equipped)
To use the CD changer, turn the ignition key
to the ACC or ON position.Disc Loading - Single
CAUTION
Trying to load a CD with the door closed
could damage the CD and/or CD changer.
When a disc selection button is pressed for
less than 1.5 seconds, the CD changer
enters the One Disc Loading Mode. The
disc selection button starts flashing green
and both WAIT and the disc selection button
number flash in the display until the door is
opened. When the door has opened, the
display changes from WAIT to LOAD and
the load indicator lights flash green. Load
only one CD at a time. After the CD is
loaded, the door closes, the load indicator
lights turn off and the disc selection button
turns a solid green. The CD that was loaded
starts to play automatically.
Disc Loading - ALL
When a disc selection button is pressed for
longer than 1.5 seconds, the CD changer
automatically changes to All Disc Loading
Mode. All disc selection buttons start flash-
ing orange, except the disc selection button
that was pushed initially. This button flashes
green and both WAIT and the disc selection
button number flash in the display until the
door is opened. When the door opens, the
display changes from WAIT to LOAD and
the load indicator lights flash green. Load
only one CD at a time. After the CD is
loaded, the door closes, the load indicator
WHA0070
Heater, air conditioner and audio systems4-17
ZX
Page 109 of 235
lights turn off and the disc selection button
turns a solid green. After all the CDs have
been loaded, the CD that was loaded first
starts to play.
Play/Stop button
Press the
button while a CD is play-
ing, the CD stops playing and the CD
changer turns off. Press the
button
while the CD changer is off, the last CD that
was loaded starts to play. Press the
button with no CDs loaded, the CD
changer enters the One Disc Loading
Mode.
FF (fast forward) REV
(reverse) buttons
When the
orbutton is pushed
while the CD is playing, the CD plays at an
increased speed while fast forwarding or
reversing. When the button is released, the
CD returns to normal play speed.
APS (Automatic Pro-
gram Search) FF, APS
REV
When the
button is pushed while the
CD is playing, the selection following the
current one starts to play from the begin-ning. Push the
button several times to
skip several selections. Each time the but-
ton is pushed, the CD advances one selec-
tion. When the last selection on the CD is
skipped, the first selection is played.
When the
button is pushed, the current
selection returns to the beginning. Push the
button several times to skip back sev-
eral selections. Each time the button is
pushed, the CD moves back one selection.
When the first selection on the CD is
skipped, the last selection is played.
Repeat Button
When the
button is pushed while a CD
is playing, the play pattern will change as
follows.
ALL - All disc repeat:All CDs are played
repeatedly in sequence.
BLANK (no symbol) - One disc repeat:
The current CD is repeated.
1 - One track repeat:The current selection
is repeated.
ALL RANDOM - All disc random:Selec-
tions from all the CDs that are stored are
played at random. The same program may
be repeated twice. Pressing the
but-ton will select the next random selection.
RANDOM - One disc random:Selections
from the current CD are played at random.
The same program may be repeated twice.
Pressing the
button will select the next
random selection.
When a new CD is inserted, the play
pattern automatically changes to the
``ALL'' play pattern.
CD Eject - Single
When the
button is pressed for less
than 1.5 seconds, then the current CD that
is playing (or if the CD changer is off, the
last CD that was played) ejects. The disc
indicator light starts flashing orange and
both WAIT and the disc selection button
number flash in the display until the CD is
ejected. When the CD is ejected, the disc
indicator light turns off and the display turns
from WAIT to EJECT. When the CD is
removed from the unit, the CD changer
automatically changes to One Disc Loading
Mode so a new CD can be loaded into the
empty holder. The disc indicator light starts
flashing green and both LOAD and the disc
selection button number appear in the dis-
play until a CD is loaded. One Disc Loading
4-18Heater, air conditioner and audio systems
ZX