2002 NISSAN SENTRA ECO mode
[x] Cancel search: ECO modePage 110 of 235
Mode cancels if another disc selection but-
ton is pushed or by waiting longer than 15
seconds to load a CD.
CD Eject - ALL
When the
button is pressed for longer
than 1.5 seconds, the CD changer auto-
matically changes to All Disc Eject Mode.
The disc indicator light for the current CD (or
the last CD that was played) starts flashing
orange and both WAIT and the disc selec-
tion button number flash in the display until
the CD ejects. When the CD ejects, the disc
indicator light turns off and the display turns
from WAIT to EJECT. When the CD is
removed from the unit, the next CD starts to
eject. After all the CDs are ejected, the CD
changer turns off.
If a CD is ejected and is not removed
within 10 seconds, it will be pulled back
into the slot.
CD CARE AND CLEANING
cHandle a CD by its edges. Never touch
the surface of the disc. Do not bend the
disc.
cAlways place the discs in the storage
case when they are not being used.
cTo clean a disc, wipe the surface from
the center to the outer edge using a
clean, soft cloth. Do not wipe the disc
using a circular motion.
Do not use a conventional record cleaner
or alcohol intended for industrial use.
c
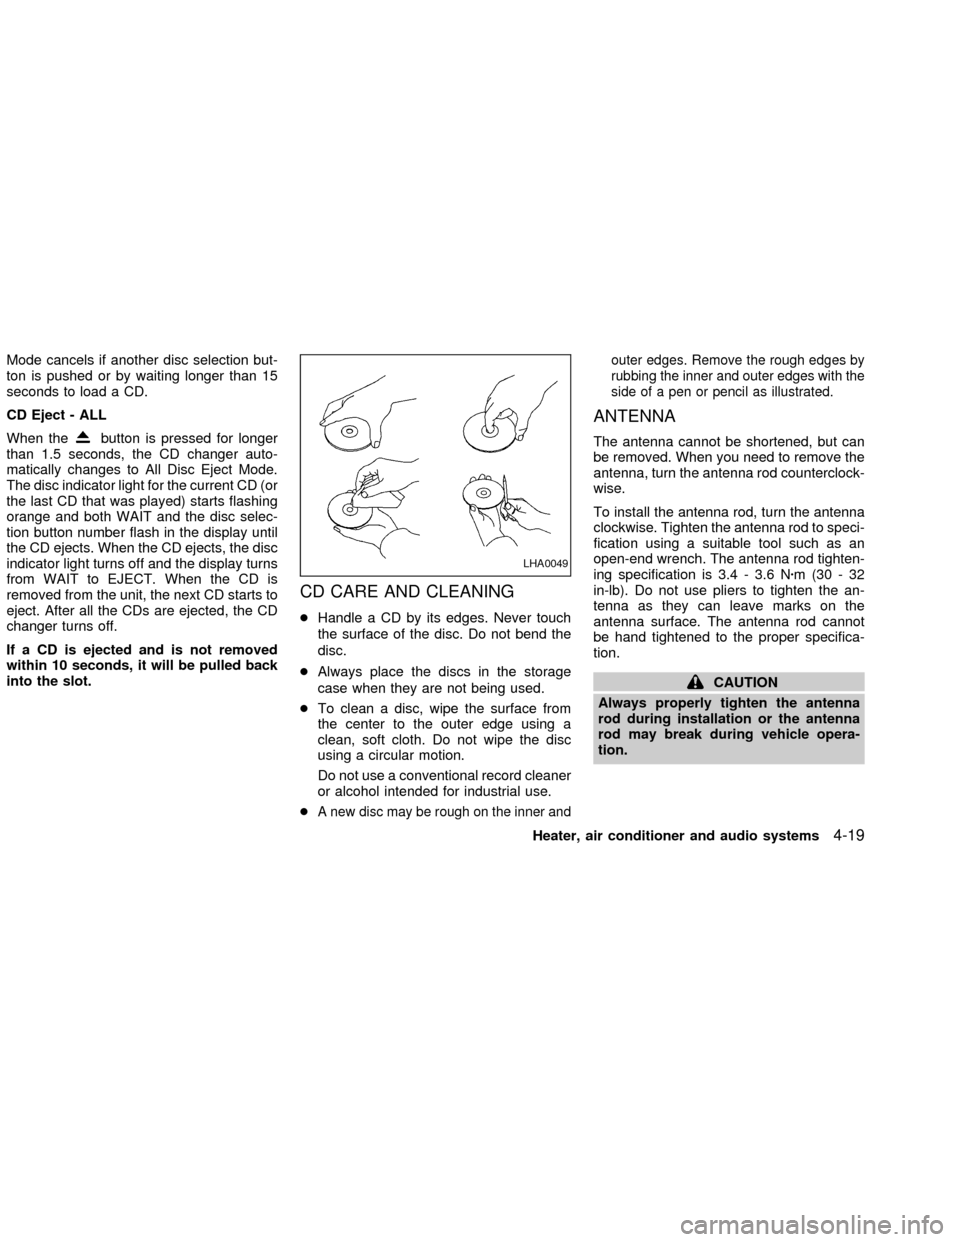
A new disc may be rough on the inner andouter edges. Remove the rough edges by
rubbing the inner and outer edges with the
side of a pen or pencil as illustrated.
ANTENNA
The antenna cannot be shortened, but can
be removed. When you need to remove the
antenna, turn the antenna rod counterclock-
wise.
To install the antenna rod, turn the antenna
clockwise. Tighten the antenna rod to speci-
fication using a suitable tool such as an
open-end wrench. The antenna rod tighten-
ing specification is 3.4 - 3.6 Nzm(30-32
in-lb). Do not use pliers to tighten the an-
tenna as they can leave marks on the
antenna surface. The antenna rod cannot
be hand tightened to the proper specifica-
tion.
CAUTION
Always properly tighten the antenna
rod during installation or the antenna
rod may break during vehicle opera-
tion.
LHA0049
Heater, air conditioner and audio systems4-19
ZX
Page 111 of 235
When installing a CB ham radio or a car
phone in your NISSAN, be sure to observe
the following cautions, otherwise the new
equipment may adversely affect the Multi-
port Fuel Injection (MFI) system and other
electronic parts.
WARNING
cA cellular telephone should not be
used while driving so full attention
may be given to vehicle operation.
Some jurisdictions prohibit the use
of cellular telephones while driving.
cIf you must make a call while your
vehicle is in motion, the hands free
cellular phone operational mode (if
so equipped) is highly recom-
mended. Exercise extreme caution
at all times so full attention may be
given to vehicle operation.
cIf a conversation in a moving vehicle
requires you to take notes, pull off
the road to a safe location and stop
your vehicle before doing so.
CAUTION
cKeep the antenna as far away as
possible from the Engine Control
Module (ECM).
c
Keep the antenna wire more than 8 in.
(20 cm) away from the Multiport Fuel
Injection harness. Do not route the
antenna wire next to any harness.
cAdjust the antenna standing-wave
ratio as recommended by the manu-
facturer.
cConnect the ground wire from the
CB radio chassis to the body.
cFor details, consult an authorized
NISSAN dealer.
CAR PHONE OR CB RADIO
4-20Heater, air conditioner and audio systems
ZX
Page 118 of 235
1. Apply the parking brake.
2.Automatic transmission:
Move the shift selector lever to P (Park)
or N (Neutral). (P is recommended.)
The shift selector lever cannot be
moved out of P (Park) and into any of
the other gear positions if the ignition
key is turned to LOCK or if the key is
removed.
The starter is designed not to operate
if the shift selector lever is in one of
the driving positions.
Manual transmission:
Move the selector lever to N (Neutral),
and depress the clutch pedal to the floor.
The starter is designed to operate
only when the clutch pedal is fully
depressed.
3. Crank the enginewith your foot off the
accelerator pedalby turning the ignition
key to START. Release the key when the
engine starts. If the engine starts, but
fails to run, repeat the above procedure.
Ð If the engine is very hard to start in
extremely cold or hot weather, de-press and hold the accelerator pedal
to help start the engine.
Ð In the summer, when restarting the
engine within 30 minutes after it has
been stopped, keep the accelerator
pedal fully depressed while starting.
CAUTION
Do not operate the starter for more than
15 seconds at a time. If the engine does
not start, turn the key off and wait 10
seconds before cranking again, other-
wise the starter could be damaged.
4.Warm-up
Allow the engine to idle for at least 30
seconds after starting. Drive at moderate
speed for a short distance first, especially
in cold weather.
AUTOMATIC TRANSMISSION
(if so equipped)
WARNING
cDo not depress the accelerator pedal
while shifting from P (Park) or N
(Neutral) to R (Reverse), D (Drive), 2
or 1. Always depress the brake pedal
until shifting is completed. Failure to
do so could cause you to lose con-
trol and have an accident.
cCold engine idle speed is high, so
use caution when shifting into a for-
ward or reverse gear before the en-
gine has warmed up.
cNever shift to P (Park) or R (Reverse)
while the vehicle is moving. This
could cause an accident.
CAUTION
cWhen stopping the vehicle on an
uphill grade, do not hold the vehicle
by depressing the accelerator pedal.
The foot brake should be used for
this purpose.
STARTING THE ENGINE DRIVING THE VEHICLE
Starting and driving5-7
ZX
Page 123 of 235
CAUTION
cDo not rest your foot on the clutch
pedal while driving. This may cause
clutch damage.
cStop your vehicle completely before
shifting into R (Reverse).
cWhen the vehicle is stopped with the
engine running (for example, at a
stop light), shift to N (Neutral) and
release the clutch pedal with the foot
brake applied.
Shifting
To change gears, or when upshifting or
downshifting, depress the clutch pedal fully,
shift into the appropriate gear, then release
the clutch slowly and smoothly.
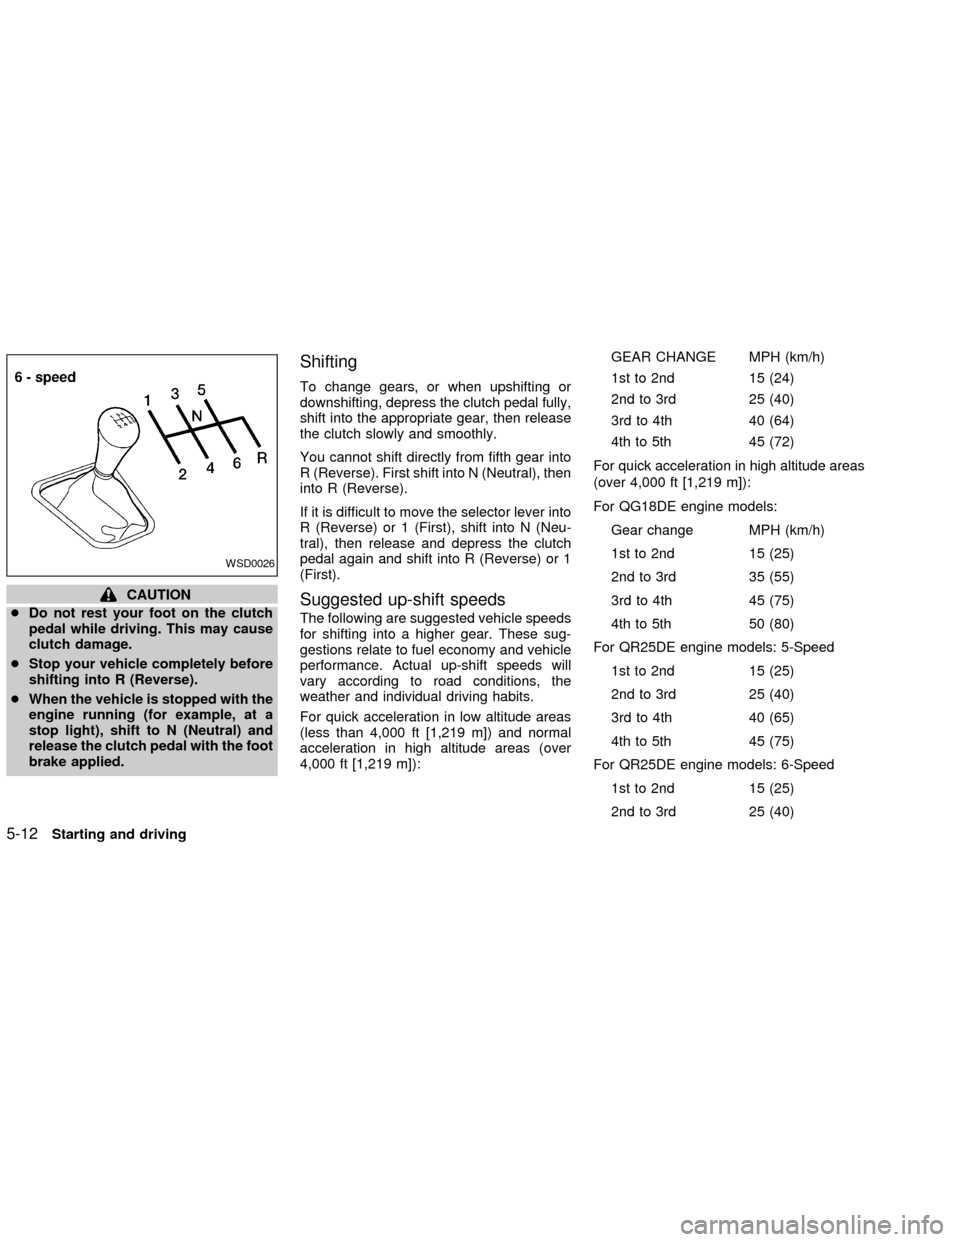
You cannot shift directly from fifth gear into
R (Reverse). First shift into N (Neutral), then
into R (Reverse).
If it is difficult to move the selector lever into
R (Reverse) or 1 (First), shift into N (Neu-
tral), then release and depress the clutch
pedal again and shift into R (Reverse) or 1
(First).
Suggested up-shift speeds
The following are suggested vehicle speeds
for shifting into a higher gear. These sug-
gestions relate to fuel economy and vehicle
performance. Actual up-shift speeds will
vary according to road conditions, the
weather and individual driving habits.
For quick acceleration in low altitude areas
(less than 4,000 ft [1,219 m]) and normal
acceleration in high altitude areas (over
4,000 ft [1,219 m]):GEAR CHANGE MPH (km/h)
1st to 2nd 15 (24)
2nd to 3rd 25 (40)
3rd to 4th 40 (64)
4th to 5th 45 (72)
For quick acceleration in high altitude areas
(over 4,000 ft [1,219 m]):
For QG18DE engine models:
Gear change MPH (km/h)
1st to 2nd 15 (25)
2nd to 3rd 35 (55)
3rd to 4th 45 (75)
4th to 5th 50 (80)
For QR25DE engine models: 5-Speed
1st to 2nd 15 (25)
2nd to 3rd 25 (40)
3rd to 4th 40 (65)
4th to 5th 45 (75)
For QR25DE engine models: 6-Speed
1st to 2nd 15 (25)
2nd to 3rd 25 (40)
WSD0026
5-12Starting and driving
ZX
Page 127 of 235

speed decreases by about 1 MPH (1.6
km/h).
To resume the preset speed,push and
release the ACCEL/RES switch. The ve-
hicle returns to the last set cruising speed
when the vehicle speed is over 25 MPH (40
km/h).During the first 1,000 miles (1,600 km),
follow these recommendations for the future
reliability and economy of your new vehicle.
cAvoid driving for long periods at constant
speed, either fast or slow.
cDo not accelerate at full throttle in any
gear.
cAvoid quick starts.
cAvoid hard braking as much as possible.
cDo not tow a trailer for the first 500 miles
(800 km).
cAccelerate slowly and smoothly. Main-
tain cruising speeds with a constant ac-
celerator position.
cDrive at moderate speeds on the high-
way. Driving at high speed lowers fuel
economy.
cAvoid unnecessary stopping and brak-
ing. Maintain a safe distance behind
other vehicles.
cUse a proper gear range which suits road
conditions. On level roads, shift into high
gear as soon as possible.
cAvoid unnecessary engine idling.
SD1001M
BREAK-IN SCHEDULE INCREASING FUEL
ECONOMY
5-16Starting and driving
ZX
Page 128 of 235
cKeep your engine tuned up.
cFollow the recommended periodic main-
tenance schedule.
cKeep the tires inflated to the correct
pressure. Low tire pressure increases
tire wear and wastes fuel.
cKeep the front wheels in correct align-
ment. Improper alignment increases tire
wear and lowers fuel economy.
cAir conditioner operation lowers fuel
economy. Use the air conditioner only
when necessary.
cWhen cruising at highway speeds, it is
more economical to use the air condi-
tioner and leave the windows closed to
reduce drag.
WARNING
Do not park the vehicle over flammable
materials such as dry grass, waste pa-
per or rags. They may ignite and cause
a fire.
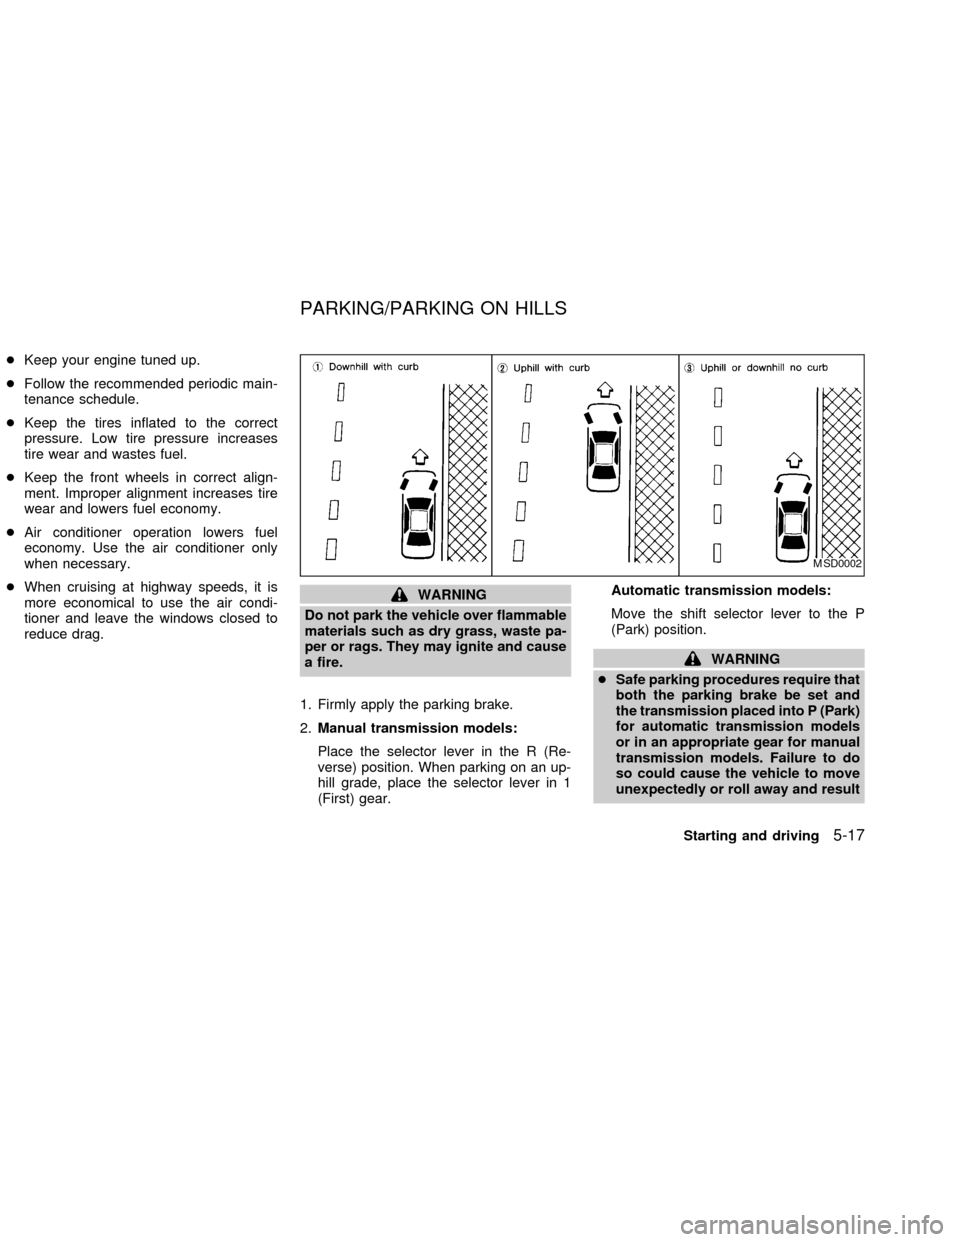
1. Firmly apply the parking brake.
2.Manual transmission models:
Place the selector lever in the R (Re-
verse) position. When parking on an up-
hill grade, place the selector lever in 1
(First) gear.Automatic transmission models:
Move the shift selector lever to the P
(Park) position.
WARNING
cSafe parking procedures require that
both the parking brake be set and
the transmission placed into P (Park)
for automatic transmission models
or in an appropriate gear for manual
transmission models. Failure to do
so could cause the vehicle to move
unexpectedly or roll away and result
MSD0002
PARKING/PARKING ON HILLS
Starting and driving5-17
ZX
Page 143 of 235
cMake sure the jumper cables do not
touch moving parts in the engine com-
partment and that the cable clamps do
not contact any other metal.
5. Start the engine of the booster vehicle
and let it run for a few minutes.
6. Keep the engine speed of the booster
vehicle at about 2,000 rpm, and start the
engine of the vehicle being jump started.
CAUTION
Do not keep the starter motor engaged
for more than 10 seconds. If the engine
does not start right away, turn the key
off and wait 3 to 4 seconds before
trying again.
7. After starting the engine, carefully dis-
connect the negative cable and then the
positive cable.
8. Be sure to dispose of the cloth used to
cover the vent holes as it may be con-
taminated with corrosive acid.
CAUTION
cAutomatic transmission models can-
not be push started. This may cause
transmission damage.
cThree way catalyst equipped models
should not be started by pushing.
The three way catalyst may be dam-
aged.
cNever try to start the vehicle by tow-
ing it. When the engine starts, the
forward surge could cause the ve-
hicle to collide with the tow vehicle.If your vehicle is overheating (indicated by
an extremely high temperature gauge read-
ing), or if you feel a lack of engine power,
detect abnormal noise, etc., take the follow-
ing steps.
WARNING
cDo not continue to drive if your ve-
hicle overheats. Doing so could
cause a vehicle fire.
cTo avoid the danger of being
scalded, never remove the radiator
cap while the engine is still hot.
When the radiator cap is removed,
pressurized hot water will spurt out,
possibly causing serious injury.
cDo not open the hood if steam is
coming out.
1. Move the vehicle safely off the road,
apply the parking brake and move the
selector lever to N (Neutral) (manual
transmission) or the shift selector lever to
P (Park) (automatic transmission).
Do not stop the engine.
2. Turn off the air conditioner. Open all the
windows, move the heater or air condi-
tioner temperature control to maximum
PUSH STARTING IF YOUR VEHICLE
OVERHEATS
6-10In case of emergency
ZX
Page 145 of 235
cAlways attach safety chains before
towing.
TOWING RECOMMENDED BY
NISSAN
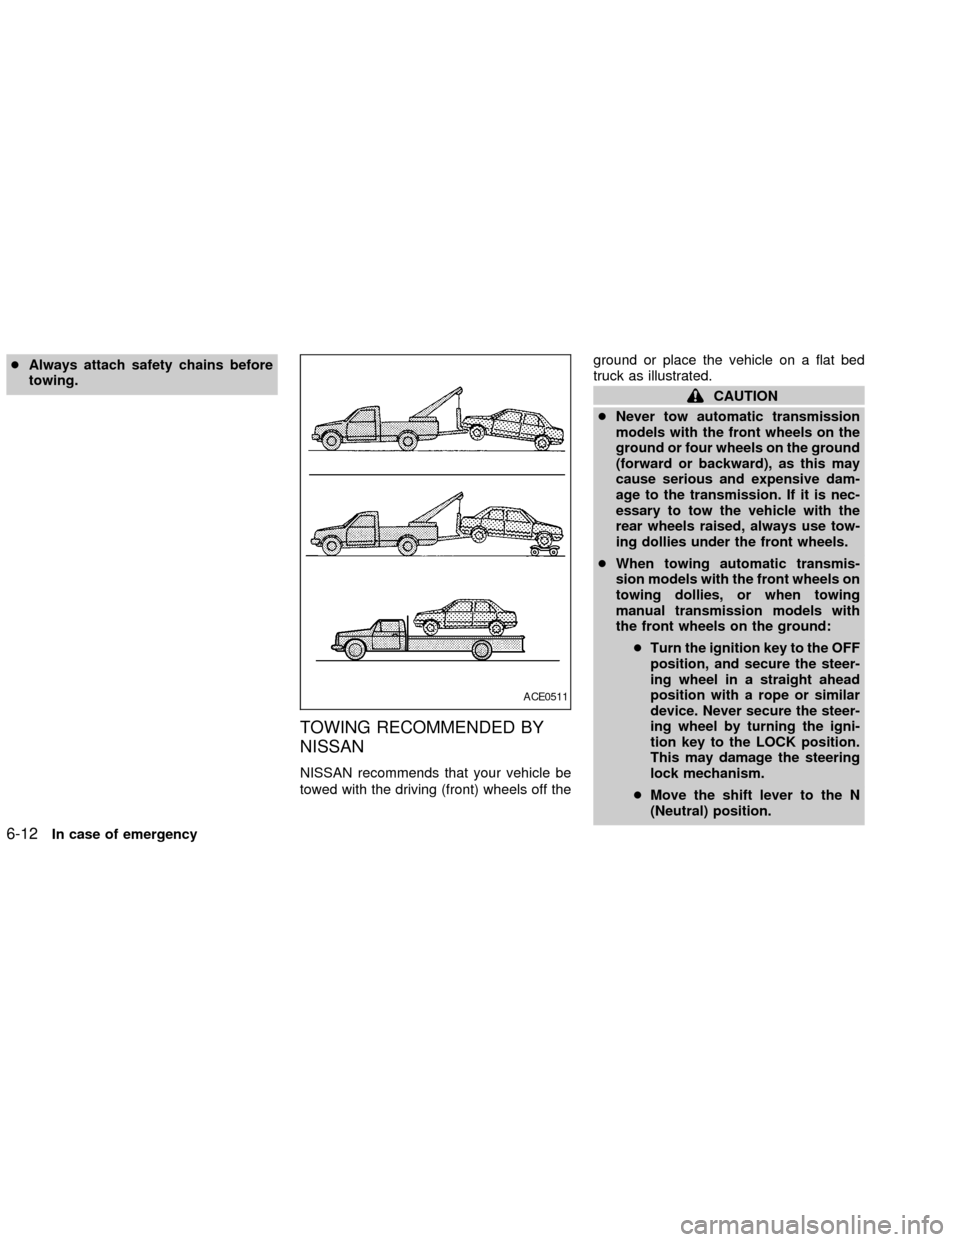
NISSAN recommends that your vehicle be
towed with the driving (front) wheels off theground or place the vehicle on a flat bed
truck as illustrated.
CAUTION
cNever tow automatic transmission
models with the front wheels on the
ground or four wheels on the ground
(forward or backward), as this may
cause serious and expensive dam-
age to the transmission. If it is nec-
essary to tow the vehicle with the
rear wheels raised, always use tow-
ing dollies under the front wheels.
cWhen towing automatic transmis-
sion models with the front wheels on
towing dollies, or when towing
manual transmission models with
the front wheels on the ground:
cTurn the ignition key to the OFF
position, and secure the steer-
ing wheel in a straight ahead
position with a rope or similar
device. Never secure the steer-
ing wheel by turning the igni-
tion key to the LOCK position.
This may damage the steering
lock mechanism.
cMove the shift lever to the N
(Neutral) position.
ACE0511
6-12In case of emergency
ZX