2002 NISSAN SENTRA maintenance
[x] Cancel search: maintenancePage 73 of 235

The light illuminates when the trunk lid is
opened. When the trunk lid is closed, the
light goes off. For bulb replacement proce-
dures, refer to ªBulb replacementº in the
``Maintenance and do-it-yourself'' section of
this manual.
TRUNK LIGHT (if so equipped)
2-28Instruments and controls
ZX
Page 117 of 235

START: (4)
This position activates the starter motor,
which starts the engine.
NISSAN VEHICLE IMMOBILIZER
SYSTEM (NVIS) (if so equipped)
The Nissan Vehicle Immobilizer System
(NVIS) will not allow the engine to start
without the use of a registered NVIS key.
If the engine fails to start using a registered
NVIS key, it may be due to interference
caused by another NVIS key, an automated
toll road device or automated payment de-
vice on the key ring. Restart the engine
using the following procedures:
1. Leave the ignition switch in the ON posi-
tion for approximately 5 seconds.
2. Turn the ignition switch to the OFF or
LOCK position and wait approximately 5
seconds.
3. Repeat step 1 and 2 again.
4. Restart the engine while holding the de-
vice (which may have caused the inter-
ference) separate from the registered
NVIS key.
If this procedure allows the engine to start,NISSAN recommends placing the regis-
tered NVIS key on a separate key ring to
avoid interference from other devices.cMake sure the area around the vehicle is
clear.
cMaintenance items listed here should be
checked periodically, for example, each
time you check engine oil.
cCheck that all windows and lights are
clean.
cVisually inspect tires for their appearance
and condition. Also check tires for proper
inflation.
cLock all doors.
cPosition seat and adjust head restraints.
cAdjust inside and outside mirrors.
cFasten seat belts and ask all passengers
to do likewise.
c
Check the operation of warning lights
when key is turned to the ON (3) position.
See ``Warning/indicator lights and audible
reminders'' in the ``Instrument and con-
trols'' section.
BEFORE STARTING THE
ENGINE
5-6Starting and driving
ZX
Page 132 of 235

FREEING A FROZEN DOOR
LOCK
To prevent a door lock from freezing, apply
de-icer or glycerin through the key hole. If
the lock becomes frozen, heat the key be-
fore inserting it in the key hole.
ANTI-FREEZE
In the winter when it is anticipated that the
temperature will drop below 32ÉF (0ÉC),
check the anti-freeze (ethylene glycol base)
to assure proper winter protection. For de-
tails, see ``Engine cooling system'' in the
``Maintenance and do-it-yourself'' section of
this manual.
BATTERY
If the battery is not fully charged during
extremely cold weather conditions, the bat-
tery fluid may freeze and damage the bat-
tery. To maintain maximum efficiency, the
battery should be checked regularly. For
details, see ``Battery'' in the ``Maintenance
and do-it-yourself'' section of this manual.
DRAINING OF COOLANT
If the vehicle is to be left outside without
anti-freeze, drain the cooling system byopening the drain valves located under the
radiator and on the engine block. Refill
before operating the vehicle. See ``Chang-
ing engine coolant'' in the ``Maintenance
and do-it-yourself'' section of this manual.
TIRE EQUIPMENT
1.SUMMER tires are of a tread design to
provide superior performance on dry
pavement. However, the performance of
these tires will be substantially reduced in
snowy and icy conditions. If you operate
your vehicle on snowy or icy roads, NIS-
SAN recommends the use of MUD &
SNOW or ALL SEASON TIRES on all four
wheels. Please consult an authorized
NISSAN dealer for the tire type, size,
speed rating and availability information.
2. For additional traction on icy roads, stud-
ded tires may be used. However, most
U.S. states and Canadian provinces pro-
hibit their use. Check local, state and
provincial laws before installing studded
tires.
Skid and traction capabilities of studded
snow tires on wet or dry surfaces may be
poorer than that of non-studded snow
tires.3. Tire chains may be used. Make sure they
are of proper size for the tires on your
vehicle and are installed according to the
chain manufacturer's suggestions.
Use of tire chains may be prohibited
according to location. Check the local
laws before installing tire chains. When
installing tire chains, make sure they are
of proper size for the tires on your vehicle
and are installed according to the chain
manufacturer's suggestions.Use only
SAE Class ªSº chains.Other types may
damage your vehicle. Use chain tension-
ers when recommended by the tire chain
manufacturer to ensure a tight fit. Loose
end links of the tire chain must be se-
cured or removed to prevent the possi-
bility of whipping action damage to the
fenders or underbody. If possible, avoid
fully loading your vehicle when using tire
chains. In addition, drive at a reduced
speed. Otherwise, your vehicle may be
damaged and/or vehicle handling and
performance may be adversely affected.
Never install tire chains on TEMPO-
RARY USE ONLY spare tires. Do not
use tire chains on dry roads.
COLD WEATHER DRIVING
Starting and driving5-21
ZX
Page 140 of 235

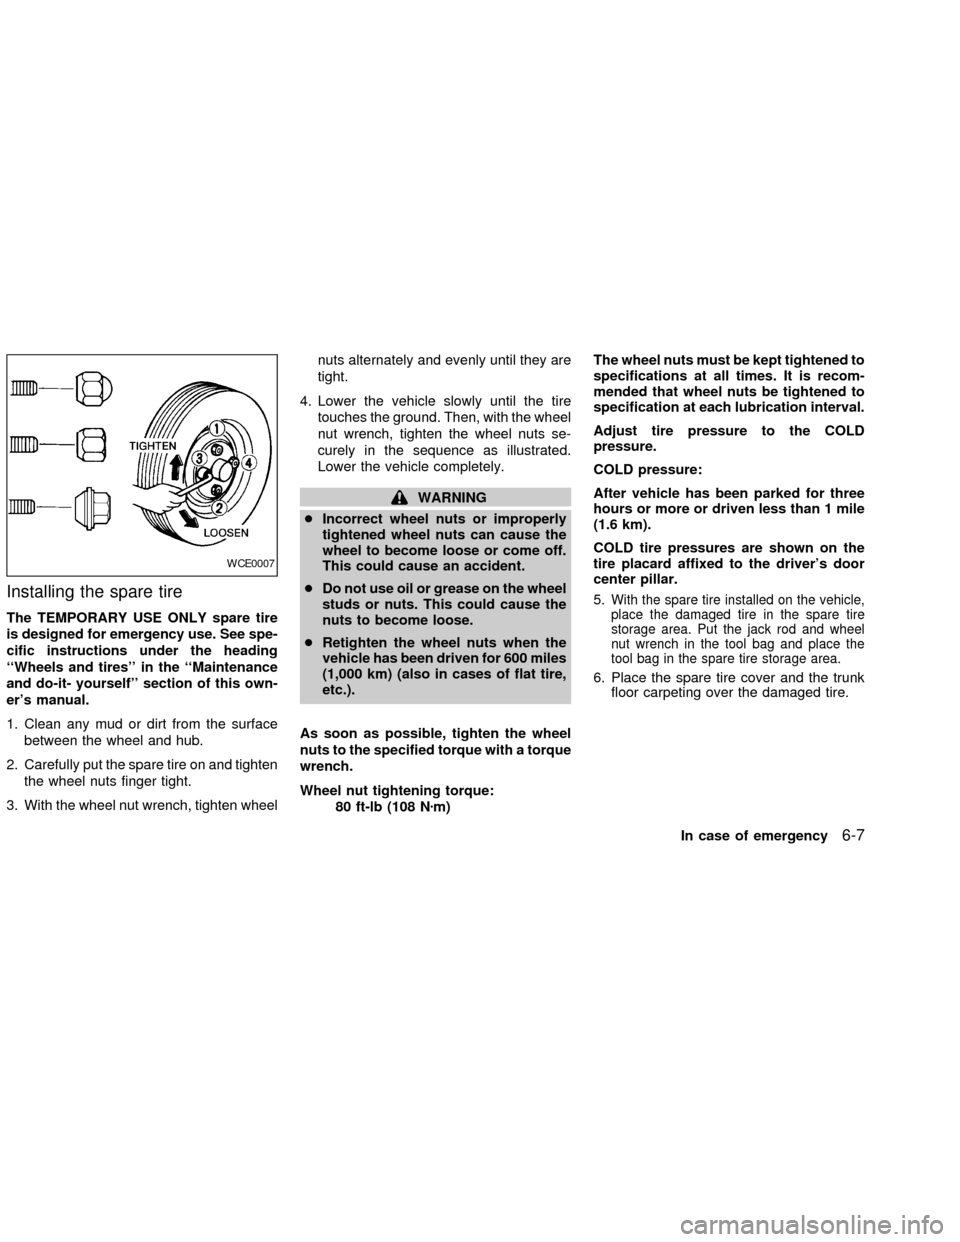
Installing the spare tire
The TEMPORARY USE ONLY spare tire
is designed for emergency use. See spe-
cific instructions under the heading
``Wheels and tires'' in the ``Maintenance
and do-it- yourself'' section of this own-
er's manual.
1. Clean any mud or dirt from the surface
between the wheel and hub.
2. Carefully put the spare tire on and tighten
the wheel nuts finger tight.
3. With the wheel nut wrench, tighten wheelnuts alternately and evenly until they are
tight.
4. Lower the vehicle slowly until the tire
touches the ground. Then, with the wheel
nut wrench, tighten the wheel nuts se-
curely in the sequence as illustrated.
Lower the vehicle completely.
WARNING
cIncorrect wheel nuts or improperly
tightened wheel nuts can cause the
wheel to become loose or come off.
This could cause an accident.
cDo not use oil or grease on the wheel
studs or nuts. This could cause the
nuts to become loose.
cRetighten the wheel nuts when the
vehicle has been driven for 600 miles
(1,000 km) (also in cases of flat tire,
etc.).
As soon as possible, tighten the wheel
nuts to the specified torque with a torque
wrench.
Wheel nut tightening torque:
80 ft-lb (108 Nzm)The wheel nuts must be kept tightened to
specifications at all times. It is recom-
mended that wheel nuts be tightened to
specification at each lubrication interval.
Adjust tire pressure to the COLD
pressure.
COLD pressure:
After vehicle has been parked for three
hours or more or driven less than 1 mile
(1.6 km).
COLD tire pressures are shown on the
tire placard affixed to the driver's door
center pillar.
5.
With the spare tire installed on the vehicle,
place the damaged tire in the spare tire
storage area. Put the jack rod and wheel
nut wrench in the tool bag and place the
tool bag in the spare tire storage area.
6. Place the spare tire cover and the trunk
floor carpeting over the damaged tire.
WCE0007
In case of emergency6-7
ZX
Page 141 of 235

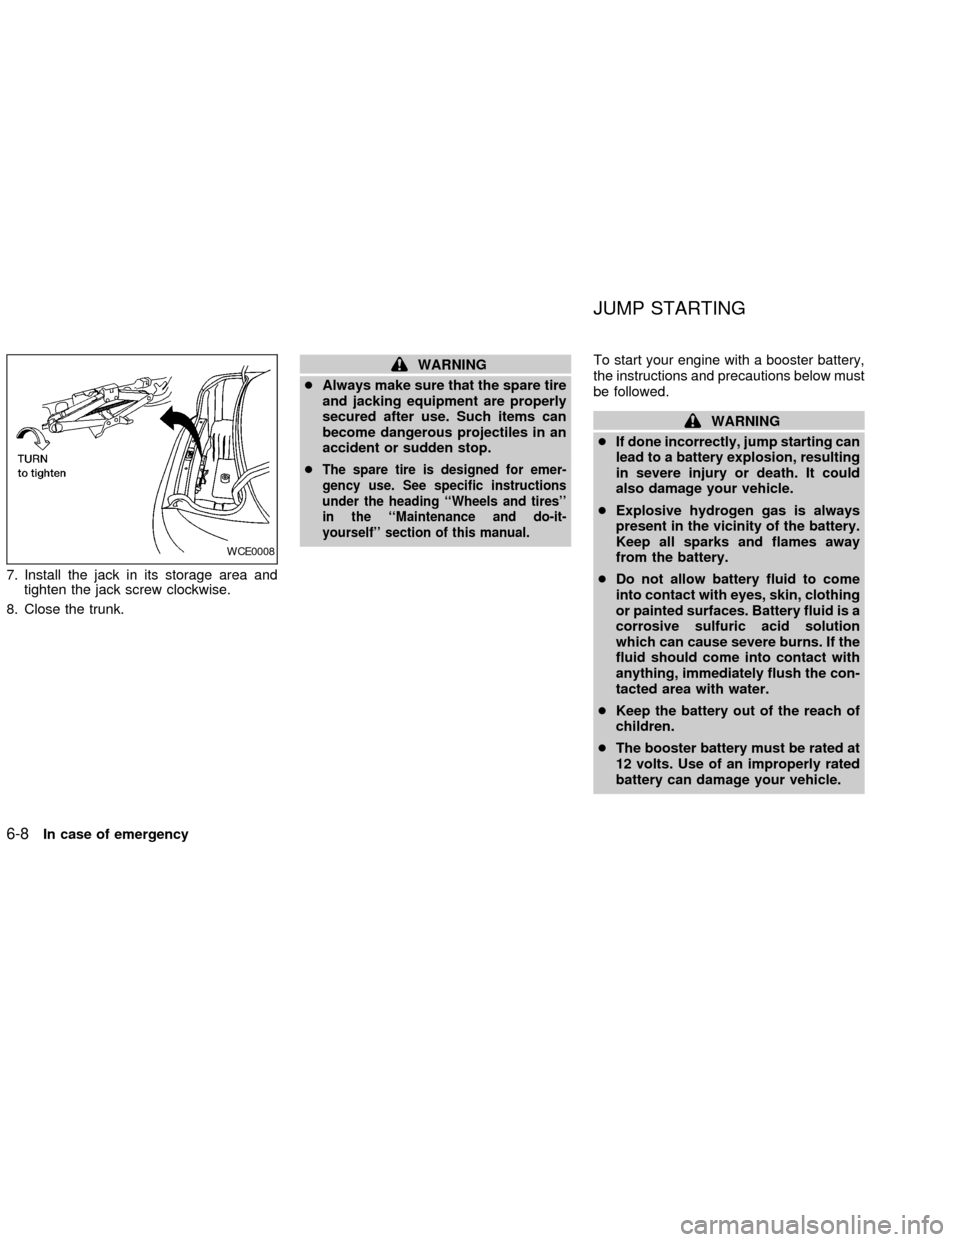
7. Install the jack in its storage area and
tighten the jack screw clockwise.
8. Close the trunk.
WARNING
cAlways make sure that the spare tire
and jacking equipment are properly
secured after use. Such items can
become dangerous projectiles in an
accident or sudden stop.
c
The spare tire is designed for emer-
gency use. See specific instructions
under the heading ``Wheels and tires''
in the ``Maintenance and do-it-
yourself'' section of this manual.
To start your engine with a booster battery,
the instructions and precautions below must
be followed.
WARNING
cIf done incorrectly, jump starting can
lead to a battery explosion, resulting
in severe injury or death. It could
also damage your vehicle.
cExplosive hydrogen gas is always
present in the vicinity of the battery.
Keep all sparks and flames away
from the battery.
cDo not allow battery fluid to come
into contact with eyes, skin, clothing
or painted surfaces. Battery fluid is a
corrosive sulfuric acid solution
which can cause severe burns. If the
fluid should come into contact with
anything, immediately flush the con-
tacted area with water.
cKeep the battery out of the reach of
children.
cThe booster battery must be rated at
12 volts. Use of an improperly rated
battery can damage your vehicle.
WCE0008
JUMP STARTING
6-8In case of emergency
ZX
Page 152 of 235

SEAT BELTS
The seat belts can be cleaned by wiping
them with a sponge dampened in a mild
soap solution. Allow the belts to dry com-
pletely in the shade before using them. See
``Seat belt maintenance'' in the ``Seats, re-
straints and supplemental air bag systems''
section of this owner's manual.
WARNING
Do not allow wet seat belts to roll up in
the retractor. NEVER use bleach, dye,
or chemical solvents to clean the seat
belts, since these materials may se-
verely weaken the seat belt webbing.
MOST COMMON FACTORS
CONTRIBUTING TO VEHICLE
CORROSION
1. The accumulation of moisture-retaining
dirt and debris in body panel sections,
cavities, and other areas.
2. Damage to paint and other protective
coatings caused by gravel and stone
chips or minor traffic accidents.
ENVIRONMENTAL FACTORS IN-
FLUENCE THE RATE OF COR-
ROSION
Moisture
Accumulation of sand, dirt and water on the
vehicle body underside can accelerate cor-
rosion. Wet floor coverings will not dry com-
pletely inside the vehicle, and should be
removed for drying to avoid floor panel
corrosion.
Relative humidity
Corrosion will be accelerated:
cin areas of high relative humidity.cin areas where the temperatures stay
above freezing.
cwhere atmospheric pollution exists.
cwhere road salt is used.
Temperature
High temperatures accelerate the rate of
corrosion to those parts which are not well
ventilated.
Air pollution
Industrial pollution, the presence of salt in
the air in coastal areas, or heavy road salt
use accelerates the corrosion process.
Road salt also accelerates the disintegra-
tion of paint surfaces.
TO PROTECT YOUR VEHICLE
FROM CORROSION
cwash and wax your vehicle often to keep
the vehicle clean.
calways check for minor damage to the
paint and repair it as soon as possible.
ckeep drain holes at the bottom of the
doors open to avoid water accumulation.
ccheck the underbody for accumulation of
CORROSION PROTECTION
Appearance and care7-5
ZX
Page 155 of 235

8 Maintenance and do-it-yourself
Maintenance requirements .....................................8-2
General maintenance .............................................8-3
Explanation of general maintenance
items ..................................................................8-3
Maintenance precautions .......................................8-5
Engine compartment check locations -
QG engine .............................................................8-7
Engine compartment check locations -
QR engine .............................................................8-8
Engine cooling system ...........................................8-9
Checking engine coolant level ..........................8-9
Changing engine coolant ................................8-10
Engine oil .............................................................8-12
Checking engine oil level ................................8-12
Changing engine oil ........................................8-13
Changing engine oil filter.................................8-14
Automatic transmission fluid ................................8-15
Temperature conditions for checking ..............8-16
Power steering fluid..............................................8-17
Brake and clutch fluid...........................................8-18
Brake fluid........................................................8-18
Clutch fluid .......................................................8-18Window washer fluid ............................................8-19
Battery ..................................................................8-19
Jump starting ...................................................8-21
Drive belts ............................................................8-22
Spark plug ............................................................8-23
Replacing spark plugs .....................................8-23
Air cleaner ............................................................8-24
Cabin air filter (if so equipped) ........................8-24
Windshield wiper blades ......................................8-28
Cleaning ..........................................................8-28
Replacing .........................................................8-28
Parking brake and brake pedal ............................8-29
Checking park brake .......................................8-29
Checking brake pedal .....................................8-30
Brake booster ..................................................8-30
Clutch pedal .........................................................8-31
Checking clutch pedal .....................................8-31
Fuses ....................................................................8-31
Engine compartment .......................................8-31
Passenger compartment .................................8-34
Keyfob battery replacement .................................8-35
Lights ....................................................................8-36
ZX
Page 157 of 235

Your new NISSAN has been designed to
have minimum maintenance requirements
with longer service intervals to save you
both time and money. However, some day-
to-day and regular maintenance is essential
to maintain your NISSAN's good mechani-
cal condition, as well as its emission and
engine performance.
It is the owner's responsibility to make sure
that the scheduled maintenance, as well as
general maintenance, is performed.
As the vehicle owner, you are the only one
who can ensure that your vehicle receives
proper maintenance. You are a vital link in
the maintenance chain.
Scheduled maintenance
For your convenience, both required and
optional scheduled maintenance items are
described and listed in your ``NISSAN Ser-
vice and Maintenance Guide.'' You must
refer to that guide to ensure that necessary
maintenance is performed on your Nissan
at regular intervals.
General maintenance
General maintenance includes those items
which should be checked during normalday-to-day operation of the vehicle. They
are essential if your vehicle is to continue to
operate properly. It is your responsibility to
perform these maintenance procedures
regularly as prescribed.
Performing general maintenance checks re-
quire minimal mechanical skill and only a
few general automotive tools.
These checks or inspections can be done
by yourself, a qualified technician or, if you
prefer, an authorized NISSAN dealer.
Where to go for service
If maintenance service is required or your
vehicle appears to malfunction, have the
systems checked and tuned by an autho-
rized NISSAN dealer.
NISSAN technicians are well-trained spe-
cialists who and are kept up-to-date with the
latest service information through technical
bulletins, service tips, and in-dealership
training programs. They are completely
qualified to work on NISSAN vehicles
beforethey work on your vehicle, rather
than after they have worked on it.
You can be confident that an authorized
NISSAN dealer's service department per-forms the best job to meet the maintenance
requirements on your vehicle Ð in a reliable
and economic way.
MAINTENANCE
REQUIREMENTS
8-2Maintenance and do-it-yourself
ZX