2002 NISSAN QUEST lock
[x] Cancel search: lockPage 134 of 294

CHILD SAFETY SLIDING DOOR
LOCKS
Child safety locking helps prevent doors
from being opened accidentally, especially
when small children are in the vehicle.When the lever is in the LOCK position,
the sliding doors can be opened only
from the outside.
APD1075
APD1056
Pre-driving checks and adjustments3-5
ZX
Page 135 of 294

It is possible to lock/unlock all doors, turn
the interior lights on or off, and activate the
panic alarm by using the keyfob from out-
side the vehicle.
Be sure to remove the key from the
vehicle before locking the doors and
leaving it.
The keyfob can operate at a distance of
approximately 30 ft (10 m) from the vehicle.
The effective distance depends on the con-
ditions around the vehicle.
As many as four keyfobs can be used with
one vehicle. For more information concern-
ing the purchase and use of additional key-
fobs, contact an authorized NISSAN dealer.
CAUTION
Listed below are conditions or occur-
rences which will damage the keyfob:
cDo not allow the keyfob to become
wet.
cDo not drop the keyfob.
cDo not strike the keyfob sharply
against another object.cDo not place the keyfob for an ex-
tended period in an area where tem-
peratures exceed 140ÉF (60ÉC).
HOW TO USE REMOTE KEY-
LESS ENTRY SYSTEM
Locking doors
1. Close all doors.
2. Push the
button on the keyfob.
3. All doors lock.
4. The parking lights flash twice and the
horn chirps once to verify all doors are
locked.
Unlocking doors
For memory seat and mirror information
see ``Memory driver seat and mirrors'' later
in this section.
1. Push the
button on the keyfob. Only
the driver door unlocks. Parking lights
flash once.
2. The interior lights come on and stay on
for 30 seconds.
3. Push the
button on the keyfob againwithin five seconds. The passenger door,
sliding doors, and the rear door unlock.
The interior lights can be turned off without
waiting 30 seconds by either turning the
ignition to ON or locking the doors with the
multi-remote controller.
Using the panic alarm
If you are near your vehicle and feel threat-
ened, you may activate the panic alarm to
call attention as follows:
1. Push and hold the
button on the
keyfob for at least one full second.
2. The theft warning alarm (horn) sounds
and the headlights and tail lights flash for
30 seconds.
3. The panic alarm stops when:
cit has run for 30 seconds, or
cthe
or thebutton is pressed, or
c
thebutton is released and re-pushed.
REMOTE KEYLESS ENTRY
SYSTEM
3-6Pre-driving checks and adjustments
ZX
Page 138 of 294

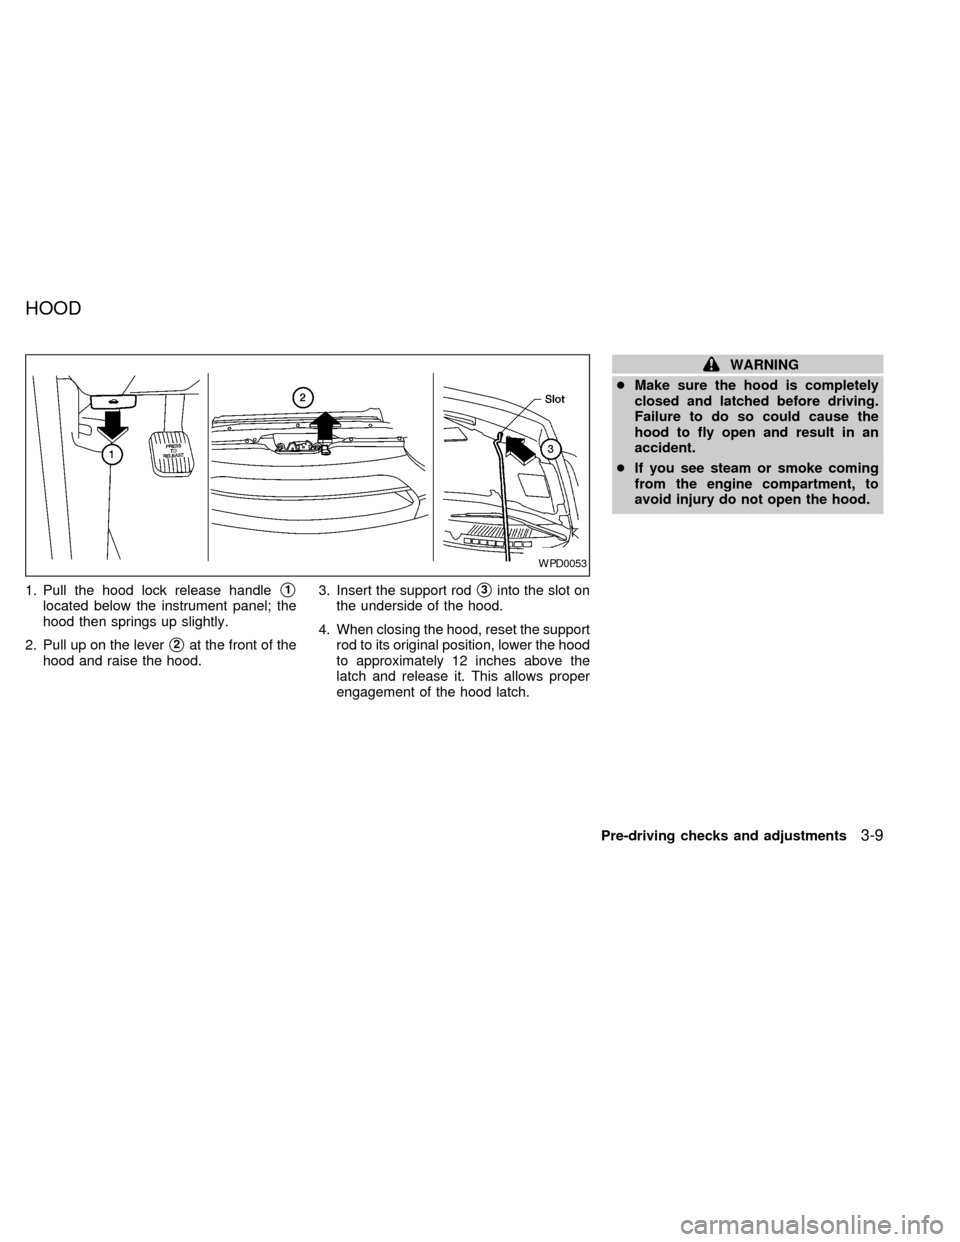
1. Pull the hood lock release handles1
located below the instrument panel; the
hood then springs up slightly.
2. Pull up on the lever
s2at the front of the
hood and raise the hood.3. Insert the support rod
s3into the slot on
the underside of the hood.
4. When closing the hood, reset the support
rod to its original position, lower the hood
to approximately 12 inches above the
latch and release it. This allows proper
engagement of the hood latch.
WARNING
cMake sure the hood is completely
closed and latched before driving.
Failure to do so could cause the
hood to fly open and result in an
accident.
cIf you see steam or smoke coming
from the engine compartment, to
avoid injury do not open the hood.
WPD0053
HOOD
Pre-driving checks and adjustments3-9
ZX
Page 139 of 294

Key operation
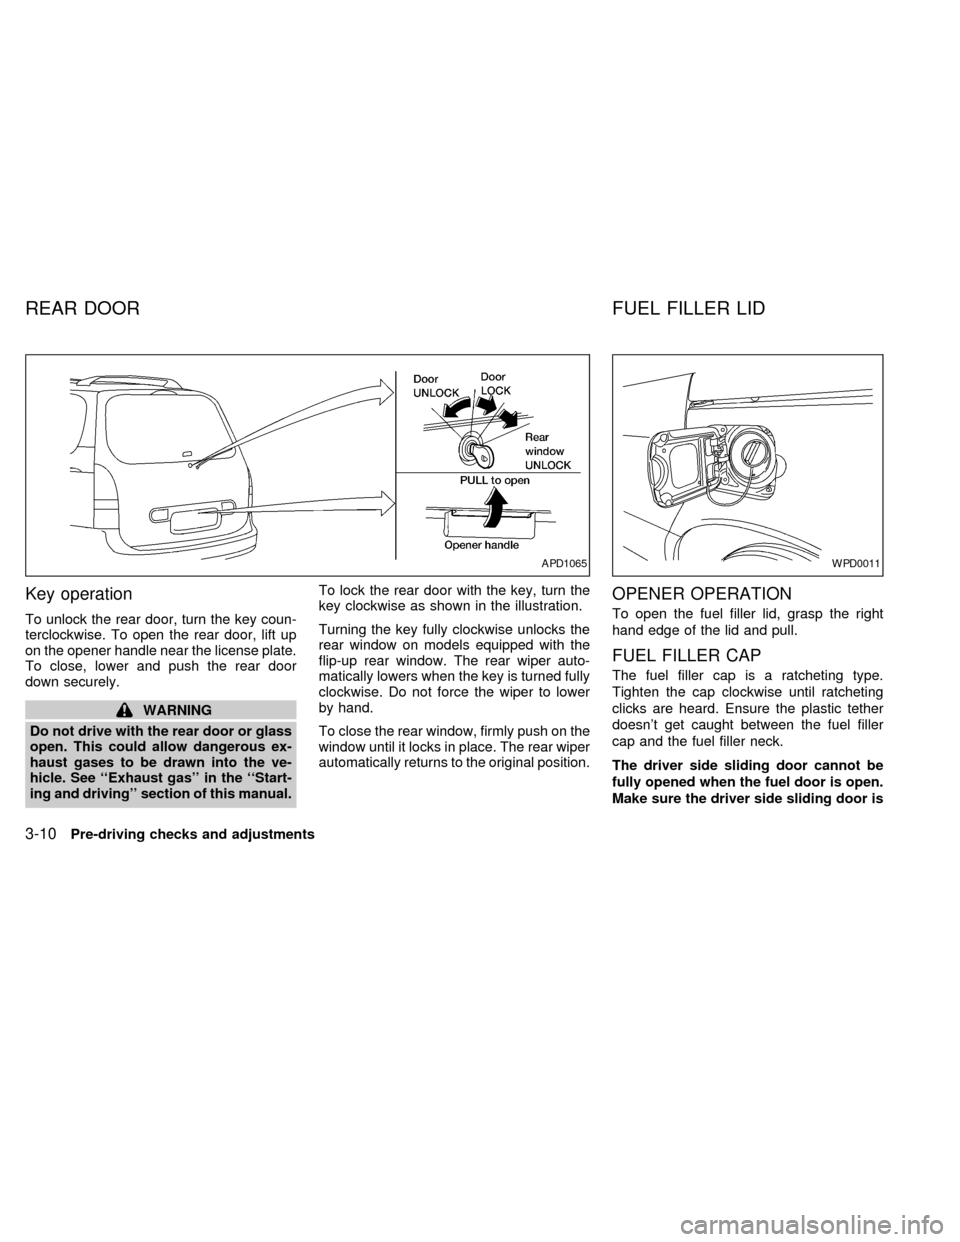
To unlock the rear door, turn the key coun-
terclockwise. To open the rear door, lift up
on the opener handle near the license plate.
To close, lower and push the rear door
down securely.
WARNING
Do not drive with the rear door or glass
open. This could allow dangerous ex-
haust gases to be drawn into the ve-
hicle. See ``Exhaust gas'' in the ``Start-
ing and driving'' section of this manual.To lock the rear door with the key, turn the
key clockwise as shown in the illustration.
Turning the key fully clockwise unlocks the
rear window on models equipped with the
flip-up rear window. The rear wiper auto-
matically lowers when the key is turned fully
clockwise. Do not force the wiper to lower
by hand.
To close the rear window, firmly push on the
window until it locks in place. The rear wiper
automatically returns to the original position.
OPENER OPERATION
To open the fuel filler lid, grasp the right
hand edge of the lid and pull.
FUEL FILLER CAP
The fuel filler cap is a ratcheting type.
Tighten the cap clockwise until ratcheting
clicks are heard. Ensure the plastic tether
doesn't get caught between the fuel filler
cap and the fuel filler neck.
The driver side sliding door cannot be
fully opened when the fuel door is open.
Make sure the driver side sliding door is
APD1065WPD0011
REAR DOOR FUEL FILLER LID
3-10Pre-driving checks and adjustments
ZX
Page 140 of 294

completely closed before opening the
fuel door.
WARNING
cGasoline is extremely flammable and
highly explosive under certain con-
ditions. You could be burned or se-
riously injured if it is misused or
mishandled. Always stop the engine
and do not smoke or allow open
flames or sparks near the vehicle
when refueling.
c
Fuel may be under pressure. Turn the
cap one-half turn, and wait for any
``hissing'' sound to stop to prevent
fuel from spraying out and possibly
causing personal injury. Then re-
move the cap.
cDo not attempt to top off the fuel
tank after the fuel pump nozzle shuts
off automatically. Continued refuel-
ing may cause fuel overflow, result-
ing in fuel spray and possibly a fire.
cUse only an original equipment type
fuel filler cap as a replacement. It has
a built-in safety valve needed for
proper operation of the fuel system
and emission control system. Anincorrect cap can result in a serious
malfunction and possible injury.
cNever pour fuel into the throttle body
to attempt to start your vehicle.
CAUTION
cIf fuel is spilled on the vehicle body,
flush it away with water to avoid
paint damage.
cTighten until the fuel filler cap clicks.
Failure to tighten the fuel filler cap
properly may cause the
mal-
function indicator lamp (MIL) to illu-
minate. If the
lamp illuminates
because the fuel filler cap is loose or
missing, tighten or install the cap
and continue to drive the vehicle.
The
lamp should turn off after
a few driving trips. If thelamp
does not turn off after a few driving
trips, have the vehicle inspected by
an authorized NISSAN dealer.
cFor additional information, see the
``Malfunction indicator lamp (MIL)''
in the ``Instrument and controls''
section earlier in this manual.
TILT OPERATION
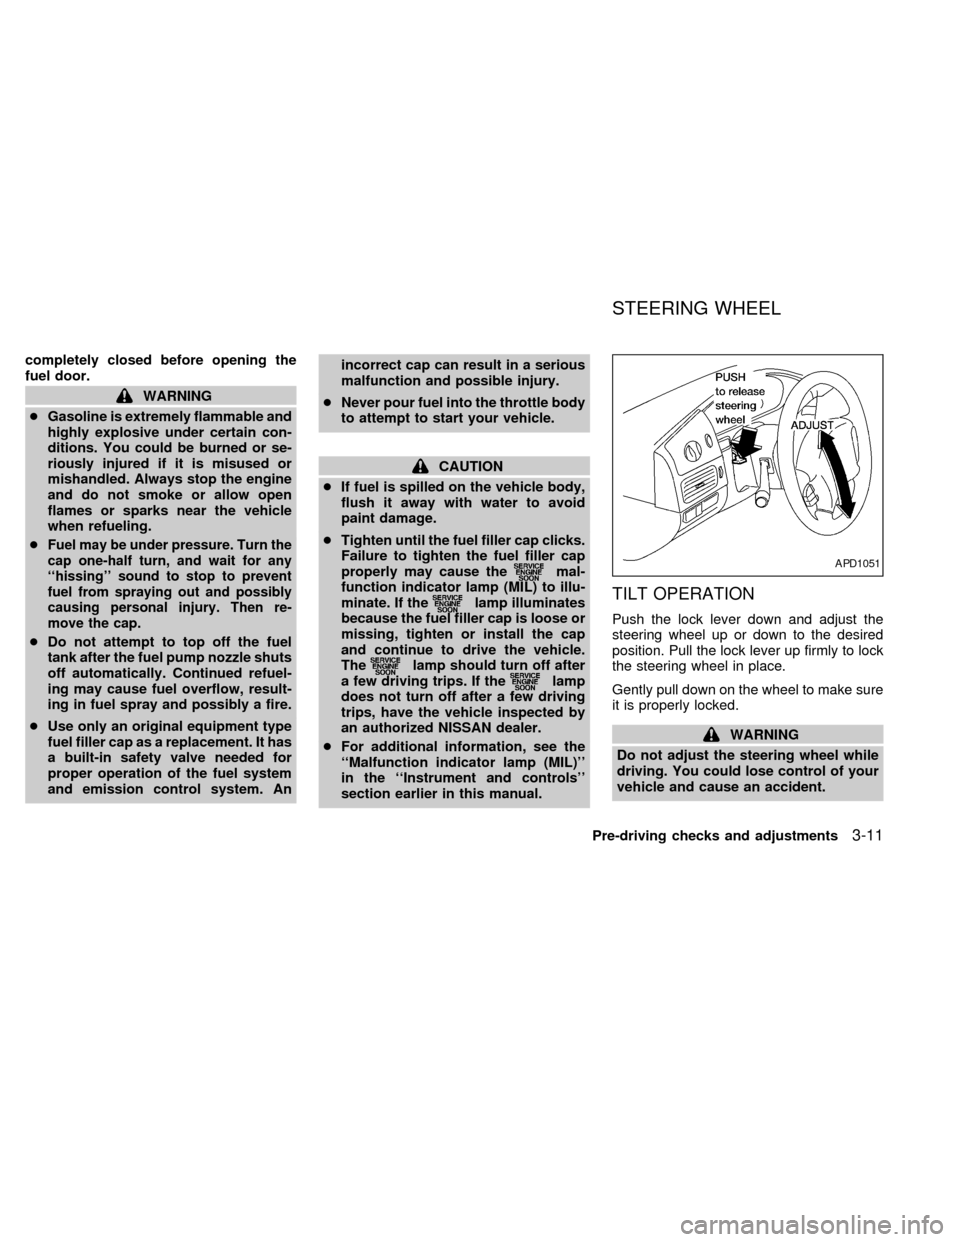
Push the lock lever down and adjust the
steering wheel up or down to the desired
position. Pull the lock lever up firmly to lock
the steering wheel in place.
Gently pull down on the wheel to make sure
it is properly locked.
WARNING
Do not adjust the steering wheel while
driving. You could lose control of your
vehicle and cause an accident.
APD1051
STEERING WHEEL
Pre-driving checks and adjustments3-11
ZX
Page 141 of 294

VANITY MIRROR
Access the mirror by pulling the sun visor
down and lifting the cover up. The vanity
mirror will illuminate when the mirror cover
is opened.
MEMORY DRIVER SEAT AND
MIRRORS (if so equipped)
The memory driver seat and mirror function
provides a convenient way to recall a driv-
er's seat and outside mirror positions. Un-
locking the doors using the multi-remote
controller, or by pressing the memory seat
position 1 or position 2 button activates the
memory driver seat and mirrors.
Remote keyless entry system entry
Pressing thebutton on the keyfob un-
locks the driver's door, and recalls the
memory settings for both outside mirrorsand driver's seat for that memory position.
Two keyfobs are delivered with the vehicle.
They can be programmed with the same
memory driver's seat and mirror positions,
or each one can be programmed sepa-
rately. One keyfob can be programmed for
memory driver's seat and mirror position 1,
and the other for memory driver's seat and
mirror position 2.
Memory Driver Seat and Mirror But-
tons
The memory seat and mirror buttons are
located on the driver door. Pressing the
memory driver seat and mirror position 1 or
position 2 button will recall the memory set-
tings for both outside mirrors and driver seat
for that memory seat position, provided the
vehicle is in P (Park) or N (Neutral). For easy
vehicle exit, press memory driver seat and
mirror position 1 and position 2 buttons to-
gether to move the driver seat fully rearward
and fully downward. This function is preset
and cannot be changed.
Programming Memory Positions
1. Move the driver seat and outside mirrors
to the desired position using the manual
controls.
WPD0012APD1062
SUN VISORS MIRRORS
3-12Pre-driving checks and adjustments
ZX
Page 159 of 294

RADIO
Turn the ignition key to ACC or ON and
press the power on switch to turn on the
radio. If you listen to the radio with the
engine not running, the key should be
turned to the ACC position.
Radio reception is affected by station signal
strength, distance from radio transmitter,
buildings, bridges, mountains and other ex-
ternal influences. Intermittent changes in
reception quality normally are caused by
these external influences.
Using a cellular phone in or near the
vehicle may influence radio reception
quality.
Radio reception
Your NISSAN radio system is equipped with
state-of-the-art electronic circuits to en-
hance radio reception. These circuits are
designed to extend reception range, and to
enhance the quality of that reception.
However there are some general character-
istics of both FM and AM radio signals that
can affect radio reception quality in a mov-
ing vehicle, even when the finest equipment
is used. These characteristics are com-pletely normal in a given reception area,
and do not indicate any malfunction in your
NISSAN radio system.
Reception conditions will constantly change
because of vehicle movement. Buildings,
terrain, signal distance and interference
from other vehicles can work against ideal
reception. Described below are some of the
factors that can affect your radio reception.
FM RADIO RECEPTION
Range: FM range is normally limited to 25 to
30 miles (40 to 48 km), with monaural
(single channel) FM having slightly more
range than stereo FM. External influences
may sometimes interfere with FM station
reception even if the FM station is within 25
miles (40 km). The strength of the FM signal
is directly related to the distance between
the transmitter and receiver. FM signals
follow a line-of-sight path, exhibiting many
of the same characteristics as light. For
example they will reflect off objects.
Fade and drift: As your vehicle moves away
from a station transmitter, the signals will
tend to fade and/or drift.
Static and flutter: During signal interference
from buildings, large hills or due to antennaposition, usually in conjunction with in-
creased distance from the station transmit-
ter, static or flutter can be heard. This can
be reduced by adjusting the treble control
counterclockwise to reduce treble re-
sponse.
Multipath reception: Because of the reflec-
tive characteristics of FM signals, direct and
reflected signals reach the receiver at the
same time. The signals may cancel each
other, resulting in momentary flutter or loss
of sound.
AM RADIO RECEPTION
AM signals, because of their low frequency,
can bend around objects and skip along the
ground. In addition, the signals can be
bounced off the ionosphere and bent back
to earth. Because of these characteristics.
AM signals are also subject to interference
as they travel from transmitter to receiver.
Fading: Occurs while the vehicle is passing
through freeway underpasses or in areas
with many tall buildings. It can also occur for
several seconds during ionospheric turbu-
lence even in areas where no obstacles
exist.
Static: Caused by thunderstorms, electrical
AUDIO SYSTEM
4-16Heater, air conditioner and audio systems
ZX
Page 162 of 294

1. VOLUME - ON/OFF control
2. BASS/TREBLE select button
3. BASS/TREBLE/BALANCE/FADE control
button
4. BALANCE/FADE select button
5. Tape eject button
6. CLOCK button
7. SCAN button
8. AUTO SET button
9. Radio tune button
10. SHUFFLE/station memory #6 button
11. COMPRESSION/station #5 memory
button
12. Dolby/station memory #4 button
13. Tape reverse/station memory #3 button
14. FAST FORWARD/station memory #2
button
15. REWIND/station memory #1 button
16. FM band select button
17. AM band select button
18. SEEK button
19. MUTE button
20. CD button
21. TAPE button
WHA0138
Heater, air conditioner and audio systems4-19
ZX