2002 NISSAN QUEST service
[x] Cancel search: servicePage 166 of 294

FM1, or FM2. The selected band illumi-
nates in the display.
2. Tune to the desired station.
3. Push the desired station select button for
more than 1.5 seconds. The radio mutes
when the select button is pushed.
4. When the sound resumes, memorizing is
complete.
5. Other station select buttons can be set in
the same manner.
If the battery is disconnected, or if the radio
fuse opens, the radio memory is canceled.
In that case, reset the desired stations.
RDS (Radio Data System)
RDS stands for Radio Data System, and is
a data information service transmitted by
some radio stations on the FM band (not
AM band) encoded within a regular radio
broadcast. Most RDS stations are currently
in large cities, but many stations are now
considering broadcasting RDS data.
RDS can display:
cStation name or call-sign, such as
``WHFR 98.3''.cMusic or programming type such as
``Classical'', ``Country'', or ``Rock''.
cTraffic reports about delays or construc-
tion.
Using RDS
To turn RDS on push the RDS/CLK button
until RDS OFF is displayed, then press the
SEL button until RDS ON is displayed.
To change display type turn RDS ON then
use the SEL button to choose between:
cSHOW TYPE - Music or program type.
cSHOW NAME - Station name or call-
sign.
cSHOW NONE - No text display.
To choose traffic reports press the
RDS/CLK button until TRAFFIC OFF is dis-
played, the use then SEL button to choose
TRAFFIC ON, then use the seek or scan
control to look for a station that may transmit
traffic reports, the radio will display a
``TRAF'' icon to show it is in traffic mode and
tuned to a station that may transmit traffic
reports. If the radio searches through the
whole band and then returns to the previous
station it was originally playing there are nostations in the area that are transmitting
traffic reports.
If a cassette or compact disc is being played
while the traffic option is on and the station
previously tuned into displays a traffic bul-
letin the radio will pause the cassette or
compact disc and broadcast the bulletin,
then resume playing the cassette or com-
pact disc.
Using RDS to search for programming type
Certain areas have a limited number of
stations that transmit RDS. Many stations
transmit call letters and frequencies only.
Searching or scanning by program type
may yield a limited number of selections.
Press the RDS/CLK button until FIND
CLASSIC is displayed, then use the SEL
button to choose between CLASSIC,
COUNTRY, INFO, JAZZ, OLDIES, R&B,
RELIGUS (Religious), ROCK, SOFT and
TOP40. When you have chosen a program
type, use the SEEK, SCAN, or AUTOSET
controls to look for a station transmitting that
kind of program. If the radio searches
through the whole band and then returns to
the previous station it was originally playing
there are no stations in the area that are
Heater, air conditioner and audio systems
4-23
ZX
Page 172 of 294

FM1, or FM2. The selected band illumi-
nates in the display.
2. Tune to the desired station.
3. Push the desired station select button for
more than 1.5 seconds. The radio mutes
when the select button is pushed.
4. When the sound resumes, memorizing is
complete.
5. Other station select buttons can be set in
the same manner.
If the battery is disconnected, or if the radio
fuse opens, the radio memory is canceled.
In that case, reset the desired stations.
RDS (Radio Data System)
RDS stands for Radio Data System, and is
a data information service transmitted by
some radio stations on the FM band (not
AM band) encoded within a regular radio
broadcast. Most RDS stations are currently
in large cities, but many stations are now
considering broadcasting RDS data.
RDS can display:
cStation name or call-sign, such as
``WHFR 98.3''.cMusic or programming type such as
``Classical'', ``Country'', or ``Rock''.
cText Messages such as telephone num-
bers for dial in requests, advertisements
and other simple messages.
cTraffic reports about delays or construc-
tion.
Using RDS
To turn RDS on push the RDS/CLK button
until RDS OFF is displayed, then press the
SEL button until RDS ON is displayed.
To change display type turn RDS ON then
use the SEL button to choose between:
cSHOW TYPE - Music or program type.
cSHOW NAME - Station name or call-
sign.
cSHOW TEXT - Text Messages such as
telephone numbers for dial in requests,
advertisements and other simple mes-
sages.
cSHOW NONE - No text display.
To choose traffic reports press the
RDS/CLK button until TRAFFIC OFF is dis-
played, the use then SEL button to chooseTRAFFIC ON, then use the seek or scan
control to look for a station that may transmit
traffic reports, the radio will display a
``TRAF'' icon to show it is in traffic mode and
tuned to a station that may transmit traffic
reports. If the radio searches through the
whole band and then returns to the previous
station it was originally playing there are no
stations in the area that are transmitting
traffic reports.
If a cassette or compact disc is being played
while the traffic option is on and the station
previously tuned into displays a traffic bul-
letin the radio will pause the cassette or
compact disc and broadcast the bulletin,
then resume playing the cassette or com-
pact disc.
Using RDS to search for programming type
Certain areas have a limited number of
stations that transmit RDS. Many stations
transmit call letters and frequencies only.
Searching or scanning by program type
may yield a limited number of selections.
Press the RDS/CLK button until FIND
CLASSIC is displayed, then use the SEL
button to choose between CLASSIC,
COUNTRY, INFO, JAZZ, RELIGUS (Reli-
Heater, air conditioner and audio systems
4-29
ZX
Page 191 of 294
WARNING
Do not leave children, impaired adults,
or pets alone in your vehicle. They
could accidently injure themselves or
others through inadvertent operation
of the vehicle. Also, on hot, sunny
days, temperatures in a closed vehicle
could quickly become high enough to
cause severe or possibly fatal injuries
to people or animals.
EXHAUST GAS
(Carbon Monoxide)
WARNING
Do not breathe exhaust gases; they
contain colorless and odorless carbon
monoxide. Carbon monoxide is dan-
gerous. It can cause unconsciousness
or death.
cIf you suspect that exhaust fumes
are entering the vehicle, drive with
all windows fully open, and have the
vehicle inspected immediately.
cDo not run the engine in closed
spaces such as a garage.c
Do not park the vehicle with the en-
gine running for any extended length
of time.
cKeep the rear door and rear window
closed while driving, otherwise ex-
haust gases could be drawn into the
passenger compartment. If you must
drive with the back door or rear win-
dow open, follow these procedures:
1. Open all the windows.
2. Set the air flow control dial to the
position and turn the fan
control dial to 4 (high) to circulate
the air.
cIf electrical wiring or other cable
connections must pass to a trailer
through the seal on the back door or
body, follow the trailer manufactur-
er's recommendation to prevent car-
bon monoxide entry into the vehicle.
cThe exhaust system and body
should be inspected by a qualified
mechanic whenever:
a. The vehicle is raised for service.b. You suspect that exhaust fumes
are entering into the passenger
compartment.
c. You notice a change in the sound
of the exhaust system.
d.
You have had an accident involv-
ing damage to the exhaust system,
underbody, or rear of the vehicle.
THREE-WAY CATALYST
The three-way catalyst is an emission con-
trol device installed in the exhaust system.
Exhaust gases in the three-way catalyst are
burned at high temperatures to help reduce
pollutants.
WARNING
cThe exhaust gas and the exhaust
system are very hot. Keep people,
animals or flammable materials
away from the exhaust system com-
ponents.
cDo not stop or park the vehicle over
flammable materials such as dry
grass, waste paper or rags. They
may ignite and cause a fire.
PRECAUTIONS WHEN
STARTING AND DRIVING
5-2Starting and driving
ZX
Page 219 of 294
following steps to correctly reset the switch:
1. Turn the key in the ignition to OFF.
2. Check under the vehicle for leaking fuel.
3. If you do not see or smell fuel, push down
the red reset button on the inertia fuel
shut-off switch.
4. Turn the ignition key ON for a few sec-
onds, then turn it OFF.
5. Check under the vehicle again for leaking
fuel. If you see or smell fuel, do not start
your vehicle again. If no fuel is detected,
try to start your vehicle again.
WARNING
If you see or smell fuel, do not reset the
switch or try to start your vehicle. You
could injure yourself or others. Have all
the passengers get out of the vehicle
and call the local fire department or a
towing service.When towing your vehicle, all State (Provin-
cial in Canada) and local regulations for
towing must be followed. Incorrect towing
equipment could damage your vehicle.
Towing instructions are available from an
authorized NISSAN dealer. Local service
operators are generally familiar with the
applicable laws and procedures for towing.
To assure proper towing and to prevent
accidental damage to your vehicle, NISSAN
recommends having a service operator tow
your vehicle. It is advisable to have the
service operator carefully read the following
precautions.WARNING
cNever ride in a vehicle that is being
towed.
cNever get under your vehicle after it
has been lifted by a tow truck.
CAUTION
cWhen towing, make sure that the
transmission, axles, steering system
and powertrain are in working con-
dition. If any unit is damaged, dollies
must be used.
cAlways attach safety chains before
towing.
TOWING YOUR VEHICLE
6-12In case of emergency
ZX
Page 229 of 294

Your new NISSAN has been designed to
have minimum maintenance requirements
with longer service intervals to save you
both time and money. However, some day-
to-day and regular maintenance is essential
to maintain your NISSAN's good mechani-
cal condition, as well as its emission and
engine performance.
It is the owner's responsibility to make sure
the scheduled maintenance, as well as gen-
eral maintenance, is performed.
As the vehicle owner, you are the only one
who can ensure that your vehicle receives
proper maintenance. You are a vital link in
the maintenance chain.
Scheduled maintenance
For your convenience, both required and
optional scheduled maintenance items are
described and listed in your ``Nissan Service
and Maintenance Guide.'' You must refer to
that guide to ensure that necessary mainte-
nance is performed on your Nissan at regu-
lar intervals.
General maintenance
General maintenance includes those items
which should be checked during normalday-to-day operation of the vehicle. They
are essential if your vehicle is to continue to
operate properly. It is your responsibility to
perform these maintenance procedures
regularly as prescribed.
Performing general maintenance checks re-
quire minimal mechanical skill and only a
few general automotive tools.
These checks or inspections can be done
by yourself, a qualified technician or, if you
prefer, an authorized NISSAN dealer.
Where to go for service
If maintenance service is required or your
vehicle appears to malfunction, have the
systems checked and tuned by an autho-
rized NISSAN dealer.
NISSAN technicians are well-trained spe-
cialists who are kept up-to-date with the
latest service information through technical
bulletins, service tips, and in-dealership
training programs. They are completely
qualified to work on NISSAN vehiclesbe-
forethey begin work on your vehicle, rather
than after they have worked on it.
You can be confident that an authorized
NISSAN dealer's service department per-forms the best job to meet the maintenance
requirements on your vehicle Ð in a reliable
and economic way.
MAINTENANCE
REQUIREMENTS
8-2Maintenance and do-it-yourself
ZX
Page 233 of 294
cIt is advisable to secure or remove
any loose clothing and remove any
jewelry, such as rings, watches, etc.
before working on your vehicle.
cAlways wear eye protection when-
ever you work on your vehicle.
cIf you must run the engine in an
enclosed space such as a garage, be
sure there is proper ventilation for
exhaust gases to escape.
cNever get under the vehicle while it
is supported only by a jack. If it is
necessary to work under the vehicle,
support it with safety stands.
cKeep smoking materials, flame and
sparks away from the fuel tank and
battery.
cOn gasoline engine models with the
multiport fuel injection (MFI) system,
the fuel filter or fuel lines should be
serviced by an authorized NISSAN
dealer because the fuel lines are
under high pressure even when the
engine is off.CAUTION
cDo not work under the hood while
the engine is hot. Turn off the engine
and wait until it cools down.
cNever connect or disconnect the bat-
tery or any transistorized compo-
nent while the ignition switch is in
the ON position.
cAvoid contact with used engine oil
and coolant. Improperly disposed
engine oil, engine coolant, and/or
other vehicle fluids can damage the
environment. Always conform to lo-
cal regulations for disposal of ve-
hicle fluid.
This ``Maintenance and do-it-yourself'' sec-
tion gives instructions regarding only those
items which are relatively easy for an owner
to perform.
A genuine NISSAN service manual is also
available. See ``Owner's manual/Service
manual order information'' in the ``Technical
and consumer information'' section.
You should be aware that incomplete or
improper servicing may result in operating
difficulties or excessive emissions, andcould affect your warranty coverage.If in
doubt about any servicing, have it done
by an authorized NISSAN dealer.
8-6Maintenance and do-it-yourself
ZX
Page 236 of 294
If the cooling system frequently requires
coolant, have it checked by an autho-
rized NISSAN dealer.
CHANGING ENGINE COOLANT
An authorized NISSAN dealer can change
the engine coolant. The service procedure
is found in NISSAN's service manual.
Improper servicing can result in reduced
heater performance and engine
overheating.
WARNING
cTo avoid danger of being scalded,
never change the coolant when the
engine is hot.
cNever remove the radiator cap when
the engine is hot. Serious burns
could be caused by high pressure
fluid escaping from the radiator.
cAvoid direct skin contact with used
coolant. If skin contact is made,
wash thoroughly with soap or hand
cleaner as soon as possible.
cKeep coolant out of reach of children
and pets.
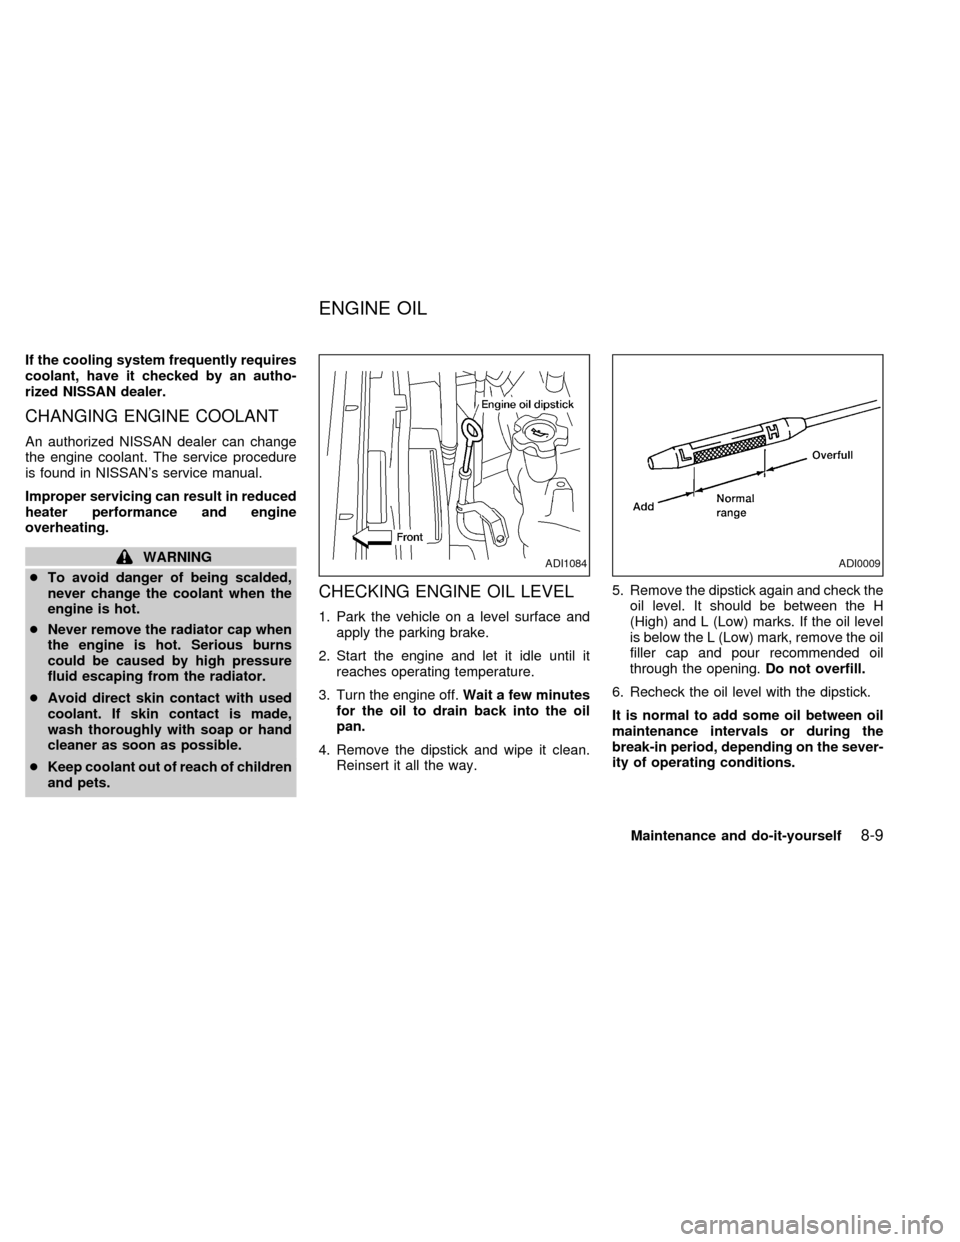
CHECKING ENGINE OIL LEVEL
1. Park the vehicle on a level surface and
apply the parking brake.
2. Start the engine and let it idle until it
reaches operating temperature.
3. Turn the engine off.Wait a few minutes
for the oil to drain back into the oil
pan.
4. Remove the dipstick and wipe it clean.
Reinsert it all the way.5. Remove the dipstick again and check the
oil level. It should be between the H
(High) and L (Low) marks. If the oil level
is below the L (Low) mark, remove the oil
filler cap and pour recommended oil
through the opening.Do not overfill.
6. Recheck the oil level with the dipstick.
It is normal to add some oil between oil
maintenance intervals or during the
break-in period, depending on the sever-
ity of operating conditions.
ADI1084ADI0009
ENGINE OIL
Maintenance and do-it-yourself8-9
ZX
Page 243 of 294
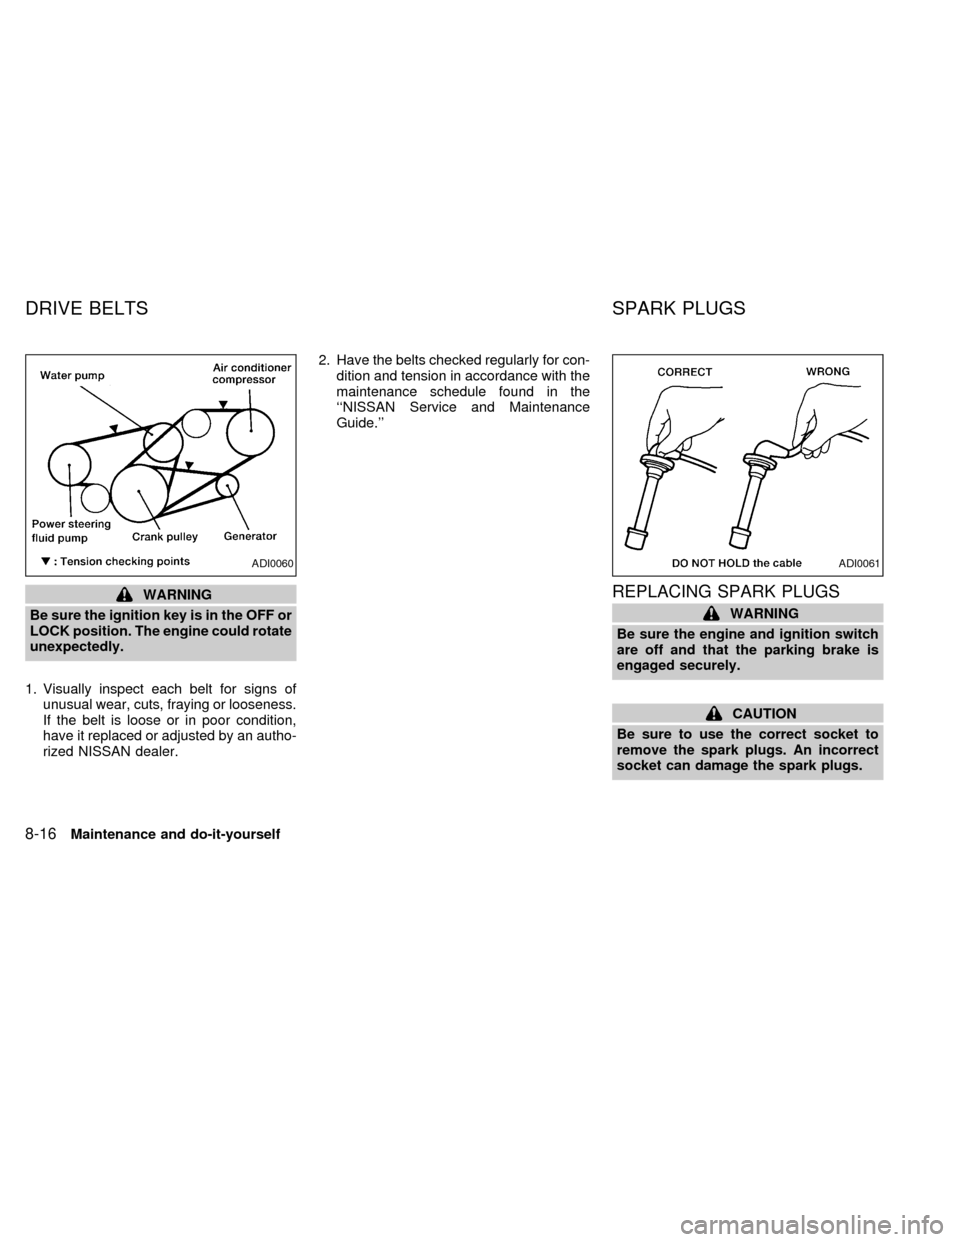
WARNING
Be sure the ignition key is in the OFF or
LOCK position. The engine could rotate
unexpectedly.
1. Visually inspect each belt for signs of
unusual wear, cuts, fraying or looseness.
If the belt is loose or in poor condition,
have it replaced or adjusted by an autho-
rized NISSAN dealer.2. Have the belts checked regularly for con-
dition and tension in accordance with the
maintenance schedule found in the
``NISSAN Service and Maintenance
Guide.''REPLACING SPARK PLUGS
WARNING
Be sure the engine and ignition switch
are off and that the parking brake is
engaged securely.
CAUTION
Be sure to use the correct socket to
remove the spark plugs. An incorrect
socket can damage the spark plugs.
ADI0060ADI0061
DRIVE BELTS SPARK PLUGS
8-16Maintenance and do-it-yourself
ZX