2002 NISSAN PATHFINDER change wheel
[x] Cancel search: change wheelPage 24 of 288
WARNING
IDo not place any objects on the steer-
ing wheel pad or on the instrument
panel. Also, do not place any objects
between any occupant and the steer-
ing wheel or instrument panel. Such
objects may become dangerous pro-
jectiles and may cause injury if the
supplemental air bag inflates.
IRight after inflation, several air bag
system components will be hot. Do
not touch them; you may severely
burn yourself.
INo unauthorized changes should be
made to any components or wiring of
the supplemental air bag system.
This is to prevent accidental inflation
of the supplemental front air bags or
damage to the supplemental air bag
system.
IDo not make unauthorized changes
to your vehicle's electrical system,
suspension system or front end
structure. This could affect properoperation of the supplemental front
air bag system.
ITampering with the supplemental
front air bag system may result in
serious personal injury. Tampering
includes changes to the steering
wheel and the instrument panel as-
sembly by placing material over the
steering wheel pad and above the
instrument panel, or by installing ad-
ditional trim material around the air
bag system.
IWork around and on the supplemen-
tal front air bag system should be
done by an authorized NISSAN
dealer. Installation of electrical equip-
ment should also be done by an au-
thorized NISSAN dealer. The yellow
Supplemental Restraint System
(SRS) wiring harnesses* should not
be modified or disconnected. Unau-
thorized electrical test equipment and
probing devices should not be used
on the air bag system.
IA cracked windshield should be re-placed immediately by a qualified re-
pair facility. A cracked windshield
could affect inflation of the supple-
mental air bag system.
* The SRS wiring harnesses are cov-
ered with yellow insulation either just
before the harness connectors or
over the complete harness for easy
identification.
When selling your vehicle, we request that you
inform the buyer about the supplemental air
bag system and guide the buyer to the appro-
priate sections in this Owner's Manual.
Seats, restraints and supplemental air bag systems
1-17
Z
01.9.21/R50-D/V5
X
Page 118 of 288

4 Heater, air conditioner and audio systemsVentilators ................................................................. 4-2
Heater and air conditioner (Manual) ......................... 4-2
Controls ................................................................ 4-3
Heater operation................................................... 4-4
Air conditioner operation ...................................... 4-5
Air flow charts....................................................... 4-5
Heater and air conditioner (Automatic) ..................... 4-8
Automatic operation ............................................. 4-9
Manual operation.................................................. 4-9
Operating tips ..................................................... 4-10
Ventilation air filter .............................................. 4-10
Servicing air conditioner .......................................... 4-10
Audio system........................................................... 4-11
FM radio reception ............................................. 4-11AM radio reception ............................................. 4-12
Audio operation precautions .............................. 4-12
FM-AM radio with cassette player and compact disc
(CD) player ......................................................... 4-14
FM-AM radio with cassette player and compact disc
(CD) player/cd changer ...................................... 4-21
CD care and cleaning ........................................ 4-26
FM-AM radio with cassette player Ð for navigation
system equipped models ................................... 4-26
Steering wheel switch for audio control
(if so equipped) ....................................................... 4-30
Antenna .............................................................. 4-31
Car phone or CB radio ........................................... 4-32
Z
01.9.21/R50-D/V5
X
Page 147 of 288

ªMODEº select switchPush the mode select switch to change the
mode in the sequence of AM, FM1, FM2, CD
player, CD autochanger and Tape.Volume control switchesPush the upper or lower side switch to in-
crease or decrease the volume.
Tuning
Memory change (radio):
Push the tuning switch
or
for lessthan 1.5 seconds to change the preset radio
channels.
Seek tuning (radio):
Push the tuning switch
or
for more
than 1.5 seconds to seek the next or previous
radio station.
APS (Automatic Program Search) FF, APS
REW (tape or CD changer):
Push the tuning switch
or
for less
1.5 seconds to return to the beginning of the
present program or skip to the next program.
Push several times to skip back or skip
through programs.
This system searches for the blank intervals
between selections. If there is a blank interval
within one program or there is no interval
between programs, the system may not stop in
the desired or expected location.
FF REW (tape or CD changer):
Push the tuning switch
or
for more
than 1.5 seconds to rewind or fast forward the
tape or to change the playing disc up or down.
In CD player operation, pushing the tuning
switch changes the track up or down.
To stop the FF or REW function, press the
or
button for more than 1.5 sec-
onds again.
SAA0464
STEERING WHEEL SWITCH FOR
AUDIO CONTROL (if so equipped)4-30
Heater, air conditioner and audio systems
Z
01.9.21/R50-D/V5
X
Page 152 of 288
compartment.
c. You notice a change in the sound
of the exhaust system.
d. You have had an accident involv-
ing damage to the exhaust system,
underbody, or rear of the vehicle.
THREE WAY CATALYSTThe three way catalyst is an emission control
device, installed in the exhaust system. In the
converter, exhaust gases are burned at high
temperatures to help reduce pollutants.
WARNING
IThe exhaust gas and the exhaust sys-
tem are very hot. Keep people, ani-
mals or flammable materials away
from the exhaust system compo-
nents.
IDo not stop or park the vehicle over
flammable materials, such as dry
grass, waste paper or rags. They may
ignite and cause a fire.
CAUTION
IDo not use leaded gasoline. Deposits
from leaded gasoline seriously re-
duce the three way catalyst's ability
to help reduce exhaust pollutants.
IKeep your engine tuned up. Malfunc-
tions in the ignition, fuel injection, or
electrical systems can cause over-
rich fuel flow into the three way cata-
lyst, causing it to overheat. Do not
keep driving if the engine misfires, or
if noticeable loss of performance or
other unusual operating conditions
are detected. Have the vehicle in-
spected promptly by an authorized
NISSAN dealer.
IAvoid driving with an extremely low
fuel level. Running out of fuel could
cause the engine to misfire, damag-
ing the three way catalyst.
IDo not race the engine while warming
it up.IDo not push or tow your vehicle to
start the engine.
ON-PAVEMENT AND OFFROAD
DRIVING PRECAUTIONSUtility vehicles have a significantly higher
rollover rate than other types of vehicles.
They have higher ground clearance than pas-
senger cars to make them capable of perform-
ing in a variety of on-pavement and offroad
applications. This gives them a higher center
of gravity than ordinary cars. An advantage of
higher ground clearance is a better view of the
road, allowing you to anticipate problems.
However, they are not designed for cornering
at the same speeds as conventional two-wheel
drive vehicles any more than low-slung sports
cars are designed to perform satisfactorily
under offroad conditions. If at all possible,
avoid sharp turns or abrupt maneuvers, par-
ticularly at high speeds. As with other vehicles
of this type, failure to operate this vehicle
correctly may result in loss of control or vehicle
rollover.
Be sure to read the driving safety precautions
later in this section.
Starting and driving
5-3
Z
01.9.21/R50-D/V5
X
Page 163 of 288
When cruising at a low speed or
climbing a gentle slope, you may feel
uncomfortable shift shocks as the
transmission shifts between 3rd and
overdrive repeatedly. In this case,
press the overdrive switch. The O/D
OFF indicator light comes on at this
time.
When driving conditions change, press the
overdrive switch again. The O/D OFF indicator
light goes out.
Remember not to drive at high speeds for
extended periods of time with the O/D OFF
light illuminated. This reduces the fuel
economy.
Fail-safeWhen the Fail-safe operation occurs, the next
time the key is turned to the ON position, the
O/D OFF light will blink for approximately 8
seconds after coming on for 2 seconds. While
the vehicle can be driven under these circum-
stances please note that the gears in the
automatic transmission will be locked in third
gear.
If the vehicle is driven under extreme con-
ditions, such as excessive wheel spinning
and subsequent hard braking, the Fail-safe
system may be activated. This will occureven if all electrical circuits are functioning
properly. In this case, turn the ignition key
OFF and wait for 3 seconds. Then turn the
key back to the ON position. The vehicle
should return to its normal operating con-
dition. If it does not return to its normal
operating condition have your NISSAN
dealer check the transmission and repair if
necessary.
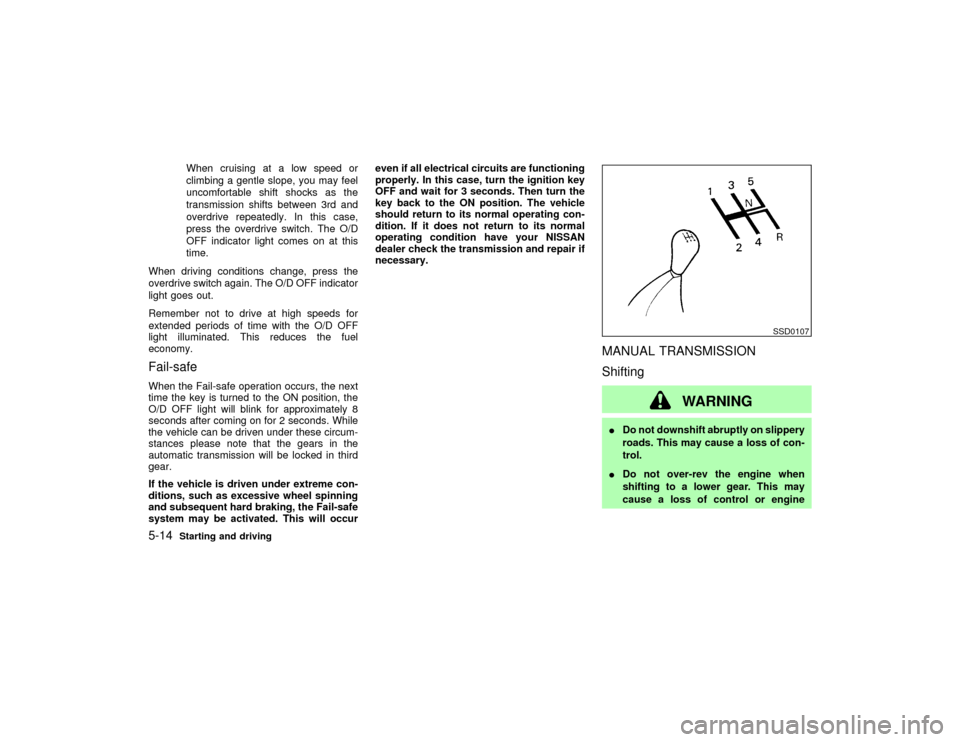
MANUAL TRANSMISSION
Shifting
WARNING
IDo not downshift abruptly on slippery
roads. This may cause a loss of con-
trol.
IDo not over-rev the engine when
shifting to a lower gear. This may
cause a loss of control or engine
SSD0107
5-14
Starting and driving
Z
01.9.21/R50-D/V5
X
Page 164 of 288
damage.
To change gears, or when up shifting or down
shifting, depress the clutch pedal fully, shift
into the appropriate gear, then release the
clutch slowly and smoothly.
Start the vehicle in 1st gear and shift to 2nd,
3rd and 4th up to 5th gear in sequence accord-
ing to the vehicle speed.
You cannot shift directly from 5th gear into
Reverse. First shift into the Neutral position,
then into Reverse.
If it is difficult to move the shift lever into
Reverse or 1st, shift into Neutral, then release
the clutch pedal and shift into Reverse or 1st
again. If your vehicle is equipped with four
wheel drive, see ªUsing four wheel driveº later
in this section.
Suggested up-shift speedsThe table below provides suggested speed
ranges for shifting into a higher gear. These
suggestions relate to fuel economy and ve-
hicle performance. Actual shift ranges should
be adjusted for specific road conditions,
weather conditions and individual driving hab-
its.
ITwo wheel drive models and four wheel
drive models (2H and 4H position)MPH (km/h)
1st to 2nd 15 (24)
2nd to 3rd 25 (40)
3rd to 4th 40 (64)
4th to 5th 45 (72)
IFour wheel drive model (4L position)
MPH (km/h)
1st to 2nd 8 (13)
2nd to 3rd 12 (20)
3rd to 4th 20 (32)
4th to 5th 22 (36)
Suggested maximum speed in each
gearDownshift to a lower gear if the engine is not
running smoothly, or if you need to accelerate.
Do not exceed the maximum suggested speed
(shown below) in any gear. For level road
driving, use the highest gear suggested for
that speed. Always observe posted speed
limits, and drive according to the road condi-
tions which will ensure safe operation. Do not
overrev the engine when shifting to a lower
gear as it may cause engine damage or loss of
vehicle control.Allowable maximum speed in each gear
Two wheel drive models and four wheel drive
models (2H position) MPH (km/h)
1st 22 (36)
2nd 37 (60)
3rd 56 (90)
4th & 5th Ð (Ð)
Four wheel drive models MPH (km/h)
4H position
1st 22 (36)
2nd 37 (60)
3rd 50 (80)
4th & 5th 50 (80)
4L position
1st 9 (15)
2nd 19 (30)
3rd 28 (45)
4th & 5th 31 (50)
CAUTION
IDo not rest your foot on the clutch
pedal while driving. This may cause
clutch damage.
IStop your vehicle completely before
shifting into R (Reverse).
Starting and driving
5-15
Z
01.9.21/R50-D/V5
X
Page 175 of 288
on paved roads, vibration and tire
squealing may occur.
IThe 4WD transfer case may not be
shifted between 4H and 4LO at low
ambient temperatures and the trans-
fer 4LO position indicator light may
blink even when the 4WD shift switch
is shifted. After driving for a while
you can change the 4WD transfer
case between 4H and 4LO.
When driving on rough roads,
ISet the 4WD shift switch to AUTO, 4H or
4LO.
IDrive carefully according to the road sur-
face conditions.
When the vehicle is stuck,
IPlace stones or wooden blocks under the
tires to free the vehicle.
ISet the 4WD shift switch to 4H or 4LO.
IIf it is difficult to free the vehicle, repeat
forward and backward movement to in-
crease the movement.
IIf the vehicle is stuck deep in mud, tirechains may be effective.
CAUTION
IDo not increase the tire rotation ex-
cessively. Tires will sink deep into the
mud, making it difficult to free the
vehicle.
IAvoid shifting gears with the engine
running at high speeds as this may
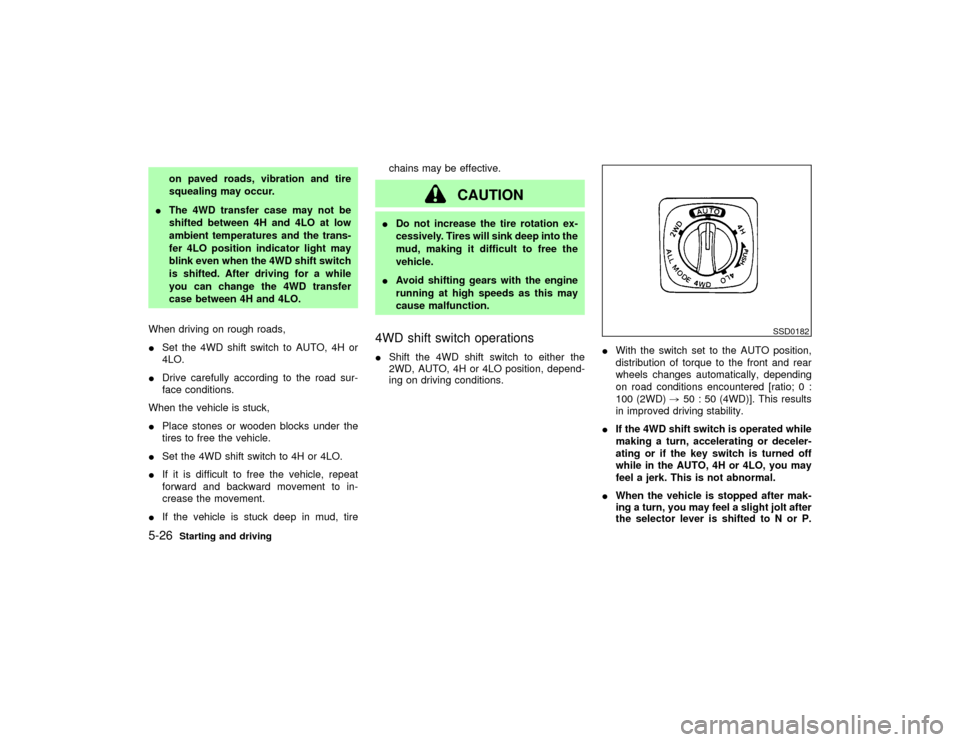
cause malfunction.4WD shift switch operationsIShift the 4WD shift switch to either the
2WD, AUTO, 4H or 4LO position, depend-
ing on driving conditions.IWith the switch set to the AUTO position,
distribution of torque to the front and rear
wheels changes automatically, depending
on road conditions encountered [ratio; 0 :
100 (2WD),50 : 50 (4WD)]. This results
in improved driving stability.
IIf the 4WD shift switch is operated while
making a turn, accelerating or deceler-
ating or if the key switch is turned off
while in the AUTO, 4H or 4LO, you may
feel a jerk. This is not abnormal.
IWhen the vehicle is stopped after mak-
ing a turn, you may feel a slight jolt after
the selector lever is shifted to N or P.
SSD0182
5-26
Starting and driving
Z
01.9.21/R50-D/V5
X
Page 177 of 288
come on immediately, make sure the
area around the vehicle is safe, and
drive the vehicle straight, accelerate or
decelerate or move the vehicle in re-
verse, then shift the 4WD shift switch.
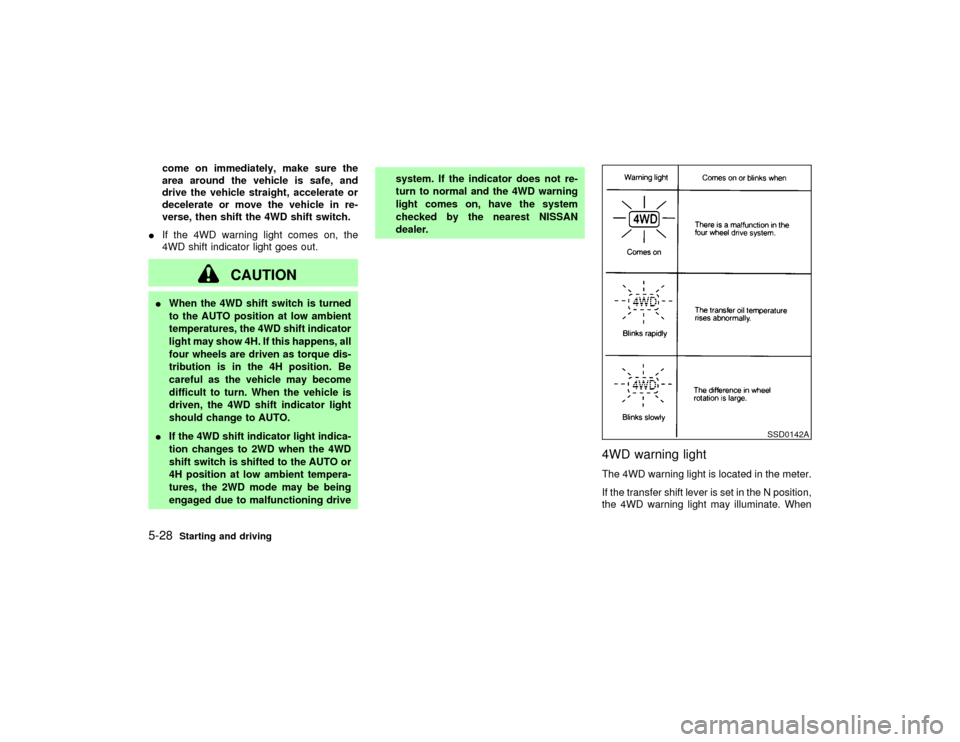
IIf the 4WD warning light comes on, the
4WD shift indicator light goes out.
CAUTION
IWhen the 4WD shift switch is turned
to the AUTO position at low ambient
temperatures, the 4WD shift indicator
light may show 4H. If this happens, all
four wheels are driven as torque dis-
tribution is in the 4H position. Be
careful as the vehicle may become
difficult to turn. When the vehicle is
driven, the 4WD shift indicator light
should change to AUTO.
IIf the 4WD shift indicator light indica-
tion changes to 2WD when the 4WD
shift switch is shifted to the AUTO or
4H position at low ambient tempera-
tures, the 2WD mode may be being
engaged due to malfunctioning drivesystem. If the indicator does not re-
turn to normal and the 4WD warning
light comes on, have the system
checked by the nearest NISSAN
dealer.
4WD warning lightThe 4WD warning light is located in the meter.
If the transfer shift lever is set in the N position,
the 4WD warning light may illuminate. When
SSD0142A
5-28
Starting and driving
Z
01.9.21/R50-D/V5
X